


|
||||||
| DIY (Do-It-Yourself) Guides For all DIYs. |
 |
|
|
Thread Tools | Search this Thread |
 06-27-2014, 10:52 PM
|
#1 |
|
Senior Member
Join Date: Jun 2012
Drives: 2013 Subaru BRZ
Location: Portland, OR
Posts: 263
Thanks: 8
Thanked 113 Times in 65 Posts
Mentioned: 31 Post(s)
Tagged: 0 Thread(s)
|
DIY - RacerX Fabrication Lower Control Arm
RacerX Fabrication sent us a sent of their Lower Control Arms for the NWMotiv Project BRZ, will help us continue to dial in the suspension and just in time for the SCCA Pro Tour in Packwood, WA.
The quality of these parts is amazing and the service has been top notch, for anyone in the market for Lower Control Arms, these should be on your list. The price is not bad either for the set. Head over to http://www.racerxfabrication.com to check them out. Tools Needed: 14mm Wrench and Socket 17mm Wrench and Socket 19mm Wrench and Socket 22mm Wrench Crescent Wrench (larger one) Our install photos will show the rear bumper removed. This is not needed, just made it easier for photos STEP ONE: Jack the car and secure on jack stands. The remove the rear wheels.  STEP TWO: Start to remove the stock Lower Control Arm. All bolts were 17mm, however if you have stock End-Links, this bolt may be 14mm.  We went from the outer bolt and work our way in.  STEP THREE: Take the stock Lower Control Arm and Line Up the wholes on the new Lower Control Arm, this will make install a bit easier.  Getting the new LCA ready to install, the RacerX Fabrication LCA will come with 2 new 19mm Bolts for the hub and shock, it will also come with a new 17mm for the end link. For the bushing on bushing on the end we just used the stock bolt.  STEP FOUR: Start to install the new LCA, we started from the inside and worked out way out.  Once all Bolts are in start to tighten them down.  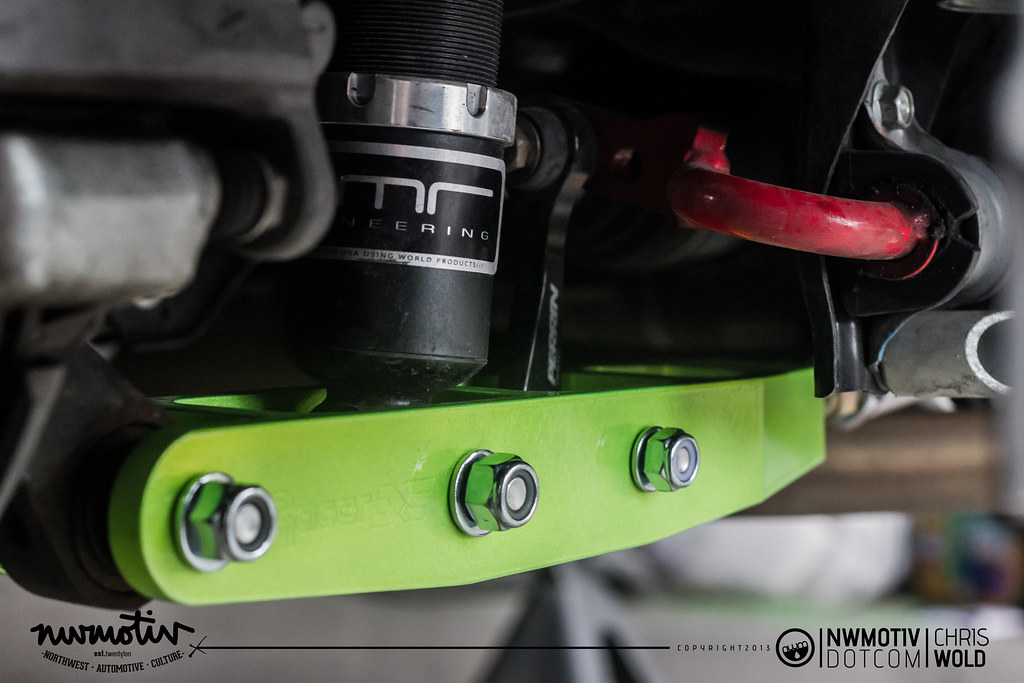 STEP FIVE: Repeat on the other side of the car.  Once installed you can make adjustments in to the camber using a 22mm wrench, however most people should have this done at an alignment shop. Use your crescent wrench to tighten the ends of the LCA to insure they dont move on their own. 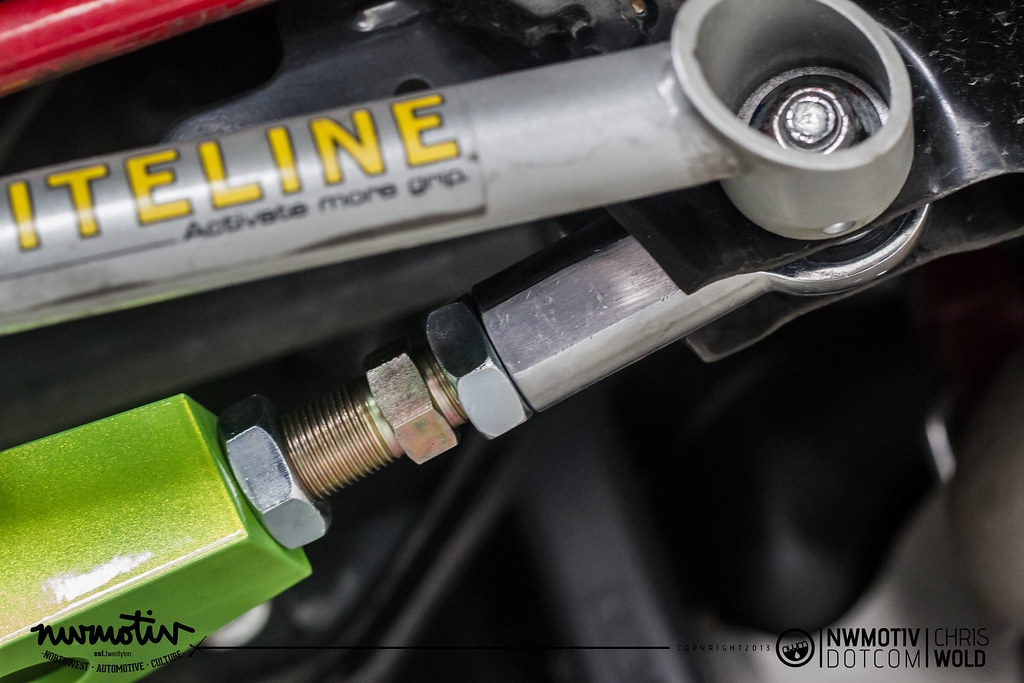 STEP SIX: Put wheels back on the car and lower back to the ground. Then head to your local alignment shop and get the car aligned, you will want to do this before doing lots of driving as your camber/toe will be not to spec.  Final Photos   I will leave some feedback after the first alignment and after the Pro Tour next weekend. Thanks for looking and hopefully this will help you with your LCA install, its a pretty easy and quick install.
__________________
|

|

|
| The Following 3 Users Say Thank You to dvsidboy For This Useful Post: |
|
06-27-2014, 11:17 PM
|
#2 |
|
Senior Member
Join Date: Aug 2012
Drives: '13 DGM BRZ Limited
Location: NJ
Posts: 1,201
Thanks: 59
Thanked 547 Times in 339 Posts
Mentioned: 8 Post(s)
Tagged: 0 Thread(s)
|
Nice write up. I like to load the suspension before torquing everything down to spec. The only bolt/nut that you may want to torque to spec while up in the air is the LCA to hub connection as there isn't much room once you put the wheels back on. I usually torque the outer nuts, put the wheels on, lower onto some ramps, bounce the car a few times, and then torque everything down.
|
|
|
|
|
06-27-2014, 11:22 PM
|
#3 |
|
Senior Member
Join Date: Jun 2012
Drives: 2013 Subaru BRZ
Location: Portland, OR
Posts: 263
Thanks: 8
Thanked 113 Times in 65 Posts
Mentioned: 31 Post(s)
Tagged: 0 Thread(s)
|
Good call. With the rear bumper off, I have lots more room to still get this done (no ramps) or might do the tightening at the alignment shop, very little drive to get there (basically 3 minutes and straight driving).
__________________
|
|
|
|
|
11-13-2014, 01:56 AM
|
#4 |
|
Senior Member

Join Date: Dec 2012
Drives: white premium brz M/T
Location: .
Posts: 709
Thanks: 406
Thanked 220 Times in 130 Posts
Mentioned: 25 Post(s)
Tagged: 0 Thread(s)
|
Do you know the torque specs for the bolts by any chance?
__________________
|
|
|
|
| The Following User Says Thank You to bjun For This Useful Post: | WallsAndFoundations (12-04-2014) |
|
01-26-2015, 12:36 PM
|
#5 | |
|
Serial Cone Killer

Join Date: Jul 2013
Drives: '14 BRZ - WRB Premium 6MT
Location: Austin, TX
Posts: 1,326
Thanks: 1,081
Thanked 656 Times in 441 Posts
Mentioned: 19 Post(s)
Tagged: 0 Thread(s)
|
Quote:
__________________
|
|
|
|
|
|
09-07-2015, 01:25 PM
|
#7 |
|
Senior Member

Join Date: Feb 2013
Drives: 2015 Subaru BRZ WRBP Limited 6MT.
Location: Dallas, TX
Posts: 441
Thanks: 271
Thanked 108 Times in 88 Posts
Mentioned: 3 Post(s)
Tagged: 0 Thread(s)
|
When u planned the swap did u consider adding whiteline's replacement bushing for the spindle side of the LCA? Your thoughts on doing the bushing swap in conjunction with the LCA install please.
|
|
|
|
|
05-19-2017, 09:55 PM
|
#8 |
|
Senior Member

Join Date: Feb 2014
Drives: C5, GT-86, '24 Colorado TrailBoss
Location: New Castle DE
Posts: 1,576
Thanks: 1,682
Thanked 1,049 Times in 582 Posts
Mentioned: 6 Post(s)
Tagged: 0 Thread(s)
|
Thank you for the write up
Will be attempting this install tomorrow along with MeisterR Coilovers. I'm thinking I might be able to semi-preload the suspension by jacking up that side and then bolting everything down witht the tires off.
__________________
 |
|
|
|
|
|
|
|
|
|
|
 Similar Threads
|
||||
| Thread | Thread Starter | Forum | Replies | Last Post |
| RacerX Upper Control Arms Review | DAMotorsports | Suspension | Chassis | Brakes -- Sponsored by 949 Racing | 33 | 05-27-2024 06:13 PM |
| FS: RacerX Front Lower Control Arms | hybridcmk | Brakes, Suspension, Chassis | 7 | 07-08-2014 03:10 AM |
| New Racer X Fabrication rear lower control arms! | Jeff@Racer X Fab | Suspension | Chassis | Brakes -- Sponsored by 949 Racing | 36 | 04-28-2014 06:56 AM |
| Racer X Fabrication: Upper rear control arms, in stock/ready to ship!! | Jeff@Racer X Fab | Brakes, Suspension, Chassis | 25 | 01-24-2014 12:42 PM |
| WTB: Front Lower Control Arm and Rear Upper Control Arm | YDNA | Brakes, Suspension, Chassis | 0 | 11-10-2013 05:40 AM |


 C'thulhu II


