|
||||||
| Member's Car Journals Car journals by our members. |
 |
|
|
Thread Tools | Search this Thread |
|
|
#1 |
|
Senior Member
Join Date: Mar 2014
Drives: 2014 BRZ Premium - SWP
Location: Chicago
Posts: 159
Thanks: 0
Thanked 21 Times in 20 Posts
Mentioned: 3 Post(s)
Tagged: 0 Thread(s)
|
SWP BRZ Journal - Vortech SC (Chicagoland)
"Everything posted here is my opinion, and if you don't like it or agree... please move on"...
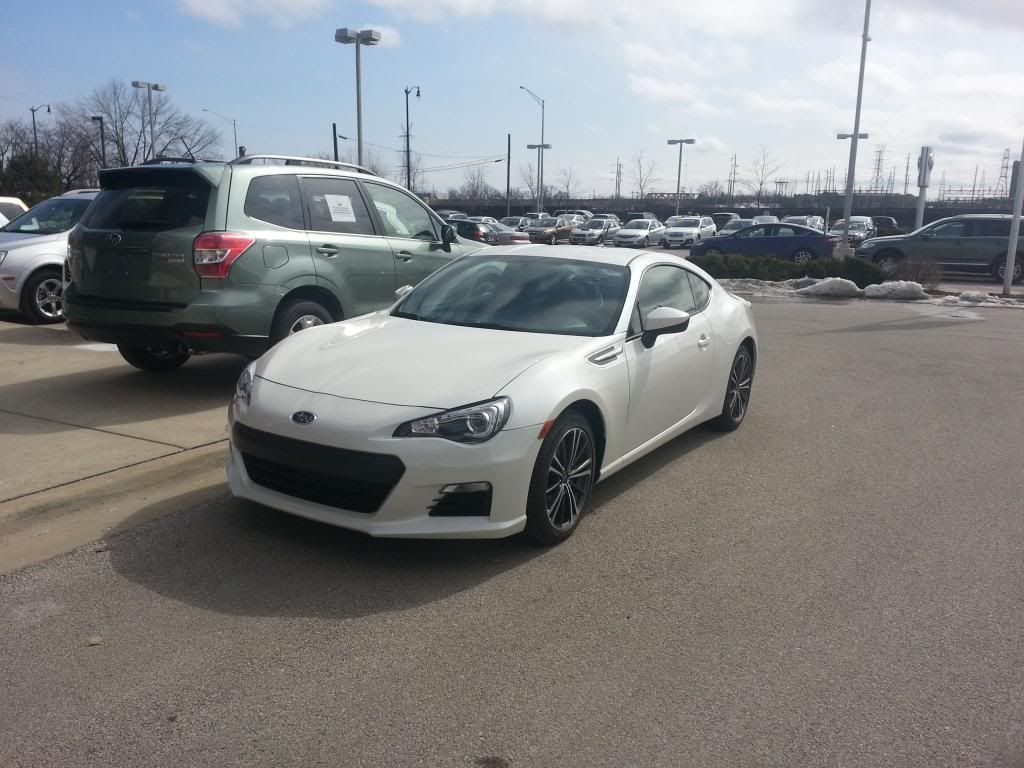
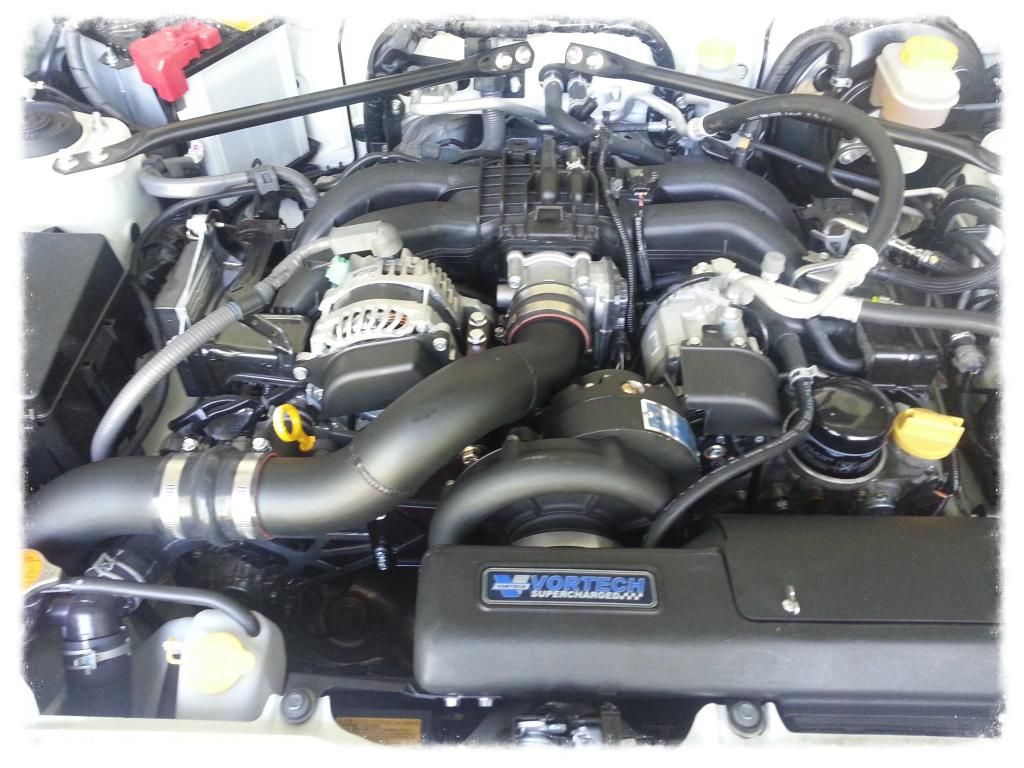
 Hi All, I've always wanted to start a journal/build thread. So here goes. I'm located in Chicago (north burbs, Glenview) and bought my BRZ on March 14th. I didn't even know what a BRZ was to be honest. I've always been in to European cars and had my fair share. 1997 - VW Jetta VR6 - silver 2001 - B5 Audi S4 sedan STG 3 - nogaro blue 2004 - B6 Audi S4 wagon - artic white w. sport package 2008 - EVO 8 - black 2001 - B5 S4 wagon - by far one of my favorites - nogaro blue w. sport package 2008 - BMW 135i Stg 2 2008 - BMW 335i Stg 2 2014 - Subaru BRZ - satin pearl white Why I choose the BRZ. I have 2 kids, and more on the way... I don't need another car to fit the family, so I wanted something that I could take a kid if needed and also fit another one if I really had to (emergency). A car to daily drive that has some feel and track day or 2 per year. Even a occasional drift event if I wanted to. Now to the car. I drove a friends BRZ with a unichip and exhaust... nothing else. The car blew my away from the driver feel, shifting, low center of gravity, road feel, and engine sound. I was on the fence with getting a S2K AP1 and a another 135i. But after the test drive, this car just feel so good and had a decent rear seat if needed. I actually have a huge ass Britax car seat for my 4-yr old and it works great for short trips. It definitely is not roomiest car, or the fastest car by any means, but it is just a great car to drive! Plain and simple... Long story short... I pulled the trigger and couldn't be happier. I tell my family and friends all the time... this is by far one of my favorite cars I've ever owned for the price, drive factor, gear box, feel, etc... March 14, 2014 - Purchase day  My Plan I've always wanted to build a car with high quality parts and keep a clean look. At the end of the day for me it's a balance act between cost and quality. I was able to get great deal a slightly used Vortech kit, so I pulled the trigger. The kit should arrive the week of May 5th. I only have 480 miles on the car and will most likely wait till I hit 1k to install. I wasn't planning on purchasing or going FI this quick, but I couldn't pass up the deal. The car is so under-powered, so the 1st thing I wanted to do is go FI. Besides the deal I got, I was going to choose Vortech for 1 reason alone. The company. They've been around for ages, and if you start modding, you want to buy expensive products from vendors who have been around so you can rely on them in case of issues. I wanted to be able to purchase replacement parts, upgrades, etc. And if one day I decide to sell the kit, I can easily re-market the kit and the new buyer can easily by new/replace or by upgraded parts. Another reason I went this route is because they offer hardware kits and part replacement if needed. Always a PITA to run to Home Depot to look or rig up something because you can't find that one bracket or screw. Anyway.. that's why I purchased this kit... Price and the Vortech name. Maybe more of the price... LOL!  What tuning? The great thing about this forum. There are vendors,... I've been in communication with most of them and have narrowed it down to a couple... 93oct and E85 with flex fuel kit is where I'm heading. I don't want to worry about switching maps and making sure I'm almost empty. Haven't made the purchase yet... got some time 'till I hit 1k miles. Quick Log March 14 - Purchase day March 25 - Grimmspeed Front Plate relocator March 28 - Detail Image Products purchased - Foammaster, chemical guy suds, poorboys wax and sealant, lake country pads, grit guard, Porter Cable 7424xp April 8 - Lumar 35% Ceramic tint - Installed by Umbra in Schaumburg. Best tint guy in Chicagoland area! April 30 - Vortech Kit purchased July 4 - Vortech installed w/Moto-East tune July 14 - DIY Red Tails with Blinker cut out July 17 - 1st tank of e85 @1280 miles July 24 - Full exterior detail with Poorboys Wax and Sealant Aug 8 - 1st Vortech oil change - @1528 miles, 4500 miles on used kit Aug 11 - Purchased; Royal Purple 0w-20, bulk OEM filters, FUMOTO F-108 drain valve, LED plate and reverse lights Sep 29 - 1st oil change - @1800 miles Sep 13 - 2000 mile mark Sep 14 - 6 month birthday  Nov 26 - Supercharger rebuild (shaft seal and 1 bearing) Dec 14 - Saikou dual catch can installed Feb 13 - T-bolt clamps installed, upgraded Flash from Moto-East for cold weather bug (under 20deg). Feb 28 - Red Line 0w-20 oil change with OEM filter @ 3560 miles - Added remaining T-Bolt clamps to Vortech Kit - Added worm clamps to Saikou catch cans and check valve removing black zip ties Apr 18 - RS*R Superdown springs installed Mod List Engine/Exhaust Vortech V3 kit w/ 3.12 pulley Moto-East 93oct/e40-50/e85/valet (4 maps) 4-bar Omni Saikou dual catch can FUMOTO valve T-Bolt clamps Suspension/Drivetrain RS*R Superdowns Exterior DIY Red Tails w/blinker cut out Interior Llumar 35% tint Wheels and Tires Stock Past Mods None Future Mods Oil cooler Spacers SBC 18x9.5 Toms USDM
__________________
Vortech SC V3 // 3.12 Pulley // Moto-East Tune (93oct,e40-50,e85)
Last edited by sissupr; 04-20-2015 at 10:51 AM. |
|
|

|
|
|
#2 |
|
Senior Member
Join Date: Jun 2013
Drives: Vortech Supercharged FR-S
Location: Central Jersey
Posts: 1,515
Thanks: 597
Thanked 934 Times in 428 Posts
Mentioned: 17 Post(s)
Tagged: 1 Thread(s)
|
Welcome!!
BTW, white wolf? My car is "White Tiger". .
__________________
I'd rather lose by a mile because I built my own car,
than win by an inch because someone else built it for me. Your car is your story, so don't let someone else write the book. ( White Tiger ) - FiGo's 車誌.  |
|
|

|
|
|
#3 |
|
Senior Member
Join Date: Mar 2014
Drives: 2014 BRZ Premium - SWP
Location: Chicago
Posts: 159
Thanks: 0
Thanked 21 Times in 20 Posts
Mentioned: 3 Post(s)
Tagged: 0 Thread(s)
|
|
|
|

|
|
|
#4 |
|
Senior Member
Join Date: Jul 2012
Drives: for the sake of driving
Location: Windy City
Posts: 538
Thanks: 249
Thanked 137 Times in 112 Posts
Mentioned: 2 Post(s)
Tagged: 0 Thread(s)
|
Nice! Looks like youre on the right track.
Btw, my parents live in buffalo grove, so I'll probably see you on the road one of these days.
__________________
'13 Argento FR-S
|
|
|

|
|
|
#5 |
|
Senior Member
Join Date: Mar 2014
Drives: 2014 BRZ Premium - SWP
Location: Chicago
Posts: 159
Thanks: 0
Thanked 21 Times in 20 Posts
Mentioned: 3 Post(s)
Tagged: 0 Thread(s)
|
Last edited by sissupr; 07-07-2014 at 08:05 PM. |
|
|

|
| The Following User Says Thank You to sissupr For This Useful Post: | charged86 (07-07-2014) |
|
|
#6 |
|
Senior Member
Join Date: Mar 2014
Drives: 2014 BRZ Premium - SWP
Location: Chicago
Posts: 159
Thanks: 0
Thanked 21 Times in 20 Posts
Mentioned: 3 Post(s)
Tagged: 0 Thread(s)
|
Quick update. Supercharger installed on 4th of July. Went with Moto-East for my tune utilizing 3.12 pulley and couldn't be happier with Mike's customer service... I will post pics and impression of the kit/install soon...
__________________
Vortech SC V3 // 3.12 Pulley // Moto-East Tune (93oct,e40-50,e85)
|
|
|

|
|
|
#7 |
|
Join Date: Sep 2012
Drives: FRS, M3
Location: La Habra, CA
Posts: 296
Thanks: 48
Thanked 135 Times in 103 Posts
Mentioned: 24 Post(s)
Tagged: 1 Thread(s)
|
Show us whats going on!
|
|
|

|
|
|
#8 |
|
Senior Member
Join Date: Mar 2014
Drives: 2014 BRZ Premium - SWP
Location: Chicago
Posts: 159
Thanks: 0
Thanked 21 Times in 20 Posts
Mentioned: 3 Post(s)
Tagged: 0 Thread(s)
|
July 3, 2014:
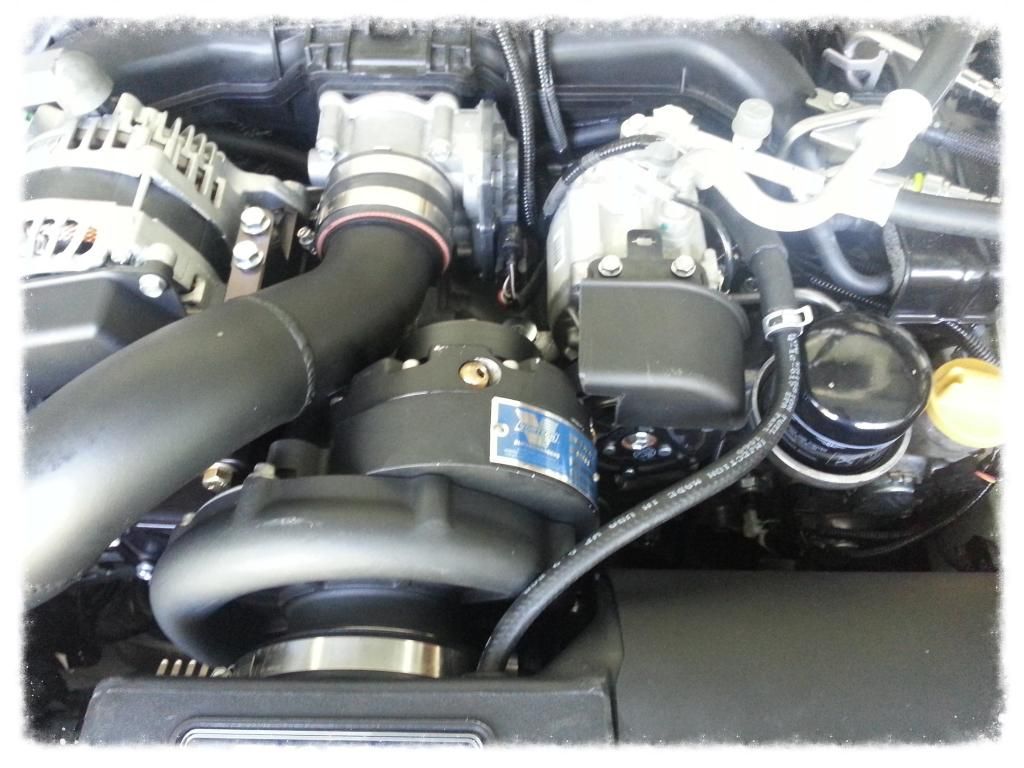
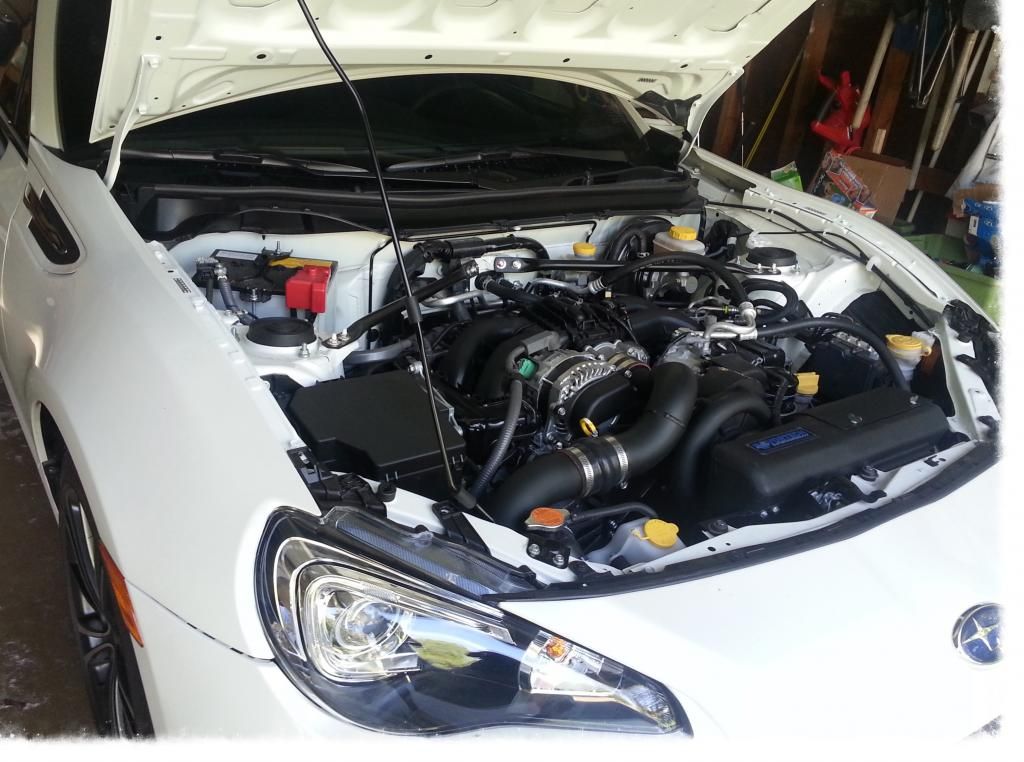
Current Mileage: 1150 (not a typo) Vortech install... Started the install at 5p. After flashing the Moto-East tune, we started taking off the bumper and under panels. Next we removed the stock belt and pulleys. Now it's 830p, we get to mounting the supercharger and for whatever reason we forgot to to re-install the one bolt on the main mounting bracket before install the charger... FUCK... take off the supercharger, put the bolt in, and re-mount... Now we have the belt routed (at least we think we have it routed right...)... but after 1h or trying to get the new belt on we decide to take a beer break and finish her up in the morning...  July 4, 2014 Continue install... Start at 7:30a and see that the belt was mounted around the pulley under the charger incorrectly... BINGO... Hold the tensioner and the new pulley is on ... thank GOD. For what's it worth, it easier to mount the belt around the smooth idler pulley underneath the AC pulley last. The Vortech manual says the Alternator is easier, THAT AIN'T EASIER!!! The alternator pulley is ribbed and you have to go over the edge of the pulley, where the smooth doesn't have an edge... a ton EASIER for anyone looking to install the kit. After getting the belt, we move to the other mounting brackets. Next we tackle the intercooler mounting. This wasn't as hard, but annoying to drill up when you don't have a lift to pre-drill the mounting holes. The Vortech instructions were vague around this and found out it was easier to use the RallySport DIY Vortech guide. Come 2p, we are all done. 1st crank was awesome, and I will never forget the satisfaction of installing the kit myself. I did have some help to bounce around confusing instructions, but all in all... the kit wasn't that bad to install. To level set my "mechanic" aptitude... when I got home from the July 3rd beginning... my wife says " do you guys know what you are doing"... If you can do suspension and have tools... you can do this install. It's not bad, just crazy when you are staring at the entire front end of your car torn apart and you have NEVER DONE THIS BEFORE... Besides that, it's not bad  Other Tips on the install... - Total install time: ~9h (not including beer and lunch break on July 4) - PRE-FLASH your car. I flashed the tuning before I was even at the place I was going to install the kit (cousin's place 2 miles away). I did throw a CE, probably because the fueling is rich as hell and the O2s were going wacko. Worst thing is to install the kit, and have issues with ECUTEK not working or the flash not compatible, etc... - Use the Vortech manual and RallySports DIY at the same time. It helped to bounce pictures off one another for comparisons. - You need a friend to help with mounting the charger... it's freaking heavy. - I would suggest started really early one day, to ensure you can finish with daylight. It's freaking annoying working with lamps, bugs, and shit when you are mounting a 30lb charger. - There are no torque specs in any manual. Do you own research beforehand... - When ready to mount the new belt, it's easier to mount over the smooth idler pulley after holding the tensioner down - Go slow with the cutting of the AC and lower pieces. I would even recommend to cut the AC after you are done, because it's so easy to rush because it's such a trivial step. - Try to have parts lined up and some how laid out for the bracket you will be installing. This would have been even more time consuming install, if I didn't go through the manuals and knew which bolts went where. Software/Tune... I went with moto-east and I have nothing but great things to say about Mike. He was sending me e-tune updates on July 4th!!! Who does that!  Running 4 maps (93, e40-50 mix, e85, valet). Added launch control options, but nothing else for now. Next up over the next month or two... - I want to tidy the engine up a bit... from the vortech install. Reroute a couple of the lines (eg MAF sensor extention, PCV line, etc) - Feel out the tune, do some logging, play with ECUTEK options, etc... - run a tank of e85 and see how that feels - install a catch can (probably radium) - get a dyno   *Before anyone mentions it... I know the there's a hose on the right side of the blower going into the intake. I couldn't plum in the stock 90degree elbow because I didn't have the right size hose to fit that routes the hose down and away... My kit was used, so I will be running to the parts store to source the hose this week and route the line away. It's a high temp hose for now... [IMG]  [/IMG] [/IMG]
__________________
Vortech SC V3 // 3.12 Pulley // Moto-East Tune (93oct,e40-50,e85)
Last edited by sissupr; 07-07-2014 at 11:53 PM. |
|
|

|
|
|
#9 |
|
Senior Member
Join Date: Mar 2014
Drives: 2014 BRZ Premium - SWP
Location: Chicago
Posts: 159
Thanks: 0
Thanked 21 Times in 20 Posts
Mentioned: 3 Post(s)
Tagged: 0 Thread(s)
|
July 14, 2014 Update:
Taillight Red/Clear Painting Materials - Dupli-Color Metalcast Red - Dupli-Clear Coat - 3m 1500 and 2000 grit - Painters tape - microfiber towels - Poor Boys Sealant/Wax (had this already) - Heat gun (optional, had already) [IMG]  Here were my steps. I used the DIY guide, but also added some additional steps. 1. Remove the lights 2. Clean tails with soap and water 3. Wet sand with 1500 grit 4. Clean tails with soap and water 5 Clean tails with rubbing alcohol (off the shelf) 6. Tape off blinker (optional) 7. Tape off rest of taillight 8. Spray one light coat of red 9. let stand for 10-15 min (outside temp was 80 deg, a bit humid) 10. Come back and use heat gun on high from 6-8 inches away 11. repeat 8, 9, 10 four more times. I ended up with 5 coats. Each coat a little more heavy. When I was done with the red coats. I had about 10-15% of my spray can left. The more you spray, the darker the red will be. See how mine came out and adjust accordingly. I really like it, but if I had to do it again I would stick to 3 coats just to make sure I didn't sand through it and was able to really get at it when I'm sanding. The worst thing to do is to have to paint again. 12. Wait overnight. I waited 15hr. This will vary depending on climate, humidity, etc. That's why the heat gun is good idea. 13. Remove blinker tape if added 14. Wet sand 1500 grit until the surface is smooth. Don't worry if some spots LOOK wetter or dryer in some areas. This won't be noticeable when the clear is applied, sanded, and sealant/wax is applied. 15. Wet sand 2000 grit. Same idea. Remember, the idea is to get the surface smooth, don't worry about what it looks like. Don't push too hard, as you can go through the layers... Make sure to get the sparkles out TOTALLY AND MAKE SURE IT'S SMOOTH. I WOULD ALSO RECOMMEND USING A BUFFER AND RUBBING COMPOUND/POLISH. IF THIS STEP ISN'T NEAR PERFECT THE BRAKE LIGHT WILL LIKE SHIT WHEN IT SHINES THROUGH. I HAD TO PULL OFF THE LIGHTS AND POLISH BACK DOWN TO THIS STEP. REALLY MAKE IT SMOOTH AND CLEAR. 16. Clean with soap and water with a microfiber towel. Don't use anything with lint as it get stuck to your light. I made this mistake, and that's why using a microfiber towel is great. It actually will help clean and smooth out the surface. Think of it as your last sanding step. 17. Back to you paint booth. Spray a light coat of clear coat. 18. let stand for 20-25 min (outside temp was 75 deg, no humidity). I waited longer because after the 1st coat I was laying it on pretty thick. But don't over do it because it will run. 19. Come back and use heat gun on high from 6-8 inches away 20. repeat 17, 18, 19, 20 3 more times. I ended up with 4 coats. This might be an overkill with the clear coat. But I wanted to make sure I had enough layers to sand with 1500, 2000, and apply a polish if needed before sealant/wax step. 21. Wait... This is where I'am now in the process. I will post finished up picks tomorrow after sanding, cleaning, and sealant/wax. Start [IMG]  [/IMG] [/IMG]After wet sanding with 1500 grit  [/IMG] [/IMG]after taping  [/IMG] [/IMG]after all coats of red applied and drying  [/IMG] [/IMG]next day, top is wet sanded, bottom is not. Can't really tell the difference in the pic, it's really just the feel that is different. Should be smooth.  [/IMG] [/IMG]more pics to come... If the lights don't turn out like I want them... going with Valenti LED Tail Lamps.. worth a shot... $50 bucks + my time vs. $350 for LED tails.
__________________
Vortech SC V3 // 3.12 Pulley // Moto-East Tune (93oct,e40-50,e85)
Last edited by sissupr; 07-15-2014 at 11:55 AM. |
|
|

|
|
|
#10 |
|
Member
Join Date: May 2014
Drives: Diesel daily / FR-S
Location: United States
Posts: 81
Thanks: 5
Thanked 25 Times in 23 Posts
Mentioned: 0 Post(s)
Tagged: 0 Thread(s)
|
I don't think the Metalcast paint was intended to be transparent. You might have reduced light output through the paint.
But like you said... doesn't hurt to try. |
|
|

|
|
|
#11 | |
|
Senior Member
Join Date: Mar 2014
Drives: 2014 BRZ Premium - SWP
Location: Chicago
Posts: 159
Thanks: 0
Thanked 21 Times in 20 Posts
Mentioned: 3 Post(s)
Tagged: 0 Thread(s)
|
Quote:
http://www.ft86club.com/forums/showt...?t=7826&page=8 hopefully I can get similar results... 
__________________
Vortech SC V3 // 3.12 Pulley // Moto-East Tune (93oct,e40-50,e85)
Last edited by sissupr; 07-14-2014 at 02:16 PM. |
|
|
|

|
|
|
#12 |
|
Senior Member
Join Date: Mar 2014
Drives: 2014 BRZ Premium - SWP
Location: Chicago
Posts: 159
Thanks: 0
Thanked 21 Times in 20 Posts
Mentioned: 3 Post(s)
Tagged: 0 Thread(s)
|
Clear done. Waiting to sand and finish up with sealant. Time to put my porter cable to work

__________________
Vortech SC V3 // 3.12 Pulley // Moto-East Tune (93oct,e40-50,e85)
Last edited by sissupr; 07-14-2014 at 07:41 PM. |
|
|

|
|
|
#13 |
|
Join Date: Feb 2014
Drives: BRZ
Location: East
Posts: 820
Thanks: 18
Thanked 301 Times in 186 Posts
Mentioned: 9 Post(s)
Tagged: 0 Thread(s)
|
careful wet sanding, do it in stages and then hold it at an angle to the light to see where your orange peel is. I burned through my clear in a few spots.
|
|
|

|
|
|
#14 | |
|
Senior Member
Join Date: Mar 2014
Drives: 2014 BRZ Premium - SWP
Location: Chicago
Posts: 159
Thanks: 0
Thanked 21 Times in 20 Posts
Mentioned: 3 Post(s)
Tagged: 0 Thread(s)
|
Quote:
 ... I know someone is going to reply with a pic of an orange peel... but thats ok 
__________________
Vortech SC V3 // 3.12 Pulley // Moto-East Tune (93oct,e40-50,e85)
|
|
|
|

|
|
|
|
|
|
|
 Similar Threads
|
||||
| Thread | Thread Starter | Forum | Replies | Last Post |
| Subaru BRZ Clear bra Install (self healing), Window Tint & Wolf's Hard Body Sealant | Rickrack | Cosmetic Maintenance (Wash, Wax, Detailing, Body Repairs) | 27 | 03-15-2015 03:54 PM |
| Nomed Alucard's Build - Wolf 86 | Nomed Alucard | Member's Car Journals | 21 | 03-26-2014 03:42 PM |
| Detailer's Domain: 12 Lexus GS350 FSport - New Car Prep with Wolf's Hard Body | DetailersDomain | Cosmetic Maintenance (Wash, Wax, Detailing, Body Repairs) | 8 | 02-12-2013 09:00 AM |
| vinyl wrap and wolf's hardbody? | enjoi23 | Cosmetic Maintenance (Wash, Wax, Detailing, Body Repairs) | 3 | 11-07-2012 11:04 PM |
| Wolf's Chemicals Hard Body? | Spd229 | Cosmetic Maintenance (Wash, Wax, Detailing, Body Repairs) | 13 | 07-30-2012 04:58 PM |