


|
||||||
| Electronics | Audio | NAV | Infotainment Anything related to in-car electronics, navigation, and infotainment. |
 |
|
|
Thread Tools | Search this Thread |
 02-08-2013, 12:25 PM
|
#1 |
|
Senior Member
Join Date: Nov 2012
Drives: 2013 Subaru BRZ Limited SWP
Location: Myrtle Beach, SC
Posts: 160
Thanks: 14
Thanked 85 Times in 36 Posts
Mentioned: 10 Post(s)
Tagged: 0 Thread(s)
|
Sealing And Deadening the Doors
One side project that I decided to do was to see how good I could make the factory stereo sound before replacing the stock system with aftermarket parts.
I had bought the outboard knee pads from JPM Coachworks which required the door cards to be removed to install them so sealing and deadening the doors seemed to be a natural thing to do. On my Civic Si, this had a MAJOR improvement in the sound of my OEM stereo and then any aftermarket upgrades. Goals: 1) Remove resonance from the panels and attempt to create a better airspace for the door speakers to operate in. 2) Add a noise barrier layer and take care of the back wave behind the speaker to clean up the sound. 3) I was going to add as little weight to the car as possible. 4) I was going to make sure that I maintained all functionality and didn't obstruct anything. Materials useage: 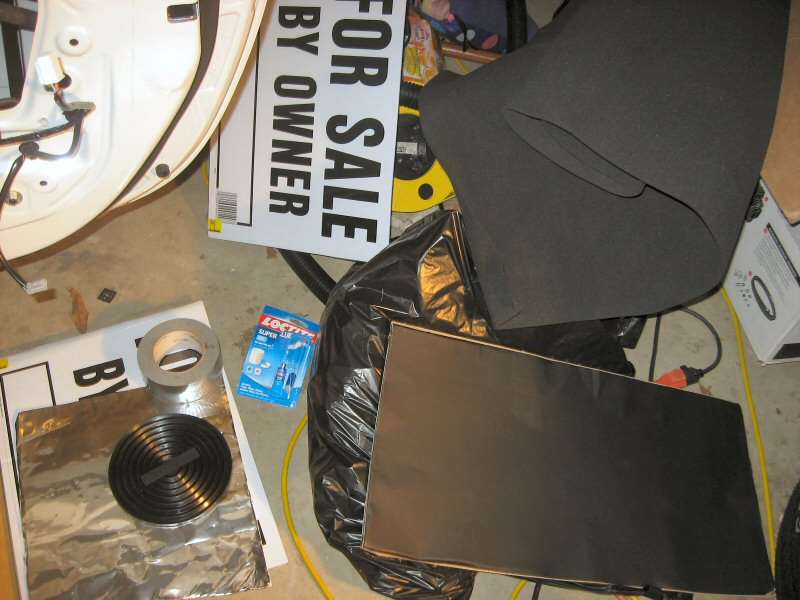
There are enough DIY's on removing the door cards out there that I won't bother to go over this process. However a little trick that will help later is to take a crayon or something else non-permanent and trace the outline of the door card against the door itself. You will thank yourself later because this will give you the boundary of where the door cards cover. 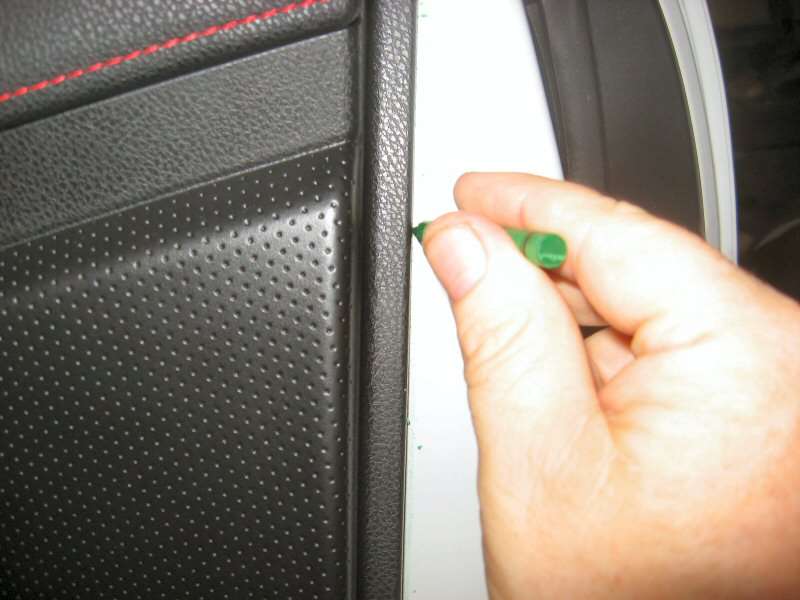 However it wasn't easy to find a picture of what the door looks like under the door card, so here's one for those of you wanting to see what detail there is: 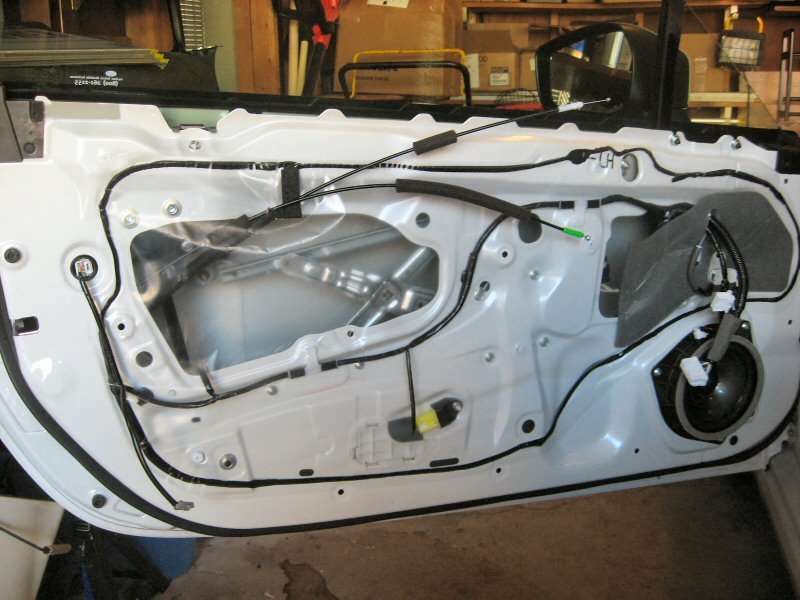 The first step is to remove the factory plastic sealant. Obviously this is the best time of the year to attempt this because typically there is a nasty bit of cleanup due to how messy this sealant is. But at this time of year, with the cooler temps, I was able to get this all off with a minimum of mess. 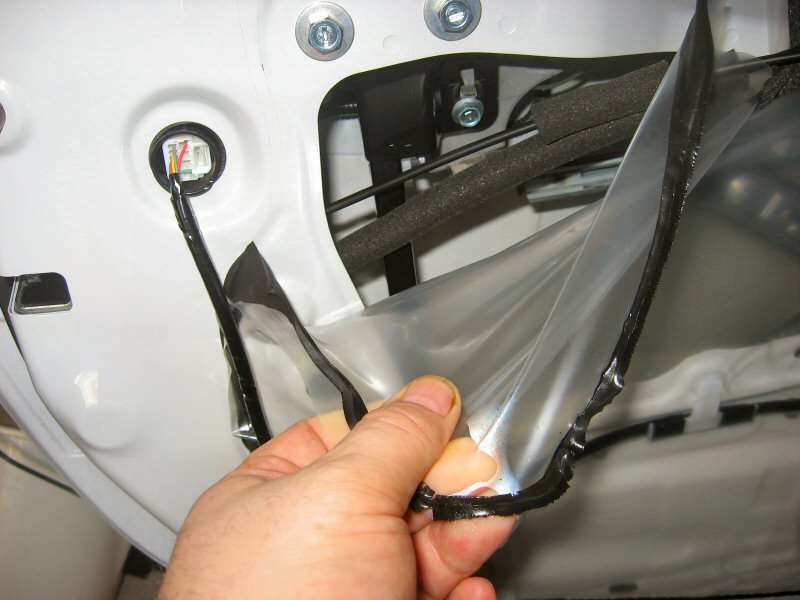 If you do make a mess, or live in a hotter climate, a lot of paper towels and Goof Off will be your best friend in getting the rest of the sealant off. 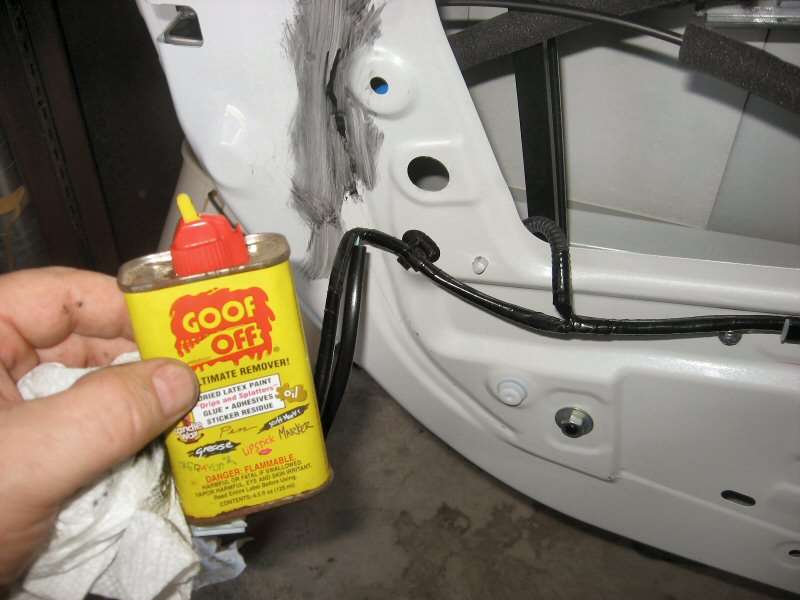 Something to note here... there are actually sound deadening on the outer door panels themselves from the factory. The white square you can see here behind the windows mechanism is one of the spots. 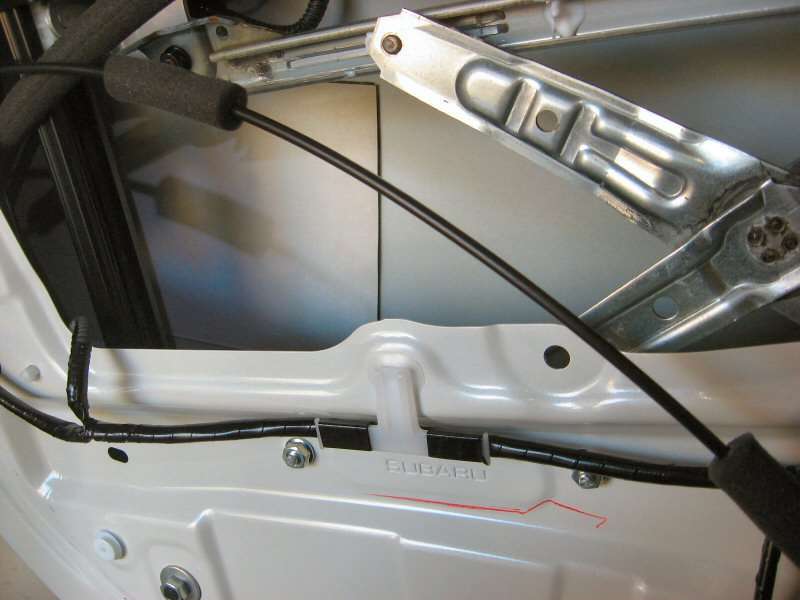 The other spot is behind the speaker. 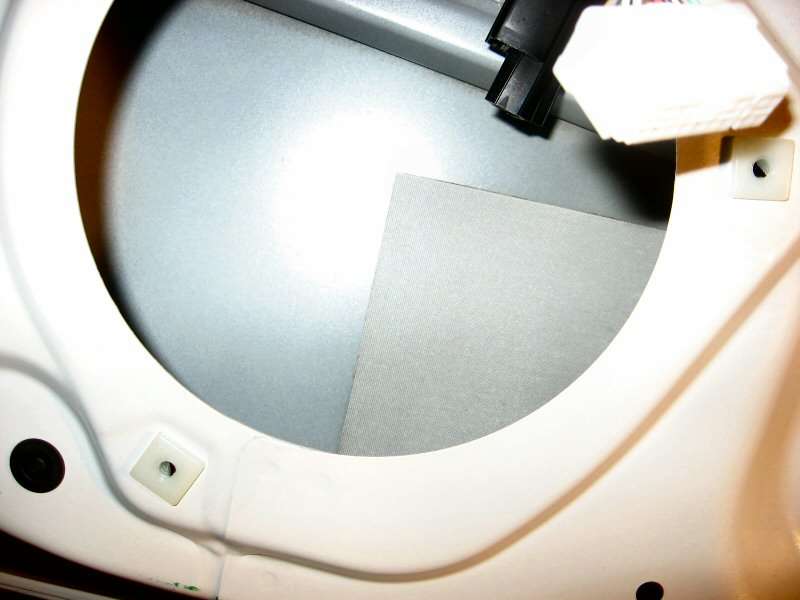 With Damplifier, full coverage is NOT necessary to effectively deaden a panel, you are just trying to remove the peak area of resonance. Therefore instead of using large chunks, I was going to instead use small pieces, and use the technique of rapping on the panel with my knuckles to determine where there was a resonance or buzz to be dampened. I probably still used too much, but after this, the door had a nice solid thunk noise with no ringing or vibrations. I also covered over any hole in the door that wasn't required for fasteners on the door car. 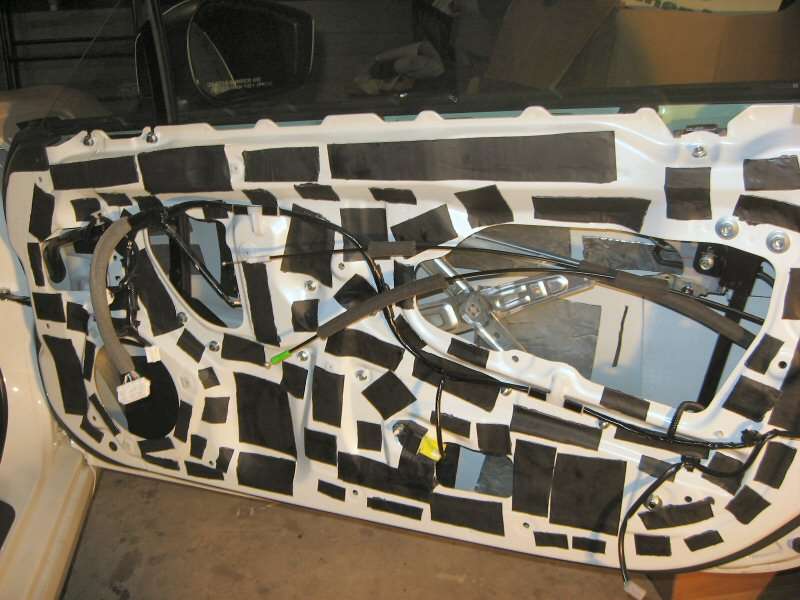 At this point, it's the easiest place to install the Second Skin Speaker Tweakers. They go behind the driver in the door and break up the back wave created by the speaker. They attach with super glue gel and there's a potential here to make a HUGE MESS and damage your paint... which I learned the hard way on my Si... Fortunately I didn't make the same mistakes as before but you literally have to put the whole tube of super glue gel on the back, then hold it into position while it bonds. I always try to have some Damplifer underneath of it to give it a good surface to bond to. They're flexible so I let the end fold at the door beam. 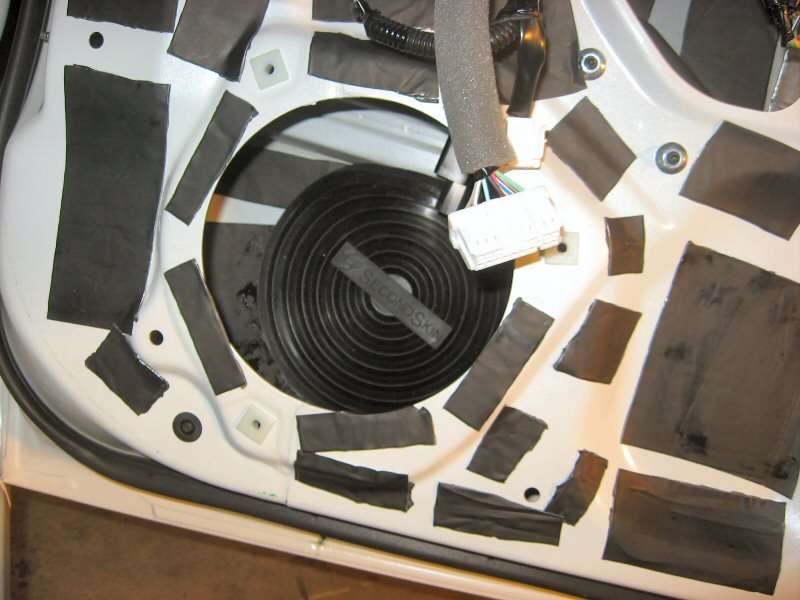 Once that was finished, then the next step was to construct panels to cover over the bigger gaps. My preference is to use the outdoor sign board material which is like a plastic cardboard but I've seen these panels done out of wood paneling, MDF, and regular cardboard but I wanted something that would be weatherproof. To construct the panel, first you want to fit it to the area that you want to cover. I typically use a Sharpie to get a rough shape, and then keep test fitting and cutting away small pieces until it fits. you may have to put small slots into it to allow cables or wiring through.  Once you have your panel finished and fitted. You want to cover it with Damplifier to create a more solid/substantial piece that will not vibrate. You don't have to cover it exactly and use one piece, but I'll trace it out on the Damplifier and then cut it out.  The resulting panel can now be put into place and sealed with duct tape. Try to get all the edges but it doesn't have to be a perfect seal... there are still plenty of air gaps that air and water can escape from in the door, but you're just trying to minimize them. I admit this looks a little bit ghetto, but it makes the panels easily removable if you have to service the window parts. I've seen several methods of attaching these panels including using screws and sealant, and this is not only a less permanent way to close the gap, but you don't have to worry about accidentally damaging something by accidentally drilling or screwing into something. 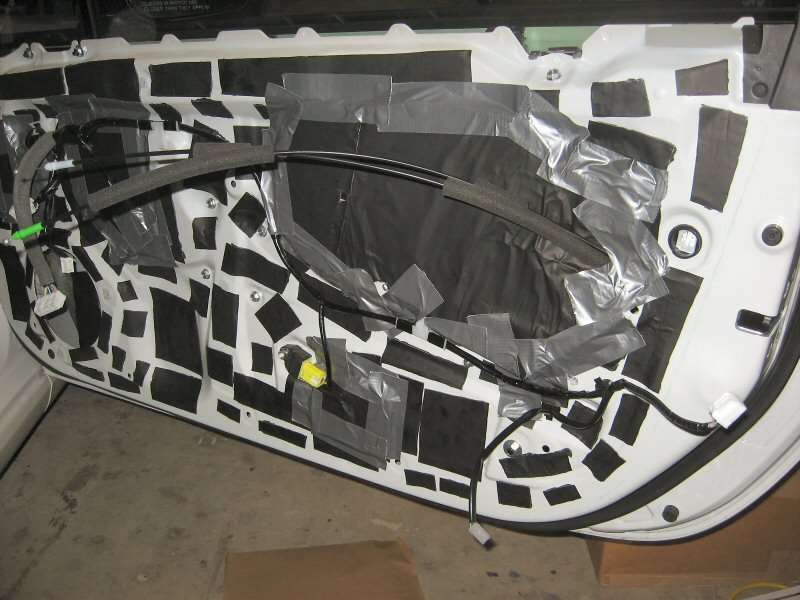 Now we look at doing the noise barrier with the Overkill Pro. This stuff is thicker than the normal Overkill closed cell foam barrier and though it does make it a bit less easy to put the panels back on, it seems to be a much more effective noise barrier. The easiest way to trace out what you need is to put the door card down on it and trace out the shape with a Sharpie. Then cut it out with some scissors. 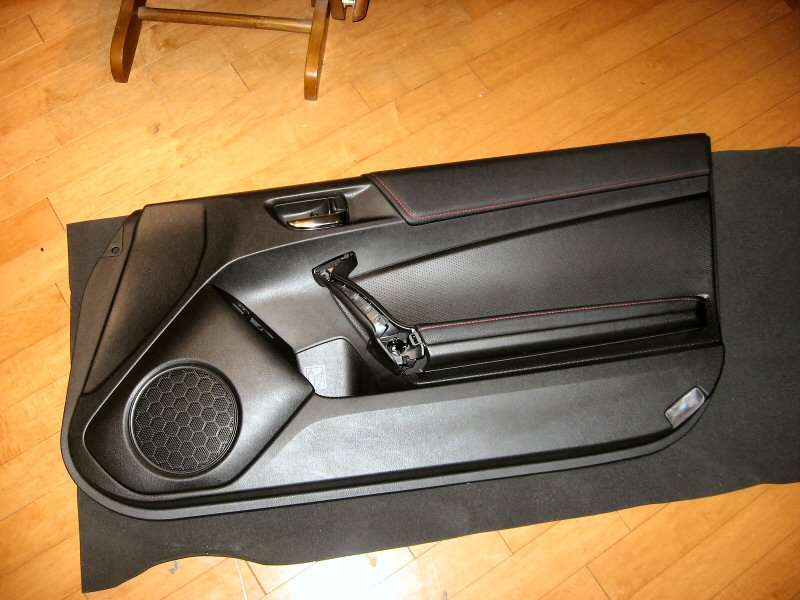 The next thing to do is to hang it on the door using a bit of duct tape and drape it over everything. 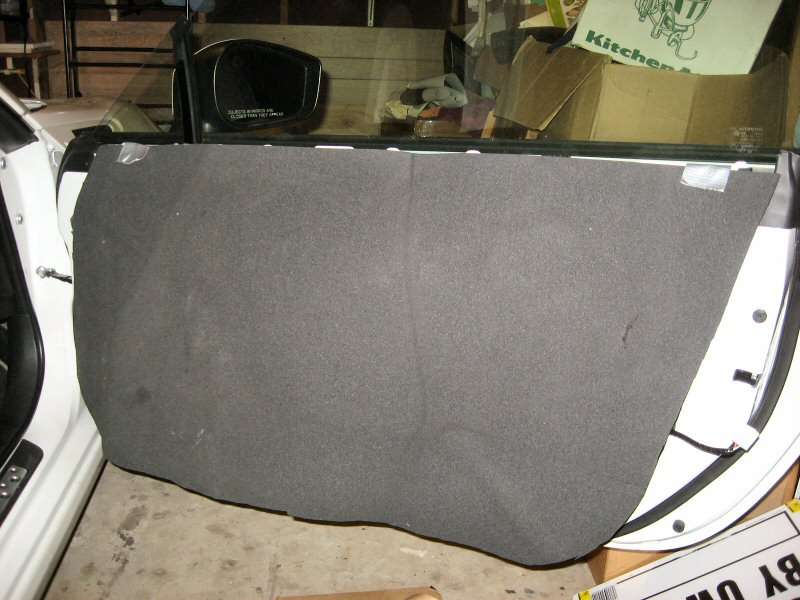 From here, you want to make slits so that any harnesses or cables can be passed through. You also want to locate and punch through holes so that the door card can be re-attached. 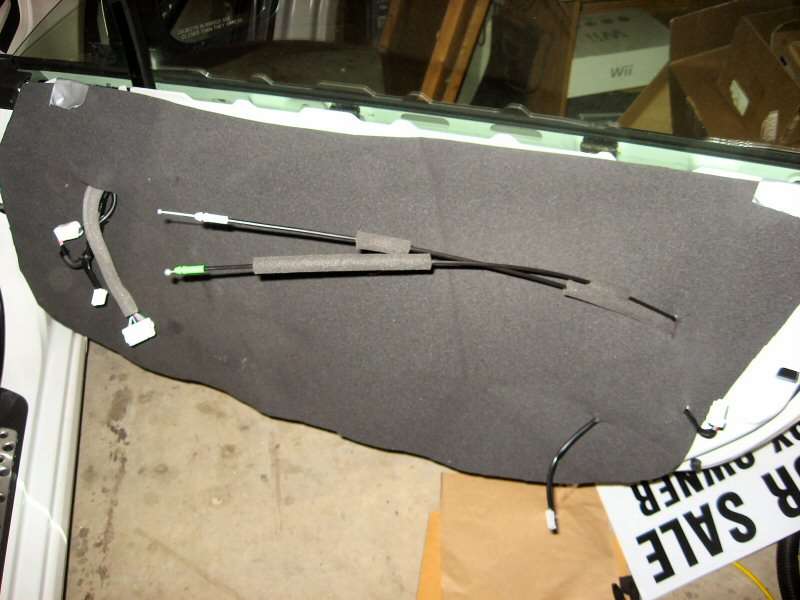 Once you have located everything and have made sure that the panel is going to sit flat, cut a hole through for the speaker. The next step is to put some tape on the sides of the Overkill in a spot which will allow you to fold down the top part and fold up the bottom, so approximately where you fed the door cables and the harness through. 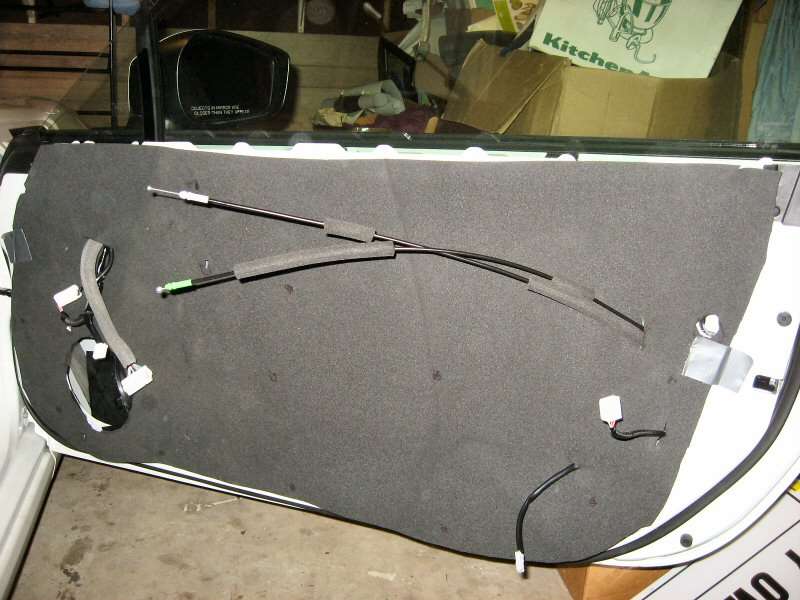 Now this is where you need to be careful. Fold down the top of your sheet of Overkill and take your spray adhesive and slowly and carefully spray the door and the exposed Overkill with adhesive, for maximum adhesion it wants to be on both surfaces. This can be a serious B**** to clean up so go slowly... it needs time to "tack up" before it will adhere anyways. 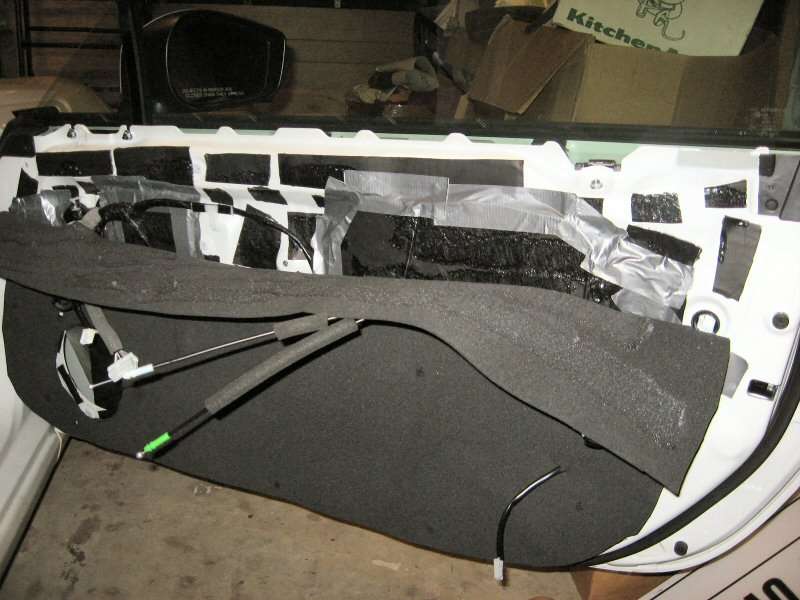 When you're finished then slowly work the overkill up against the door and press until it holds on it's own. When you have the upper half stuck in place then fold up the lower half, it helps if you use a little tape and put the adhesive on the door and the other half of the foam, again, for maximum adhesion, both surfaces need to have the adhesive applied. Be very careful around the hole you cut for the speaker and some of the other holes, the adhesive will go through these and make a mess. 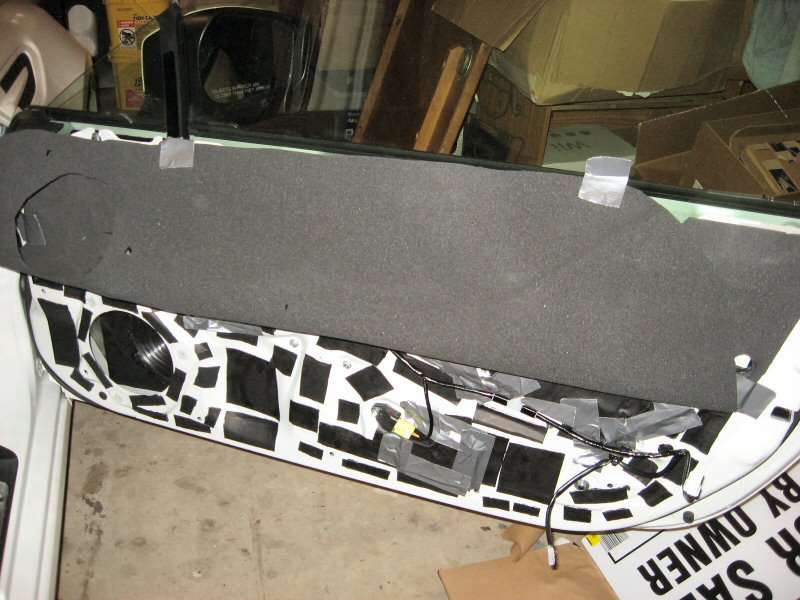 When you're finished, fold down the bottom and press everything together... you will be much happier if you make sure you keep your holes lined up correctly. The result is a somewhat form fitting layer of noise barrier on the door. 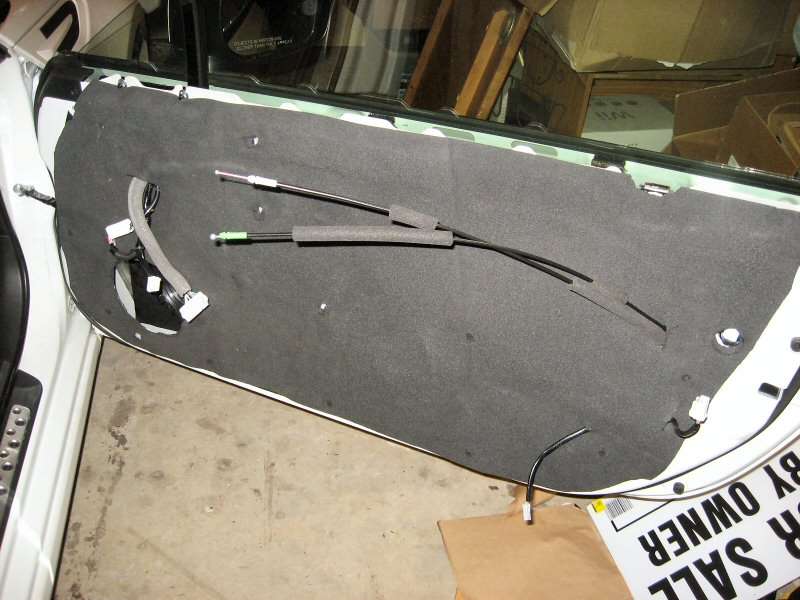 You may need to clean up your trimming a little, but reinstall the speaker, make sure that you left enough Overkill around it so that it acts as a gasket for the speaker. 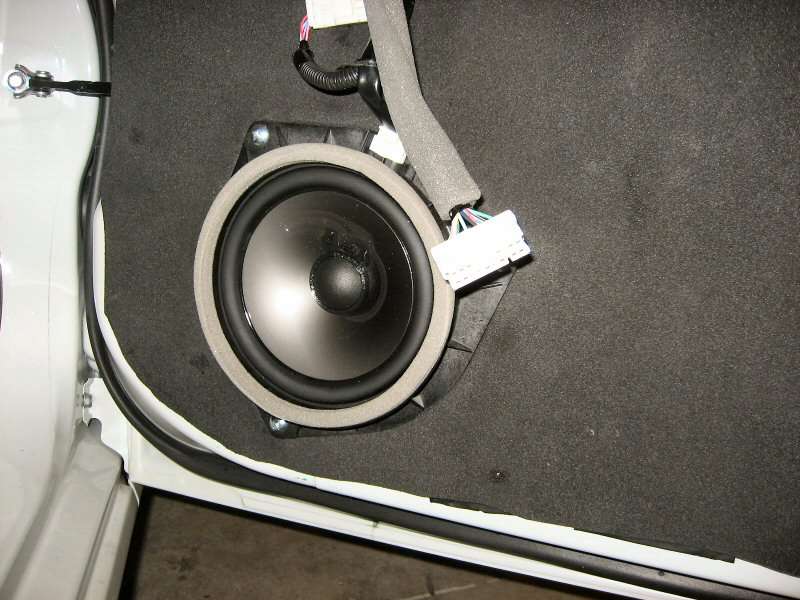 Before you put the door back together... We want to address the plastic in the door card which can also vibrate.... significantly. All of those odd shaped pieces of Damplifier left over from making your panels work well here. 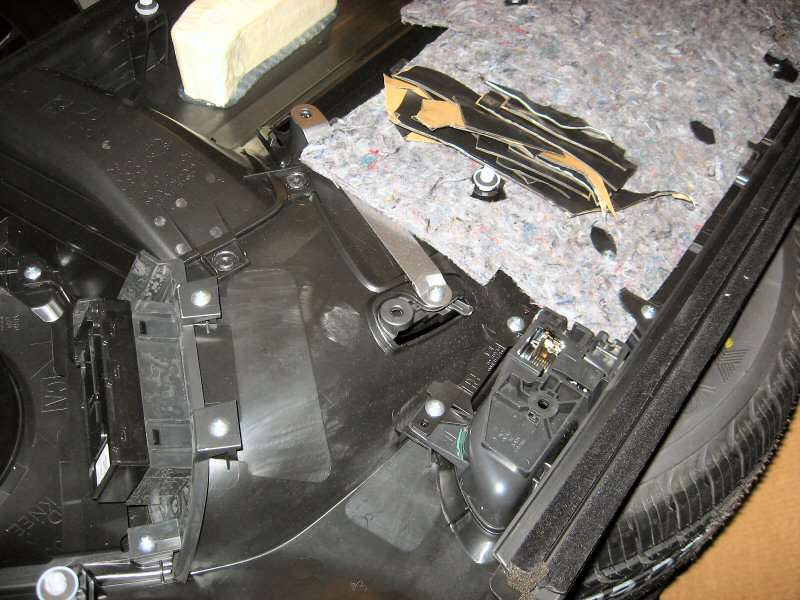 Again, you don't need total coverage with this stuff... just enough to dampen the vibration. The tap test isn't as effective here so a bit of guesswork won't hurt. 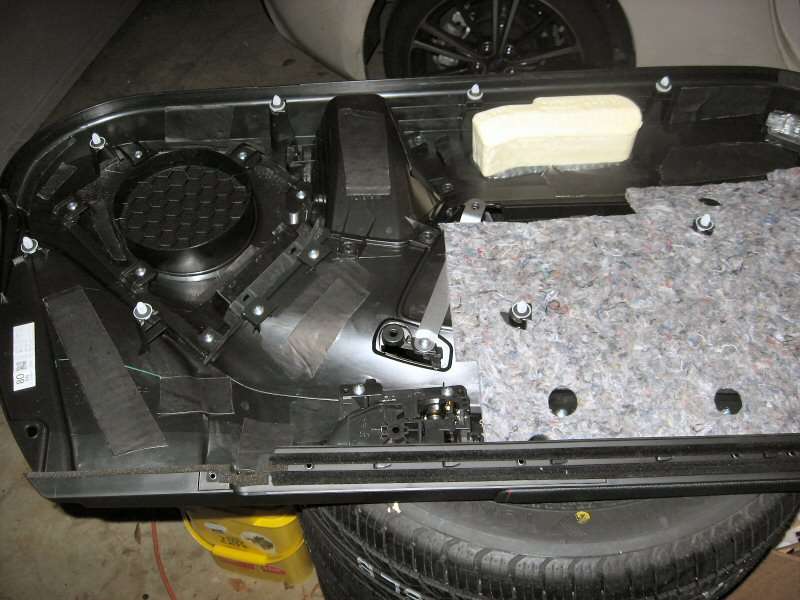 Of course, don't forget that the main goal was to install these beautiful JPM Coachworks Outer Knee Pads. 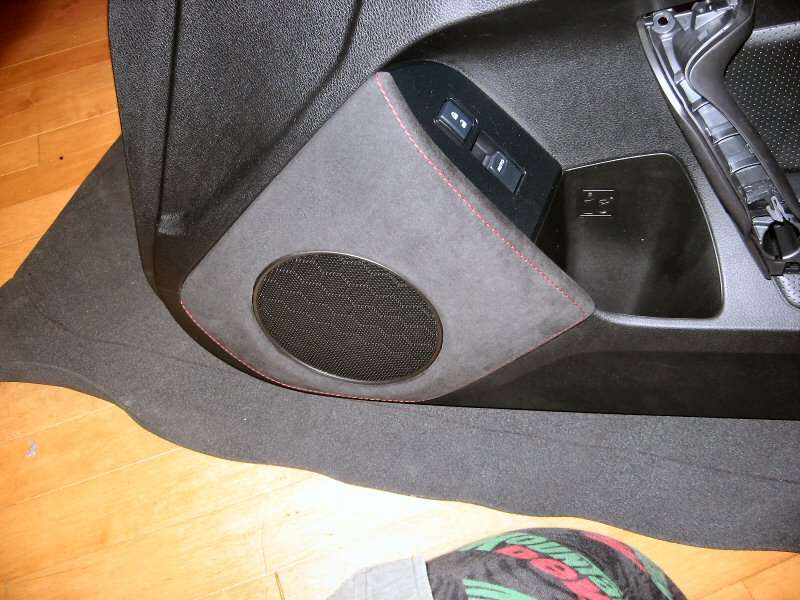 From here... you just need to reassemble the door. If you have a BRZ Limited then the lights in the door are a bit of a PITA to get plugged back in, and it does take a bit of force to get the fasteners back in and compress the Overkill. Oh... and make sure you have all of those rubber washer things that go on the fasteners in place. This is now redundant but they were originally there so that the fasteners didn't rattle while in the door. 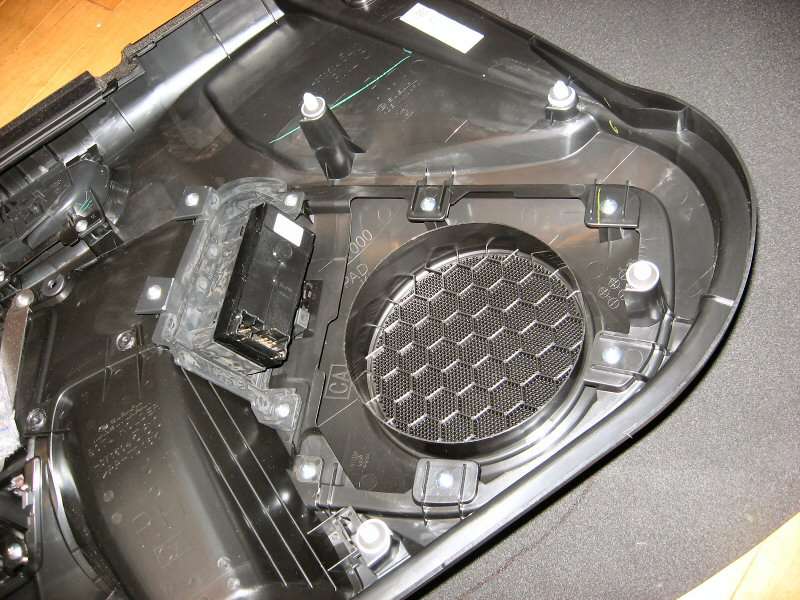 When you've finished both doors, it's time to figure out if all the work was worth it. I tend to work very slowly and deliberately and take my time doing this, and it basically took two 4-5 hour evenings to do this. If I'd just gone for full coverage I could've gone much quicker. So did it make a difference. OH HELL YES!!!! I'd listened to a few choice tracks before, after I'd done the first door and after I'd done both doors. The difference is amazing. My test track was "Satellite 15...The Final Frontier" from Iron Maiden's "The Final Frontier" which I picked because the intro "Satellite 15..." features a staccato chaotic mixture of drums, bass and guitars that are hard to pick out and certain points caused massive buzzing in the panels when the bass note is plucked and allowed to ring out. The bass is distorted through the intro, which makes it hard to pick out if it's speaker distortion or the recording (it's the recording, but will distort a speaker pretty easily). From there "The Final Frontier" starts with a staccato snare hit and goes into clean tone bass, harmonized chord progressions and features a lot of wide open spaces for the vocals and the various melodies to ring out. I hated listening to this song in the BRZ before... because everything muddied together in the intro and it's a long intro... the song is 8:40 in total. This is one song I used to listen to a lot in my Si and so I could barely stand to hear in the BRZ. Once the doors were sealed, the panel rattling was gone, and you could pick out each individual instrument... it was a night and day difference and the song now has the sound it deserves. I probably drove around for another couple of hours after that I picking several other songs for dynamics including Rush's "2112", some of my Initial D techno and several Pink Floyd Albums. I still need a sub, but this mod definitely gives those door drivers a punch and a depth that they sorely needed, and when the bass gets busy it remains clear and distinct and doesn't just muddle together. The next step... we're currently working on the rear seat sub woofer box/storage box/amp rack setup since the back seats in this car are useless anyways, and once I get the Sub ready to go, then that will be the next addition with some more sound deadening. Oh... and since Damplifier is .35 lbs per square foot, used 8 2 square ft sheets total, plus the Overkill Pro and the Speaker Tweakers, I don't think that I added much more than 7 lbs to the car, which is a perfect result!
__________________
Derek
 2013 BRZ Limited SWP Professional driver in search of closed course.. |

|

|
| The Following 41 Users Say Thank You to WolfSongX For This Useful Post: | aegisdrgn (12-24-2015), BabaYaga (08-31-2014), Black Tire (02-18-2013), boxer 2.5 (10-08-2013), BRAWL (05-02-2014), Brzzee (04-05-2013), Calum (09-27-2015), Choco (10-29-2015), ducks (02-08-2013), freerunner (04-05-2016), FreshFRS (02-09-2013), Guff (10-28-2013), hushypushy (08-14-2013), kidgogeta (02-25-2013), kmbkk (02-08-2013), Koa (02-23-2015), kwood9000 (02-22-2013), Marcoscrdo (01-14-2014), mit_peid (02-22-2013), MJones_RB (10-09-2017), n2oinferno (04-05-2013), naking (02-24-2013), onefitz (02-08-2013), PerCompLLC (09-12-2017), rawbz (02-08-2013), Rayme (02-08-2013), Revmatch (02-19-2013), Shankenstein (02-08-2013), shiud (01-21-2014), Skippman (02-20-2013), Slartibartfast (03-09-2013), solidONE (04-08-2020), speedrye (04-11-2014), SubieNate (02-08-2013), sure74 (02-08-2013), Thobjo (02-08-2013), TofuJoe (12-20-2015), tripjammer (02-19-2013), VenaSera (02-08-2013), wheelhaus (03-08-2013), Wolfdogelite (03-29-2015) |
|
02-08-2013, 02:59 PM
|
#2 |
|
Frosty Carrot
Join Date: Jan 2013
Drives: The Atomic Carrot
Location: Baltimore, MD
Posts: 513
Thanks: 272
Thanked 428 Times in 199 Posts
Mentioned: 19 Post(s)
Tagged: 0 Thread(s)
|
Excellent DIY. Thanks for posting it up.
(From experience) Many brands of duct tape will degrade after a couple years. Typically the adhesive will get yellow and crusty... and the cloth can separate from its backing. It will continue to hold just fine though. How do you like the Speaker Tweaker pads?
__________________
If you think you're nerd enough, join in the discussions about Suspension and Aerodynamic modelling!
Wall of Fame - JDL Auto Design, Raceseng, Vishnu Tuning, Penske Shocks, Nameless, Perrin, RaceComp Engineering, Essex/AP Racing, Verus, RacerX Wall of Shame - aFe Takeda, Wilwood, FA20Club |
|
|
|
|
02-08-2013, 03:02 PM
|
#3 |
|
Member

Join Date: May 2012
Drives: SWP BRZ Limited
Location: Greenbelt, MD
Posts: 33
Thanks: 0
Thanked 5 Times in 5 Posts
Mentioned: 0 Post(s)
Tagged: 0 Thread(s)
|
Thanks for the write up. I'm planning on deadening my BRZ doors and am using SoundDeadenerShowdown.com as my source of info. Understanding the difference between CLV vs. CCF vs. MLV was like climbing a mountain, altough in the end it's relatively simple stuff. I always thought sound deadener was a "one item conquers all" thing (no doubt due to dynamat marketing) so the biggest hurdle was understanding there are different items for different applications.
Sounddeadenershowdown talks about MLV (mass loaded vinyl) being the major sound deadening contributor. Is there a reason you didn't use any MLV in your setup? Was it weight savings since MLV is usually the heaviest of the three products (1lb per ft^2)? Was it because you aren't really trying to "sound proof" the door but "deaden" it? Not trying to poke holes in your plan just trying to learn. I already put Dayton RS180-4 midbass speakers in my doors so I'm tackling this project differently than you. Going from 2ohm to 4ohm killed the power from the stock amp so it wasn't very beneficial, although a lot of the "mud" was removed. I did realize in the process that the door speakers are receiving a full range of frequencies (or close to it). Maybe putting a bandpass inline with the stockers will allow them to play their selected frequencies with sufficient clarity. |
|
|
|
|
02-08-2013, 03:45 PM
|
#4 |
|
Frosty Carrot
Join Date: Jan 2013
Drives: The Atomic Carrot
Location: Baltimore, MD
Posts: 513
Thanks: 272
Thanked 428 Times in 199 Posts
Mentioned: 19 Post(s)
Tagged: 0 Thread(s)
|
The same way that you can install "Bass Blockers" on your tweeters, you can bass block your midbasses. For a 4 ohm speaker, and ~80 Hz corner frequency... a high pass filter can be made from a 500 uF capacitor. LINK to Parts Express
If there are other crossover components, they may interfere with operation... higher order options can be made without too much headache too. Calculator: LINK
__________________
If you think you're nerd enough, join in the discussions about Suspension and Aerodynamic modelling!
Wall of Fame - JDL Auto Design, Raceseng, Vishnu Tuning, Penske Shocks, Nameless, Perrin, RaceComp Engineering, Essex/AP Racing, Verus, RacerX Wall of Shame - aFe Takeda, Wilwood, FA20Club |
|
|
|
|
02-08-2013, 03:45 PM
|
#5 |
|
First 86 Driver Baby!

Join Date: Jan 2012
Drives: FR-S, Flex
Location: Williamsburg, VA
Posts: 1,752
Thanks: 504
Thanked 513 Times in 349 Posts
Mentioned: 32 Post(s)
Tagged: 3 Thread(s)
|
I will be doing something similar to this when I do my system install, thanks for the details!
|
|
|
|
|
02-08-2013, 04:40 PM
|
#6 | |
|
Senior Member
Join Date: Nov 2012
Drives: 2013 Subaru BRZ Limited SWP
Location: Myrtle Beach, SC
Posts: 160
Thanks: 14
Thanked 85 Times in 36 Posts
Mentioned: 10 Post(s)
Tagged: 0 Thread(s)
|
Quote:
So technically all 3 of them perform different tasks as far as sound proofing goes. The CLD dampens the metal panel so it does not vibrate in resonance with the sound and transmit it fully, the CCF filters a lot of the harsh higher frequencies that intrude into the cabin, and the MLV blocks the lower frequency. Each does their part, so even if you combine 2 of them, there is significant improvement. With Mass being an enemy to these cars, taking a minimalist approach means that I wanted to get the best benefit for the least weight gain. Adding MLV such as Second Skin's Luxury Liner would've added another 7 lbs to each door and tripled the weight increase of my modifications. Shankenstein, I like the Speaker Tweakers, I used them in my Si and there was a noticeable improvement after I added them, so I naturally just added them here. I think it helps to break up the back wave and makes the air compression by the speaker more distinct. I think it probably has a huge hand in cleaning up the "mud".
__________________
Derek
2013 BRZ Limited SWP Professional driver in search of closed course.. |
|
|
|
|
|
02-18-2013, 08:10 PM
|
#7 |
|
Senior Member

Join Date: Jun 2012
Drives: Whiteout Scion FR-S
Location: Minnesota
Posts: 508
Thanks: 367
Thanked 209 Times in 129 Posts
Mentioned: 5 Post(s)
Tagged: 1 Thread(s)
|
Thanks so much, this is a GREAT tutorial. I plan to use it later in the spring (its supposed to be -3F here tonight).
I like the idea of using tape so that it can be removed, but duct tape tends to dry out after a few years. I plan to use aluminum tape (the "real" duct tape). This doesn't dry out and should still be removable if needed.
__________________
My cars always dress formally. They all wear black tires.
 |
|
|
|
|
02-18-2013, 08:25 PM
|
#8 |
|
Banned
Join Date: Jan 2012
Drives: Attitude
Location: MD
Posts: 10,046
Thanks: 884
Thanked 4,889 Times in 2,902 Posts
Mentioned: 123 Post(s)
Tagged: 4 Thread(s)
|
Speaking of weight gain, did you manage to weigh/can you guesstimate how much mass you added?
|
|
|
|
|
02-18-2013, 08:46 PM
|
#9 |
|
SW5 Driver

Join Date: Jul 2012
Drives: Asphalt FRS
Location: Ontario
Posts: 225
Thanks: 13
Thanked 76 Times in 30 Posts
Mentioned: 6 Post(s)
Tagged: 0 Thread(s)
|
Looks good man. I want to do most of my car (at least the problem areas) I figure I can combat the weight with some HP gain. Either way, being that you appear to be a SecondSkin fan have you ever seen or used their Sludge undercoating? looks handy for use in a trunk or on the floor panels.
|
|
|
|
|
02-19-2013, 08:50 PM
|
#10 | |
|
Senior Member
Join Date: Nov 2012
Drives: 2013 Subaru BRZ Limited SWP
Location: Myrtle Beach, SC
Posts: 160
Thanks: 14
Thanked 85 Times in 36 Posts
Mentioned: 10 Post(s)
Tagged: 0 Thread(s)
|
Quote:
__________________
Derek
2013 BRZ Limited SWP Professional driver in search of closed course.. |
|
|
|
|
|
02-19-2013, 10:35 PM
|
#11 | |
|
Senior Member
Join Date: Nov 2012
Drives: 2013 Subaru BRZ Limited SWP
Location: Myrtle Beach, SC
Posts: 160
Thanks: 14
Thanked 85 Times in 36 Posts
Mentioned: 10 Post(s)
Tagged: 0 Thread(s)
|
Quote:
__________________
Derek
2013 BRZ Limited SWP Professional driver in search of closed course.. |
|
|
|
|
| The Following User Says Thank You to WolfSongX For This Useful Post: | tripjammer (02-24-2013) |
|
02-19-2013, 11:17 PM
|
#12 |
|
Banned
Join Date: Jan 2012
Drives: Attitude
Location: MD
Posts: 10,046
Thanks: 884
Thanked 4,889 Times in 2,902 Posts
Mentioned: 123 Post(s)
Tagged: 4 Thread(s)
|
Yeah I read that however you didn't provide a solid figure. Thanks!
|
|
|
|
|
02-20-2013, 12:11 PM
|
#13 |
|
Senior Member

Join Date: Jan 2013
Drives: GBS BRZ Limited
Location: St. Louis MO
Posts: 290
Thanks: 47
Thanked 48 Times in 42 Posts
Mentioned: 2 Post(s)
Tagged: 0 Thread(s)
|
WolfSongX,
What do you think of RAAMMat? I'm debating on getting their Package #2 and doing the doors much the same way you've done yours and using the rest to do the rear deck, trunk lid, and trunk floor. I'm planning to combine that with a set of Speaker Tweekers in the doors much like you've done. |
|
|
|
|
02-21-2013, 10:16 PM
|
#14 |
|
Member
Join Date: Jan 2013
Drives: BRZ
Location: Massachusetts
Posts: 89
Thanks: 38
Thanked 20 Times in 13 Posts
Mentioned: 0 Post(s)
Tagged: 0 Thread(s)
|
FYI people looking for sound insulation while keeping weight down, Walmart has some good foam for this. Also, you cant beat the price!
http://www.walmart.com/ip/5-Zone-2-C...opper/15581041 http://www.walmart.com/ip/FASTTRACK-...opper/15581050 |
|
|
|
|
|
|
|
|
|
|
 Similar Threads
|
||||
| Thread | Thread Starter | Forum | Replies | Last Post |
| What are you using for sound deadening ? | mashal | Electronics | Audio | NAV | Infotainment | 108 | 11-06-2015 12:51 PM |
| SOUND DEADENING | White64Goat | BRZ First-Gen (2012+) -- General Topics | 7 | 04-22-2013 01:36 AM |
| Sound deadening | yomchi1989 | Electronics | Audio | NAV | Infotainment | 16 | 01-02-2013 02:08 PM |
| Sound deadening | yomchi1989 | AUSTRALIA | 9 | 12-27-2012 09:09 PM |
| Window not sealing | NOHOME | Issues | Warranty | Recalls / TSB | 9 | 12-12-2012 02:57 PM |


 Faylene
 2013 Scion FRS