


|
||||||
| DIY (Do-It-Yourself) Guides For all DIYs. |
 |
|
|
Thread Tools | Search this Thread |
 06-03-2014, 10:00 PM
|
#1 |
|
Senior Member

Join Date: Oct 2013
Drives: 2022 BRZ Limited
Location: Orange County
Posts: 1,553
Thanks: 997
Thanked 607 Times in 404 Posts
Mentioned: 32 Post(s)
Tagged: 1 Thread(s)
|
I was trying to find some reasonable brake ducting kit that utilizes the fog light bezels since I didn't want to spend $650 for the APR brake ducting kit. Then I figured there is no other alternative so I decided to make my own. My total cost was about $80 bucks and it seems to be working just fine
 FYI, the aftermarket brake ducting options seem to be using the same quality ducting hose so you basically pay for the backing plates and some clamps/zip ties FYI, the aftermarket brake ducting options seem to be using the same quality ducting hose so you basically pay for the backing plates and some clamps/zip ties  I am sure there are many creative guys here and someone can come up with a lot easier method . This should typically take about 3-4 hours but I have to say I am very slow so YMMV ..with that said, please read carefullyWARNING: This mod requires you to remove the bumper, brake pads, calipers and rotors so please see below links and make sure you are comfortable with performing these and as always DO IT AT YOUR OWN RISK!!! It also involves the washer bottle removal on the driver side in order to utilize the fog light inserts and requires you to modify the OEM brake backing plates,, Did I mention the removal of the fog lights  . Since I have an intercooler I wasn't able to use an air inlets but if you're NA, you may be able to route the ducting and use these air inlets and keep your fog lights and washer bottle in their places . Since I have an intercooler I wasn't able to use an air inlets but if you're NA, you may be able to route the ducting and use these air inlets and keep your fog lights and washer bottle in their places  https://www.pegasusautoracing.com/pr...p?Product=3624 Tools and Parts required :
Props to @blackfireball5 for providing information about the mesh screen and how I can fix it on the fog light bezels. If you have an FRS I would highly recommend you to follow his directions since the fog light bezels might be slightly different http://www.ft86club.com/forums/showthread.php?t=63231 To remove your bumper you may use the following link as a reference or the video below: http://www.ft86club.com/forums/showthread.php?t=8788 [ame="http://youtu.be/7bUV3nVVtds"]http://youtu.be/7bUV3nVVtds[/ame] Bumper and fog lights removed  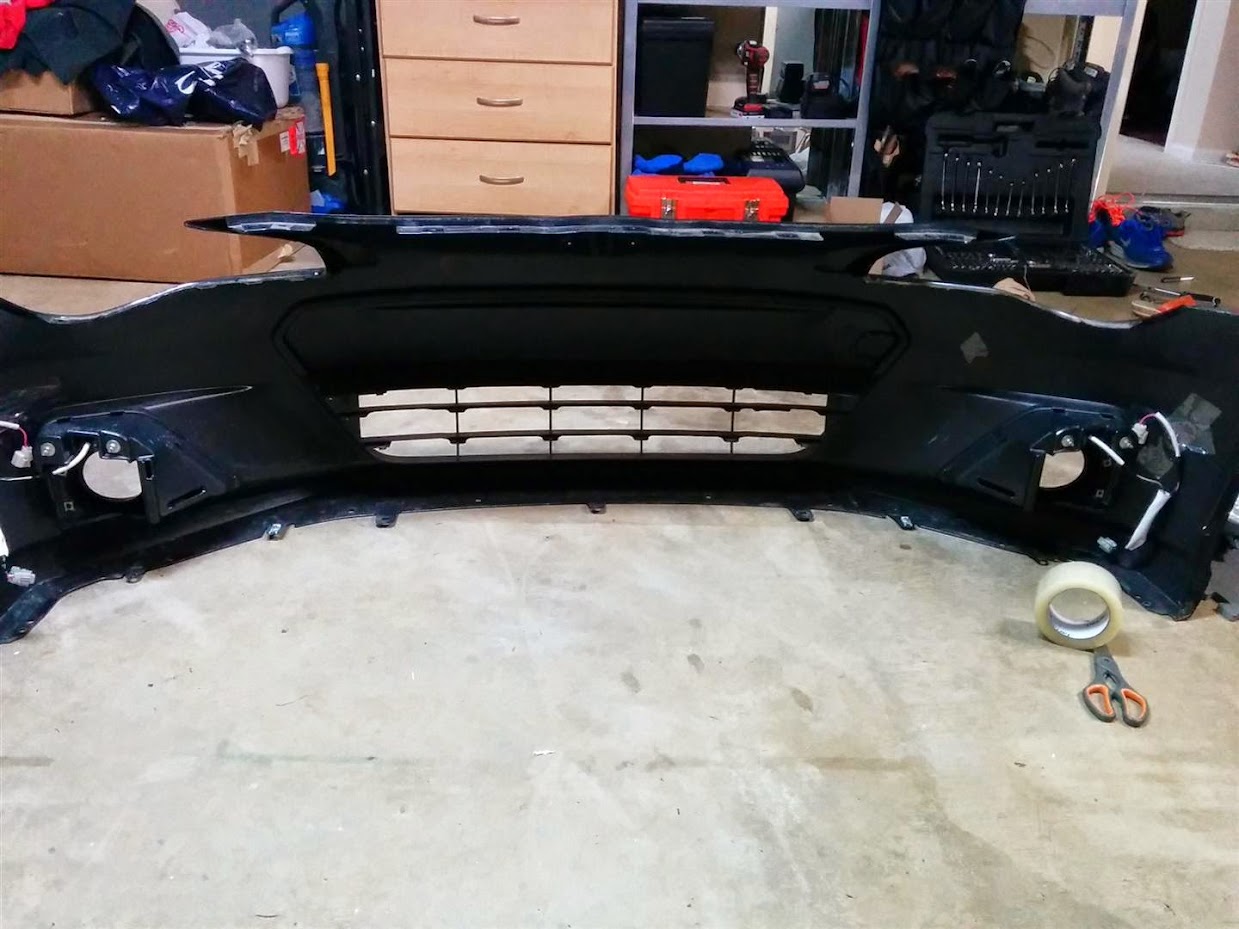  since I have the foglights (BRZ Limited) I removed after removing the bumper and safely put aside the fog light cable (you may use gorilla tape to fix it inside the bumper) then I cut the mesh gutter with a scissor and placed it into the fog light bezel and applied some liquid nails.. ** make sure you cut the mesh a bit bigger than the opening so it will fit tightly 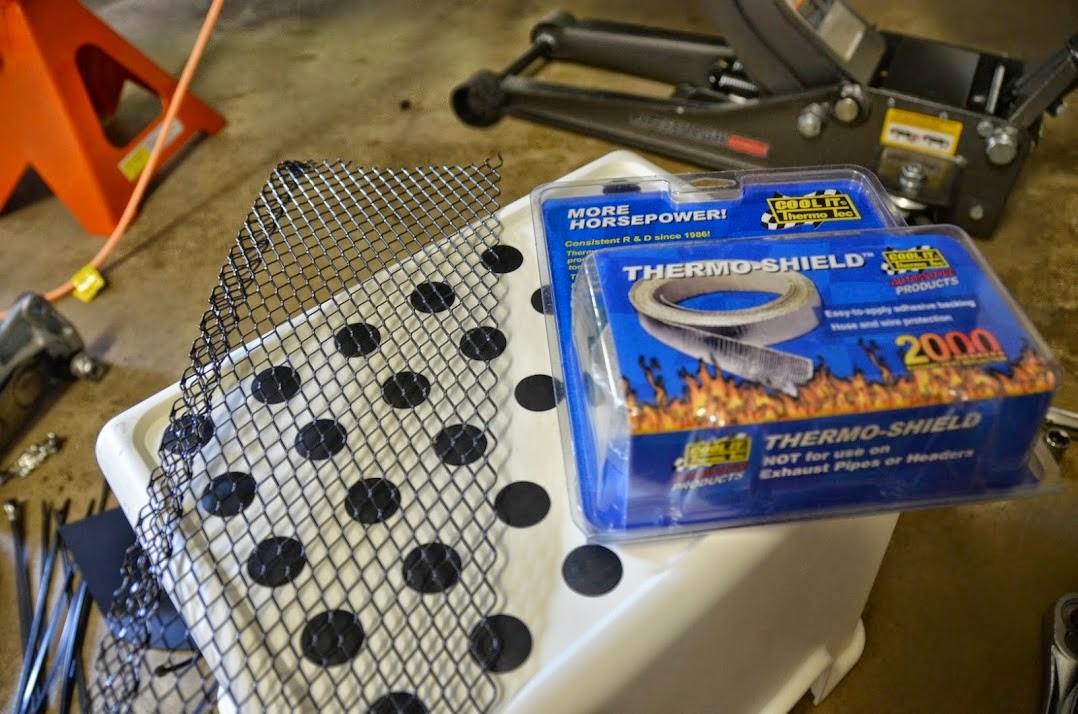    Pay attention to these tabs you will need to put the zip ties through these tabs and the holes on the side and connect the couplers from their shields so those will stay in place  you can test fit your ducting hose but don't attach your hose yet  After removing the bumper I drained the washer bottle (this step is also necessary with Kraftwerks kit install and the smaller washer bottle that comes with the KW kit still wouldn't work) 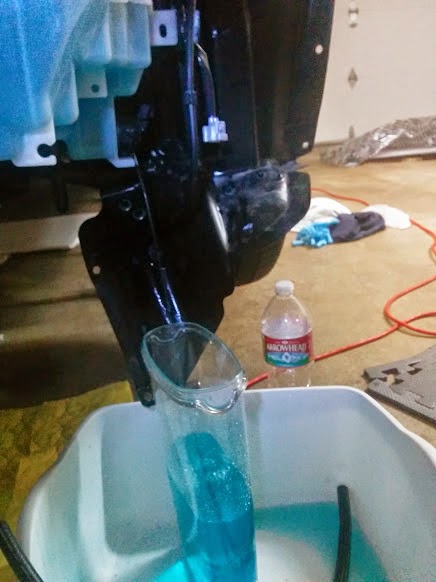 after draining the washer bottle you can remove the whole thing (washer bottle) and put back your bumper so behind the inner tire wells you can see the grills (passenger side in the picture) 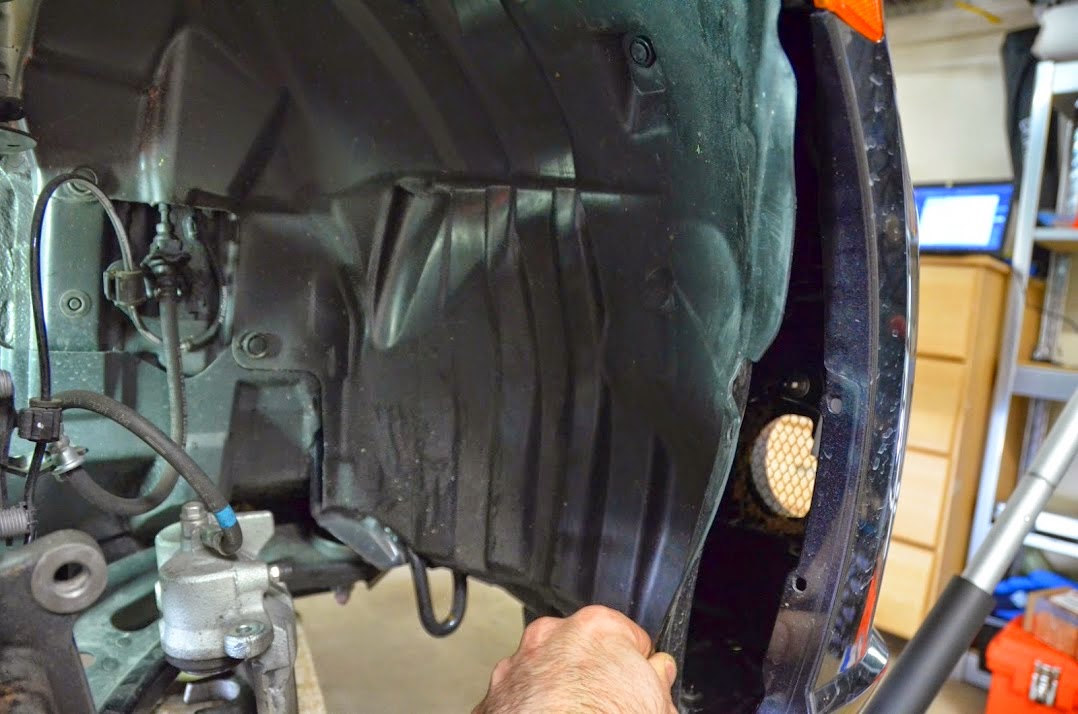 and the way it looks from the front   if you see some liquid nail residue you can either clean it or simply ignore it since they will be completely dirty and look black after a while you can now remove your front calipers, brakes and rotors you may refer to below instructions http://www.ft86club.com/forums/showthread.php?t=45713  after removing the calipers and rotors you may put the calipers on the control arm and remove the brake backing plates(those should be 3x 12 mm bolts) I didn't have electric saw and the Dremel tool wasn't strong enough so I simply used the electric drill and put some holes in the backing plate(this is the left/driver side backing plate) and connected the dots to make a hole  now you can cut the 11ft ducting hose in half and attach one half of the backing plate with 5-6 zip ties if you have metal zip ties those might be even better UPDATE: I have used Metal zip ties and left the plastic ones to see if they get melted after some hard track use and they all held up just fine but it wouldn't hurt to use the metal ones (driver side shown in the picture) since I didn't test the longevity of the regular zip ties I will check them after a few event and will probably change them with metal ones  you can now put the rotors, calipers and pads in place so we will have more room to route the ducting hose here is the correct routing of the ducting hose and more zip ties of course  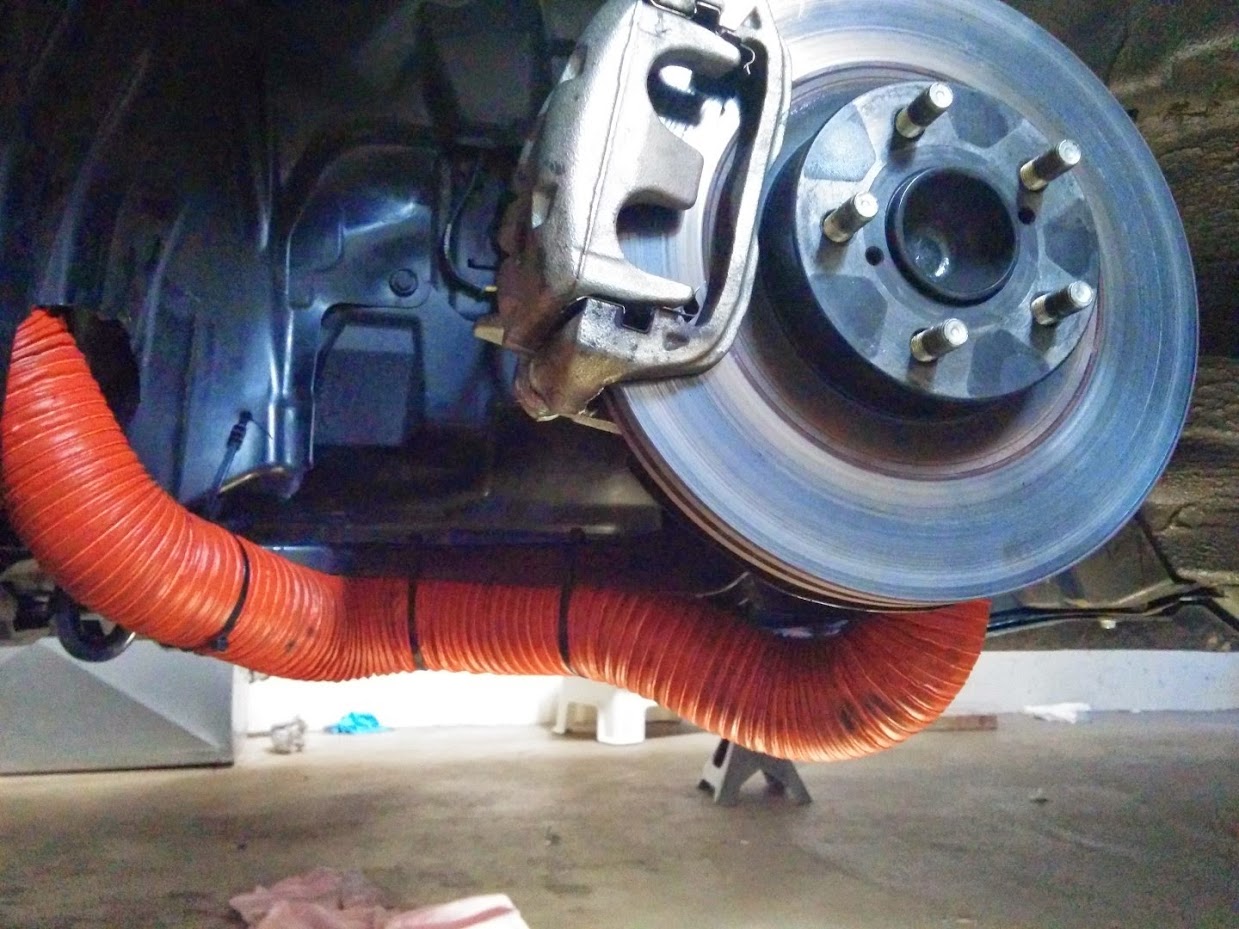 then you will cut the other end of the hose about 7.5" long so the remainder of the hose will make some tension and push it forward to the bumper and the hose will stay in place (you will do the same thing for the passenger side too) 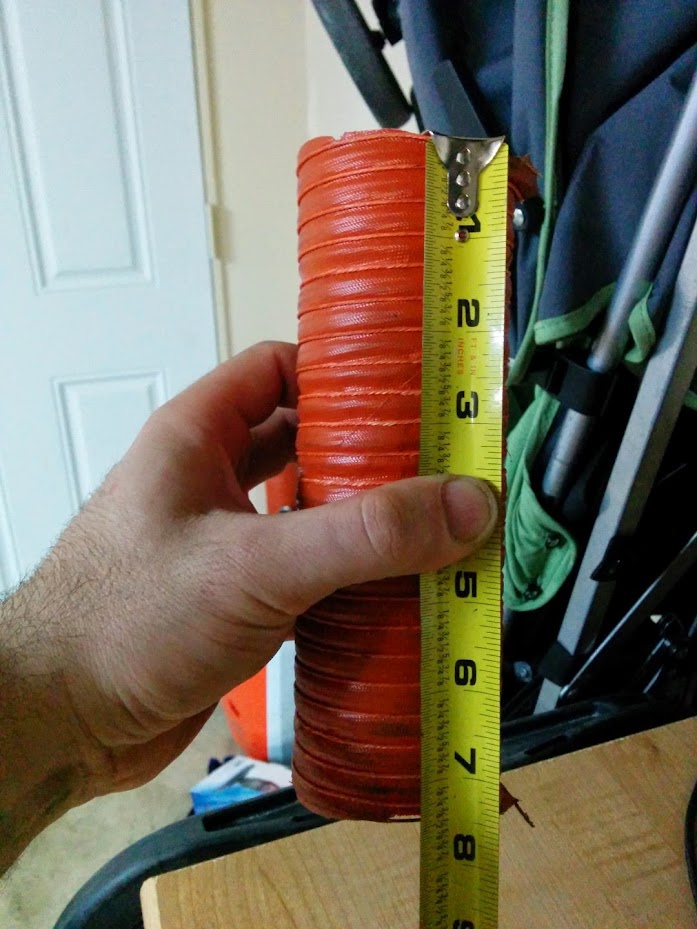 you can now cut the inner fender well and make sure you cut it close to the frame and control arm side as much as possible .. there is a metal hook (not pictured) right behind the hose you will use that to zip tie the hose before you put it through the fender well 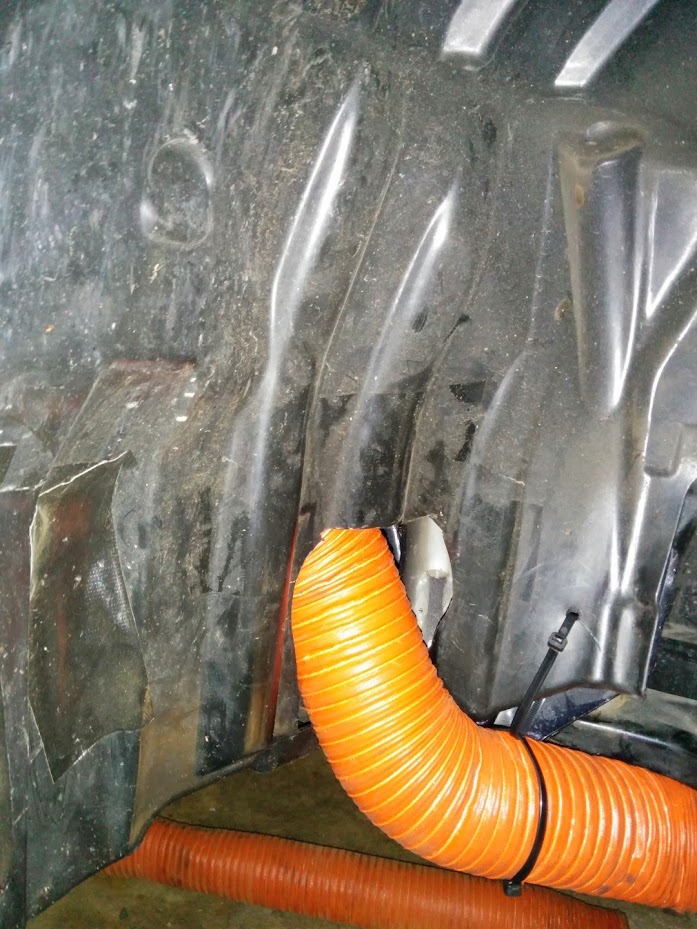   IMPORTANT: Make sure you test fit the ducting hose to see if the tires make contact with them at full lock.. I would definitely suggest you to to put the wheels when the car is on the jack stands so it would save you some time and effort Gorilla tape comes in handy to close the gaps  now you can follow the same steps for the passenger side, there you have it a cheap alternative to those expensive brake duct kits ..enjoy it
__________________
Last edited by glamcem; 07-13-2014 at 05:31 AM. |

|

|
| The Following 8 Users Say Thank You to glamcem For This Useful Post: | blackfireball5 (06-04-2014), chaoskaze (08-12-2015), DAEMANO (06-03-2014), Kristian (07-12-2014), phastafrican (06-05-2014), Ryaquinn (06-24-2014), Wayno (05-25-2016), WillRacer1jz (06-07-2014) |
|
06-03-2014, 10:15 PM
|
#2 |
|
Senior Member

Join Date: Apr 2013
Drives: DGM BRZ 6MT
Location: San Francisco, CA
Posts: 758
Thanks: 223
Thanked 359 Times in 195 Posts
Mentioned: 15 Post(s)
Tagged: 0 Thread(s)
|
Great detailed write up!

__________________
|
|
|
|
| The Following 2 Users Say Thank You to TM For This Useful Post: | blackfireball5 (06-04-2014), glamcem (06-03-2014) |
|
06-04-2014, 10:33 AM
|
#3 |
|
Senior Member
Join Date: Jun 2012
Drives: Scion FRS Firestorm
Location: Cleveland, Ohio
Posts: 538
Thanks: 459
Thanked 102 Times in 74 Posts
Mentioned: 7 Post(s)
Tagged: 0 Thread(s)
|
Wow, seriously nice job dude! Very detailed! And thanks for the shoutout!
|
|
|
|
| The Following User Says Thank You to blackfireball5 For This Useful Post: | glamcem (06-04-2014) |
|
06-05-2014, 02:52 PM
|
#4 |
|
Boosted
Join Date: Jul 2012
Drives: Sideways
Location: Atlanta Georgia USA
Posts: 2,377
Thanks: 388
Thanked 716 Times in 414 Posts
Mentioned: 25 Post(s)
Tagged: 0 Thread(s)
|
Good job man for exploring the option, but there seriously has to be a better way to DIY that doesn't look so..... DIY'ish.
__________________
Nismo 370Z 300whp -> FR-S Turbo 450whp on E85 -> Z06 Corvette 500whp
|
|
|
|
| The Following User Says Thank You to Synack For This Useful Post: | glamcem (06-05-2014) |
|
06-05-2014, 03:19 PM
|
#5 | |
|
Senior Member
Join Date: Oct 2013
Drives: 2022 BRZ Limited
Location: Orange County
Posts: 1,553
Thanks: 997
Thanked 607 Times in 404 Posts
Mentioned: 32 Post(s)
Tagged: 1 Thread(s)
|
Quote:
but FYI both APR and Touge Factory kits should require you to cut some holes and routing ( removal of the brakes, rotors and pads as well) ..so those are the absolute steps, I think the only additional step with my custom method is the modification to the OEM backing plate and washer/fog lights removal since using air inlets is not an option who's running intercooler...
__________________
Last edited by glamcem; 07-13-2014 at 05:32 AM. |
|
|
|
|
|
06-05-2014, 09:36 PM
|
#6 | |
|
Boosted
Join Date: Jul 2012
Drives: Sideways
Location: Atlanta Georgia USA
Posts: 2,377
Thanks: 388
Thanked 716 Times in 414 Posts
Mentioned: 25 Post(s)
Tagged: 0 Thread(s)
|
Quote:
__________________
Nismo 370Z 300whp -> FR-S Turbo 450whp on E85 -> Z06 Corvette 500whp
|
|
|
|
|
|
06-06-2014, 06:47 AM
|
#7 |
|
Senior Member

Join Date: Mar 2013
Drives: 2013 Raven Scion FR-S
Location: Fernandina Beach, FL
Posts: 437
Thanks: 118
Thanked 171 Times in 112 Posts
Mentioned: 13 Post(s)
Tagged: 3 Thread(s)
|
Great write up
__________________
Emmanuel Baako: NASA-Southeast Race Control & NASA Florida Race Director
 RaceCar:2013 Scion FR-S #986 NASA PTD || Tow:2011 Dodge Durango R/T  |
|
|
|
| The Following User Says Thank You to phastafrican For This Useful Post: | glamcem (06-06-2014) |
|
06-06-2014, 12:29 PM
|
#8 | |
|
Senior Member
Join Date: Oct 2013
Drives: 2022 BRZ Limited
Location: Orange County
Posts: 1,553
Thanks: 997
Thanked 607 Times in 404 Posts
Mentioned: 32 Post(s)
Tagged: 1 Thread(s)
|
Quote:
__________________
|
|
|
|
|
|
06-18-2014, 12:24 PM
|
#9 |
|
Senior Member
Join Date: Oct 2013
Drives: 2022 BRZ Limited
Location: Orange County
Posts: 1,553
Thanks: 997
Thanked 607 Times in 404 Posts
Mentioned: 32 Post(s)
Tagged: 1 Thread(s)
|
little update about my custom brake cooling duct;
this past weekend I had a chance to test my custom brake ducting (updated routing) and even I ran out of the track couple times and it still held up just fine  as well as my new FT86 front splitter..so for those who are not sure about the sturdiness of the ducting and the splitter, this might be a good news as well as my new FT86 front splitter..so for those who are not sure about the sturdiness of the ducting and the splitter, this might be a good news I have to mention that I added metal zip ties and intentionally left the plastic ones to see if they melt after some hard track use and they both held up just fine,YMMV with that said I still had some fading especially when coming close to the T3 but soon after that brakes recover I think it's due to brake cooling, I will also need to address the rubbing issues I will most likely raise the car a little bit.. here is some footage from the last event some track footage with the splitter and brake ducting [ame="http://youtu.be/2JDtUJGLag0"]http://youtu.be/2JDtUJGLag0[/ame]
__________________
|
|
|
|
| The Following User Says Thank You to glamcem For This Useful Post: | chaoskaze (08-12-2015) |
|
06-19-2014, 11:30 AM
|
#10 | |
|
Senior Member

Join Date: Sep 2012
Drives: 13 White MT FR-S
Location: Gastonia, NC
Posts: 1,841
Thanks: 976
Thanked 1,129 Times in 522 Posts
Mentioned: 41 Post(s)
Tagged: 0 Thread(s)
|
is that the cheapest option for the ducting??
__________________
 Build Thread https://www.instagram.com/mount_tele_lion/ Quote:
|
|
|
|
|
|
07-08-2014, 04:17 AM
|
#11 | |
|
Senior Member
Join Date: Oct 2013
Drives: 2022 BRZ Limited
Location: Orange County
Posts: 1,553
Thanks: 997
Thanked 607 Times in 404 Posts
Mentioned: 32 Post(s)
Tagged: 1 Thread(s)
|
Quote:
__________________
|
|
|
|
|
| The Following User Says Thank You to glamcem For This Useful Post: | ML (07-08-2014) |
|
07-12-2014, 05:08 AM
|
#12 |
|
Senior Member

Join Date: Jun 2012
Drives: ZC6, Junk of ALL sorts
Location: Ohio
Posts: 516
Thanks: 111
Thanked 288 Times in 171 Posts
Mentioned: 7 Post(s)
Tagged: 0 Thread(s)
|
Just for terminology's sake.
What you're calling the spindle is actually the "Brake/Dust Cover" or a "Backing Plate" Not being a **** here. Mad Paint skillz, I know. Thanks for sharing the progress.
__________________
# 1. Always know where your towel is.
ZC6-CBS, is home  |
|
|
|
| The Following User Says Thank You to Floggin Tires For This Useful Post: | glamcem (07-13-2014) |
|
07-13-2014, 05:34 AM
|
#13 | |
|
Senior Member
Join Date: Oct 2013
Drives: 2022 BRZ Limited
Location: Orange County
Posts: 1,553
Thanks: 997
Thanked 607 Times in 404 Posts
Mentioned: 32 Post(s)
Tagged: 1 Thread(s)
|
Quote:
Sorry for the confusion, and thanks for clarifying and yes I was referring to the brake dust cover/ backing plates.. I updated the wording accordingly
__________________
|
|
|
|
|
| The Following User Says Thank You to glamcem For This Useful Post: | Floggin Tires (07-13-2014) |
|
05-13-2018, 05:49 PM
|
#14 |
|
Senior Member
Join Date: Nov 2014
Drives: Blue BRZ
Location: Rockville, MD
Posts: 201
Thanks: 67
Thanked 25 Times in 20 Posts
Mentioned: 0 Post(s)
Tagged: 1 Thread(s)
|
with the fog light cable., do you cap it off or you can just simply disconnect it? i just thought i cannot leave the disconnected end open like that.
__________________
|
|
|
|
|
|
|
|
|
|
|
 Similar Threads
|
||||
| Thread | Thread Starter | Forum | Replies | Last Post |
| BRZ Premium custom brake ducting | ATL BRZ | Suspension | Chassis | Brakes -- Sponsored by 949 Racing | 54 | 02-17-2015 09:01 PM |
| 3rd Brake Light Delete | xxBrun0xx | Cosmetic Modification (Interior/Exterior/Lighting) | 10 | 04-19-2014 11:45 PM |
| Custom Third Brake Light Install (incl. Pics) | Skorov | AUSTRALIA | 14 | 07-27-2013 04:04 AM |
| DIY Request: 3rd brake light delete | Iddoit2er | DIY (Do-It-Yourself) Guides | 8 | 05-27-2013 06:53 PM |
| Custom Brake Ducting. | Asterisked Accolade | Wheels | Tires | Spacers | Hub -- Sponsored by The Tire Rack | 12 | 07-09-2012 08:50 PM |


 2013 Suburu BRZ
 Scion FR-S