


 08-17-2012, 12:34 AM
|
#155 |
|
♥カレー大好き !!
Join Date: Mar 2012
Drives: ♿
Location: 𝐋𝐎𝐒 𝐀𝐍𝐆𝐄𝐋𝐄𝐒
Posts: 762
Thanks: 43
Thanked 144 Times in 77 Posts
Mentioned: 2 Post(s)
Tagged: 0 Thread(s)
|
the "goop" is not like slime, it's more like chewing gum... just make sure it doesn't get on anywhere it doesn't belong :]
__________________
 |

|

|
|
08-17-2012, 10:07 AM
|
#156 |
|
Senior Member
Join Date: May 2012
Drives: 2013 Scion FR-S Raven
Location: Lake Worth Florida
Posts: 1,181
Thanks: 76
Thanked 366 Times in 252 Posts
Mentioned: 13 Post(s)
Tagged: 1 Thread(s)
|
Oven, be careful, ask a friend to help during separation and reassembly baking
|
|
|
|
|
08-17-2012, 11:19 AM
|
#157 | |
|
Senior Member

Join Date: Mar 2012
Drives: 2018 Golf R
Location: Richmond, VA
Posts: 2,807
Thanks: 5,386
Thanked 1,095 Times in 647 Posts
Mentioned: 68 Post(s)
Tagged: 7 Thread(s)
|
Quote:
__________________
Parting out HERE
|
|
|
|
|
|
08-19-2012, 02:13 PM
|
#158 |
|
NW Region Moderator
Join Date: Mar 2010
Drives: FR-S No More
Location: Portland OR
Posts: 5,156
Thanks: 1,134
Thanked 3,186 Times in 1,091 Posts
Mentioned: 300 Post(s)
Tagged: 4 Thread(s)
|
I agree with civicdrivr.... focus too much heat in one place and you will start doing damage. Heating everything evenly causes everything to expand evenly so will probably lead to less problems down the road.
__________________
|
|
|
|
| The Following 2 Users Say Thank You to DarrenDriven For This Useful Post: | civicdrivr (08-19-2012), Khyron686 (08-29-2012) |
|
08-24-2012, 05:39 PM
|
#159 | ||
|
Member
Join Date: Aug 2012
Drives: 86 pending move
Location: SoCal
Posts: 60
Thanks: 30
Thanked 14 Times in 11 Posts
Mentioned: 4 Post(s)
Tagged: 0 Thread(s)
|
Quote:
Quote:
__________________
Motorsports: Because basketball, baseball, and football only require one ball.
Last edited by Duo; 08-24-2012 at 11:20 PM. |
||
|
|
|
|
08-24-2012, 05:53 PM
|
#160 |
|
Senior Member
Join Date: May 2012
Drives: 2013 Scion FR-S Raven
Location: Lake Worth Florida
Posts: 1,181
Thanks: 76
Thanked 366 Times in 252 Posts
Mentioned: 13 Post(s)
Tagged: 1 Thread(s)
|
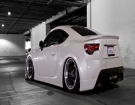
Always amazed by the do it yourself talent displayed on this forum, but on a black car I still prefer the chrome with my retrofitsource kit
|
|
|
|
|
08-24-2012, 06:50 PM
|
#161 |
|
Senior Member
Join Date: Jun 2012
Drives: Blue BRZ
Location: Canada
Posts: 506
Thanks: 108
Thanked 127 Times in 75 Posts
Mentioned: 0 Post(s)
Tagged: 0 Thread(s)
|
I haven't read this entire thread yet, but has anyone mentioned the hot water method? That what I did when I did my projector retrofit on my Echo and it worked great.... boil water, pour into a container that is large enough to immerse at least part of your headlight (I used the utility sink in my basement) and keep it in the water for a few minutes until warm.... start to pry the housing apart.... when it gets cool, just dip it again..... you don't have to submerge the entire light... the water just needs to be a couple of inches deep... just enough to soften the sealant.
|
|
|
|
|
08-25-2012, 12:41 PM
|
#162 |
|
NW Region Moderator
Join Date: Mar 2010
Drives: FR-S No More
Location: Portland OR
Posts: 5,156
Thanks: 1,134
Thanked 3,186 Times in 1,091 Posts
Mentioned: 300 Post(s)
Tagged: 4 Thread(s)
|
That seems like another reasonable way to split the lights, but what about softening the sealant when you want to reattach?
__________________
|
|
|
|
|
08-25-2012, 03:28 PM
|
#163 | |
|
Senior Member
Join Date: Jun 2012
Drives: Blue BRZ
Location: Canada
Posts: 506
Thanks: 108
Thanked 127 Times in 75 Posts
Mentioned: 0 Post(s)
Tagged: 0 Thread(s)
|
Quote:
|
|
|
|
|
|
08-27-2012, 03:43 PM
|
#164 | |
|
Member
Join Date: Jan 2012
Drives: 2012 Tacoma TRD Sport
Location: Costa Mesa, CA
Posts: 32
Thanks: 0
Thanked 4 Times in 3 Posts
Mentioned: 0 Post(s)
Tagged: 0 Thread(s)
|
From my experience, you should still reheat the new butyl tape @ 265F for 7 minutes.
Quote:
|
|
|
|
|
|
08-27-2012, 04:31 PM
|
#165 | |
|
Senior Member
Join Date: Jun 2012
Drives: Blue BRZ
Location: Canada
Posts: 506
Thanks: 108
Thanked 127 Times in 75 Posts
Mentioned: 0 Post(s)
Tagged: 0 Thread(s)
|
Quote:
|
|
|
|
|
|
08-29-2012, 02:18 PM
|
#166 | |
|
Member
Join Date: Jun 2012
Drives: 2013 Asphalt FR-S
Location: Canada
Posts: 42
Thanks: 11
Thanked 9 Times in 6 Posts
Mentioned: 1 Post(s)
Tagged: 0 Thread(s)
|
Quote:
|
|
|
|
|
|
08-29-2012, 02:29 PM
|
#167 |
|
NW Region Moderator
Join Date: Mar 2010
Drives: FR-S No More
Location: Portland OR
Posts: 5,156
Thanks: 1,134
Thanked 3,186 Times in 1,091 Posts
Mentioned: 300 Post(s)
Tagged: 4 Thread(s)
|
Ummm... it's a brand new high-end oven in a condo, so probably convection... but it doesn't really matter, I let the oven preheat completely and it wasn't in there for too long. Convection just moves the air around, right? So it wouldn't get it hotter, just get it to the proper temp a little faster.
__________________
|
|
|
|
|
08-29-2012, 07:33 PM
|
#168 |
|
Member
Join Date: Jun 2012
Drives: 2013 Asphalt FR-S
Location: Canada
Posts: 42
Thanks: 11
Thanked 9 Times in 6 Posts
Mentioned: 1 Post(s)
Tagged: 0 Thread(s)
|
I did convection, bake is just heat from bottom convection is from top
Sent from my SGH-I727R using Tapatalk 2 |
|
|
|
|
|
|
|
 |
|
|
 Similar Threads
|
||||
| Thread | Thread Starter | Forum | Replies | Last Post |
| HID Headlight Upgrade KIT - 1st MOD completed | SpecPer | Exterior Parts - The Rest | 76 | 08-03-2012 10:13 AM |
| Is Anyone Else Tired of SOA Information Blackout | geb2391 | BRZ First-Gen (2012+) -- General Topics | 23 | 04-21-2012 09:37 PM |
| Headlight Swap Question | nogaroblues4 | Scion FR-S / Toyota 86 GT86 General Forum | 9 | 02-07-2012 02:45 AM |
| headlight condensation | MRZ415 | Off-Topic Lounge [WARNING: NO POLITICS] | 1 | 01-23-2012 02:24 AM |
| TRS headlight mod | RRnold | Other Vehicles & General Automotive Discussions | 0 | 12-24-2011 04:20 PM |


