


|
||||||
| DIY (Do-It-Yourself) Guides For all DIYs. |
 |
|
|
Thread Tools | Search this Thread |
 10-24-2012, 08:46 PM
|
#15 |
|
Senior Member
Join Date: Feb 2010
Drives: FR-S, Exige S, Miata
Location: Basking Ridge NJ
Posts: 798
Thanks: 327
Thanked 131 Times in 80 Posts
Mentioned: 2 Post(s)
Tagged: 0 Thread(s)
|
Thanks F1point4. Love your DIY series. Whats next?
__________________
'13 Scion FR-S (Whiteout)
'07 Lotus Exige S (Aspen White) Touring, Traction, Starshield '95 Miata (Montego Blue) |

|

|
|
10-24-2012, 10:07 PM
|
#16 | |
|
Photo Specialist

Join Date: Feb 2012
Drives: 2013 Toyota 86 DGM 6MT
Location: Texas
Posts: 1,152
Thanks: 587
Thanked 1,802 Times in 420 Posts
Mentioned: 94 Post(s)
Tagged: 0 Thread(s)
|
Quote:
__________________
|
|
|
|
|
|
10-25-2012, 05:43 PM
|
#17 |
|
Member
Join Date: Aug 2012
Drives: .
Location: Bay Area, CA
Posts: 30
Thanks: 0
Thanked 8 Times in 7 Posts
Mentioned: 0 Post(s)
Tagged: 0 Thread(s)
|
Great write up!
All I can say to people who do there own brake work: Buy the flare wrench. You will be glad you did when it saves your brake lines from stripped "bolt" heads etc. It will be one of the better $10 to $20 you will spend! :happy0180: |
|
|
|
| The Following User Says Thank You to themadpants For This Useful Post: | F1point4 (10-25-2012) |
|
10-25-2012, 05:58 PM
|
#18 | |
|
Photo Specialist
Join Date: Feb 2012
Drives: 2013 Toyota 86 DGM 6MT
Location: Texas
Posts: 1,152
Thanks: 587
Thanked 1,802 Times in 420 Posts
Mentioned: 94 Post(s)
Tagged: 0 Thread(s)
|
Quote:
__________________
|
|
|
|
|
|
10-26-2012, 12:43 PM
|
#19 | |
|
sleep, drive, eat, repeat

Join Date: Mar 2012
Drives: '13 BRZ, '12 Outback
Location: Sack of Potatoes
Posts: 4,431
Thanks: 2,630
Thanked 3,796 Times in 1,981 Posts
Mentioned: 188 Post(s)
Tagged: 4 Thread(s)
|
Very nice write-up! I've just purchased my speed bleeders (used to have them on my bike) and they just make it so much easier, specially for cars. I'm planning on upgrading the brake fluid, and maybe better pads and swapping in SS brake lines, for my first HPDE.
Quote:
 One tip I have when doing a flush is using a turkey baster to pull out most of the old fluid from the master cylinder, then refilling it with new (just a general tip, not sure if it will work for our cars, since I'm yet to look in there). You can then just keep an eye for the color change as you're bleeding, refilling as needed. As you've stated though, this might be a little difficult when doing a flush with a new car (newish fluid). Also, may I request adding brake pad replacement and bedding? That would just make this Brake DIY so complete! |
|
|
|
|
| The Following User Says Thank You to BigFatFlip For This Useful Post: | BAOVAN (12-27-2016) |
|
10-26-2012, 12:50 PM
|
#20 |
|
Senior Member

Join Date: Jun 2012
Drives: 2013 BRZ, 2002 WRX
Location: Houston, TX
Posts: 710
Thanks: 978
Thanked 245 Times in 158 Posts
Mentioned: 33 Post(s)
Tagged: 0 Thread(s)
|
I like to use ATE Super Blue when flushing the brake system because it's easy to see the new fluid (it's blue).
They also sell an amber variety for when you're going to flush the blue stuff. Just look for the color change.
__________________
|
|
|
|
| The Following User Says Thank You to cobrabyte For This Useful Post: | amram (03-21-2014) |
|
10-26-2012, 01:58 PM
|
#21 |
|
Senior Member
Join Date: Apr 2012
Drives: FR-S
Location: California
Posts: 1,956
Thanks: 294
Thanked 673 Times in 390 Posts
Mentioned: 11 Post(s)
Tagged: 2 Thread(s)
|
How did you properly torque the 10mm hardline nut?
Also, I noticed I overtorqued a couple banjo bolts. Should I just leave it as is or retighten them even tho they use crush washers? |
|
|
|
|
10-26-2012, 02:14 PM
|
#22 | |
|
Photo Specialist
Join Date: Feb 2012
Drives: 2013 Toyota 86 DGM 6MT
Location: Texas
Posts: 1,152
Thanks: 587
Thanked 1,802 Times in 420 Posts
Mentioned: 94 Post(s)
Tagged: 0 Thread(s)
|
Quote:
The service manual says 11 ft lbs so that's barely more than hand tight! Id leave the banjo as is.
__________________
|
|
|
|
|
|
10-26-2012, 02:17 PM
|
#23 | |
|
Photo Specialist
Join Date: Feb 2012
Drives: 2013 Toyota 86 DGM 6MT
Location: Texas
Posts: 1,152
Thanks: 587
Thanked 1,802 Times in 420 Posts
Mentioned: 94 Post(s)
Tagged: 0 Thread(s)
|
Quote:
Ill gladly do pad+rotor change DIY when someone on our team wants to do their pads....or when someone is generous to send me new pads *wink wink
__________________
|
|
|
|
|
|
10-26-2012, 05:40 PM
|
#24 |
|
Senior Member

Join Date: Aug 2012
Drives: FR-S
Location: IL
Posts: 2,857
Thanks: 519
Thanked 2,997 Times in 1,095 Posts
Mentioned: 159 Post(s)
Tagged: 1 Thread(s)
|
Great write up on this
|
|
|
|
|
10-26-2012, 08:49 PM
|
#25 |
|
Boosted

Join Date: Jul 2012
Drives: Sideways
Location: Atlanta Georgia USA
Posts: 2,377
Thanks: 388
Thanked 716 Times in 414 Posts
Mentioned: 25 Post(s)
Tagged: 0 Thread(s)
|
I love how far into the twins we are here in Texas. Doing literally everything to our cars. Houston especially.
__________________
Nismo 370Z 300whp -> FR-S Turbo 450whp on E85 -> Z06 Corvette 500whp
|
|
|
|
|
10-27-2012, 12:22 AM
|
#26 |
|
Photo Specialist
Join Date: Feb 2012
Drives: 2013 Toyota 86 DGM 6MT
Location: Texas
Posts: 1,152
Thanks: 587
Thanked 1,802 Times in 420 Posts
Mentioned: 94 Post(s)
Tagged: 0 Thread(s)
|
Just did pads, rotors, stainless lines, and a blue fluid flush on a R56 Mini Cooper S. my goodness ze Germans make things complicated. For those who care:
Main differences + Torx T50 to hold on the rotors - who has that socket. Ours just fall off + Soft Lines screw into the caliper and don't have a free turning connection. You have to twist the entire line to undo it. Thank goodness for the German's banjo bolt + Im mad at the stainless lines he bought. It wasn't a vendor I ever heard of...the rubber grommets that hold the line to the suspension weren't aligned and required the force of two titans to slide to the correct position. + blue Bremsflüssigkeit is awesome. Easy to see when new fluid has reached the caliper! In my pregame, I notice there weren't many complete DIYs. I won't let this happen to our community
__________________
|
|
|
|
| The Following User Says Thank You to F1point4 For This Useful Post: | amram (03-21-2014) |
|
10-28-2012, 09:41 AM
|
#28 | |
|
Photo Specialist
Join Date: Feb 2012
Drives: 2013 Toyota 86 DGM 6MT
Location: Texas
Posts: 1,152
Thanks: 587
Thanked 1,802 Times in 420 Posts
Mentioned: 94 Post(s)
Tagged: 0 Thread(s)
|
Quote:
Please please, find torque values for the work you do to your cars. The owner did this to his Mini yesterday 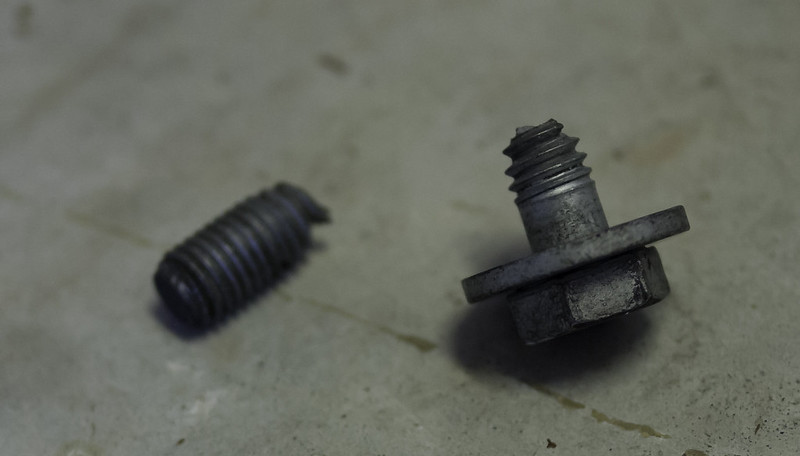 20121027-ChantaR56BrakeSetback-01 by VictorN07, on Flickr We didn't find good documentation for the rear brakes. Since the procedure was similar as the front, we assumed the torque values are the same as the front brakes. 81 ft lb was too much for the rear caliper bracket bolt. We found a replacement at Lowes to hold him over until the Mini bolt ($12) can be ordered in next Tuesday  20121027-ChantaR56BrakeSetback-02 by VictorN07, on Flickr Thank goodness it didn't break inside the hub. It snapped after we removed it.
__________________
|
|
|
|
|
|
|
|
|
|
| Tags |
| brakes, fluid, motul, speed bleeders, stoptech |
|
|
 Similar Threads
|
||||
| Thread | Thread Starter | Forum | Replies | Last Post |
| BC Racing Coilovers with Free Stainless Steel Brake Lines!!! | Dustin@Dynosty | Brakes, Suspension, Chassis | 21 | 01-08-2013 10:34 AM |
| Dynosty Stainless Steel Brake Lines $99 Shipped | Dustin@Dynosty | Brakes, Suspension, Chassis | 9 | 12-29-2012 09:56 AM |
| Stoptech stainless brake lines + Motul RBF600 fluid combo | No Limit Motorsport | Brakes, Suspension, Chassis | 9 | 10-31-2012 07:36 PM |
| Stoptech Front Stainless Steel Brake Lines | Pekingduck | Brakes, Suspension, Chassis | 1 | 10-21-2012 10:29 PM |
| Stainless steel brake lines | taosracer | Suspension | Chassis | Brakes -- Sponsored by 949 Racing | 15 | 09-20-2012 04:09 AM |


 Salvatore