|
||||||
| DIY (Do-It-Yourself) Guides For all DIYs. |
 |
|
|
Thread Tools | Search this Thread |
 05-08-2013, 05:21 PM
|
#1 |

Join Date: Apr 2012
Drives: 2014 Widebody Cosworth FR-S
Location: Salt Lake City, Utah
Posts: 4,542
Thanks: 205
Thanked 1,198 Times in 554 Posts
Mentioned: 38 Post(s)
Tagged: 0 Thread(s)
|
Prova Steering Wheel Install
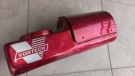
 So it seems I may be on a Prova kick recently. But this is one of those items that I literally could not wait to install, so you may have an idea of how excited I was when I saw this box on my desk.  First things first, we have to make sure the item is in good condition and has everything included.  Everything looked great, well better than great, it looks amazing!  When messing with Airbags, I always prefer to disconnect the Battery, but others just remove the horn relays to prevent honking your horn through the install. Use a 10mm combination wrench to disconnect the negative battery terminal.  Or you can remove the (2) 7.5AMP horn fuses located in the engine bay's fuse box. Now we can move onto removing the OEM wheel. On the backside of the wheel you will see 3 small holes in the plastic surround. Shine a light in there and you should see a small metal rod in each hole. You are going to push each rod in towards the center of the wheel, in parallel with the wheel. That side of the airbag should pop out a bit without any problem. Repeat this process on the other 2 metal rods.  You can see how each one is oriented here and the direction you need to push the rods.   With the airbag out, you will remove the 2 harness clips on the backside of the airbag.  Use a small flat head screwdriver to lift the yellow tab so you can remove the plug.  The plug should come right out with a gentle tug. Dont forget the ground wire for the horn.  Air bag is out!  Now we can remove the lower plastic trim on the wheel, there will be 2 screws holding these to the frame of the wheel.  With the screws removed, give it a tub to release it from the wheel.  Now remove the harness going to the Cruise Control stalk, its a bit tricky to get to, so I used a small flat head to help with the removal.  The center nut is 17mm and is on tight! Have a buddy hold the wheel, or use the internal wheel lock to keep the wheel from spinning when removing this. Note: DO NOT remove the nut all the way! That way when you have to summon your super human strength to remove the wheel from the steering shaft, you wont smash it into your face. I like to center the wheel before sliding it off the splines, which should make for a hassle free install with the steering wheel alignment.  Carefully slide the harnesses through the small opening at the top of the wheel as you are removing the wheel from the steering shaft. Pay close attention that the clock spring remains in the upward position(or whatever position it was in when the steering wheel was removed)  We can now start the disassembly of the steering wheel accessories. I started with the rubber damper/spring located at the top of the wheel. It comes off easily with 2 screws.  Next I removed the Cruise Control Stalk, which is also held in by 2 screws. I also popped off the back plastic cover.  Make sure to transfer over the metal rods/clips that hold in the air bag. I found it best to do one at a time with both steering wheels next to each other. This way you can make sure they go in the same way they came off the old wheel.  Now compare the stock wheel to the new wheel and be proud you are half way done!  I snapped on the rear black plastic cover first, and then proceeded to bolt on the rubber damper/horn spring, but you could do this in any order.  Now slide the Cruise Control Stalk into place and secure it with the 2 screws.  The new Steering Wheel is ready to go back in the car!  Carefully slide the harnesses through the back of the wheel and orientate the wheel in the exact position it came off.  Tighten center nut, and check alignment of the steering wheel. Plug the cruise control harness back into the stalk.  Pop the lower plastic trim back onto the wheel and secure it with the 2 screws.  Plug in the airbag harness. Remember, Orange on Orange, Black on Black. Push the yellow clips down to secure them to the airbag.  Hook up the ground wire to the horn.  Push air bag assembly back into the steering wheel. It should pop right into place on all 3 corners. If you notice one does not seem to secure itself down, remove the airbag again and check to make sure the Metal rods/clips are fully seated and try again. It should go in without issue.  Enjoy your new Steering Wheel!   Thanks, Rick |

|

|
| The Following 30 Users Say Thank You to RallySport Direct For This Useful Post: | Abflug (05-10-2013), AdamBomb518 (04-01-2014), Anthonytpt (05-08-2013), B L U E S L A T E (12-06-2013), bhmax (11-15-2019), charged86 (05-11-2013), chas3wba0 (07-01-2014), driggity (03-02-2017), Hotchkis (08-20-2013), humanshield (07-02-2013), JEFFSTYLE (06-12-2019), JPxM0Dz (10-07-2015), kanundrum (10-18-2013), korhun (01-06-2020), mid_life_crisis (05-19-2014), mixtape (05-10-2016), normancw (05-10-2013), omegared19 (05-18-2014), pcuerpo (12-21-2014), schtebie (05-08-2013), shiumai (05-12-2013), ShoNUFF (08-21-2013), SirBrass (05-21-2014), SkAsphalt (09-04-2013), Slartibartfast (11-13-2013), SoCal_86 (05-12-2013), stevo_12v (10-15-2013), stockysnail (05-14-2014), UF Key Master (04-01-2014), zoomzoomers (05-08-2013) |
|
05-08-2013, 05:31 PM
|
#2 |
|
Senior Member

Join Date: May 2012
Drives: 2013 Subaru BRZ Limited SWP
Location: Central NJ
Posts: 369
Thanks: 51
Thanked 221 Times in 118 Posts
Mentioned: 4 Post(s)
Tagged: 0 Thread(s)
|
WOW
|
|
|
|
|
05-08-2013, 05:53 PM
|
#4 | ||
|
Join Date: Apr 2012
Drives: 2014 Widebody Cosworth FR-S
Location: Salt Lake City, Utah
Posts: 4,542
Thanks: 205
Thanked 1,198 Times in 554 Posts
Mentioned: 38 Post(s)
Tagged: 0 Thread(s)
|
Quote:
Quote:
 Thanks, Rick |
||
|
|
|
|
05-08-2013, 06:48 PM
|
#5 |
|
Superleggera
Join Date: Jan 2013
Drives: 2016 Mazda MX-5
Location: San Francisco, CA
Posts: 191
Thanks: 72
Thanked 68 Times in 48 Posts
Mentioned: 0 Post(s)
Tagged: 0 Thread(s)
|
looking good!
|
|
|
|
|
05-08-2013, 07:12 PM
|
#6 |
|
Senior Member
Join Date: Apr 2013
Drives: FR-S
Location: Dublin, CA
Posts: 177
Thanks: 64
Thanked 41 Times in 31 Posts
Mentioned: 8 Post(s)
Tagged: 0 Thread(s)
|
Wow! Thanks for the DIY.
Sent from my iPhone using Tapatalk |
|
|
|
|
05-10-2013, 04:13 AM
|
#7 |
|
Senior Member
Join Date: Apr 2013
Drives: 2001 ZX2, WRBP BRZ (soon hopefully)
Location: Port Arthur Tx
Posts: 182
Thanks: 111
Thanked 23 Times in 23 Posts
Mentioned: 0 Post(s)
Tagged: 0 Thread(s)
|
@rally sport direct do you think that un-used connector by the rest of the plugs might be for Steering wheel audio controls?
|
|
|
|
|
05-10-2013, 06:22 PM
|
#8 | |||
|
Join Date: Apr 2012
Drives: 2014 Widebody Cosworth FR-S
Location: Salt Lake City, Utah
Posts: 4,542
Thanks: 205
Thanked 1,198 Times in 554 Posts
Mentioned: 38 Post(s)
Tagged: 0 Thread(s)
|
Quote:
Quote:
Quote:
I was actually thinking that exact same thing as the STi has the audio controls run through the same spot. I wish I knew the answer to this though! Thanks, Rick |
|||
|
|
|
|
05-11-2013, 11:39 AM
|
#9 |
|
Senior Member
Join Date: Mar 2013
Drives: whiteout gt86 2015 IS350fsport
Location: northern kentucky. cincy
Posts: 1,931
Thanks: 2,154
Thanked 697 Times in 437 Posts
Mentioned: 42 Post(s)
Tagged: 0 Thread(s)
|
That is bad ass
What is the retail on one of those More than you can afford pal. Ferrari... Jk How much is the steering wheel
__________________
INSTAGRAM @Rcf_700 www.youtube.com/boostindub
|
|
|
|
|
05-11-2013, 01:35 PM
|
#10 |
|
Member
Join Date: Sep 2012
Drives: FR-S Asphalt M/T
Location: Tacoma WA
Posts: 93
Thanks: 25
Thanked 28 Times in 10 Posts
Mentioned: 4 Post(s)
Tagged: 0 Thread(s)
|
^ Link is posted at the end of OP
__________________
Asphalt FR-S M/T Airaid intake/5Axis wing
|
|
|
|
| The Following User Says Thank You to Mickeyt86 For This Useful Post: | RallySport Direct (05-13-2013) |
|
05-11-2013, 04:40 PM
|
#11 | |
|
Glorious BRZ Master Race

Join Date: Apr 2011
Drives: Subaru Libird
Location: Race Wars
Posts: 3,645
Thanks: 1,050
Thanked 2,718 Times in 1,079 Posts
Mentioned: 110 Post(s)
Tagged: 0 Thread(s)
|
Quote:
-- Edit: Figured out how to lock the wheel from the manual. Car needs to be switched off, door needs to be opened then closed, then wheel has to be nudged either left or right to activate the lock. I'd have to start with the wheel turned a hair to the right off center before I turn it a hair left to lock it to center. Of course, all this has to be done before disconnecting the battery. As far as keying to the same teeth on the spline gear, I hope there's a demarcation on the spline gear indicating the top center tooth. Then I can mark a line for that tooth on the stock wheel and copy that mark to the new steering wheel. I can also mark the plastics attached to the steering wheel against marks I make on the static steering column just before I pull the steering wheel. I just line all the markings back up when I slide on the new wheel. Figuring out how to mod the steering wheel without messing anything up has been plaguing me but your pics cleared things up a bit for me. Seems straightforward now, thanks!
__________________
Last edited by switchlanez; 05-12-2013 at 01:14 AM. |
|
|
|
|
| The Following User Says Thank You to switchlanez For This Useful Post: | RallySport Direct (05-13-2013) |
|
05-12-2013, 10:27 AM
|
#12 |
|
Senior Member
Join Date: Jul 2012
Drives: Sonic Blue 86GT Manual
Location: Victoria
Posts: 376
Thanks: 51
Thanked 122 Times in 61 Posts
Mentioned: 1 Post(s)
Tagged: 0 Thread(s)
|
One stunning steering wheel!
|
|
|
|
|
05-13-2013, 09:08 AM
|
#14 | |
|
Senior Member
Join Date: Apr 2013
Drives: 2001 ZX2, WRBP BRZ (soon hopefully)
Location: Port Arthur Tx
Posts: 182
Thanks: 111
Thanked 23 Times in 23 Posts
Mentioned: 0 Post(s)
Tagged: 0 Thread(s)
|
Quote:
 Look what i found Rick! The general consensus is that americans didn't want SC... thats fud as we are supposedly lazy lol... Now i know im gonna need a new wheel if the 2014 doesn't come with wheel controls. |
|
|
|
|
|
|
|
|
|
|
|
 Similar Threads
|
||||
| Thread | Thread Starter | Forum | Replies | Last Post |
| WTB: Stock steering wheel (wheel not airbag) | mobybrz | Interior Parts (Incl. Lighting) | 2 | 09-11-2014 02:23 PM |
| JDM steering wheel off center after install | iketiak | Cosmetic Modification (Interior/Exterior/Lighting) | 4 | 06-25-2013 05:16 PM |
| Steering Wheel Help | switchlanez | Cosmetic Modification (Interior/Exterior/Lighting) | 12 | 03-22-2013 09:32 PM |
| Different Steering Wheel?- NOT? | BRZfan | Cosmetic Modification (Interior/Exterior/Lighting) | 10 | 03-07-2013 09:01 PM |
| That steering wheel | poormans_LFA | Scion FR-S / Toyota 86 GT86 General Forum | 26 | 12-04-2011 12:16 AM |


 Maddy
Maddy