


 08-22-2022, 02:49 PM
|
#225 |
|
Senior Member
Join Date: May 2021
Drives: GR86
Location: Kansas
Posts: 323
Thanks: 168
Thanked 249 Times in 139 Posts
Mentioned: 1 Post(s)
Tagged: 0 Thread(s)
|
Just for fun - this is printed in PLA (so that I could get shiny finishes and colors without painting) which means it would get soft if left in the car outside in full sun.
For some reason the camera actually picks up a lot of imperfections you can't really see with the naked eye, so it looks better in person than in pictures. |

|

|
|
08-22-2022, 08:58 PM
|
#226 |
|
Senior Member
Join Date: May 2021
Drives: GR86
Location: Kansas
Posts: 323
Thanks: 168
Thanked 249 Times in 139 Posts
Mentioned: 1 Post(s)
Tagged: 0 Thread(s)
|
Oh, I should mention that just because I could, I made the rings as separate parts.
The piston from the top compression ring up is a "cap" that fits over a narrower section where the rings are, and each ring is separated from the one under it by a "spacer" ring that matches the OD of the piston so it looks like there are grooves the rings fit into. The piston body itself is hollow with baffles on the inside so that I could fill the entire thing with plaster and stainless steel shot to make it heavy (267g). The result is that you can actually turn the rings with a bit of resistance, the way the rings on a piston can be rotated around it. Nice little bonus effect from me just wanting to have piston rings and print without supports. |
|
|
|
| The Following 2 Users Say Thank You to Spektyr For This Useful Post: | bcj (08-23-2022), soundman98 (08-22-2022) |
|
08-23-2022, 07:29 AM
|
#227 |
|
JHerbert Racing

Join Date: Feb 2013
Drives: 2013 Scion FRS
Location: Syracuse NY
Posts: 1,425
Thanks: 769
Thanked 1,186 Times in 593 Posts
Mentioned: 20 Post(s)
Tagged: 3 Thread(s)
|
Since we are talking shift knobs. I made one for my little brothers Genesis Coupe a while back. It incorporates two coupling nuts on both sides of threaded rod. One of them threads onto the shifter shaft and the other is just to add some weight. Printed in two pieces out of PA6-CF. It has been in use for 6 months with no issues.
   
__________________
|
|
|
|
| The Following User Says Thank You to Takumi788 For This Useful Post: | bcj (08-23-2022) |
|
08-23-2022, 03:42 PM
|
#228 |
|
Senior Member
Join Date: May 2021
Drives: GR86
Location: Kansas
Posts: 323
Thanks: 168
Thanked 249 Times in 139 Posts
Mentioned: 1 Post(s)
Tagged: 0 Thread(s)
|
Looks nice. I was thinking of using an embedded nut in mine to screw into the shaft but I went with 3D printed plastic threads instead.
It works really well either way, but the reason I decided to go with the plastic instead was for a little extra leeway on the "tight" side. The knob starts to get snug enough to use with about 100-180 degrees of tightening left available, so you can get it oriented the way you want and have it "tight enough". With metal threads it's less adjustable. EDIT: obviously that matters if your knob has a "front" that needs to face a certain way. Last edited by Spektyr; 08-23-2022 at 04:39 PM. |
|
|
|
|
08-30-2022, 02:12 PM
|
#229 | |
|
Senior Member
Join Date: May 2021
Drives: GR86
Location: Kansas
Posts: 323
Thanks: 168
Thanked 249 Times in 139 Posts
Mentioned: 1 Post(s)
Tagged: 0 Thread(s)
|
Quote:
I bought nyloc nuts. The nylon insert in them would make it easy to get the knob on there snugly, where it will still turn but not without decent force - no worrying about trying to get the threads turned in the model so that the knob gets tight in the correct orientation. |
|
|
|
|
| The Following User Says Thank You to Spektyr For This Useful Post: | bcj (08-30-2022) |
|
09-01-2022, 04:37 AM
|
#230 |
|
Junior Member
Join Date: Jun 2022
Drives: Toyota 86
Location: Adelaide, Australia
Posts: 2
Thanks: 0
Thanked 3 Times in 1 Post
Mentioned: 0 Post(s)
Tagged: 0 Thread(s)
|
Tried to use the search but mostly came away with phone brackets, has anyone 3D printed a headrest mount for a GoPro?
|
|
|
|
|
09-01-2022, 09:27 AM
|
#231 | |
|
Senior Member
Join Date: May 2021
Drives: GR86
Location: Kansas
Posts: 323
Thanks: 168
Thanked 249 Times in 139 Posts
Mentioned: 1 Post(s)
Tagged: 0 Thread(s)
|
Quote:
|
|
|
|
|
|
09-01-2022, 09:29 AM
|
#232 |
|
Senior Member
Join Date: May 2021
Drives: GR86
Location: Kansas
Posts: 323
Thanks: 168
Thanked 249 Times in 139 Posts
Mentioned: 1 Post(s)
Tagged: 0 Thread(s)
|
Decided to go a bit Mad Max...
This is still PLA (so not good for hot car temps) but this would be easy to print in PETG or something that can handle the heat. |
|
|
|
| The Following User Says Thank You to Spektyr For This Useful Post: | bcj (09-01-2022) |
|
09-05-2022, 05:29 PM
|
#233 | |
|
Senior Member

Join Date: Dec 2018
Drives: 2019 Toyota 86 TRD SE
Location: Honolulu
Posts: 235
Thanks: 160
Thanked 86 Times in 71 Posts
Mentioned: 1 Post(s)
Tagged: 0 Thread(s)
|
Quote:
I actually have a set from the seller on Etsy. I ordered it glossy from him and I think he put the side markers in the shipping bag before the clear coat fully dried. So when I got it it had all the bubble wrap markings in the clear coat. I was working with the guy to send me a new set and he basically ghosted me afterwards. So if anyone wants to use these and make a file and share it for everyone, Ill gladly send these to you for measurements.  Sent from my iPhone using Tapatalk |
|
|
|
|
|
09-05-2022, 10:20 PM
|
#234 | |
|
Senior Member

Join Date: Apr 2019
Drives: 86 GT
Location: Malaysia
Posts: 358
Thanks: 218
Thanked 205 Times in 105 Posts
Mentioned: 2 Post(s)
Tagged: 0 Thread(s)
|
Quote:
I stick it on the rear windscreen for the most solid footage, but I'm also looking for a better solution that checks all the boxes.
__________________
DIY stuff at Compelica Works
|
|
|
|
|
|
09-06-2022, 01:01 PM
|
#235 | |
|
Senior Member
Join Date: May 2021
Drives: GR86
Location: Kansas
Posts: 323
Thanks: 168
Thanked 249 Times in 139 Posts
Mentioned: 1 Post(s)
Tagged: 0 Thread(s)
|
Quote:
|
|
|
|
|
|
10-15-2022, 08:41 PM
|
#236 |
|
Junior Member
Join Date: Aug 2022
Drives: Subaru BRZ 2017 Limited Edition
Location: Tallinn, Estonia
Posts: 3
Thanks: 0
Thanked 1 Time in 1 Post
Mentioned: 0 Post(s)
Tagged: 0 Thread(s)
|
I'm trying to find a way to add more buttons on the lower instrument panel, so was thinking 3d scanning the existing cover, editing it to remove the circular placeholder on the second position, to add an extra button, and 3d print it.
Would someone have this 3d file already ? Photo :  Drawing before/after: 
|
|
|
|
|
11-27-2022, 01:59 PM
|
#237 | |
|
Senior Member
Join Date: Dec 2018
Drives: 2019 Toyota 86 TRD SE
Location: Honolulu
Posts: 235
Thanks: 160
Thanked 86 Times in 71 Posts
Mentioned: 1 Post(s)
Tagged: 0 Thread(s)
|
Quote:
Its flat faced. |
|
|
|
|
|
11-29-2022, 03:42 PM
|
#238 |
|
FT86Club Official Vendor
Join Date: Oct 2022
Drives: 2023 BRZ
Location: Canada
Posts: 64
Thanks: 5
Thanked 76 Times in 34 Posts
Mentioned: 1 Post(s)
Tagged: 0 Thread(s)
|
  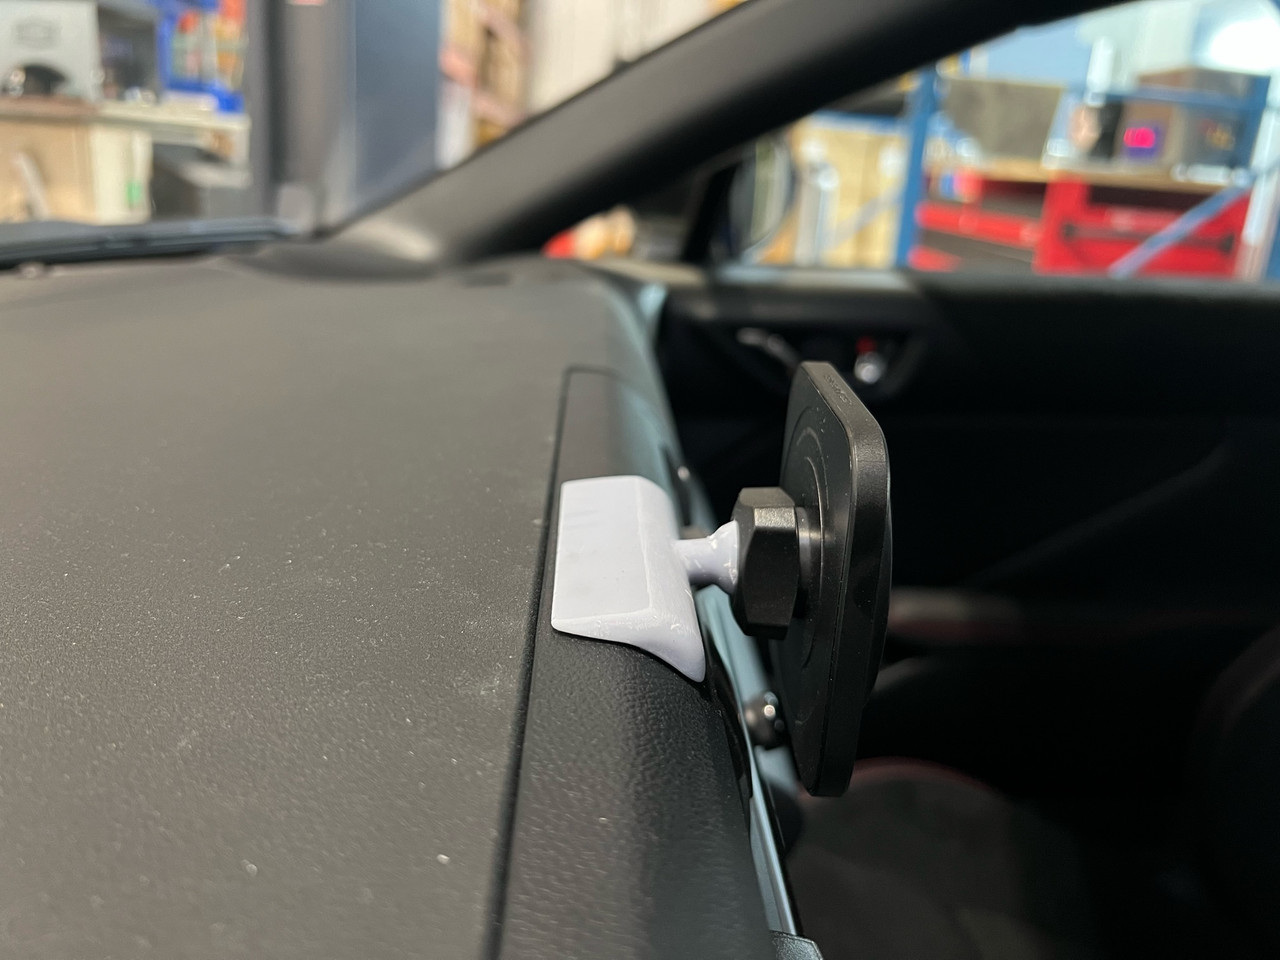 Check out our universal cell phone mount. It has a pretty standard ball end to attach to your favorite style holder. We have a clamp style and a MagSafe style shown here. The print is attached with 3m VHB double sided tape to the dash. We've uploaded it for free to download on our site. https://ansixauto.com/2022-brz-gr86-cell-phone-mount/
__________________
|
|
|
|
| The Following User Says Thank You to Ansix Auto For This Useful Post: | DocWalt (02-27-2023) |
|
|
|
|
 |
|
|
 Similar Threads
|
||||
| Thread | Thread Starter | Forum | Replies | Last Post |
| Official DTM Autobody Services Thread for FT86Club! | DTMAUTOBODY | Southern California | 9 | 12-31-2013 02:09 PM |
| Official FT86Club Chatroom? | wrxgoose | Site Announcements / Questions / Issues | 13 | 09-15-2012 05:26 PM |
| Official FT86Club decal idea? | Hanzo | Scion FR-S / Toyota 86 GT86 General Forum | 71 | 06-21-2012 08:09 PM |


