


|
||||||
| Cosmetic Maintenance (Wash, Wax, Detailing, Body Repairs) Wash, Wax, Details, Repairs |
 |
|
|
Thread Tools | Search this Thread |
 03-12-2020, 06:45 PM
|
#1 |
|
Member
Join Date: Mar 2020
Drives: 2014 Subaru BRZ Limited
Location: California
Posts: 23
Thanks: 5
Thanked 3 Times in 3 Posts
Mentioned: 0 Post(s)
Tagged: 0 Thread(s)
|
Scratch Repair & Painting
I recently bought a 2014 BRZ thats only major defect was a few deep scratches on the rear quarter panel. I have been thinking of ways to fix these scratches or at least minimize them and wanted to hear from those with experience.
First, how well do paint pens work? If they work well can anyone suggest a brand or type of paint pen? Second, Do waxing/Buffing compounds like I see all over car repair videos really buff out scratches incredibly well? If so, could I polish/buff the scratches and then immediately put a clear bra over the car to keep the paint looking good and protect the paint? I wasn't thinking of completely repainting, especially over one or two scratches, but wanted to figure out the best course of action to fix the minor scratches and then completely clear bra the car to keep it looking good and prevent any further damage. Also, any suggestions on what clear bra to use? Thanks **Car is super dirty right now**  
|

|

|
|
03-12-2020, 07:14 PM
|
#2 |
|
Member
Join Date: Apr 2019
Drives: 2013 Scion FRS white
Location: Phoenix, Arizona
Posts: 76
Thanks: 0
Thanked 22 Times in 15 Posts
Mentioned: 0 Post(s)
Tagged: 0 Thread(s)
|
First i will admit that i am no body shop expert but have done a little work similar to this. That scratch looks pretty deep, like through the entire paint and down to primer so I highly doubt polishing/buffing would do anything. You could certainly probably get it to fade or look a little better by polishing but not much. Polishing and buffing is used to repair damage in the clear coat and even a bit into the painted surfaces. Your damage looks much further than that and beyond the scope of buffing. Regarding the clear bra, it is great and i highly recommend it, but for the cost it is not worth doing that part of the car. I would save the clear bra for the front bumper and get it done immediately; especially since you have a black car that is known to have not so great paint.
Working with a paint pen is quite challenging. It is great for filling small scratches, chips, and imperfections but the damage you have would be hard to do with a paint pen. You could try filling it in via a paint pen and then buffing/polishing to blend but you kinda have to know what you are doing for that. Paint pens tend to go on chunky and are very difficult to blend and look good and easy to end up looking like someone took a sharpie to your car...My suggestion would be to live with it or take it to a body shop and pay them to fix it. A decent body shop could probably fix it for a reasonable price with an employee who really knows what they are doing. If you are really cheap and don't want to spend any money you could try a paint pen and then try buffing it to blend it. Last edited by mrhayes1; 03-12-2020 at 07:30 PM. |
|
|
|
|
03-12-2020, 07:37 PM
|
#3 | |
|
Member
Join Date: Mar 2020
Drives: 2014 Subaru BRZ Limited
Location: California
Posts: 23
Thanks: 5
Thanked 3 Times in 3 Posts
Mentioned: 0 Post(s)
Tagged: 0 Thread(s)
|
Quote:
|
|
|
|
|
|
03-13-2020, 12:22 AM
|
#4 | ||
|
ProCrastinationConsultant

Join Date: Sep 2013
Drives: '14 Ranger, '18 Tacoma 4Dr LB
Location: chicago-ish
Posts: 11,330
Thanks: 35,240
Thanked 13,673 Times in 6,781 Posts
Mentioned: 98 Post(s)
Tagged: 0 Thread(s)
|
Quote:
paint pens are about precisely applying an amount of paint to a small area. they still require a careful hand, wet sanding, clear coating, and buffing to make anything invisible. Quote:
detailing cars isn't impossible. but it's a skill that takes time. you don't become a great novelist or a renowned pianist the first time out, and the same goes for car detailing-- doing it yourself, you WILL make mistakes. some are correctable, others aren't. as hayes talked about, that particular scratch looks very deep. so i doubt most detail guys will be able to completely get rid of it. but with some careful buffing, they could likely minimize it so it's not very obvious (i've done this to my own cars to the point when people compliment the car while looking at the 'bad side', i almost laugh). i agree with him that repainting is likely going to be the best option to completely eliminate the scratch. if your car is only black, and not a metallic flake, this really shouldn't be a problem for most shops to blend in without major issues. notice that i keep talking about how far the scratch can be 'gotten gone'. there are a number of levels of acceptability that is entirely personal preference, and each level is going to have widely-varying costs depending on who does it and what process they choose to use. the end results will very likely be much the same. the very first thing you need to decide is how much work is good enough. if it can be seen at 10ft? 5ft? only in direct sunlight 1ft away? pristine never-there finish? note an increasing finish quality is going to have higher and higher costs. if you're only going for a 5ft finish, it should be easily accomplishable with a very mild buffer pad, some polishing glaze, and about 10 minutes... all that said, if you want to attempt to do this yourself, i highly recommend autogeek.net for their video series, though i generally order most of my supplies through them as well. everyone's got their preference on compound product lines, i usually pick based on what i need to accomplish, is cheaper, has the least marketing jargon, and still has good reviews. i've worked with the auto parts store stuff, and while a good finish is still possible, it tends to take more physical effort and time than some of the more specialty compounds autogeek sells. personally, i like to use the wolfgang uber compound with a white rotary buffer pad on most of my cars with light swirls/scratches. for the most part, it gets everything to a 5-3ft niceness, and is plenty for my standards, as i know using the car like a car, it's going to get screwed up again. i learned in a dealership to use a rotary buffer, though many will recommend against them-- they are a very specific skill, as they move/scratch in a specific direction, and applying slight differences in pressure to different parts of the pad can make drastic changes in the final product.
__________________
"The time you enjoy wasting is not wasted time"
 |
||
|
|
|
|
03-13-2020, 04:06 PM
|
#5 |
|
Member
Join Date: Apr 2019
Drives: 2013 Scion FRS white
Location: Phoenix, Arizona
Posts: 76
Thanks: 0
Thanked 22 Times in 15 Posts
Mentioned: 0 Post(s)
Tagged: 0 Thread(s)
|
I have no idea what a body shop would say but I would imagine that to make it look perfect they would respray that entire panel. I would also assume that someone experienced could touch it up for a reasonable price and make it looks decent. I can tell you for a fact that painting is a hugely variable thing which is why I suggest clear bra on your front bumper to protect and avoid having to respray in the future.
You can go to a cheap place and probably get that panel sprayed for a couple hundred or even cheaper. Then again, you could probably go to a high end shop that does paint work above or at OEM quality and pay hundreds more or even thousands for the same work but of much higher quality. As said previously, it sounds like you want it to look good or at least decent which no offense but sounds like it leaves you fixing it as not an option (I wouldn't try it either if it was my car). Probably best getting some quotes from body shops. Just keep in mind that you get what you pay for when it comes to that stuff. |
|
|
|
|
03-13-2020, 04:23 PM
|
#6 |
|
Member
Join Date: Mar 2020
Drives: 2014 Subaru BRZ Limited
Location: California
Posts: 23
Thanks: 5
Thanked 3 Times in 3 Posts
Mentioned: 0 Post(s)
Tagged: 0 Thread(s)
|
Thanks for the inputs! So, essentially, the safest option would be taking it to a bodyshop and getting it either resprayed or professionally touched up rather than doing it myself. Before getting it done I plan to get several quotes from shops, but does anyone have any experience on how much a panel like that would cost to touch up/repaint?
Also, once it is touched up, would you suggest a full body bra or just simply on the front end of the car? |
|
|
|
|
03-13-2020, 10:04 PM
|
#7 |
|
ProCrastinationConsultant
Join Date: Sep 2013
Drives: '14 Ranger, '18 Tacoma 4Dr LB
Location: chicago-ish
Posts: 11,330
Thanks: 35,240
Thanked 13,673 Times in 6,781 Posts
Mentioned: 98 Post(s)
Tagged: 0 Thread(s)
|
i want to reinforce that painting might not be your only option-- detailing might be plenty worthwhile.
i understand wanting to keep the car nice, but unless the car is parked in a nitrogen-sealed bubble, as long as it's out in the world, it's going to get further damaged in some way. first a story with no pictures: i've got some family friends, they proudly bought their first brand new truck ever about 2 years ago. 3 months after getting it, we all went camping, and the brand new truck ended up parked under a walnut tree. walnut trees where the squirrels brutally attacked anything parked under it every morning for 2-3 hours at a time. it was like hail, but louder somehow. so their 3 month old truck ended up with a number of dents from those viscous attacks. after taking it to a paintless dent repair place, they reported 19 dents. i could never make out more than 3. they chose to have all the dents repaired, to the tune of $2500. a few weeks after having all of that repaired, they were picking up the mother in law to go out to a nice dinner, and accidentally drove straight into a handicapped sign pylon they didn't see, denting the chrome bumper. now a (shorter) story with a few pictures!: very long story short, my first brz was totaled after 4 months. i'm on my second brz. this second one, i was pulling out of a grocery store, turning left across 2 lanes of traffic. the closer lane had a large suv that turned into the same lot, so i never saw the small car in the second lane until it was too close, and i was already across both lanes. so i gunned it the best i could, but it still clipped my bumper. it left me with a reminder. the car is about as dirty as yours in this first picture, so it looks much worse than it is. 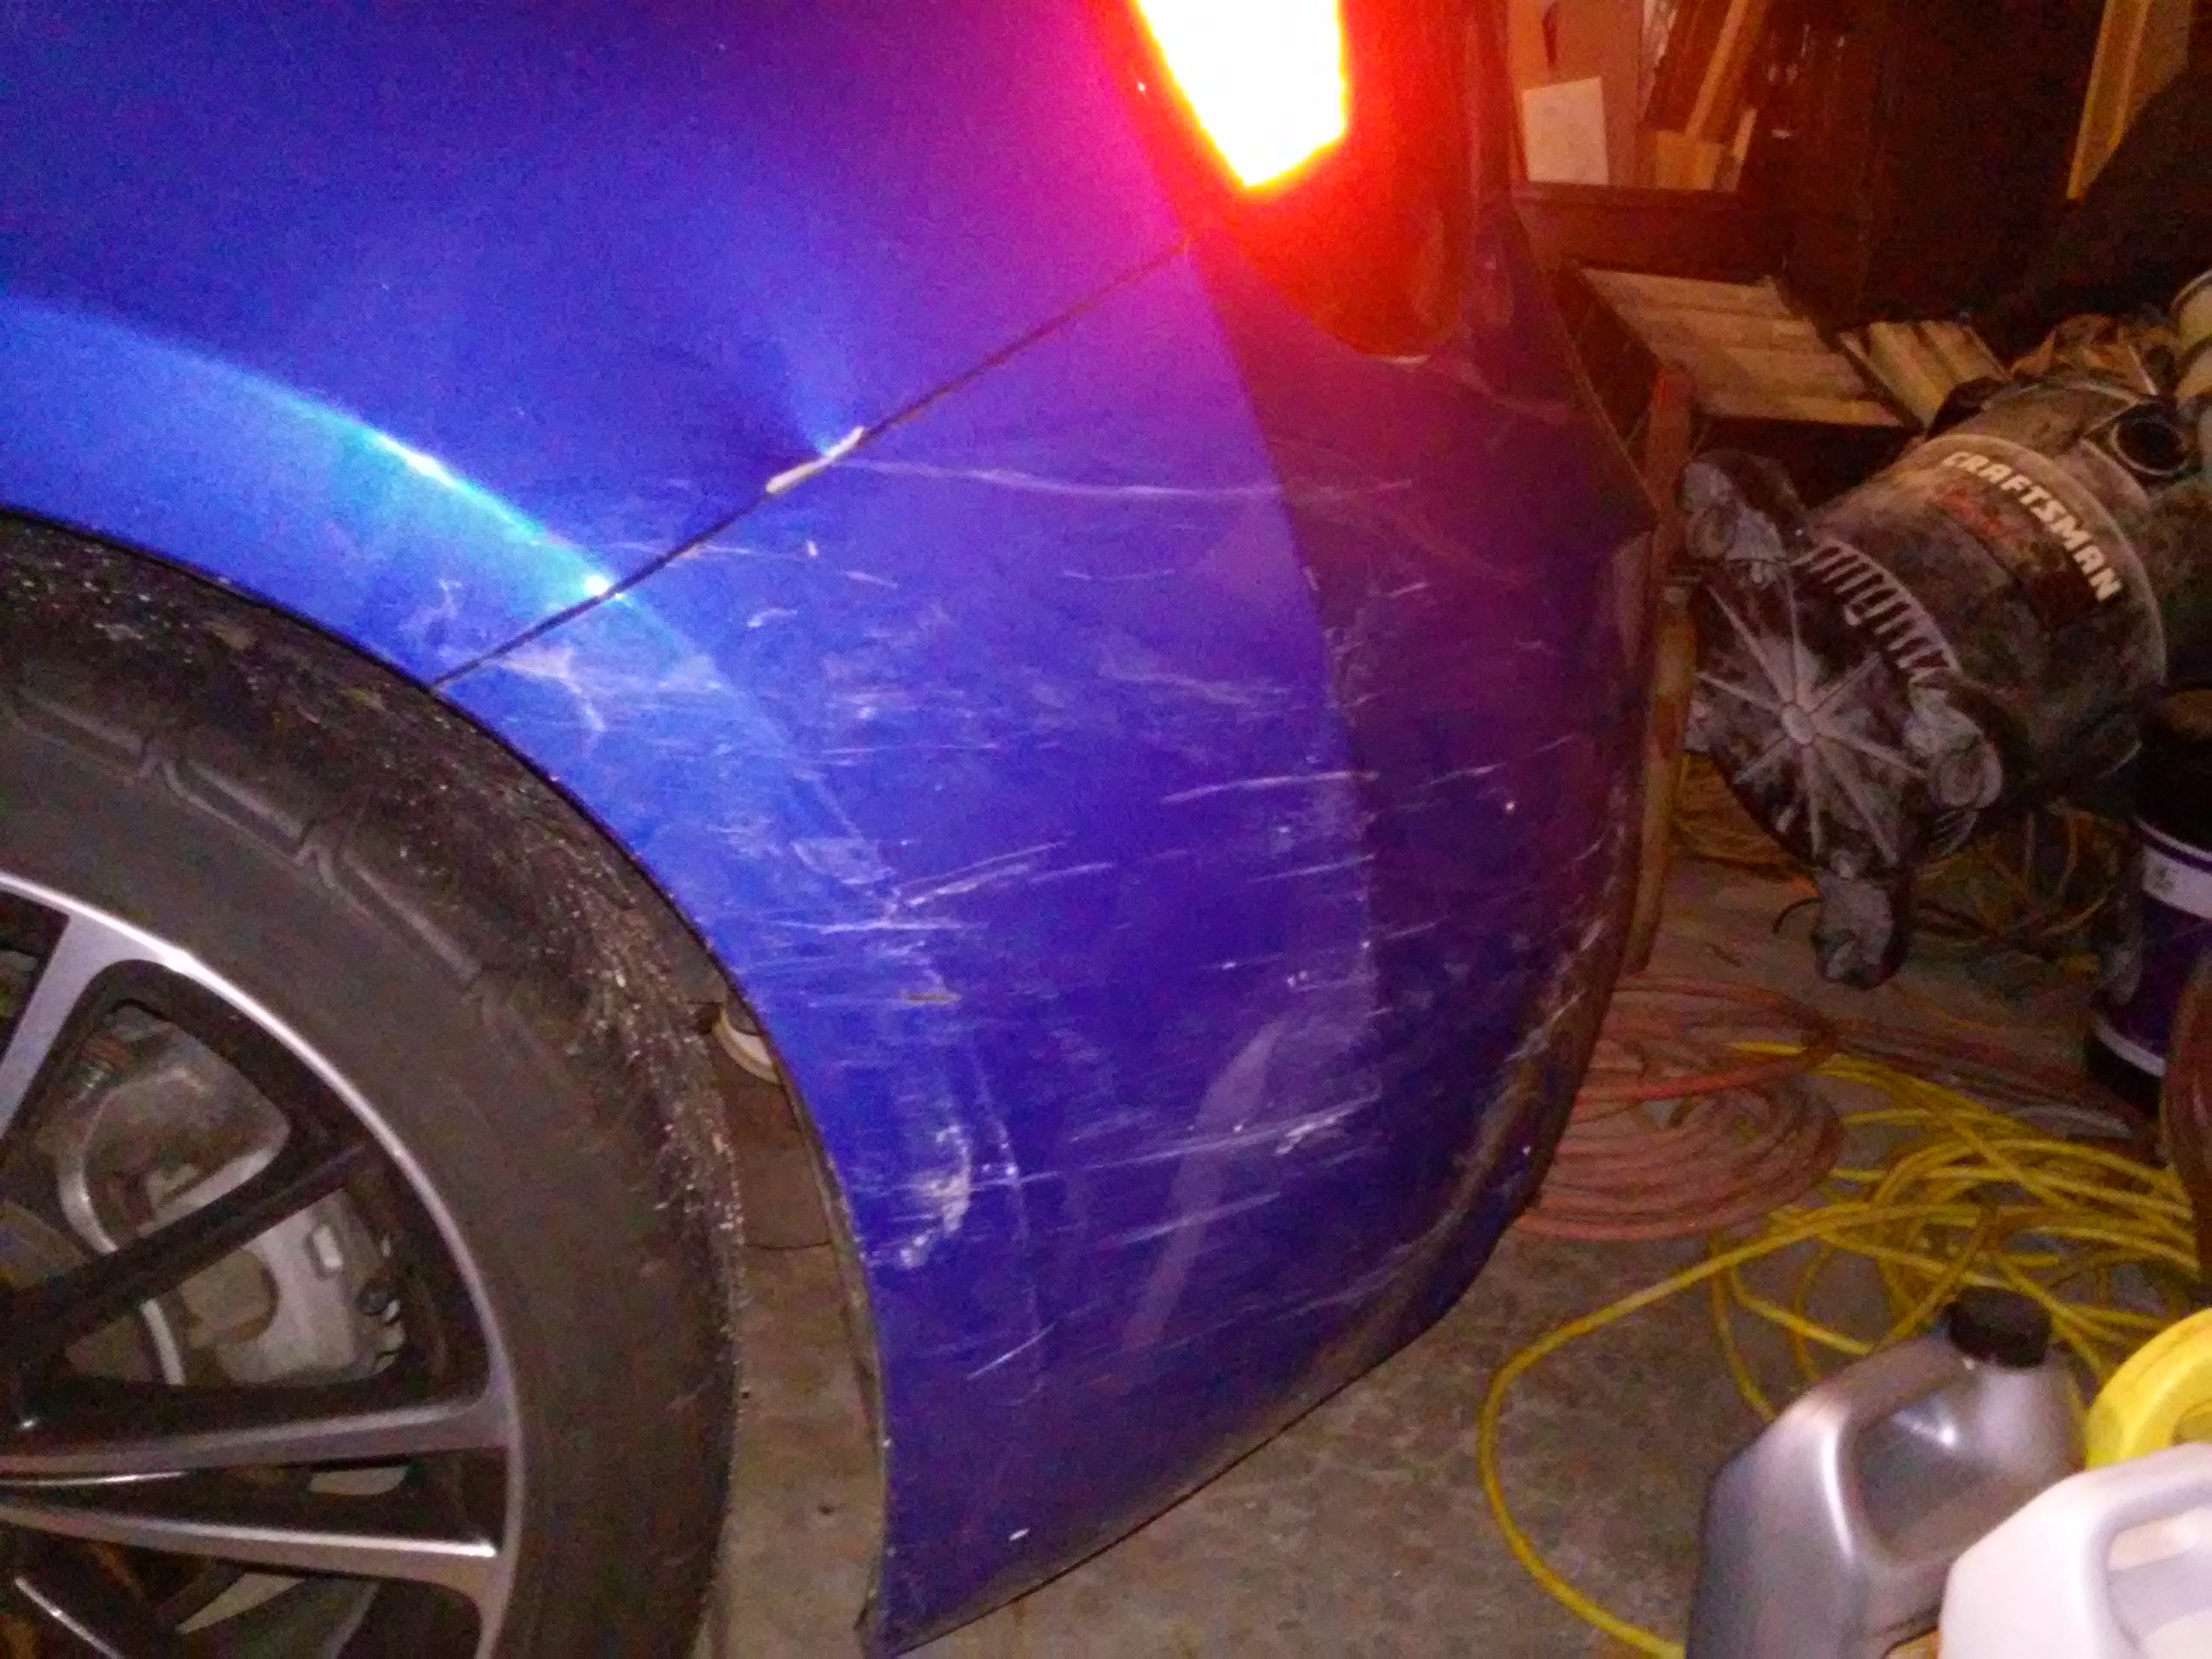 i've been avoiding getting it repaired due to some other body work i want done, so i tried buffing it out because i had nothing to lose. this is how it came out after clay barring, buffing, and wax. 
__________________
"The time you enjoy wasting is not wasted time"
|
|
|
|
|
03-14-2020, 12:54 PM
|
#8 |
|
Senior Member
Join Date: Feb 2013
Drives: car
Location: usa
Posts: 2,162
Thanks: 1,028
Thanked 867 Times in 530 Posts
Mentioned: 35 Post(s)
Tagged: 1 Thread(s)
|
wipe a little Dr. Colorchip over those marks and it should blend it in further.
|
|
|
|
|
03-15-2020, 08:27 PM
|
#9 | |
|
Member
Join Date: Mar 2020
Drives: 2014 Subaru BRZ Limited
Location: California
Posts: 23
Thanks: 5
Thanked 3 Times in 3 Posts
Mentioned: 0 Post(s)
Tagged: 0 Thread(s)
|
Quote:
I gotcha, looks a lot better after the buffing and waxing. I was thinking of doing something similar, essentially trying everything I can, first buffing, etc and if all else fails I may just try a pen to minimize the damage to a maybe 5 foot sight radius or something to that amount. I can live with something similar to that. If all else fails and down the line I can't stand looking at it, then I will take it in and have it re-sprayed. |
|
|
|
|
|
03-16-2020, 01:20 AM
|
#10 |
|
ProCrastinationConsultant
Join Date: Sep 2013
Drives: '14 Ranger, '18 Tacoma 4Dr LB
Location: chicago-ish
Posts: 11,330
Thanks: 35,240
Thanked 13,673 Times in 6,781 Posts
Mentioned: 98 Post(s)
Tagged: 0 Thread(s)
|
yep, that's why i posted those pictures
 . for me, it's plenty fine, but to some, nothing less than a showroom-fresh appearance will cut it. . for me, it's plenty fine, but to some, nothing less than a showroom-fresh appearance will cut it.if you were local, i'd be happy to spend the saturday with you on it... so a few pointers-- assuming you choose to do this yourself and have zero materials, some experience waxing a car, but the space to wash/work on the car. get a clay bar and clay lubricant. --wash and dry the car like normal, and then rub the clay bar over the entire car using the lubricant. usually in round patterns like you were waxing it. kneed the bar every once in a while to keep a 'fresh' part of it exposed to the paint. after that, you'll need a mild abrasive. like i recommended before, i really like the wolfgang uber compound(everyone's got their own variation though). i have used it around the door handles on a towel(where the buffer won't fit) to fix fingernail scratches with decent success. so it can be done by hand, but is extremely time consuming. the main trick scratch correction is to treat the paint as a very thick but malleable clay. the amount of pressure placed onto the surface creates friction, which creates heat. but it's also important to understand that there are abrasive elements within the compound that also is removing some of the layer of paint as well-- so you're both 'moving' the paint, as well as scratching the paint, but with smaller pieces of abrasive. heat is good to an extent, as it allows the paint to move where you want it. but too much heat is a problem, as then you risk burning the paint, which will tint it a different color, or start to deform the underlying body panels. then the direction of movement you push is the direction the paint flows. so you would want to push from one side into and across the scratch, and then push from the other side into and across again. at a very basic level, flowing the existing paint into and across the scratch, and then pushing that paint back to where it came from. essentially, you're pushing the paint into the lower spot, and then pushing it back out to create an even flat surface. with a rotary buffer and pad, the one-side-then-the-other-side type process takes about 10 seconds(and then i generally follow with a very light overall pass perpendicular to the two directions i was forcing to better blend the area into the overall car). by hand, it can take up to about 2-5 minutes. you'll never fill in the scratch completely, but after a few passes, should start to see the scratch start to 'fill in' or diminish in size. as you see it diminish in size, you make the determination on how far it's worth going. smaller lighter scratches are worth the effort to erase. bigger scars like my damage, or potentially what you're dealing with are best left to still be visible. this is where it's easy to get carried away. i generally won't try anymore than twice(2 10 second tries with the buffer) on any scratch. it's usually enough to look good out of direct light sources. so that's the process i follow to the entire car. after that, i wipe it down with a microfiber cloth or two(because there's always a few spots with compound on it that were missed or didn't need a ton of correction). and then pick a wax--i recently tried natty's paste wax, and really like it overall over past waxes i've tried-- though many people with black cars tend to prefer a black-car specific wax to reduce visible swirls. use a typical wax applicator, then use afew microfiber clothes to take it back off. overall, i usually take a full day to do this process to any of my cars(it actually took 4 partial days last time i did the brz). but some of it is therapeutic to me, so i'm not moving like i'm getting paid to do it either.
__________________
"The time you enjoy wasting is not wasted time"
|
|
|
|
|
03-16-2020, 01:20 AM
|
#11 |
|
ProCrastinationConsultant
Join Date: Sep 2013
Drives: '14 Ranger, '18 Tacoma 4Dr LB
Location: chicago-ish
Posts: 11,330
Thanks: 35,240
Thanked 13,673 Times in 6,781 Posts
Mentioned: 98 Post(s)
Tagged: 0 Thread(s)
|
yep, that's why i posted those pictures
. for me, it's plenty fine, but to some, nothing less than a showroom-fresh appearance will cut it.if you were local, i'd be happy to spend the saturday with you on it... so a few pointers-- assuming you choose to do this yourself and have zero materials, some experience waxing a car, but the space to wash/work on the car. get a clay bar and clay lubricant. --wash and dry the car like normal, and then rub the clay bar over the entire car using the lubricant. usually in round patterns like you were waxing it. kneed the bar every once in a while to keep a 'fresh' part of it exposed to the paint. after that, you'll need a mild abrasive. like i recommended before, i really like the wolfgang uber compound(everyone's got their own variation though). i have used it around the door handles on a towel(where the buffer won't fit) to fix fingernail scratches with decent success. so it can be done by hand, but is extremely time consuming. the main trick scratch correction is to treat the paint as a very thick but malleable clay. the amount of pressure placed onto the surface creates friction, which creates heat. but it's also important to understand that there are abrasive elements within the compound that also is removing some of the layer of paint as well-- so you're both 'moving' the paint, as well as scratching the paint, but with smaller pieces of abrasive. heat is good to an extent, as it allows the paint to move where you want it. but too much heat is a problem, as then you risk burning the paint, which will tint it a different color, or start to deform the underlying body panels. then the direction of movement you push is the direction the paint flows. so you would want to push from one side into and across the scratch, and then push from the other side into and across again. at a very basic level, flowing the existing paint into and across the scratch, and then pushing that paint back to where it came from. essentially, you're pushing the paint into the lower spot, and then pushing it back out to create an even flat surface. with a rotary buffer and pad, the one-side-then-the-other-side type process takes about 10 seconds(and then i generally follow with a very light overall pass perpendicular to the two directions i was forcing to better blend the area into the overall car). by hand, it can take up to about 2-5 minutes. you'll never fill in the scratch completely, but after a few passes, should start to see the scratch start to 'fill in' or diminish in size. as you see it diminish in size, you make the determination on how far it's worth going. smaller lighter scratches are worth the effort to erase. bigger scars like my damage, or potentially what you're dealing with are best left to still be visible. this is where it's easy to get carried away. i generally won't try anymore than twice(2 10 second tries with the buffer) on any scratch. it's usually enough to look good out of direct light sources. so that's the process i follow to the entire car. after that, i wipe it down with a microfiber cloth or two(because there's always a few spots with compound on it that were missed or didn't need a ton of correction). and then pick a wax--i recently tried natty's paste wax, and really like it overall over past waxes i've tried-- though many people with black cars tend to prefer a black-car specific wax to reduce visible swirls. use a typical wax applicator, then use afew microfiber clothes to take it back off. overall, i usually take a full day to do this process to any of my cars(it actually took 4 partial days last time i did the brz). but some of it is therapeutic to me, so i'm not moving like i'm getting paid to do it either.
__________________
"The time you enjoy wasting is not wasted time"
|
|
|
|
|
03-16-2020, 12:16 PM
|
#12 |
|
Senior Member

Join Date: Oct 2013
Drives: BRZ, Noble M400, AC-LS7,1956 AC
Location: Wi/Fl
Posts: 1,022
Thanks: 328
Thanked 867 Times in 471 Posts
Mentioned: 7 Post(s)
Tagged: 0 Thread(s)
|
Try doing something your self. If it helps and you can live with it, good. If not then have a pro do it. You have only lost the cost of touch op product.
|
|
|
|
| The Following User Says Thank You to ls1ac For This Useful Post: | soundman98 (03-16-2020) |
|
03-21-2020, 11:07 PM
|
#13 | |
|
Member
Join Date: Mar 2020
Drives: 2014 Subaru BRZ Limited
Location: California
Posts: 23
Thanks: 5
Thanked 3 Times in 3 Posts
Mentioned: 0 Post(s)
Tagged: 0 Thread(s)
|
Quote:
|
|
|
|
|
| The Following User Says Thank You to Reasy For This Useful Post: | soundman98 (03-21-2020) |
|
03-22-2020, 12:02 AM
|
#14 | |
|
Member
Join Date: Mar 2020
Drives: 2014 Subaru BRZ Limited
Location: California
Posts: 23
Thanks: 5
Thanked 3 Times in 3 Posts
Mentioned: 0 Post(s)
Tagged: 0 Thread(s)
|
Quote:
|
|
|
|
|
|
|
|
|
|
|
|
 Similar Threads
|
||||
| Thread | Thread Starter | Forum | Replies | Last Post |
| Headlight scratch repair and hood repaint/wrap | MaximS | Cosmetic Modification (Interior/Exterior/Lighting) | 9 | 06-24-2018 09:53 AM |
| Products to recommend to repair internal plastic scratch | impossible | Cosmetic Modification (Interior/Exterior/Lighting) | 7 | 10-10-2014 10:06 AM |
| Scratch Repair | Tdot | CANADA | 9 | 01-14-2013 12:02 PM |
| dent / scratch repair | encity5 | NY / NJ / CT / PA | 1 | 12-12-2012 09:09 PM |
| Recommendations for scratch repair? | Tainen | Northwest | 6 | 09-11-2012 07:44 PM |


 2013 Scion FRS
 2017
2017 