


|
||||||
| DIY (Do-It-Yourself) Guides For all DIYs. |
 |
|
|
Thread Tools | Search this Thread |
 09-09-2014, 11:43 PM
|
#1 |
|
Senior Member
Join Date: Oct 2013
Drives: 2013 WR Blue Limited Manual BRZ
Location: Los Angeles, CA
Posts: 496
Thanks: 85
Thanked 134 Times in 102 Posts
Mentioned: 4 Post(s)
Tagged: 0 Thread(s)
|
Qi Wireless Charging in BRZ/FR-S/GT86 Center Console
Whelp, I did it, I added Wireless Charging to the center console of my BRZ. This is a DIY idea that I've been excited about doing because we just got 2 new Android phones with built in Wireless Charging capabilities. And, since I use the free hotspot on my phone (T-mobile if you're wondering) to give my Ca-Fi HU internet connection, this wireless charging keeps my phone from draining without having to plug in every time I hop in the car, I just drop and go. The project really wasn't all that complicated or difficult, just takes a bit of time getting the console out, but it's easier to put back on once you understand how the process goes. So without further adieu, here's my proof of concept:
[ame="https://www.youtube.com/watch?v=NFKxfmDwmQ0"]Qi Wireless Charging in a Subaru BRZ - YouTube[/ame] So, now that I've got you hooked, let's continue. First, the materials: (The one I bought) 3-coil Qi barebones charging board: [ame]http://smile.amazon.com/gp/product/B00M7O6Y0C/ref=oh_aui_detailpage_o00_s00?ie=UTF8&psc=1[/ame] Any of these 3-coil ones should work though:http://www.amazon.com/s?url=search-a...qi+charger+diy 12v DC to 5v (3a) Micro-USB step down converter: [ame]http://smile.amazon.com/gp/product/B00KUNPJS0/ref=oh_aui_detailpage_o00_s00?ie=UTF8&psc=1[/ame] 3M Super Strength Molding tape Clear Liquid Nails Solder & Soldering Iron (or wire taps if you prefer) Tools (Phillips Screwdriver set and Socket Set and wire stripper) Disposable Gloves OK, here we go! First things first, we need to get the entire center console out, I used the pictures and guide in this thread: http://www.ft86club.com/forums/showthread.php?t=53511 Should be pretty straightforward, once you get it out of the car and somewhere you can work on it we can continue. Now, flip over your center console and locate the area in the console you want to place your charging coils, I wanted it closer to the front of the cubby. Be sure to take your phone or phone back and approximate the location of your phone's receiving coils in the cubby so you can line up the charger as best as possible on the other side to enable an easy connection every time you place your phone. *Note, there was a small bump right under where I wanted to place the coil, so I just took my dremel and sanded that area down completely flat (you can shave it off any number of ways if you want to put your coil there, but the dremel took seconds, then I smoothed it out by hand, sorry I don't have pictures of that).*  When you know where you want to place your coils load the one side up with Liquid Nails (as well as the PCBA) and stick it down, apply pressure for a number of seconds and make sure it's secure, once it drys it really won't be going anywhere. I opted to place the coil side up (when installed in car) right up against the plastic of the console so it could be as close to the phone as possible. This also keeps the PCBA away from the coils in case of interference or heat and allows you to tuck the USB cable you'll attach to it up under the styrofoam (I'll come back to this).  Now that your coils are in place and setting up, it's time to tap our power. Take the step down converter and strip enough of the red and black cables to work with. You'll be attaching the red cable to the center screw on the 12v cig outlet. Carefully use a socket or wrench to remove the nut at the center of the cig outlet, but be careful as shit will fall apart if you don't stick something up into the outlet to push on the screw from the other side. I stuffed some double-sided tape up in there and held with my finger, 2 people would make this easier but as long as you get something to hold that screw in you'll be fine, and even if it falls out it's not hard to put back together, just annoying. Once the nut is off get rid of the washer and screw the nut back on just enough to keep it on the threads. Then wrap your red wire around the screw like you would with speaker wire, and tighten the nut back on. The nut will hold your red wire securely in place and your wire will now have power.  The black wire's a little trickier as there isn't anything to really hold it to, what you need to do is solder it to the ground connector tab (the fatter one on top when the console is laying upside down). You could tap into the black ground wire going to the cig back in the car, or attach to a bolt somewhere, but I like all my wires neatly arranged together. The soldering here is very minimal and shouldn't be too much trouble with the right solder. Just make sure the tab has enough neck where the connector can still slide right on. I attached the box right below (or above when installed in car) the cig outlet with 2 strips of molding tape, just be sure to clean off all areas when taping or liquid nailing for the most secure adhesion, that sucker's not going anywhere.  Now you can take that USB cord and tuck it under the styrofoam side pads and back up to the Qi port. But before you do that, let's test it out to make sure we're working. Our coil comes with an LED light that goes from red (not connected) to blue (connected and charging). So I flipped over the console and left the LED sticking out so I could see. I plugged in the Qi charger to a wall outlet and the red light came on.  Now, let's place the phone where we normally would, I also put back the rubber mat, which helps with grip and keeping the phone in place. Blue LED lights up, phone makes Qi sound and shows that it is currently charging wirelessly.  Moving the phone to the back of the cubby, well off the coils results in a disconnection just as it should.  Let's try it with the 12v flap open and the phone a little farther back.  Good, now how about flipping the phone in the opposite position.  Success on all fronts! At this point I'm a happy camper  I decided to snip the LED wires from the PCBA though, because I have no use for the LEDs in the car, no real place I'd want them, you're free to do with them what you please. So now let's start putting it back in the car, but before we secure everything back together, let's hook up the 12v socket and turn the car on ACC for one final test.  Works the same in the car, now I have a magical charging cubby for my phone with no wires or anything showing. And yes, the 12v socket still works the same as before. I hope you enjoyed this DIY as much as I did, and if you have any questions or requests don't hesitate to ask, enjoy and happy modding! 
Last edited by Deathalo; 01-20-2016 at 09:52 AM. |

|

|
| The Following 11 Users Say Thank You to Deathalo For This Useful Post: |
|
09-10-2014, 11:11 AM
|
#2 |
|
TALLY FT86

Join Date: Mar 2014
Drives: 2014 FR-S Monogram -- SBD Turbo --
Location: Tallahassee, FL
Posts: 624
Thanks: 185
Thanked 444 Times in 241 Posts
Mentioned: 12 Post(s)
Tagged: 1 Thread(s)
|
Awesome work man!
Defintely going to do this when I get a new phone |
|
|
|
| The Following User Says Thank You to Cockatoo For This Useful Post: | Deathalo (09-10-2014) |
|
09-10-2014, 11:14 AM
|
#3 |
|
Member
Join Date: Jan 2013
Drives: 2013 SWP BRZ-L
Location: United States
Posts: 31
Thanks: 10
Thanked 10 Times in 8 Posts
Mentioned: 2 Post(s)
Tagged: 0 Thread(s)
|
Still room for the cup holder?
Sent from my VS980 4G using Tapatalk |
|
|
|
|
09-10-2014, 11:24 AM
|
#4 | |
|
Senior Member
Join Date: Oct 2013
Drives: 2013 WR Blue Limited Manual BRZ
Location: Los Angeles, CA
Posts: 496
Thanks: 85
Thanked 134 Times in 102 Posts
Mentioned: 4 Post(s)
Tagged: 0 Thread(s)
|
Quote:
We have a Nexus 5 and LG G3 though, which are both too big to be set there with the dual cup holder insert. I'm thinking of making a single cup holder insert out of my dual, that would fit just fine. I'm also about to turn the side door bottle holders into useable cup holders with some A/C high density insulating foam, might do a write up on that if it turns out nice. |
|
|
|
|
|
09-10-2014, 11:36 AM
|
#5 |
|
Señor Member

Join Date: May 2013
Drives: 2013 Scion FR-S
Location: Rockland County NY
Posts: 1,607
Thanks: 1,103
Thanked 1,322 Times in 645 Posts
Mentioned: 17 Post(s)
Tagged: 4 Thread(s)
|
This is awesome @WhiteFRS69
|
|
|
|
| The Following User Says Thank You to STV3 For This Useful Post: | Deathalo (09-10-2014) |
|
09-10-2014, 12:38 PM
|
#6 |
|
Senior Member

Join Date: Oct 2013
Drives: 2014 Scion FRS
Location: NNJ
Posts: 2,289
Thanks: 1,808
Thanked 1,432 Times in 756 Posts
Mentioned: 30 Post(s)
Tagged: 2 Thread(s)
|
this is awesome!!!! damn this is kinda tempting to do
nice work man! @STV3 i regret selling all my phones now 
|
|
|
|
|
09-10-2014, 12:51 PM
|
#7 |
|
Senior Member

Join Date: Jan 2014
Drives: 2013 Scion FR-S
Location: NY/NJ
Posts: 273
Thanks: 182
Thanked 173 Times in 89 Posts
Mentioned: 9 Post(s)
Tagged: 0 Thread(s)
|
Fantastic idea!
For another layer of technical awesomeness, I'd suggest using micro-suction tape to hold the phone in place: 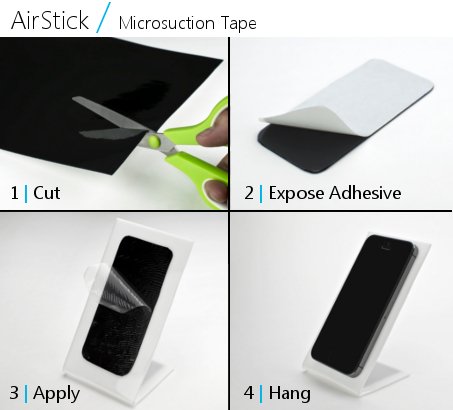 For folks unfamiliar with it, microsuction tape has microscopic sized suction cups to adhere to objects placed against it...Which means it will hold the object securely like you're using tape, but is reusable because they're tiny suction cups! [ame="http://www.amazon.com/Sewell-Direct-AirStick-Microsuction-250mmx300mm/dp/B00ITX9OU2"]Amazon.com: Sewell Direct AirStick Microsuction Tape[/ame]
__________________
|
|
|
|
| The Following User Says Thank You to Namuna For This Useful Post: | Deathalo (09-10-2014) |
|
09-10-2014, 01:03 PM
|
#8 | |
|
Senior Member
Join Date: Oct 2013
Drives: 2013 WR Blue Limited Manual BRZ
Location: Los Angeles, CA
Posts: 496
Thanks: 85
Thanked 134 Times in 102 Posts
Mentioned: 4 Post(s)
Tagged: 0 Thread(s)
|
Quote:
|
|
|
|
|
|
09-10-2014, 01:44 PM
|
#9 |
|
Member
Join Date: Sep 2014
Drives: 2015
Location: NY
Posts: 68
Thanks: 0
Thanked 29 Times in 20 Posts
Mentioned: 0 Post(s)
Tagged: 0 Thread(s)
|
very nice. i thought about doing this aswell. the only thing that was holding me back was that i have an iphone lol
|
|
|
|
|
09-10-2014, 02:41 PM
|
#10 | |
|
Senior Member
Join Date: Oct 2013
Drives: 2013 WR Blue Limited Manual BRZ
Location: Los Angeles, CA
Posts: 496
Thanks: 85
Thanked 134 Times in 102 Posts
Mentioned: 4 Post(s)
Tagged: 0 Thread(s)
|
Quote:

|
|
|
|
|
| The Following User Says Thank You to Deathalo For This Useful Post: | Trap63 (09-12-2014) |
|
09-12-2014, 02:04 PM
|
#11 |
|
Member
Join Date: Jul 2014
Drives: 13 DGM BRZ 04 WRB STi
Location: Arizona
Posts: 10
Thanks: 3
Thanked 4 Times in 4 Posts
Mentioned: 0 Post(s)
Tagged: 0 Thread(s)
|
Awesome! Thanks for the write up.
|
|
|
|
|
09-12-2014, 02:16 PM
|
#12 |
|
Senior Member
Join Date: Jun 2012
Drives: ZC6, Junk of ALL sorts
Location: Ohio
Posts: 516
Thanks: 111
Thanked 288 Times in 171 Posts
Mentioned: 7 Post(s)
Tagged: 0 Thread(s)
|
Approved,
Great Job
__________________
# 1. Always know where your towel is.
ZC6-CBS, is home  |
|
|
|
| The Following User Says Thank You to Floggin Tires For This Useful Post: | Deathalo (09-13-2014) |
|
09-14-2014, 09:23 PM
|
#13 |
|
USMC

Join Date: Aug 2013
Drives: DGM BRZ LMT
Location: NC
Posts: 106
Thanks: 12
Thanked 29 Times in 20 Posts
Mentioned: 0 Post(s)
Tagged: 0 Thread(s)
|
What's the range on this? Does it charge if you hold it 3-5" off the base plate?
__________________
 |
|
|
|
|
09-14-2014, 09:39 PM
|
#14 | ||
|
Senior Member

Join Date: Jul 2013
Drives: 2013 BRZ Limited WRB
Location: Ottawa, Canada
Posts: 1,278
Thanks: 375
Thanked 480 Times in 260 Posts
Mentioned: 29 Post(s)
Tagged: 0 Thread(s)
|
Quote:
__________________
Quote:
|
||
|
|
|
|
|
|
|
|
| Thread Tools | Search this Thread |
|
|
 Similar Threads
|
||||
| Thread | Thread Starter | Forum | Replies | Last Post |
| My idea for a center arm rest / console cover / center cup holder | ravenblackfrs | Cosmetic Modification (Interior/Exterior/Lighting) | 67 | 02-13-2016 03:00 PM |
| need help on jpm center console | Jhon19lopez | Cosmetic Modification (Interior/Exterior/Lighting) | 4 | 06-24-2013 07:57 PM |
| red center console? | gusbarragan | Cosmetic Modification (Interior/Exterior/Lighting) | 13 | 02-19-2013 08:03 PM |
| Center Console help | mbh1101 | Cosmetic Modification (Interior/Exterior/Lighting) | 2 | 08-22-2012 09:56 AM |


 ---
---

