


|
||||||
| DIY (Do-It-Yourself) Guides For all DIYs. |
 |
|
|
Thread Tools | Search this Thread |
 04-03-2016, 05:33 PM
|
#1 |
|
Senior Member

Join Date: Aug 2015
Drives: 2013 Scion FRS Limited Edition
Location: Wilsonville, OR
Posts: 319
Thanks: 247
Thanked 278 Times in 144 Posts
Mentioned: 32 Post(s)
Tagged: 1 Thread(s)
|
DIY: Velox hood louver install
Hey everyone, This is my DIY install guide for the Velox hood louvers. This thread was created off of my own interest to review the install process for the Velox hood louvers, so yes, it is 100% my own experience and opinions. please feel free to share your own experiences and please ask questions! I want to know what ya'll want to know!
Manufacturers website: http://www.velox-motorsports.com/ Original thread: Modular Hood Louver Kit - Velox Motorsports I ordered my package from FT86Speedfactory and got them by mail within a week. Optional: Rain guards are also available. I did not install these because I don't need them, but they are still useful if you like a cleaner engine bay. FT86speedfactory.com also has a DIY: Here. -------------The down low--------------- 1: BE GENTLE!!!! Trust me, I went a little overboard on my install and I didn't put much elbow grease into it. 1.1: The hood is a soft, thin peace of aluminum and it can easily be warped out of place when making your center punches. 1.2: The louvers are also aluminum and over tightening the bolts can lead to some nasty results. I will go more into detail when we get there. 2: Take your time. It's no race, so don't rush. you can always take out more metal and drill bigger holes, but you cant make them smaller. 3: stay comfortable. I did this on the floor of my garage, on my hands and knees and my back was killing my by the time I was done. Don't forget to take breaks and stretch if you need. or find a better place to sit. 4: keep it clean. Vacuum us debris and other particles as you work so you don't scratch your paint or leave them to end up in your engine bay. 5: Have fun! I only say this because once you start, you cant stop. So please have fun! for me?  ---------------The DIY-------------------- Install time: Roughly 3-5 hours. 1: Unboxing: The packaging was fantastic. Every peace was numbered and labeled appropriately. I was extremely satisfied with the quality of the shipping.  Cat not included... [URL=http://s300.photobucket.com/user/PitViperFRS/media/Velox%20install/20160325_145922_zps2qk1cfwu.jpg.html] 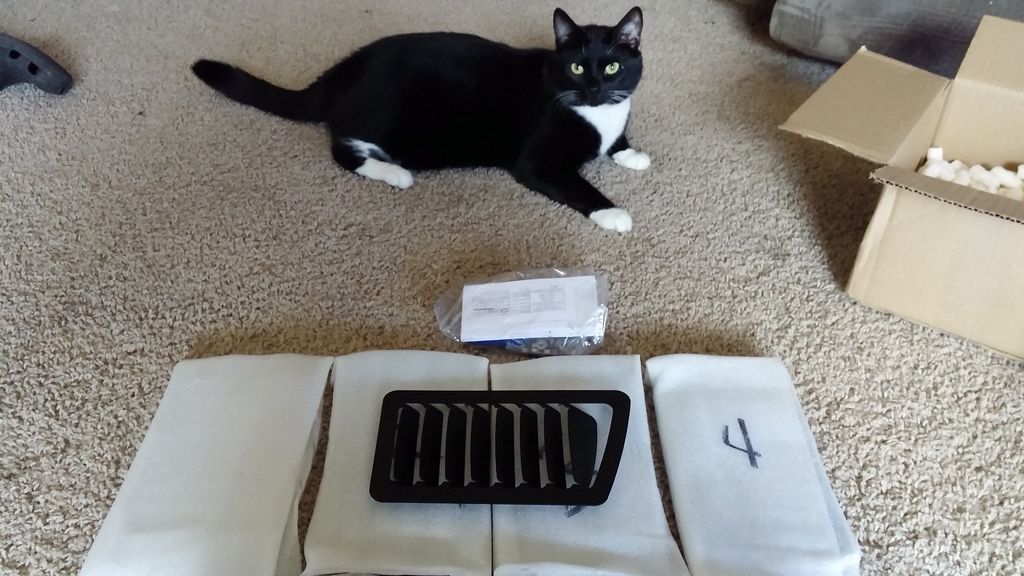 [URL=http://s300.photobucket.com/user/PitViperFRS/media/Velox%20install/20160325_145939_zpsukt8r0xc.jpg.html] 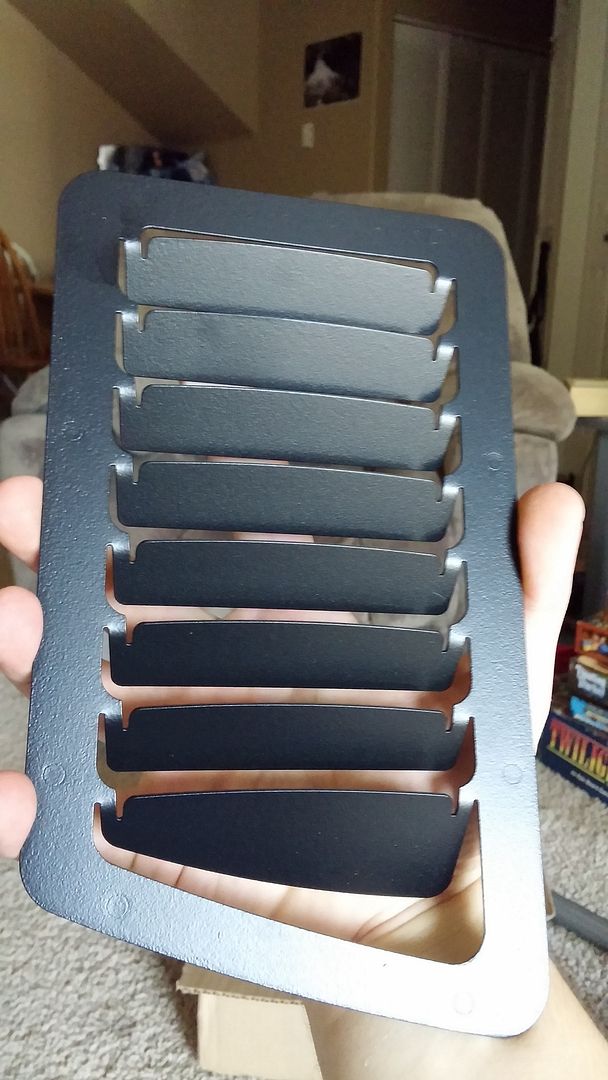  2: Prep: Tools: -Safety glasses and a gas mask (Safety first!) -12mm socket -9/32 socket -Wrench/ratchet -Scissors -Electric drill -Center punch -Hammer -11/64 drill bit -1/16 drill bit -Die grinder (I used a 90 degree die grinder for the whole process. You may use a straight if you want. Would NOT recommend using a Dremel, it may take you a year!) -Cutting wheel (you'll only need one... unless it breaks.) -Blue painters tape -A large chunk of carpet of lots of towels Recommended but not necessary: - Vacuum (Highly recommended. If you don't have a shop vac, use compressed air to dust off the work area and the hood. Then give it a bath with a low pressure, pressure washer before final installation.) - stepped drill - Abrasive roll-lock wheels 3: Hood removal: The removal process can be done with 2 people, but it is recommended to have at least 3 sets of hands to uninstall the hood and reinstall it. You'll need: - 12mm socket and a ratchet - Carpet to lie the hood on  4: Template: You'll need: -Scissors -painters tape Cut and align the templates to the inside of the hood. One thing that I found on the lables for the templates is that 2 of them are labled for "passanger inside" and "passanger outside" in small text in the bottom corner. Note to Velox: Make that text a little more obvious please   5: Center punch You'll need: -Center punch -Hammer be gentle when you punch. It will chip your paint either way, we just don't want to warm the hood and leave bulges, resulting in gaps between the hood and the louvers.  6: Drill your holes You'll need: -Electric drill -11/64 drill bit -1/16 drill bit -Stepped drill I drilled from the inside of the hood. It's a rather fast step in the process.I drilled all the holes with a smaller bit before making my larger holes and using a stepped drill to clean up the leftovers. (go easy on the stepped drill bit. It's thin metal and we just need to clean up the flakes.)   Be sure to vacuum up all chunks as you make your holes! 7: Tape out your lines You'll need: -Tape Try to run a straight line from the outside of each of the inner holes.  8: Make your cuts You'll need: -Die grinder -Cutting wheel -Abrasive roll-lock wheels Try to make smooth, straight cuts. the drilled holes are there to be a buffer zone so you don't cut into the remaining hood.  After you've fitted the louvers and found them to fit properly, use sand paper or an Abrasive roll-lock wheel, to clean up the cuts. Be sure to vacuum up all chunks as you make your cuts! 9: Test fits You'll need: -To leave the tape on... -The appropriate louver for the hole. Use the louver to verify that there is no overlapping metals and that the holes for the bolts are large enough and aligned properly.    (Yes, I was removing each louver between cuts and re-adding them for the photos.) 10: clean up You'll need: -Vacuum -Trash can -air gun -Pressure washer/ hose (if you want to wash off the small flakes before hand cleaning.)  11: final fitment you'll need: -The supplied nuts -9/32 socket and ratchet hand tighten all of the nuts and be sure to apply pressure to the apposing side of the louver to confirm a snug fit and that the louver is not catching on the hood. The louver should be completely flush by the time you're done. After hand tightening, LIGHTLY torque down the bolts an extra 1/4 rotation. You may need to fit the socket around the supports for the hood, just push straight down, and the small lip should bend out of the way with no damage to the hood or louver. -when installing the defusers, be sure to install the defusers with the longer cut channels onto the longer louvers. They will fit one way and each one is made for each louver. So if it doesn't fit, it might not be the right one. The FT86spedfactory manual goes into more detail with photos. Sorry, I forgot to take photos on this step. ----I recommend doing this part with the hood vertical. I stood it up on the back points, with extra cloth padding. This will make it easier to install and much harder to bend the blades of the louvers. -----  As you can see, on the right I over tightened the bolts. This is why you'll want to be gentle. It will warp the louvers and potentially pull out the bolts all together. So be gentle! EDIT: If you do over tighten, you can always back off the nut and try again. EDIT: If you're concerned about the nut loosening over time, you may always use lock tight to assure adhesion of the nut to the bolt. If you pull the bolt through: you can put the bolt back through from the top and re-tighten the nut. you can paint over it after.  End product:    Product review: My impressions: -It's a well thought out and well designed product. I'm glad that Velox went as far as they did to test their product. And from the data I gathered, it is accurate. I've had them installed for a little over a week, in the rain, hail, and pollen that is poring down in Oregon. This is by far, one of my favorite aftermarket parts I've installed. what changed: -Engine bay pressure is gone, finally. -Intake temps at idle went down -It took longer for the car to warm up on cold days -Component temps went down in the engine bay. -My Innovate supercharger temps went down by a few degrees, which was a socking result, considering the locations. -With the defusers installed, It actually defused enough air that the hood, behind the louvers, stayed wet, after the rest of the hood dried off from passing air. (I wish I got a photo of it. I'll be washing my car this week and I'll try to get a photo of it and post it. It is an awesome result and shows just how efficient they are! install difficulty: 6/10 -Got to be gentle -Got to take your time -Precision is the key, but don't think to hard on it. there's a lot of wiggle room. Just don't over cut, so perform many test fits through the process. likes: -Looks great -Easy to install, for louvers -They work really well! -They are modular. (rain guards, deflectors) -They fit with the natural look of the FRS, in my opinion. Dislikes: -They are fragile. They can easily be damaged during install. I know there's not much that VELOX can do about this without taking away from their design, so I'm not holding this against them. It's the nature of the product, and it will be the same thing with other light weight louver kits. 10/10, would buy again! ------------------- Thanks VELOX! And thanks to everyone that read this! Please let me know what I can change in the future for reviews and what you all want to see! It's the only way I'll get any better! P.S. Send me stickers?
Last edited by PitViper; 04-04-2016 at 04:34 PM. Reason: EDIT: If you're concerned about the nut loosening over time, you may always use lock tight to assure adhesion of the nut to t |

|

|
| The Following 13 Users Say Thank You to PitViper For This Useful Post: | 8R6 (04-04-2016), avishenoy1 (06-21-2016), Bonburner (09-26-2018), DAEMANO (04-04-2016), Decay107 (02-18-2017), FRSBRZGT86FAN (04-03-2016), Initial_RD (06-27-2016), jflogerzi (07-09-2021), kch (04-04-2016), Lonewolf (07-15-2021), shiumai (04-04-2016), sirbobbinhood (04-04-2016), VerusEric (04-03-2016) |
|
04-04-2016, 01:40 PM
|
#2 |
|
Member

Join Date: Mar 2014
Drives: 2014 WRB BRZ
Location: Portland
Posts: 60
Thanks: 7
Thanked 35 Times in 25 Posts
Mentioned: 4 Post(s)
Tagged: 2 Thread(s)
|
I parked in front of you at the PIR swap meet on Saturday and these look awesome. Makes me want to get them for my car even more.
|
|
|
|
| The Following User Says Thank You to sirbobbinhood For This Useful Post: | PitViper (04-04-2016) |
|
04-04-2016, 04:22 PM
|
#3 | |
|
Senior Member
Join Date: Aug 2015
Drives: 2013 Scion FRS Limited Edition
Location: Wilsonville, OR
Posts: 319
Thanks: 247
Thanked 278 Times in 144 Posts
Mentioned: 32 Post(s)
Tagged: 1 Thread(s)
|
Quote:
And I'm glad to hear that you like them I daily mine and i haven't had any issues with the verity of Oregon weather. So I guess you can say they passed the Oregon weather test, haha. So if you do pull the trigger, post some pics, I'd enjoy seeing the end result! Sent from my LG-D950 using Tapatalk |
|
|
|
|
|
04-04-2016, 07:45 PM
|
#4 |
|
Senior Member

Join Date: Jan 2014
Drives: FRS
Location: SoCal
Posts: 2,086
Thanks: 2,738
Thanked 1,338 Times in 746 Posts
Mentioned: 30 Post(s)
Tagged: 2 Thread(s)
|
i dont plan on getting these for my car, but damn. if i were to ever get it, this DIY thread rocks! lol
__________________
|
|
|
|
| The Following User Says Thank You to 8R6 For This Useful Post: | PitViper (04-04-2016) |
|
04-09-2016, 04:01 PM
|
#5 |
|
Shadetree Project Ratchet

Join Date: Apr 2014
Drives: series.Blue
Location: Greater DMV
Posts: 1,014
Thanks: 1,575
Thanked 634 Times in 376 Posts
Mentioned: 10 Post(s)
Tagged: 3 Thread(s)
|
Let me add some tips.
Put the painters tape on the hood before you drill through. BUY A NEW DRILL BIT!! Drill at a low speed, and DO NOT PUSH the drill through. Let the weight of the drill cut through the hood; let the drill bit do the work. You will not chip the paint this way, and won't bend/warp the hood around the holes, as you can see happened on your hood. Lastly, as you pointed out, finger tight on the bolts. No tools needed.
__________________
The Shadetree Project: I turn wrenches
Last edited by Hyper4mance2k; 04-10-2016 at 11:14 AM. |
|
|
|
|
04-24-2016, 10:06 PM
|
#6 |
|
Senior Member
Join Date: Aug 2015
Drives: 2013 Scion FRS Limited Edition
Location: Wilsonville, OR
Posts: 319
Thanks: 247
Thanked 278 Times in 144 Posts
Mentioned: 32 Post(s)
Tagged: 1 Thread(s)
|
Here is some data from an autocross race today.

|
|
|
|
| The Following User Says Thank You to PitViper For This Useful Post: | Lonewolf (07-15-2021) |
|
07-09-2021, 11:14 AM
|
#7 | |
|
Member
Join Date: Dec 2020
Drives: 2013 BRZ sprintex SC
Location: Haifa
Posts: 35
Thanks: 0
Thanked 2 Times in 1 Post
Mentioned: 0 Post(s)
Tagged: 0 Thread(s)
|
Quote:
How much this helped with the sprintex heat soak? Did vooled the supercharger itself? Charge temps where reduced? Pls update. Considering for my sprintex SC brz |
|
|
|
|
|
10-01-2021, 08:19 PM
|
#8 | |
|
Junior Member

Join Date: Oct 2021
Drives: volvo s80
Location: canada
Posts: 1
Thanks: 0
Thanked 0 Times in 0 Posts
Mentioned: 0 Post(s)
Tagged: 0 Thread(s)
|
Quote:
|
|
|
|
|
|
10-01-2021, 09:19 PM
|
#9 | |
|
Master Collaborator

Join Date: Nov 2019
Drives: Was '15 FR-S, 6MT, Now '15 GT86
Location: West Virginia, USA
Posts: 1,395
Thanks: 208
Thanked 985 Times in 597 Posts
Mentioned: 20 Post(s)
Tagged: 0 Thread(s)
|
Reported. Nobody in there right mind would EVER use a hammer drill for this job!
Idiot!
__________________
Quote:
|
|
|
|
|
|
|
|
|
|
|
|
 Similar Threads
|
||||
| Thread | Thread Starter | Forum | Replies | Last Post |
| Modular Hood Louver Kit - Verus Engineering | VerusEric | Cosmetic Modification (Interior/Exterior/Lighting) | 276 | 07-08-2023 04:03 PM |
| TRD JDM Louver Install (and "review") | nataku | DIY (Do-It-Yourself) Guides | 66 | 06-08-2018 05:28 AM |
| New Louver and Side Louver designs | JiroZero713 | Cosmetic Modification (Interior/Exterior/Lighting) | 31 | 08-12-2016 11:55 AM |
| ***SuperTek Carbon Hood Dampers - Install DIY*** | FT-86 SpeedFactory | Cosmetic Modification (Interior/Exterior/Lighting) | 3 | 05-18-2014 08:16 AM |
| DIY Install Mach V Carbon Fiber Hood Dampers: | nataku | DIY (Do-It-Yourself) Guides | 2 | 04-10-2013 09:44 PM |


 2014 Subaru BRZ

