


|
||||||
| DIY (Do-It-Yourself) Guides For all DIYs. |
 |
|
|
Thread Tools | Search this Thread |
 01-03-2016, 11:09 AM
|
#1 |
|
Member
Join Date: May 2015
Drives: 2013 Scion FR-S Asphault
Location: Cartersville, Ga
Posts: 91
Thanks: 19
Thanked 20 Times in 16 Posts
Mentioned: 1 Post(s)
Tagged: 0 Thread(s)
|
DIY: Skunk 2 Ultra Radiator w/ Oil Cooler
First and fore most let me start by saying they claim this to be a simple replacement for your stock radiator with slight modification to your fan shroud. That is partially true if you do not intend to use the oil cooler or go with a turbo setup. I did a turbo setup with this radiator so it is possible, but for this DIY we will focus on the naturally aspirated who intend on using the stock shroud.
The first step is to get your car jacked up and securely placed on jack stands. This should be a given, but since its commonly done wrong please read this thread before continuing. http://www.ft86club.com/forums/showthread.php?t=10111 Tools Needed: 1/4 Drive Ratchet Ratchet Extension Universal Joint 7mm Socket 10mm Socket 12mm Socket 12mm Wrench Flat Head Screw Driver Phillips head crew Driver Pop Clip Pliers Regular Pliers Pick Tool Coolant Coolant Funnel For a visual you can watch this from Mishimoto. [ame="https://www.youtube.com/watch?v=7bUV3nVVtds"]How To Install: Mishimoto Subaru BRZ Scion FR-S Toyota GT86 Performance Radiator - YouTube[/ame] 1) Disconnect negative terminal on battery for safety. 2) Unbolt 3 10mm Bolts and 9 pop clips and remove front splash shield 3) Unbolt 4 10mm, 8 12mm bolts, and 7 pop clips and remove metal skid pan. 4) Unbolt 1 10mm bolt and 2 pop clips from each side the bumper. This connect the fender well splash pans to the bumper. 5) Drain the coolant. Use a pies of 3/8ths hose to drain into pan. Coolant will splash over the frame if you do not use this. You can open the rad cap to make this go quicker. 6) On each side ,remove 3 pop clips that connect fender well to bumper and then 1 pop clip next to corner marker. 6) Remove corner marker. Pull on the back corner to pop them loose and as you pull them out rotate them a little bit. Take care when removing the corner markers. These clips are delicate and may break. 7) Remove pop clip from behind corner marker. 8) Remove 2 pop clips and 5 10mm bolts from top of bumper and take off bumper gasket. 9) Remove front bumper. I would put painters take on the fenders to keep from scratching. Pull firmly on each side at the bumper is clipped in around the headlights. 10) Remove the intake and intake box. (3 10mm bolts ) 11) Remove the windshield washer fill neck and fluid tank . (1 pop clip and 2 10mm bolts ) 12) Remove 2 pop clips and 4 12mm bolts from the top of the rad support 13) Remove 2 12mm bolts from the bottom of the rad support and take of the 2 clips that hold the hood release cable to the rad support. 14) Remove the front air dam from the crash support. ( 4 pop clips ) 15) Remove the coolant tank ( 2 10mm bolts ) 16) Remove 4 10mm bolts that hold the fill neck housing to the front of the car. ( remove bracket ) 17) Remove the upper rad hose and assembly. 18) Disconnect the fan harness and unclip from fan shroud 19) Unclip the rad on each side and lift out. ( Don't immediately pull this out. There is a piece of foam connected to this. Take a flat head and work your way through it to remove from the shroud. 20) Remove lower rad hose. 21) Remove 4 10mm bolts that hold the AC condenser to the rad. 22) Remove 4 10mm bolt that hold the radiator stays 23) Unclip harness for the horns from the radiator and remove the rad itself. 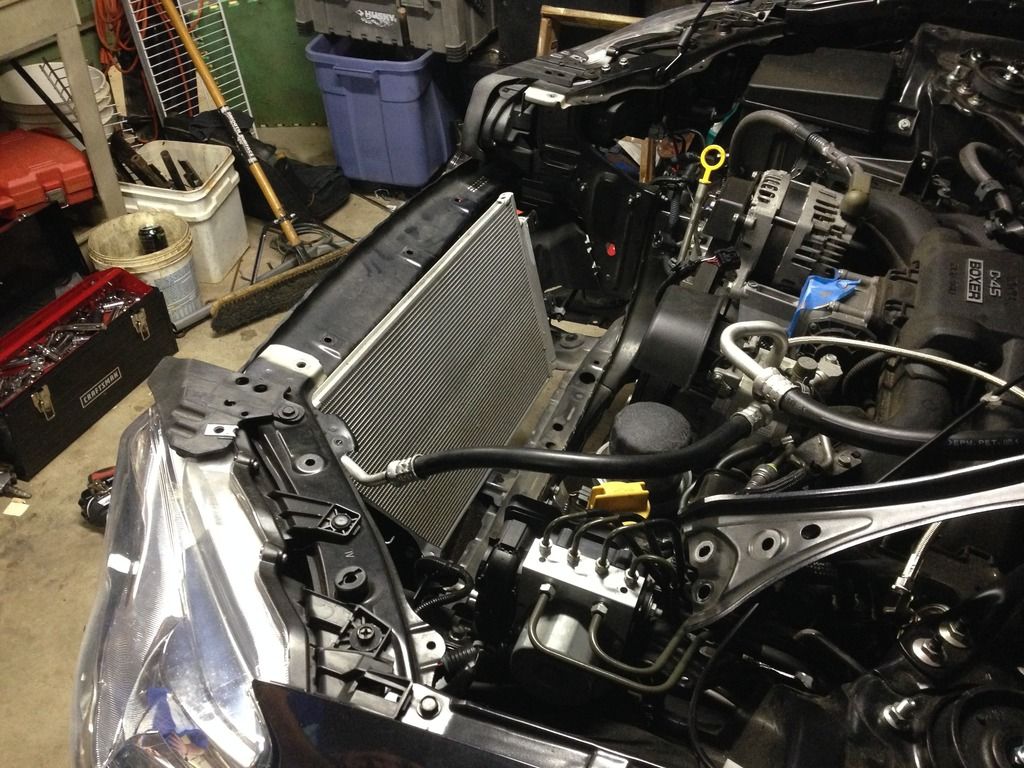 Right here is where we will take a turn from the how too video posted by Mishimoto. We have a built in oil cooler and we need to accommodate the layout for the new lines. I set in the new radiator and found the center on the headlight support. Using a metal hole saw I was able to cut out the space necessary to bring the line through. You will also need to adjust the upper AC line. Be careful when bending this line. You do not want to put a crease in the line whatsoever. 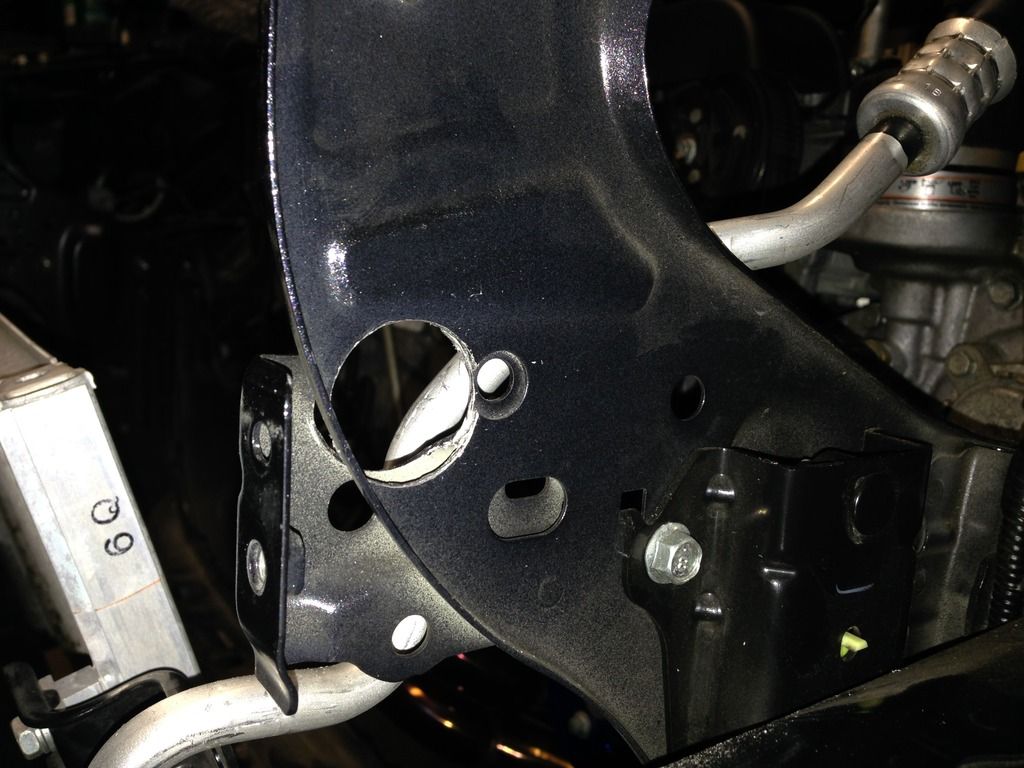 My fittings to make these lines were pretty basic. The Skunk2 Oil adapter uses 8an fitting and the radiator uses 1/2npt. Here is a list: 1 1/2npt male to 8an male 1 1/2npt male to 8an male 90 degree 2 90 degree 8an hose fittings 2 45 degree 8an hose fittings 3 ft 8an hose 2 8an male to 8am male fittings Use the 1/2 npt elbow with 8an 45 on the lower and the 1/2 npt straight with the 8an 90 on the upper. It will look something like this. 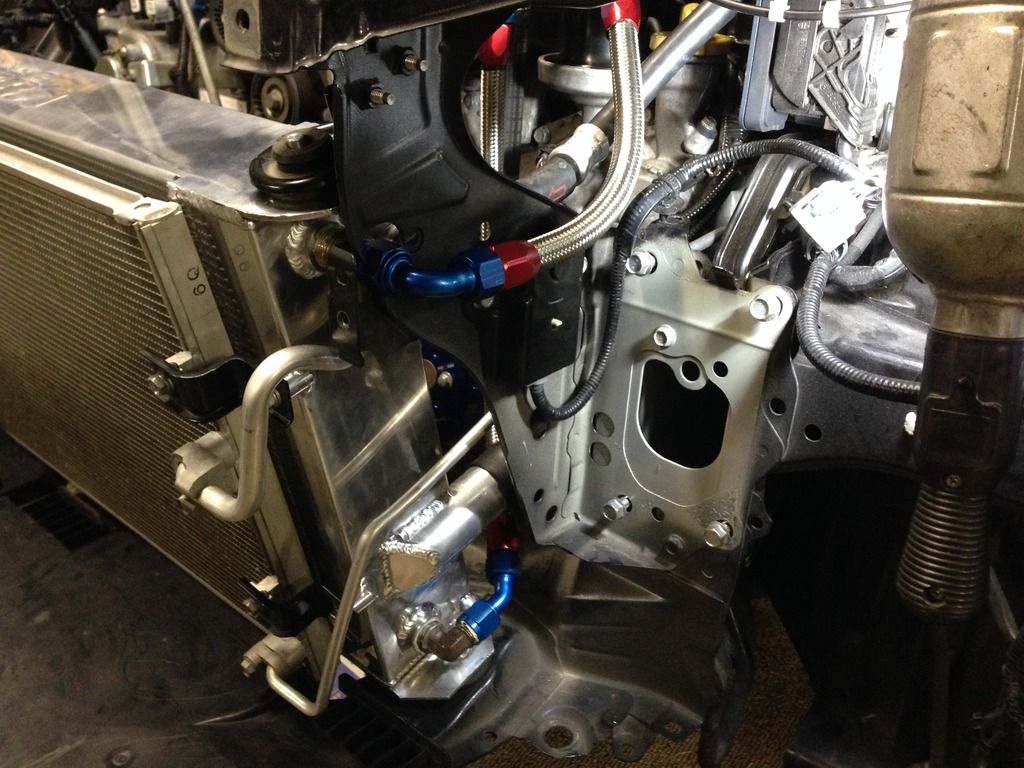 You may need to modify your hole on the top a little to make sure you have no rubbing. You want a good bit of clearance on these lines. Install the sandwich adapter 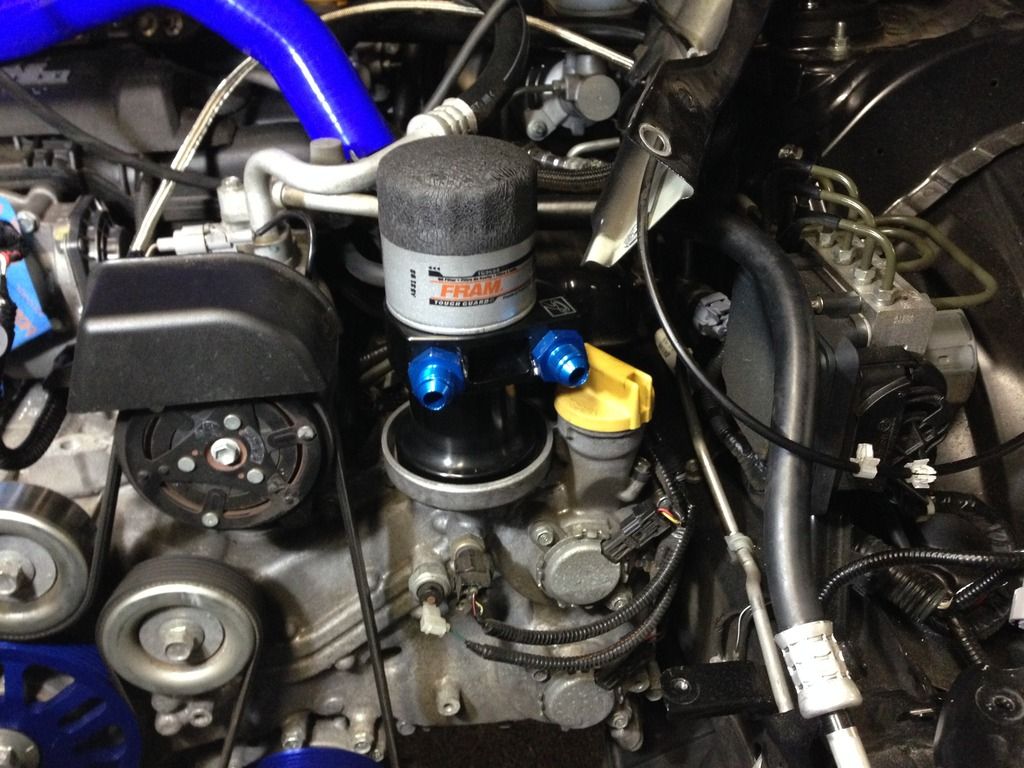 Run all your hoses  Reinstall the fan shroud. You will have to modify the top of shroud where the radiator support comes down over it. Sorry I didn't take a pic of what I cut off but you can use your own judgment once you have it in place. 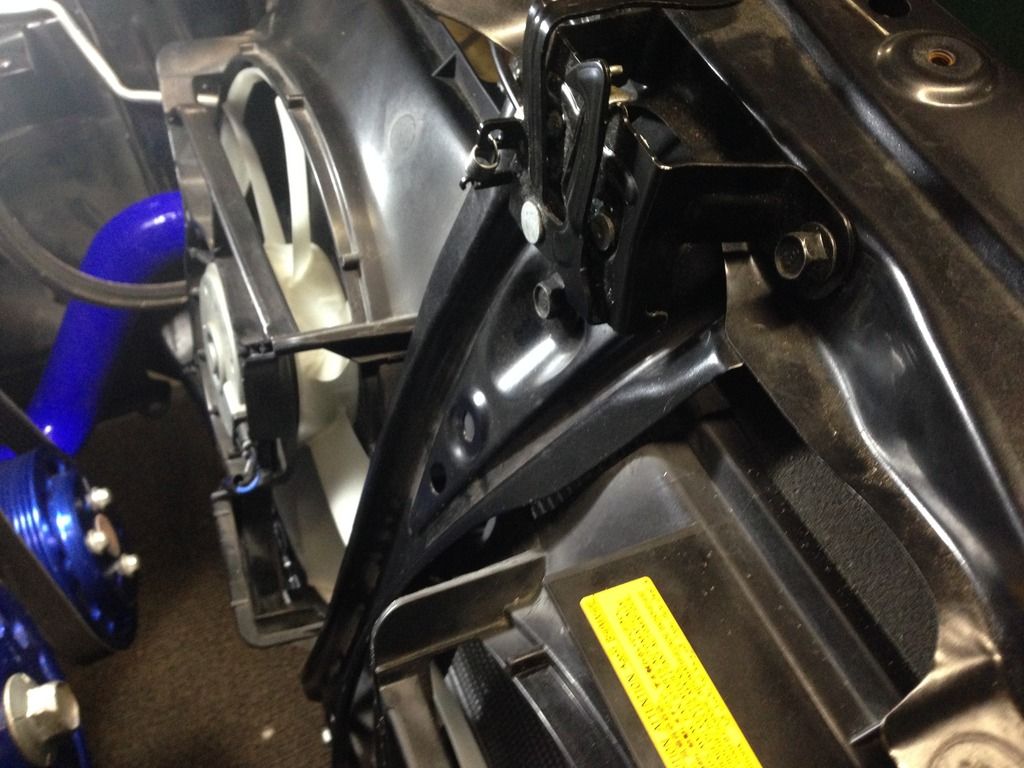 Now you can start to reinstall the AC condenser and rad hoses. You will need to bend out the bracket that holds the filler neck. The radiator is so wide that you will need to adjusted the filler cap bracket to push the neck closer to the motor and up. The angles need to be closer to 135 degrees to use the stock setup. Look at the pic below to get a better idea of what I mean. If you are going turbo you will need to go a different route if your inner cooler piping travels over and next to the passenger headlight. 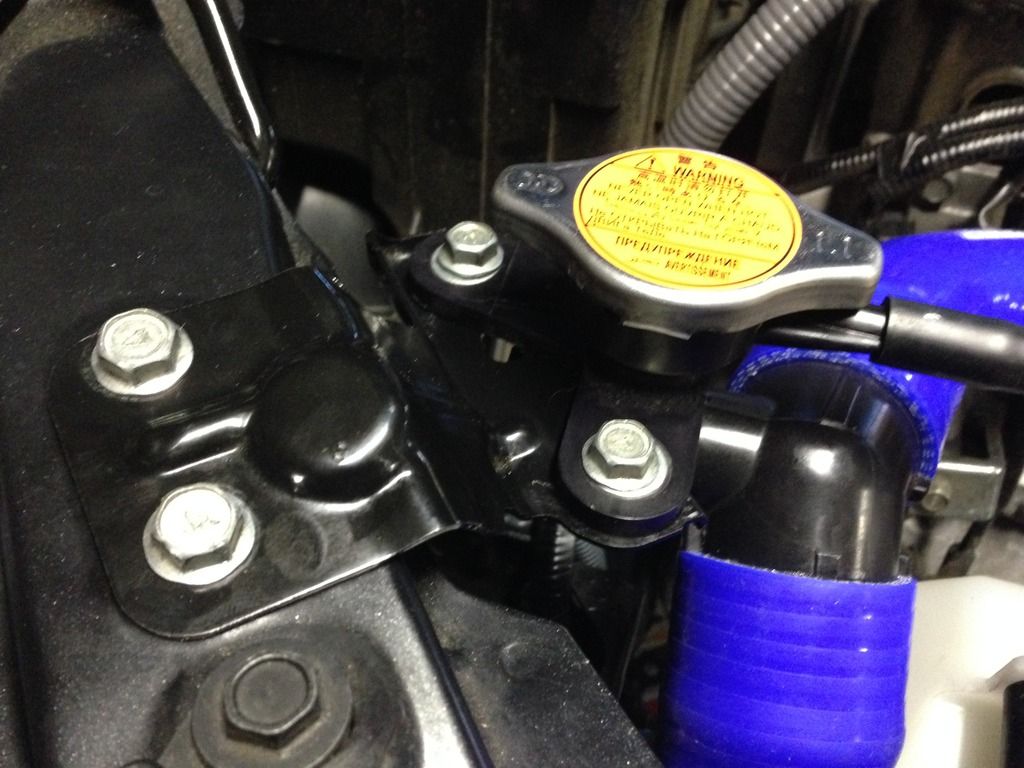 Add coolant test for leaks. Start the car and then check oil for proper level. I had to add a little. Once you are leak free you can reassemble in the reverse order. I hope this DIY helped for those who choose to do the Skunk 2 Ultra. Please post questions, if any, and I will do my best to answer. Thanks for the read. Last edited by g0odspeed; 01-11-2016 at 05:03 PM. |

|

|
| The Following 3 Users Say Thank You to g0odspeed For This Useful Post: |
|
01-20-2016, 12:55 PM
|
#2 |
|
義理チョコ

Join Date: Sep 2014
Drives: a 13 e8h frs
Location: vantucky, wa
Posts: 31,865
Thanks: 52,120
Thanked 36,513 Times in 18,917 Posts
Mentioned: 1106 Post(s)
Tagged: 9 Thread(s)
|
Great read. Thanks for the step-by-step.
Please let us know how this rad holds up. I've been really torn between this and a standard air/oil unit.
__________________
|
|
|
|
|
01-20-2016, 12:57 PM
|
#3 | ||
|
Not Bаnned Anymore

Join Date: Jan 2015
Drives: Heavily Modified FRS
Location: Calgary, AB
Posts: 9,827
Thanks: 14,918
Thanked 8,274 Times in 4,797 Posts
Mentioned: 355 Post(s)
Tagged: 374 Thread(s)
|
Quote:
Looks like a nice setup OP
__________________
Quote:
 |
||
|
|
|
| The Following 2 Users Say Thank You to go_a_way1 For This Useful Post: | g0odspeed (01-20-2016), Ultramaroon (01-20-2016) |
|
01-20-2016, 02:52 PM
|
#4 | ||
|
Member
Join Date: May 2015
Drives: 2013 Scion FR-S Asphault
Location: Cartersville, Ga
Posts: 91
Thanks: 19
Thanked 20 Times in 16 Posts
Mentioned: 1 Post(s)
Tagged: 0 Thread(s)
|
Quote:
Quote:
|
||
|
|
|
| The Following User Says Thank You to g0odspeed For This Useful Post: | go_a_way1 (01-20-2016) |
|
01-20-2016, 03:01 PM
|
#5 | ||
|
Not Bаnned Anymore
Join Date: Jan 2015
Drives: Heavily Modified FRS
Location: Calgary, AB
Posts: 9,827
Thanks: 14,918
Thanked 8,274 Times in 4,797 Posts
Mentioned: 355 Post(s)
Tagged: 374 Thread(s)
|
Quote:
__________________
Quote:
|
||
|
|
|
|
01-20-2016, 08:40 PM
|
#6 | |
|
Member
Join Date: May 2015
Drives: 2013 Scion FR-S Asphault
Location: Cartersville, Ga
Posts: 91
Thanks: 19
Thanked 20 Times in 16 Posts
Mentioned: 1 Post(s)
Tagged: 0 Thread(s)
|
Quote:
|
|
|
|
|
| The Following User Says Thank You to g0odspeed For This Useful Post: | go_a_way1 (01-20-2016) |
|
12-26-2016, 04:43 PM
|
#7 |
|
Member
Join Date: Apr 2016
Drives: GT86 GTS
Location: Sydney
Posts: 94
Thanks: 13
Thanked 24 Times in 18 Posts
Mentioned: 0 Post(s)
Tagged: 0 Thread(s)
|
Great write up, any reviews on this rad?
|
|
|
|
| The Following User Says Thank You to Bobster For This Useful Post: | RD1428 (03-16-2020) |
|
01-29-2018, 10:46 PM
|
#8 | |
|
Member
Join Date: May 2015
Drives: 2013 Scion FR-S Asphault
Location: Cartersville, Ga
Posts: 91
Thanks: 19
Thanked 20 Times in 16 Posts
Mentioned: 1 Post(s)
Tagged: 0 Thread(s)
|
Quote:
|
|
|
|
|
|
01-29-2018, 10:55 PM
|
#9 | |
|
Senior Member
Join Date: May 2015
Drives: Brz
Location: Bay Area, CA
Posts: 131
Thanks: 96
Thanked 39 Times in 31 Posts
Mentioned: 1 Post(s)
Tagged: 2 Thread(s)
|
Quote:
__________________
Daily Project: Honda s2000
Track: 707 WHP Turbo Honda Civic EG Old: Kraftwerks Supercharged Subaru Brz |
|
|
|
|
|
01-29-2018, 11:08 PM
|
#10 | |
|
Member
Join Date: May 2015
Drives: 2013 Scion FR-S Asphault
Location: Cartersville, Ga
Posts: 91
Thanks: 19
Thanked 20 Times in 16 Posts
Mentioned: 1 Post(s)
Tagged: 0 Thread(s)
|
Quote:
|
|
|
|
|
| The Following User Says Thank You to g0odspeed For This Useful Post: | JoeeStacks (01-30-2018) |
|
01-30-2018, 10:52 AM
|
#11 | |
|
Senior Member
Join Date: Jun 2014
Drives: frs
Location: Gunsai
Posts: 4,877
Thanks: 7,145
Thanked 2,922 Times in 1,769 Posts
Mentioned: 23 Post(s)
Tagged: 2 Thread(s)
|
Quote:
|
|
|
|
|
|
01-30-2018, 12:26 PM
|
#12 | |
|
Senior Member
Join Date: May 2015
Drives: Brz
Location: Bay Area, CA
Posts: 131
Thanks: 96
Thanked 39 Times in 31 Posts
Mentioned: 1 Post(s)
Tagged: 2 Thread(s)
|
Quote:
__________________
Daily Project: Honda s2000
Track: 707 WHP Turbo Honda Civic EG Old: Kraftwerks Supercharged Subaru Brz |
|
|
|
|
|
01-30-2018, 05:31 PM
|
#13 | |
|
Member
Join Date: May 2015
Drives: 2013 Scion FR-S Asphault
Location: Cartersville, Ga
Posts: 91
Thanks: 19
Thanked 20 Times in 16 Posts
Mentioned: 1 Post(s)
Tagged: 0 Thread(s)
|
Quote:
|
|
|
|
|
| The Following User Says Thank You to g0odspeed For This Useful Post: | JoeeStacks (01-31-2018) |
|
|
|
|
|
|
|
 Similar Threads
|
||||
| Thread | Thread Starter | Forum | Replies | Last Post |
| Skunk 2 Radiator/Oilcooler | oSoSlow | Engine, Exhaust, Transmission | 5 | 11-20-2015 11:21 PM |
| Skunk2 ultra radiator | Andreas83 | Engine, Exhaust, Transmission | 92 | 10-27-2015 11:06 PM |
| Skunk 2 Oil Cooler comments? | take the cannoli | Engine, Exhaust, Transmission | 2 | 08-08-2015 03:22 AM |
| skunk 2 intake owners, oil cooler fitment question. | fluffy-reindeer-slayer | Engine, Exhaust, Transmission | 2 | 06-04-2015 10:53 AM |
| Robispec Radiator/oil cooler NEW $800 or trade for NEW FB oil cooler kit. | mike the snake | Engine, Exhaust, Bolt-Ons | 1 | 01-31-2014 05:46 PM |


 Ellana

