


|
||||||
| Member's Car Journals Car journals by our members. |
 |
|
|
Thread Tools | Search this Thread |
 04-27-2020, 04:13 AM
|
#15 |
|
Senior Member

Join Date: Jan 2015
Drives: White GT86
Location: UK
Posts: 153
Thanks: 48
Thanked 108 Times in 58 Posts
Mentioned: 0 Post(s)
Tagged: 0 Thread(s)
|
Day 47: The repair process begins again.
So last week I had a contactless collection of the BRZ as its booked in at a crash collision centre to get the slam panel welded in and ensure everything else is straight. I'm waiting on an update from them this week. Once its done it will come straight back for me to start preparing it for paint.  Untitled by James Baker, on Flickr Untitled by James Baker, on FlickrI also purchased a used SARD style wing which I had delivered via courier. The clear coat has a bit of damage from a pigeon strike, however that will be repaired by my local bodyshop and the side brackets are in solid condition but needed a refresh so I removed the stickers, sanded them down and gave them a blast over with primer before they go full matt black. Once finished it will look like new for a fraction of the cost:  Untitled by James Baker, on Flickr Untitled by James Baker, on FlickrI also received another delivery from Subaru, this time the wheel arch liners, numerous clips, 1 of 2 washer jet covers (The other is on back order from Japan) and the headlight rubber seals (2 of the most expensive bits of rubber I will ever order, ridiculous but needed to bridge the gap between the headlights and the bumpers). I also purchased a used rear bumper as mine was damaged by the previous owner reversing it into something. It was damaged on the textured part which I didnt realise was moulded to the entire bumper, so decided theres no point painting a damaged bumper if I cant replace that textured bit at a later date, hence the new one. If anyone wants a cheap white rear bumper with a couple of marks on the textured part, give me a shout. I have also joined the group buy run by Jordan for the HID setup for the Vland headlights to get some decent light output from them. 
__________________
 https://www.youtube.com/tweedbean - How To Videos https://www.instagram.com/tweedbean - Latest updates |

|

|
|
04-29-2020, 07:04 AM
|
#16 |
|
Senior Member
Join Date: Jan 2015
Drives: White GT86
Location: UK
Posts: 153
Thanks: 48
Thanked 108 Times in 58 Posts
Mentioned: 0 Post(s)
Tagged: 0 Thread(s)
|
Day 49
While the BRZ is away at the crash specialists, I decided to start work on the wing brackets. They weren't in the best visual condition, but it was all superficial:  Untitled by James Baker, on Flickr Untitled by James Baker, on Flickr- So I used a heat gun to remove the GT86 stickers. - Followed by a light sand with fine grit to remove any minor surface imperfections or corrosion - I then cleaned down with a panel prep spray and clean cloth - I used a number of coats of grey primer - Finally finished in matt black  Sard style wing part refresh by James Baker, on Flickr Sard style wing part refresh by James Baker, on FlickrI am looking into what protection a matt clear coat over the top would provide as not used it before. Also had a photo from the crash specialist who are busy working away, they have the slam pane in place and are currently working out if everything else is straight. Once, done it can come back for me to paint the slam panel and get the rest ready for the bodyshop to paint it.  Slam panel is on by James Baker, on Flickr Slam panel is on by James Baker, on Flickr
__________________
https://www.youtube.com/tweedbean - How To Videos https://www.instagram.com/tweedbean - Latest updates |
|
|
|
| The Following User Says Thank You to tweedbean For This Useful Post: | tehShirt (04-29-2020) |
|
05-01-2020, 06:24 AM
|
#17 |
|
Senior Member
Join Date: Jan 2015
Drives: White GT86
Location: UK
Posts: 153
Thanks: 48
Thanked 108 Times in 58 Posts
Mentioned: 0 Post(s)
Tagged: 0 Thread(s)
|
Day 51 - More Progress
The car is now completely straight and panels aligned. The passenger leg was bent backwards, but this has now been rectified using the fancy jig setup they have. I'm just waiting to hear when the car can be transported back to me. Excited as its starting to actually look like a car again even if I know the front end has to come apart again.  Untitled by James Baker, on Flickr Untitled by James Baker, on FlickrPhotos from when he was lining it all up: 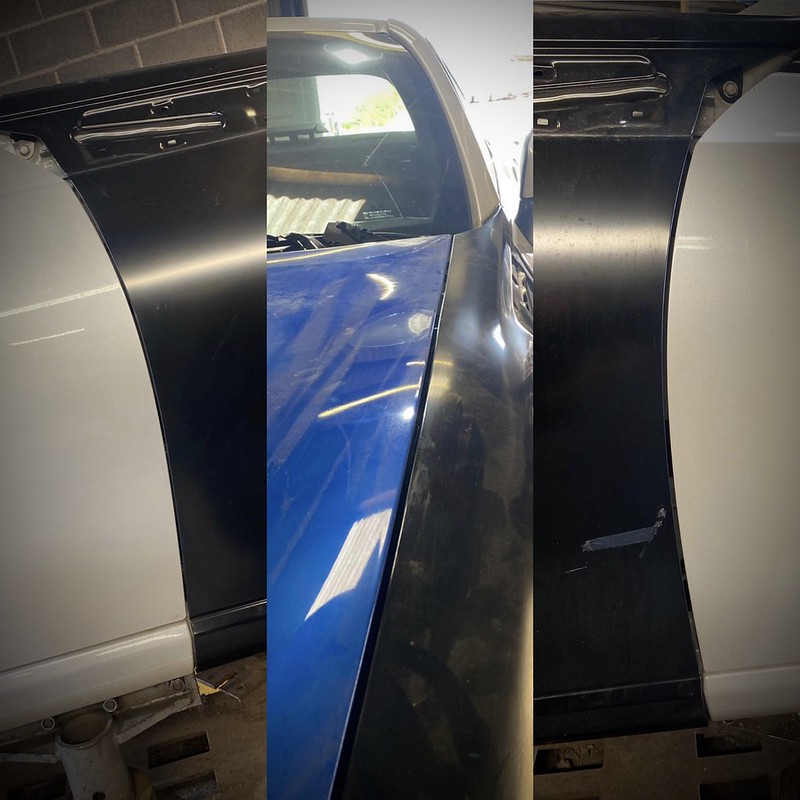 Untitled by James Baker, on Flickr Untitled by James Baker, on FlickrHere you can see the gap left if you dont buy or re-use the stick on rubber seals from a BRZ especially if you are doing the 2017 facelift bumper retro fit like im doing. I have the seals on the shelf to stick on when the car gets back to me:  Untitled by James Baker, on Flickr Untitled by James Baker, on FlickrFinally I picked up a super cheap set of used Rota Grids 18x8.5 et44 they need a refurb and are currently sitting on a new set of budget tyres Avon ZV7 that came with them, these will keep me rolling while I work on the car and will allow me to sell on the stock wheels which have decent tread and have been painted black by the previous owner. Eventually I will replace the Grids but for now they look better than the stock wheels:  Untitled by James Baker, on Flickr Untitled by James Baker, on Flickr
__________________
https://www.youtube.com/tweedbean - How To Videos https://www.instagram.com/tweedbean - Latest updates |
|
|
|
| The Following User Says Thank You to tweedbean For This Useful Post: | new2subaru (05-01-2020) |
|
05-11-2020, 04:07 AM
|
#18 |
|
Senior Member
Join Date: Jan 2015
Drives: White GT86
Location: UK
Posts: 153
Thanks: 48
Thanked 108 Times in 58 Posts
Mentioned: 0 Post(s)
Tagged: 0 Thread(s)
|
Day 61
Last week the BRZ arrived back via contactless delivery. Fully aligned and ready to go. Ignore the bonnet gap, the bonnet is open as I needed to fix the lock before I close it:  Untitled by James Baker, on Flickr Untitled by James Baker, on FlickrHowever my first job was to start stripping the front end back down so I could fit the rads/aircon/fans. Super easy job now I have done it multiple times.  Untitled by James Baker, on Flickr Untitled by James Baker, on FlickrMy make shift painting station where I painted everything within the engine bay/front that had come from other cars or had come from Subaru in the black primer type finish.  Untitled by James Baker, on Flickr Untitled by James Baker, on FlickrI decided to go with matt black for a simple clean look. I will eventually do the entire engine bay in matt black as it will tie in with whichever colour I do the exterior and the engine isnt coming out for the respray so its easier for me to paint it matt black and get a decent finish. Hence why you can see paint under where the front wings will go. Next I fitted the radiator/air con/fan assembly, I had to swap over the air con metal hoses as mine were also damaged from the crash. I then followed the correct process to fill/bleed/test the radiators with no signs of leaks:  Untitled by James Baker, on Flickr Untitled by James Baker, on FlickrThis was a relief as it means I can move the car with no fear of damaging everything as this now means I have a running car. Idles perfectly, the engine seems good with no error codes which is a bonus. Once that was done I set about bolting up the front end, fitting the crash beam, crash sensors etc and accounting for all the hanging connectors. All went back perfectly. I also refitted the airbox, snorkel and the surround that sits between the two. New items added to the list of bits to buy include the radiator filler bracket and a new filler neck for the washer reservoir:  Untitled by James Baker, on Flickr Untitled by James Baker, on FlickrNext I plumbed in the new washer reservoir which had been destroy in the crash. Check for leaks and all good. Now I need to order some washer jets for the headlights but other than that the washer system is now fully functional again:  Untitled by James Baker, on Flickr Untitled by James Baker, on FlickrPrep for paint Fixing wise there isnt much left to do so the car can now go for paint, however I need to strip the car to keep costs down. So I stripped everything needed to get the car painted including: -Both wings -Rear Lights -Door Seals -Window Seals -Aerial -Roof trim -Wing Mirrors -Kick Plates -Door cards (I will replace weather seal plastic once painted)  Untitled by James Baker, on Flickr Untitled by James Baker, on FlickrSo the only things left that I need to do this week are the: - Rear Bumper - Door Handles Then its ready for paint: 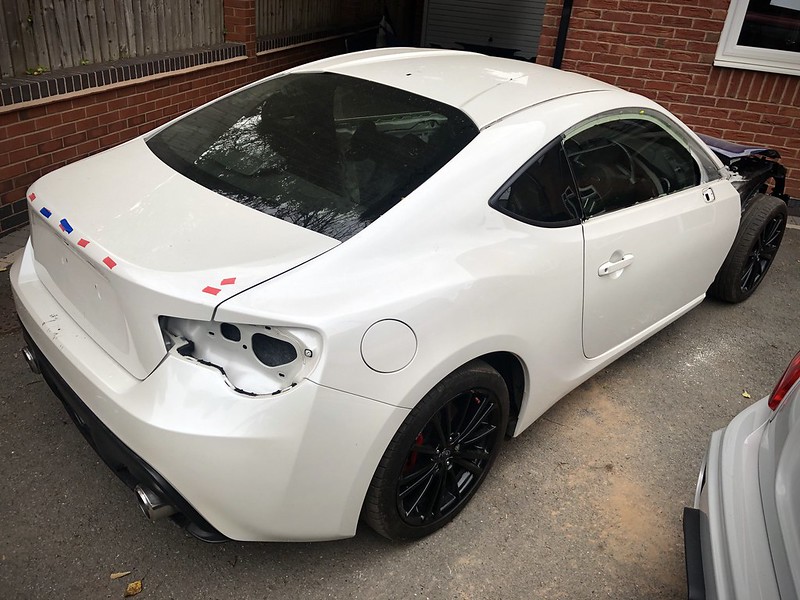 Untitled by James Baker, on Flickr Untitled by James Baker, on Flickr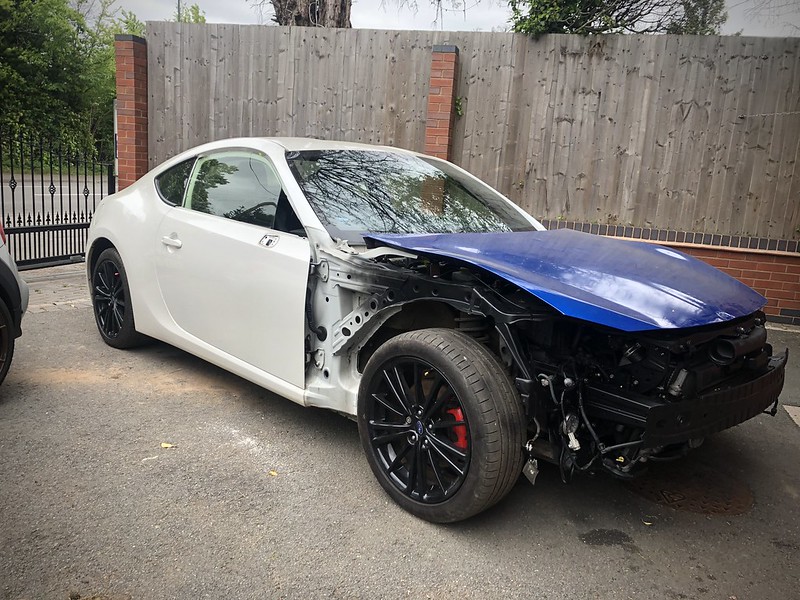 Untitled by James Baker, on Flickr Untitled by James Baker, on FlickrAlso my bonnet lifters arrived, they will go on the shelf to be fitted once the car has been painted as they will only have to come off again: 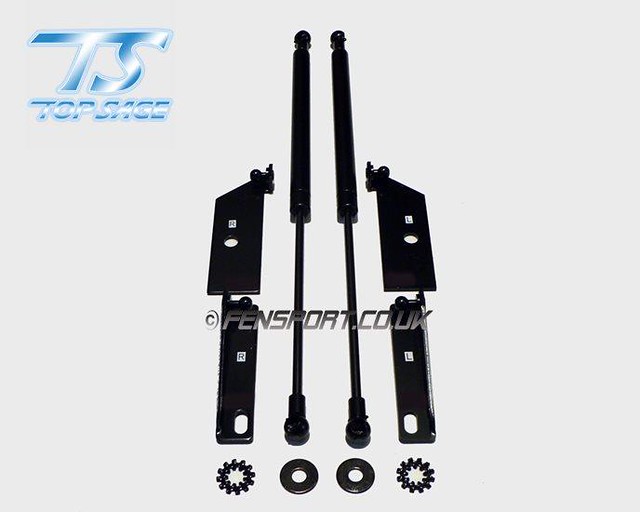 Untitled by James Baker, on Flickr Untitled by James Baker, on FlickrAlso a courier today is collecting a Boral Unequal length manifold and a Milltek Overpipe that came up for sale at a great price. I fancy a bit of Scooby rumble from the boxer while I save up for forced induction. Removing Exterior Door Handles If anyone has any tips for doing this on a BRZ/GT86/FRS that have the touch sensors, please let me know. Only way I can see so far is to remove the glass to get to the connector to disconnect it. Its super easy for cars without this feature as its one torx headed bolt and you are done, not so simple on the UK spec cars with the touch sensors.
__________________
https://www.youtube.com/tweedbean - How To Videos https://www.instagram.com/tweedbean - Latest updates |
|
|
|
| The Following User Says Thank You to tweedbean For This Useful Post: | Opie (05-18-2020) |
|
05-13-2020, 04:36 AM
|
#19 |
|
Senior Member
Join Date: Jan 2015
Drives: White GT86
Location: UK
Posts: 153
Thanks: 48
Thanked 108 Times in 58 Posts
Mentioned: 0 Post(s)
Tagged: 0 Thread(s)
|
Day 63
I had confirmation yesterday that the bodyshop can now get paint so the car is being transported over there this coming Monday for paint to begin. So yesterday I removed the final parts, the door handles and the rear bumper. The rear bumper must have been off previously as half the clips were missing. The exterior door handles looked to be a tricky task as the UK spec car has an extra sensor which I was told you need to remove the glass to disconnect the connector before removing the door handle in the normal way. However under investigation I worked out you could just pull really hard and the connector comes out with the handle then you disconnect once off, saves the faff of removing the glass:
__________________
https://www.youtube.com/tweedbean - How To Videos https://www.instagram.com/tweedbean - Latest updates |
|
|
|
|
05-13-2020, 06:52 AM
|
#20 |
|
Senior Member
Join Date: Jan 2015
Drives: White GT86
Location: UK
Posts: 153
Thanks: 48
Thanked 108 Times in 58 Posts
Mentioned: 0 Post(s)
Tagged: 0 Thread(s)
|
Day 63 Continued.
After waiting for a while due to Covid I finally put in an order to Japanparts. This is my first order with them so hoping for a good experience. Ive gone for the following, all none UK parts: Genuine STI lip kit including front lip, side skirts, rear bumper trim and STI strut brace:  Alcantara/suede visor cover with red stitching:  Black buttons to integrate with the controller for the retro fit cluster which comes in black:  Driver and passenger side TS upper door trims in Alcantara/suede with red stitching: 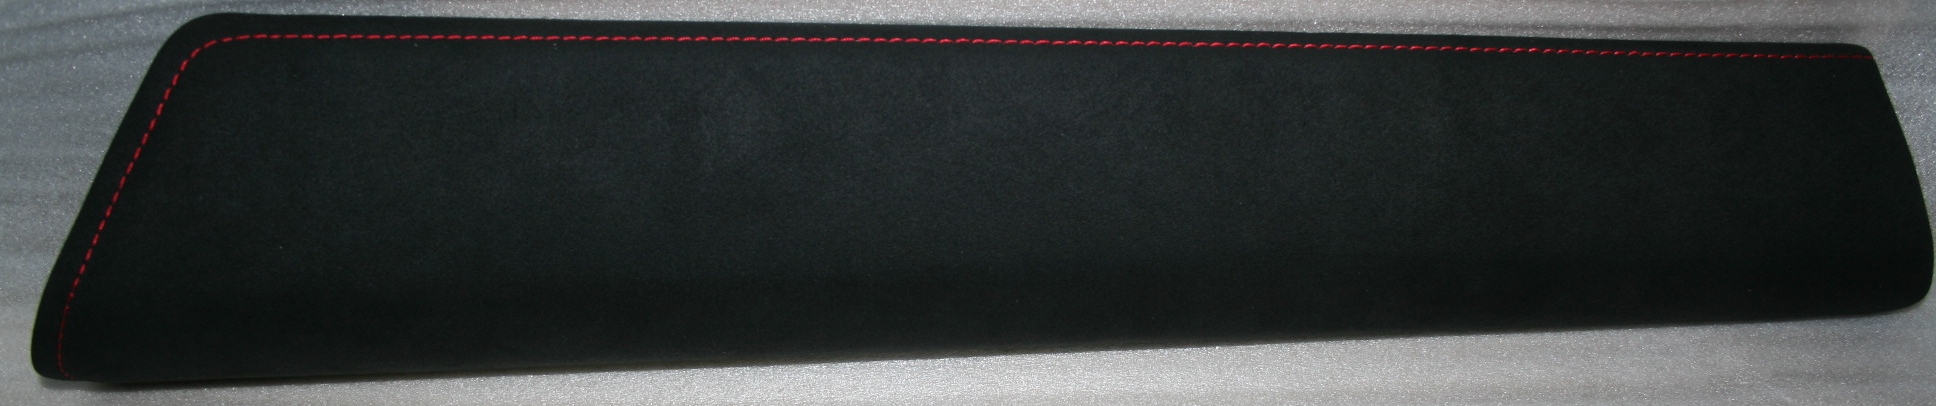
__________________
https://www.youtube.com/tweedbean - How To Videos https://www.instagram.com/tweedbean - Latest updates |
|
|
|
| The Following User Says Thank You to tweedbean For This Useful Post: | Busybee (04-21-2022) |
|
05-14-2020, 02:34 PM
|
#21 |
|
Senior Member
Join Date: Jan 2015
Drives: White GT86
Location: UK
Posts: 153
Thanks: 48
Thanked 108 Times in 58 Posts
Mentioned: 0 Post(s)
Tagged: 0 Thread(s)
|
Day 64
I decided to test fit the facelift dial cluster which contains the additional digital dials. Pretty much plug and place on push button start cars. This is part one of the install, once I have the controller unit to make up for the lack of steering wheel controls I will do a second video:  Untitled by James Baker, on Flickr Untitled by James Baker, on FlickrAlso my Borla unequal length manifold and Milltek arrived today, this should release that Scooby rumble:  Untitled by James Baker, on Flickr Untitled by James Baker, on Flickr
__________________
https://www.youtube.com/tweedbean - How To Videos https://www.instagram.com/tweedbean - Latest updates |
|
|
|
|
05-18-2020, 09:03 AM
|
#22 |
|
Senior Member
Join Date: Jan 2015
Drives: White GT86
Location: UK
Posts: 153
Thanks: 48
Thanked 108 Times in 58 Posts
Mentioned: 0 Post(s)
Tagged: 0 Thread(s)
|
Day 68 - Things are moving along nicely
So yesterday I gutted the dash so I can get the trim painted by the bodyshop to match the exterior and all the grey trim rings etc will be going matt black:  Untitled by James Baker, on Flickr Untitled by James Baker, on FlickrThis morning I dropped the BRZ off at the bodyshop for its respray, cant wait to see the new colour on it. I've asked for progress photos throughout so I can keep you all up to date.  Untitled by James Baker, on Flickr Untitled by James Baker, on FlickrI also test fitted the Grids on the car, just to check they actually were 5x100 before I get them refurbed. Note coilovers will be ordered come pay day to reduce that wheel gap.  Untitled by James Baker, on Flickr Untitled by James Baker, on Flickr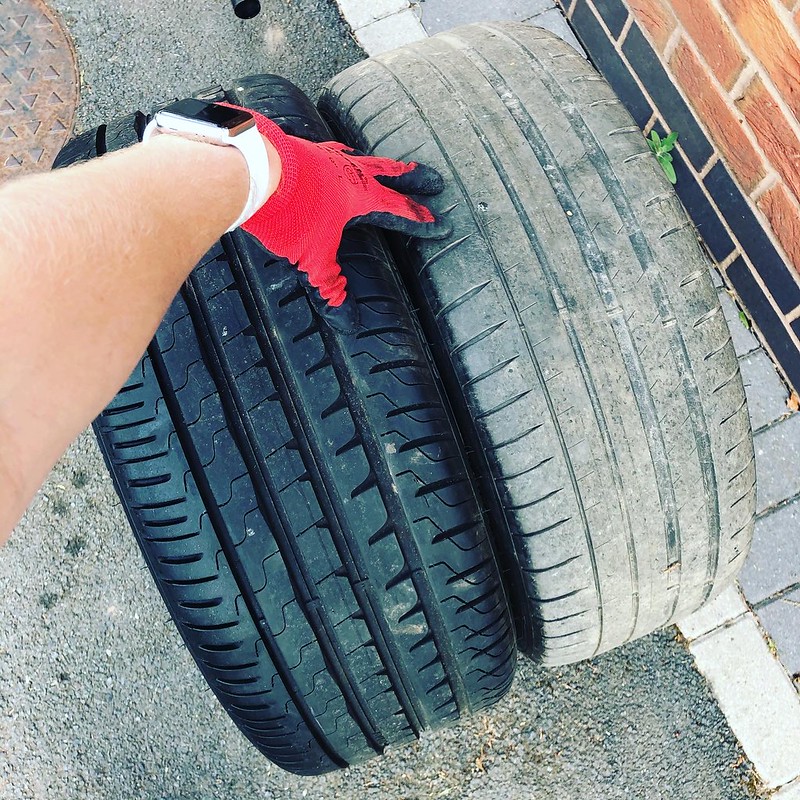 Untitled by James Baker, on Flickr Untitled by James Baker, on FlickrI also used my day off today to take a trip to City Wheel Refurbishment to drop the Rota's off for a full refurb. Going for a matt finish, for the first time from them, I've always gone gloss from them.  Untitled by James Baker, on Flickr Untitled by James Baker, on Flickr My plans are starting to come together now, its just a shame I still dont have the V5 due to Covid closing down half of the DVLA, 68 days a counting since they received the paperwork.
__________________
https://www.youtube.com/tweedbean - How To Videos https://www.instagram.com/tweedbean - Latest updates Last edited by tweedbean; 05-18-2020 at 11:12 AM. |
|
|
|
|
05-21-2020, 10:04 AM
|
#23 |
|
Senior Member
Join Date: Jan 2015
Drives: White GT86
Location: UK
Posts: 153
Thanks: 48
Thanked 108 Times in 58 Posts
Mentioned: 0 Post(s)
Tagged: 0 Thread(s)
|
Day 71
Well the BRZ is away at the moment so I have very little to progress until its return. SARD Style Wing Refresh Part 2 In regards to the SARD style wing, the brackets etc I refreshed and look like new, so focus turned to the wing, this had suffered a pigeon strike when fitted to the previous owners car. Luckily the carbon wasnt damaged, just the clear coat. Therefore I dropped it off at a local bodyshop that I have used in the past to repair similar carbon items. They flicked off the damaged clear coat and then worked their magic. As per the pic below you can see a before, during and after repair. The final picture is the clear coat being applied, once that has dried for a couple of days they will be giving it a full polish:  Untitled by James Baker, on Flickr Untitled by James Baker, on FlickrReally impressed with their work, its a bodyshop that used to do all the bodywork/paint jobs for lots of the Max Power cars of the past so they know their stuff. I love buying a used item like this a bringing it back to life for a hell of a lot cheaper than buying new. Obviously there are certain components I tend not to buy used like coilovers items as you dont always know the history/true mileage/amount of cars they have been fitted to, but visual items like this especially have little risk if you know the right people you get big rewards. BRZ Fog Lights As mentioned above, some areas of a car you have to go new, such as the front bumper as I couldnt get any used parts but with the fog lights I refused to pay the ridiculous amount Subaru wanted for a brand new fog lights. So I went for some generic ones on ebay for £20 a pair. https://www.ebay.co.uk/itm/Pair-Fog-...72.m2749.l2649  Ive then bought some H8 female wiring connectors to attach to the cars wiring as my connectors were ripped off anyway and these will plug straight into the new foglights: https://www.ebay.co.uk/itm/2PCS-H11-...rwfgWWeipz4f4U All the electrical components have arrived for me to wire up my fog lights. On a BRZ the wiring goes into the bumper mounted DRL then back out of that into the fog light. Therefore I had to use a multimeter to identify the fog light wiring amongst that. Once the car is back I will get some photos of this.
__________________
https://www.youtube.com/tweedbean - How To Videos https://www.instagram.com/tweedbean - Latest updates |
|
|
|
|
05-26-2020, 03:44 PM
|
#24 |
|
Senior Member
Join Date: Jan 2015
Drives: White GT86
Location: UK
Posts: 153
Thanks: 48
Thanked 108 Times in 58 Posts
Mentioned: 0 Post(s)
Tagged: 0 Thread(s)
|
Day 76
More Parcels Finally my parts from JapanParts are here. First of three parcels to arrive were the alcantara with red stitch door toppers and instrument cluster cover from the JDM TS version:  Untitled by James Baker, on Flickr Untitled by James Baker, on FlickrI love alcantara, I cant wait to get these in alongside some other bits once the car is back from paint. Next up with have my SARD style wing. I collected it from my local bodyshop and oh my they have done an amazing job. Its like glass, theres so much depth to the clear coat now with no sign of the previous damage, I would go as far as to say the clearcoat is better than when it was new for sure:  Untitled by James Baker, on Flickr Untitled by James Baker, on FlickrI'm expecting more parts tomorrow.
__________________
https://www.youtube.com/tweedbean - How To Videos https://www.instagram.com/tweedbean - Latest updates |
|
|
|
|
05-27-2020, 05:18 AM
|
#25 |
|
Senior Member
Join Date: Jan 2015
Drives: White GT86
Location: UK
Posts: 153
Thanks: 48
Thanked 108 Times in 58 Posts
Mentioned: 0 Post(s)
Tagged: 0 Thread(s)
|
Day 77
More parts from Japan, this time a full STI kit including front lip, sideskirts and rear bumper trims. All finished in a satin/matt black finish and will be fitted as they are. Glad I went for the genuine bits over rep parts as they should fit no issue, even if they hit my wallet hard: Side Skirts  STI BRZ Parts by James Baker, on Flickr STI BRZ Parts by James Baker, on FlickrFront Lip 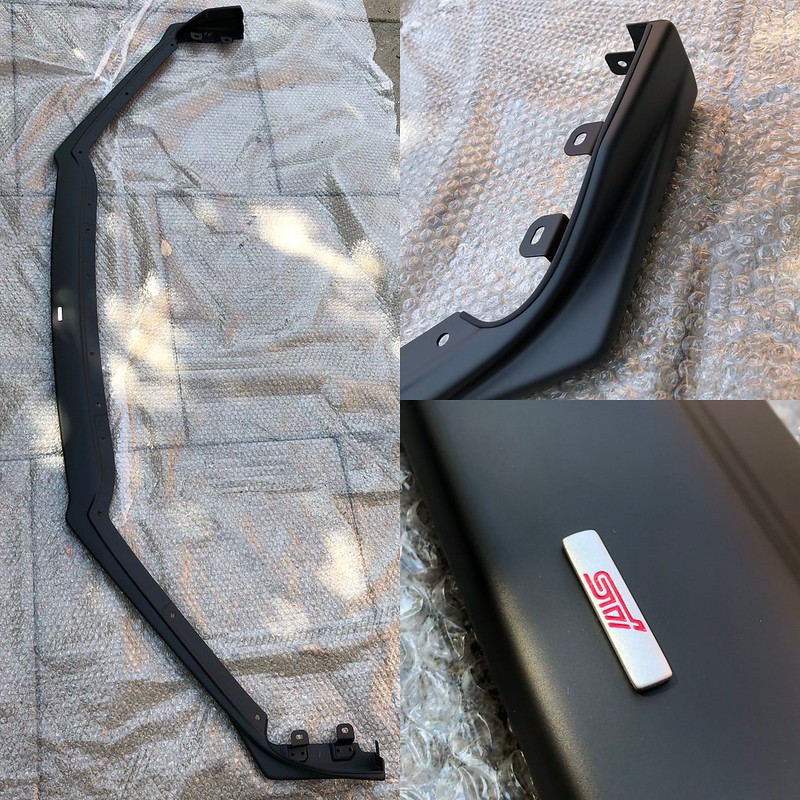 STI BRZ Parts by James Baker, on Flickr STI BRZ Parts by James Baker, on FlickrRear Bumper Trim  STI BRZ Parts by James Baker, on Flickr STI BRZ Parts by James Baker, on FlickrI also have black controls so I can remove the silver ones to work better with my theme:  STI BRZ Parts by James Baker, on Flickr STI BRZ Parts by James Baker, on Flickr
__________________
https://www.youtube.com/tweedbean - How To Videos https://www.instagram.com/tweedbean - Latest updates |
|
|
|
| The Following User Says Thank You to tweedbean For This Useful Post: | weederr33 (06-05-2020) |
|
05-28-2020, 08:18 AM
|
#26 |
|
Senior Member
Join Date: Jan 2015
Drives: White GT86
Location: UK
Posts: 153
Thanks: 48
Thanked 108 Times in 58 Posts
Mentioned: 0 Post(s)
Tagged: 0 Thread(s)
|
Day 78 - I finally legally own the BRZ
After 78 days of waiting the V5 finally turned up today which means its actually SORN'd and legally mine. More parts arrived. Firstly suspension components, I went for Tein Flex Z as I wanted to stick with a Japanese made component where possible and I got a bargain on a brand new set that the owner never got chance to fit. He also had Whiteline droplinks which I also snapped up as no doubt the stock ones will need cutting off, which is a known issue.  Untitled by James Baker, on Flickr Untitled by James Baker, on Flickr Untitled by James Baker, on Flickr Untitled by James Baker, on FlickrI also removed all my silver interior trim before the car went off to paint so I could paint them myself matt black. Not a big fan of matching these to body colour so went for something simple. I sanded, primed, painted matt black then used matt lacquer for protection. I'm intersted to see how long they last, if the finish doesn't hold up, I will invest in some carbon parts but for now this was a simple and cheap fix.  Untitled by James Baker, on Flickr Untitled by James Baker, on FlickrAlso an interesting package arrived from Japan, a flexible STI strut brace:  Untitled by James Baker, on Flickr Untitled by James Baker, on FlickrUnlike a conventional rigid brace, the flexible one is split and joined with pillow ball joints in the centre to be longitudinally mobile while helping laterally stiffen the body of the car. Here is some blurb from Subaru: "Different from a rigid bar which is designed just to increase rigidity of the body of a car, the concept behind this bar is to constantly enhance traction of the wheels by strongly holding in a transverse direction at the same time as moderately handling the impact from the ground, in order to realize a ‘flexible yet elegant driving feel’. As a result, responsiveness at the time of steering improves without compromising comfort, which allows the driver to actually feel that the car can turn as intended, and when they want to go straight, it provides a stable drive without too much impact from uneven road surfaces. As described, this product will further deepen your pleasure of driving. https://www.sti.jp/en/parts/feature/...etowerbar.html I will let you know how I get on with it, it came as a bundle with the other STi bits so I haven't lost anything by trying it.
__________________
https://www.youtube.com/tweedbean - How To Videos https://www.instagram.com/tweedbean - Latest updates |
|
|
|
|
06-01-2020, 09:54 AM
|
#27 |
|
Senior Member
Join Date: Jan 2015
Drives: White GT86
Location: UK
Posts: 153
Thanks: 48
Thanked 108 Times in 58 Posts
Mentioned: 0 Post(s)
Tagged: 0 Thread(s)
|
Pulled together a quick update based on video taken when I got the car back from being straightened and my prep for the bodyshop:
__________________
https://www.youtube.com/tweedbean - How To Videos https://www.instagram.com/tweedbean - Latest updates |
|
|
|
|
06-05-2020, 09:57 AM
|
#28 |
|
Senior Member
Join Date: Jan 2015
Drives: White GT86
Location: UK
Posts: 153
Thanks: 48
Thanked 108 Times in 58 Posts
Mentioned: 0 Post(s)
Tagged: 0 Thread(s)
|
Day 86 - The wheels are back from the refurbisher
As mentioned above, I picked up some super cheaper Rota Grids that looked like they had seen better days to get me off stock wheels until I can get some TE37's. I sent them off to City Wheel Refurbishment https://www.citywheelrefurbishment.co.uk/ in Birmingham who have done many sets of wheels for me and other mates in the past. I decided to go with a matt bronze finish, I have had the gloss version from them before but fancied something a little different, this colour should work well with the new body colour once done. It took a couple of weeks for them to turn them around due to whats going on at the moment but they did a great job especially for the price. £205 including tyre remove/fitting/balancing, it could have been even cheaper at around £30 a wheel if I had gone for a more standard colour such as black/silver and they didn't have to remove/fit/balance tyres. Great service if anyone is looking for somewhere to get theirs wheels done. Ignore the budget tyres, they came pretty much free with the wheels and are literally brand new so threw them on to keep the car rolling while I continue to build it. 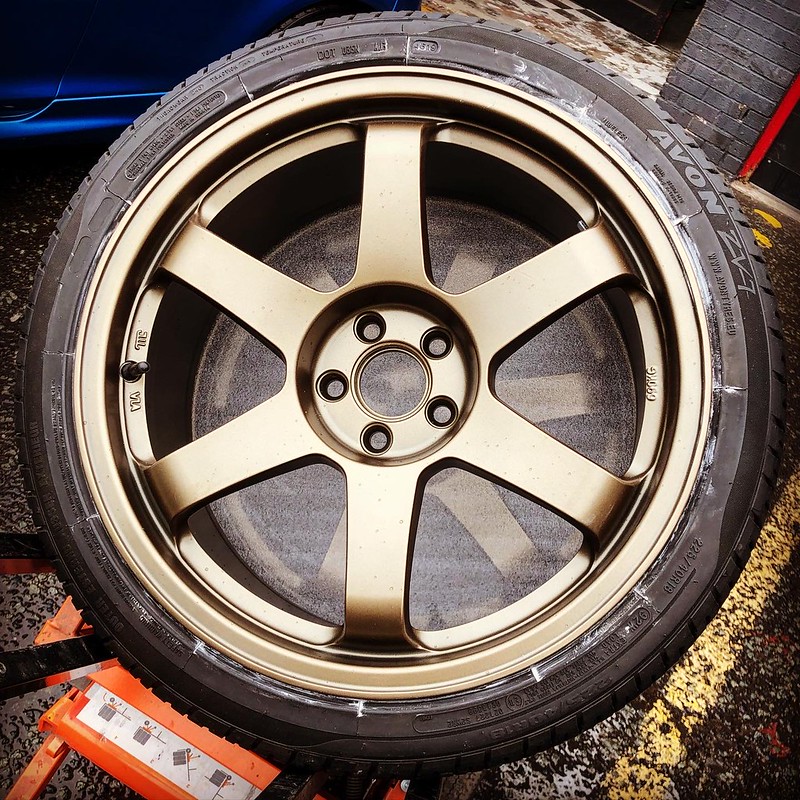 Untitled by James Baker, on Flickr Untitled by James Baker, on Flickr
__________________
https://www.youtube.com/tweedbean - How To Videos https://www.instagram.com/tweedbean - Latest updates |
|
|
|
| The Following User Says Thank You to tweedbean For This Useful Post: | Yoshoobaroo (06-05-2020) |
|
|
|
|
|
| Thread Tools | Search this Thread |
|
|
 Similar Threads
|
||||
| Thread | Thread Starter | Forum | Replies | Last Post |
| tweedbean's Orange GT86 | tweedbean | Member's Car Journals | 2 | 12-05-2016 10:51 AM |
| '13 Subaru BRZ rebuild | P3tras | Member's Car Journals | 96 | 01-03-2016 06:05 PM |
| Subaru BRZ 2015 Series Blue rebuild | kilohercas | Member's Car Journals | 75 | 12-28-2015 08:21 AM |
| Looking to rebuild a Scion FRS | miller.4311 | FR-S & 86 Photos, Videos, Wallpapers, Gallery Forum | 4 | 06-24-2015 06:47 PM |
| Rebuild the one from twins | skalinkin | Scion FR-S / Toyota 86 GT86 General Forum | 23 | 11-14-2014 01:58 PM |


