


 04-18-2013, 10:16 AM
|
#71 |
|
Red is Fastest

Join Date: Dec 2012
Drives: 13 FRS 6MT Firestorm
Location: Central Kentucky
Posts: 439
Thanks: 85
Thanked 242 Times in 120 Posts
Mentioned: 11 Post(s)
Tagged: 0 Thread(s)
|
Yeah, the steering wheel is a bit tricky. Good steady even pull and a little wiggle and it will pop off. I also about smacked myself in the face removing it. I was worried that I had damaged the air bag wiring running through it but all was well.
|

|

|
|
04-18-2013, 10:46 AM
|
#72 | |
|
Senior Member
Join Date: Sep 2012
Drives: 2003 Camry Blue | 2013 FR-S White
Location: Bay Area - South Bay
Posts: 1,144
Thanks: 804
Thanked 288 Times in 221 Posts
Mentioned: 8 Post(s)
Tagged: 0 Thread(s)
|
Quote:
|
|
|
|
|
|
04-18-2013, 11:26 AM
|
#73 | |
|
Senior Member

Join Date: Apr 2012
Drives: Scion Fr-s
Location: Dallas, Texas
Posts: 524
Thanks: 38
Thanked 283 Times in 100 Posts
Mentioned: 4 Post(s)
Tagged: 0 Thread(s)
|
Quote:
|
|
|
|
|
|
04-18-2013, 01:38 PM
|
#74 | |
|
Senior Member
Join Date: Sep 2010
Drives: FR-S
Location: New Orleans, LA
Posts: 423
Thanks: 87
Thanked 107 Times in 68 Posts
Mentioned: 5 Post(s)
Tagged: 0 Thread(s)
|
Quote:
That's $192 minus shipping for the bezels from Amayama. I'm about to rerun my wire the new way coming from that plug. I've been doing this for all my local FRS guys. |
|
|
|
|
|
04-19-2013, 03:52 AM
|
#75 | ||||||
|
give us this day

Join Date: Jul 2012
Drives: AE86 - FRS
Location: Three Stars & A Sun
Posts: 404
Thanks: 138
Thanked 161 Times in 37 Posts
Mentioned: 1 Post(s)
Tagged: 0 Thread(s)
|
references..
FRS Fogs using BRZ Stalk http://www.ft86club.com/forums/showthread.php?t=29263 Fog Light Powered with Factory Stalk and BCM http://www.ft86club.com/forums/showthread.php?t=33025 Scion Frs Fog Lights http://www.ft86club.com/forums/showthread.php?t=27581 for more information and guide please visit these threads.. 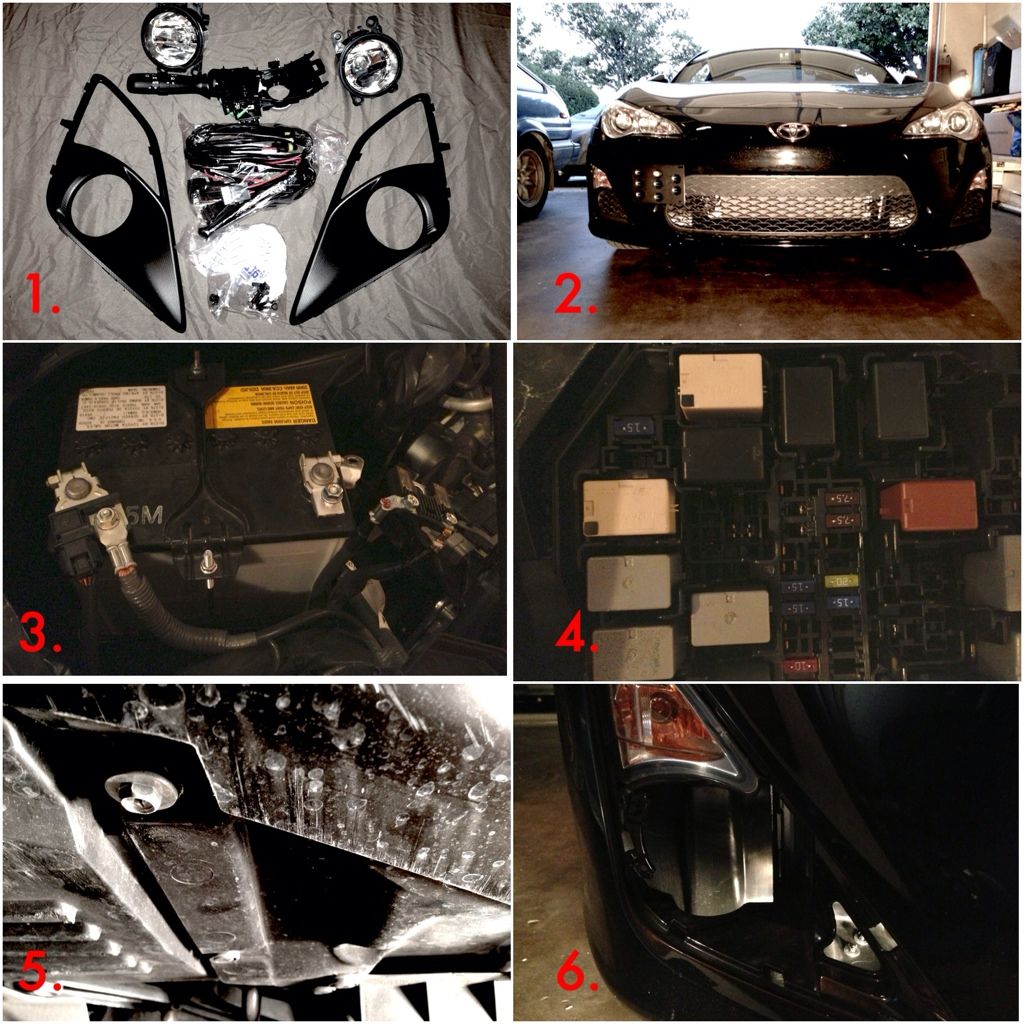 1. L&R Fog Lights Quote:
Quote:
Item#: 83115FJ070 http://subarupartsforyou.com/cp_part...p?partid=23294 H11 Harness Any h11 harness you prefer, wether you buy one from amazon.com or get Nigel fog light harness kit. Mounting Hardwares You need 4x m5 or m6 Allen bolts, 4x m5 or m6 washer, 4x nylon m5 or m6 nuts. Extra Harness Pins, to make a new harness with your h11 connectors, to connect to the signal lights connectors.  http://www.ft86club.com/forums/showt...=29263&page=12 2. Start by disconnecting the battery 3. Positive Terminal disconnected 4. 3x fuses for the Horn were taken off. Heres a reference http://www.ft86club.com/forums/showthread.php?t=12257 5. Now take off plastic splash guard underneath the bumper, both passenger and driver sides, there 1x 10mm nut you need to take off and 2 pop offs.. 6. take off the plastic cover on passenger side, be patient, you can actually literally pull it all off once you get a corner off. 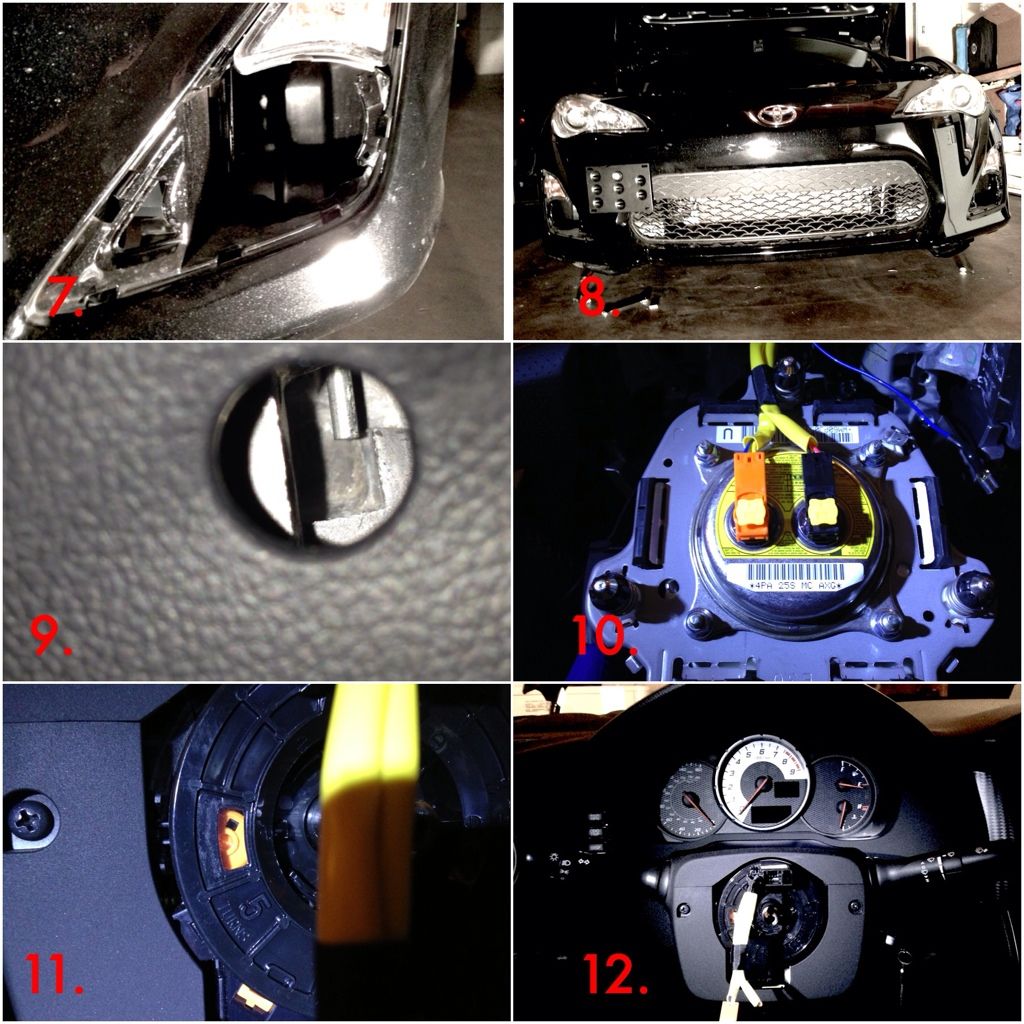 7. Now same as passenger side take off driver side plastic cover 8. Here both driver and passenger side plastic coverts taken off 9. Now its time to take the steering wheel off, first you need to take the airbag off. once again dont forget to disconnect battery off. now go to the cabin and push the pin forward the center of the steering wheel on all three holes. while pulling the airbag itself towards you. Reference http://www.ft86club.com/forums/showt...ghlight=Airbag 10. remove both orange and black harness off the also the ground for the horn off the airbag remove the nut that's holding the steering wheel, then gently pull the steering wheel towards you. 11. make sure to tape the steering angle sensor does not move I used a tape t o make sure it does not move, basically you want the orange to be visible in the window just like the picture. 12. remove two bolts to take upper and lower plastic steering cover. Quote:
 13. now remove the white connector on the steering angle sensor 14. remove all off the sensors underneath, the yellow one is a tricky one you actually need to push it from the end. Quote:
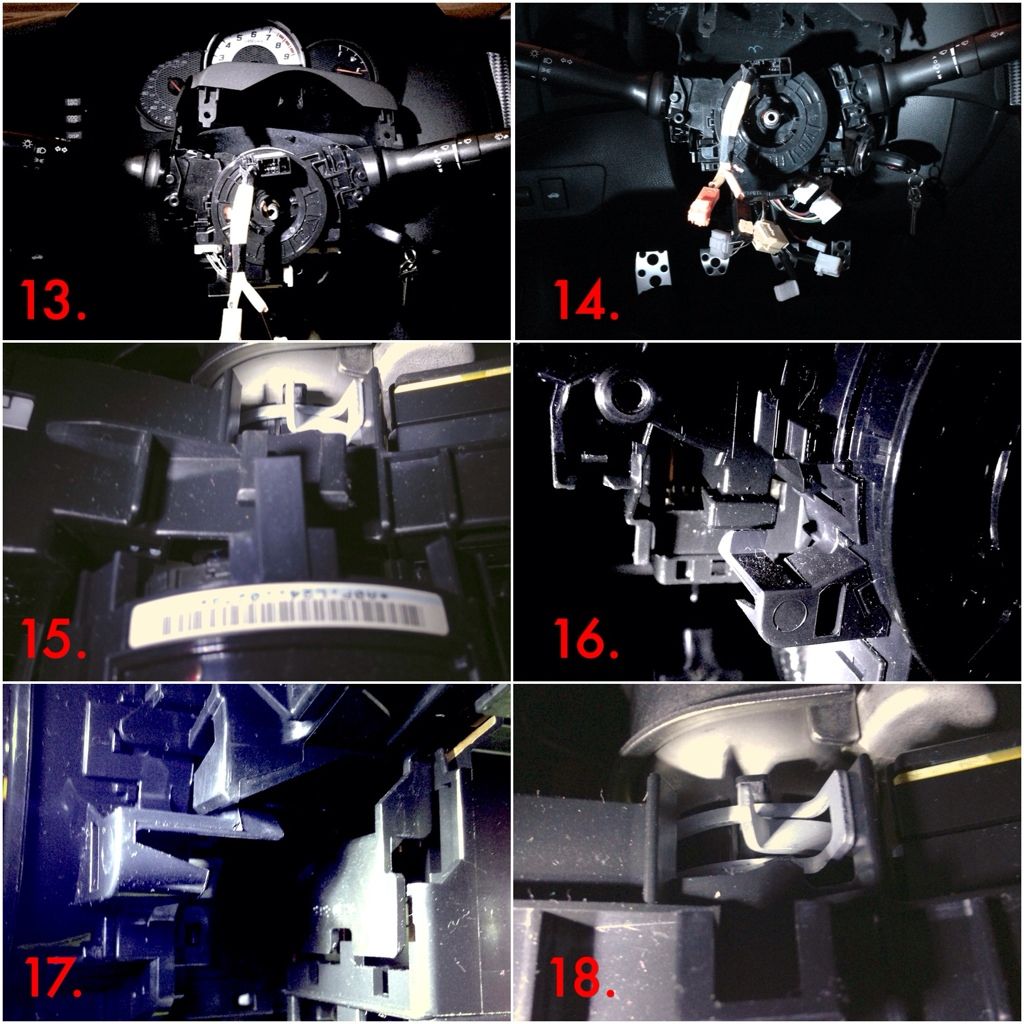
16. Then unclip the clip on the 9 oclock position to remove the steering angle sensor 17. Finally, unclip the clip on the 3 oclock position to remove the steering anlge sensor 18. After removing the sensor, locate the clamp thats holding the switch, the clamp is at the back at your 12 oclock, squeeze the clamp thats holding the original stalk switch at the back and wiggle the stalk out towards you.. It might take some time but be patient and wiggle it out towards you..  19. You need to remove the wiper switch first before you take the light switch stalk. 20. you should see this when you take the original stalk switch while depressing the clamp and pulling it towards you. Quote:
22-23. take off the original turn signal lights driver and passenger side harness, and make a new one by putting a new pin on the fourth slot. and tappping into the black wire for ground. Refer to.. Quote:
24-25. install fog lights. your choice of hardwares. Just so you know the top is larger than the bottom. So you might wanna buy two different sizes of bolts. Also an Allen stylel bolts works best for me. 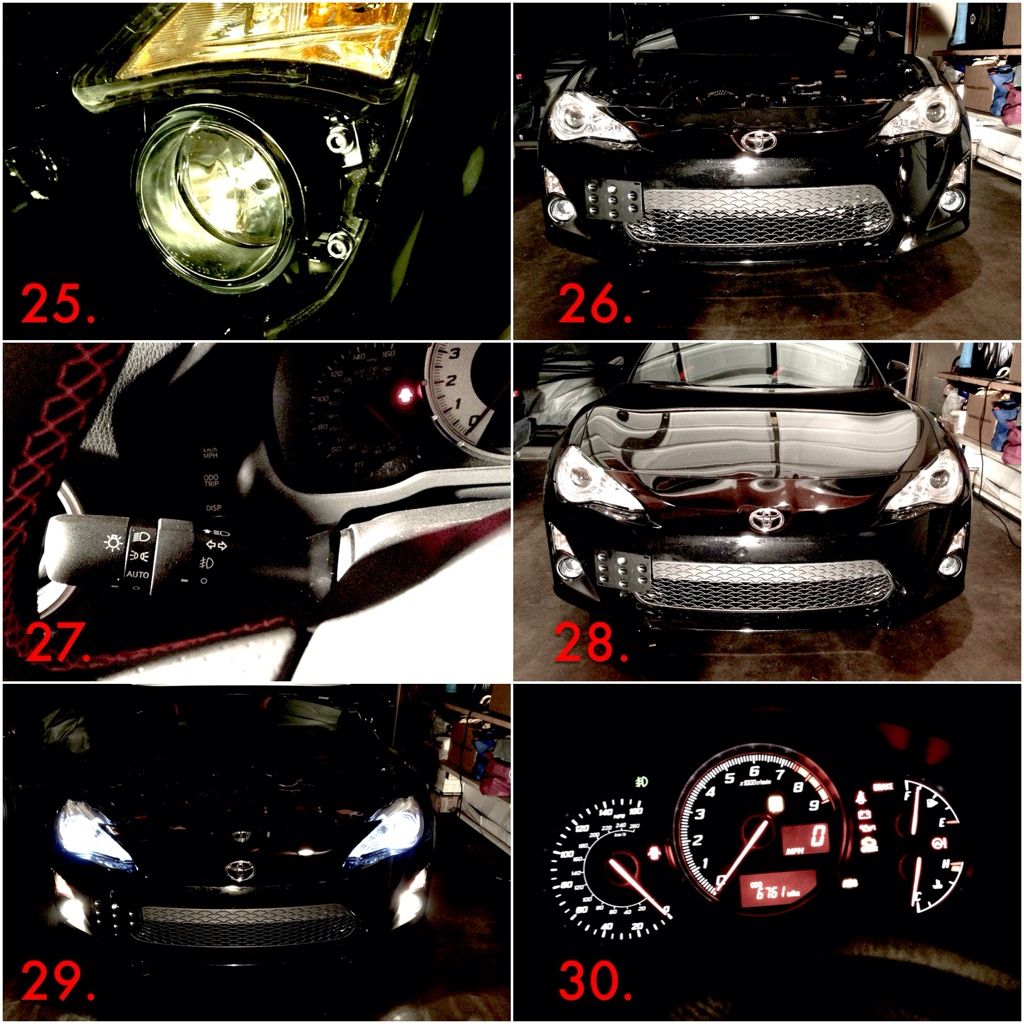 26. you should now end up with this  27. turn fog light switch on 28-29. enjoy! 30. Also ere is a fog light indicator inside the cabin! You need to read the first three references for you to fully understand what is going on.. Please take the time to do some research... as I did as well.. But I hope these pictures will guide you.. If you have any questions feel free to send me a message!! Have a good one!
__________________
 Last edited by imravenit; 04-19-2013 at 06:20 AM. |
||||||
|
|
|
| The Following 4 Users Say Thank You to imravenit For This Useful Post: |
|
04-19-2013, 08:16 PM
|
#76 |
|
Senior Member
Join Date: May 2012
Drives: Scion FR-S Asphalt AT & XB
Location: Virginia Beach,VA
Posts: 123
Thanks: 15
Thanked 30 Times in 21 Posts
Mentioned: 3 Post(s)
Tagged: 2 Thread(s)
|
I'm lost on #11 about taping the steering angle sensor. where do you apply tape at??? And what is the reason for doing this????? Much thanks for putting this together.
|
|
|
|
|
04-19-2013, 09:20 PM
|
#77 | |
|
give us this day
Join Date: Jul 2012
Drives: AE86 - FRS
Location: Three Stars & A Sun
Posts: 404
Thanks: 138
Thanked 161 Times in 37 Posts
Mentioned: 1 Post(s)
Tagged: 0 Thread(s)
|
Quote:
just to secure position so making sure the orange is visible through the window .. or else youll get an abs light warning
__________________
|
|
|
|
|
|
04-21-2013, 02:03 AM
|
#78 |
|
Senior Member
Join Date: Sep 2012
Drives: 2003 Camry Blue | 2013 FR-S White
Location: Bay Area - South Bay
Posts: 1,144
Thanks: 804
Thanked 288 Times in 221 Posts
Mentioned: 8 Post(s)
Tagged: 0 Thread(s)
|
Hi Guys, I wanted to add I think I just found the part where I can make this kit myself for a fraction of the cost:
Here's the plug assembly that we need: http://www.villagescionparts.com/sho...roduct=8465060 Here's the Stock Code: SU00302583 Can someone at Toyota verify if this is the harness that we need so we can do this fog light plug n play? |
|
|
|
|
04-21-2013, 04:51 AM
|
#79 | |
|
Senior Member
Join Date: May 2012
Drives: Scion FR-S Asphalt AT & XB
Location: Virginia Beach,VA
Posts: 123
Thanks: 15
Thanked 30 Times in 21 Posts
Mentioned: 3 Post(s)
Tagged: 2 Thread(s)
|
Quote:
I ordered from this site. http://www.onlinetoyotaparts.com/oem...U00302583.html |
|
|
|
|
|
04-21-2013, 12:56 PM
|
#80 | |
|
Senior Member
Join Date: Sep 2012
Drives: 2003 Camry Blue | 2013 FR-S White
Location: Bay Area - South Bay
Posts: 1,144
Thanks: 804
Thanked 288 Times in 221 Posts
Mentioned: 8 Post(s)
Tagged: 0 Thread(s)
|
Quote:
|
|
|
|
|
|
04-21-2013, 10:40 PM
|
#81 | |
|
Member
Join Date: Feb 2013
Drives: 2013 Raven Scion FR-S
Location: Ottawa, ON
Posts: 56
Thanks: 10
Thanked 15 Times in 10 Posts
Mentioned: 0 Post(s)
Tagged: 0 Thread(s)
|
Quote:
If anyone knows even the Japanese part number too! Being in Canada, it's often times less expensive for me to order direct from Japan through Amayama.com The only evidence I've found from the info in this thread is a wiring harness from ebay that has the part number blanked out -- grrr.... I hate it when the sellers feel the need to blank the numbers out... (ebay link for reference: http://www.ebay.com/itm/TOYOTA-GENUI...sories&vxp=mtr) Thanks for everyone contributing to making an "as-close-to-OEM" fog light installation possible!!! |
|
|
|
|
| The Following User Says Thank You to PatGT86 For This Useful Post: | imravenit (04-21-2013) |
|
04-21-2013, 10:44 PM
|
#82 | |
|
Senior Member
Join Date: Apr 2012
Drives: TSX
Location: Coquitlam, BC
Posts: 162
Thanks: 27
Thanked 74 Times in 42 Posts
Mentioned: 2 Post(s)
Tagged: 0 Thread(s)
|
Quote:
http://www.amayama.com/search/?q=SU00302583 19 bucks each. Lol at Hokori selling them for 72 each! 
|
|
|
|
|
| The Following User Says Thank You to norm24 For This Useful Post: | imravenit (04-21-2013) |
|
04-22-2013, 04:46 AM
|
#83 |
|
Senior Member
Join Date: Sep 2010
Drives: FR-S
Location: New Orleans, LA
Posts: 423
Thanks: 87
Thanked 107 Times in 68 Posts
Mentioned: 5 Post(s)
Tagged: 0 Thread(s)
|
If that's the real part on amayama, I'll be so happy. I'm going to order it when I get home. Where did you get the P/N from @norm24
|
|
|
|
|
04-22-2013, 08:12 AM
|
#84 | |
|
Senior Member
Join Date: Apr 2012
Drives: TSX
Location: Coquitlam, BC
Posts: 162
Thanks: 27
Thanked 74 Times in 42 Posts
Mentioned: 2 Post(s)
Tagged: 0 Thread(s)
|
Quote:
I just did a search on amayama using this part number |
|
|
|
|
|
|
|
|
 |
|
|
 Similar Threads
|
||||
| Thread | Thread Starter | Forum | Replies | Last Post |
| FRS fogs using BRZ stalk | Sco2355 | DIY (Do-It-Yourself) Guides | 378 | 12-16-2018 05:17 AM |
| Factory shift light/chime | Wonderbar | Electronics | Audio | NAV | Infotainment | 29 | 04-05-2013 03:30 PM |
| Manual shifter stalk thread dimensions for knobs | bcj | Scion FR-S / Toyota 86 GT86 General Forum | 1 | 03-19-2013 06:42 AM |
| SEAT BELT STALK COVERS | cslntuee | Cosmetic Modification (Interior/Exterior/Lighting) | 1 | 03-01-2013 12:57 PM |
| FRS fogs using BRZ stalk | Sco2355 | Cosmetic Modification (Interior/Exterior/Lighting) | 0 | 02-18-2013 01:51 PM |


 2013 Scion FR-S


