


 06-27-2012, 12:19 AM
|
#1 |
|
Boostin'

Join Date: Jun 2012
Drives: FRS-T
Location: Montreal
Posts: 1,042
Thanks: 337
Thanked 489 Times in 241 Posts
Mentioned: 4 Post(s)
Tagged: 0 Thread(s)
|
DIY Rear foglight
Hello everyone!
I decided to write a DIY, my first one ever. I guess i just never took time to take detailed pictures of what i do and share with others but i really appreciate the community over here so i decided to use my spare time at home and write this up for folks that need a hand at it! i am writing this as it goes and will modify it till its fully done up so bare with me for now! first thing first, make sure you have the following tools: -Jack -Jack Stands (please use them for your safety) -8mm wrench -10mm wrench -Flat tip screwdriver -Hole saw -Dremel (rotary cutting tool) -soldering kit -wire skinners/cutters -electrical tape/heat shrink -6mm circle connector for ground and male/female for + on tail light 0. raise and support car 1. start off by removing the two back-up light sockets  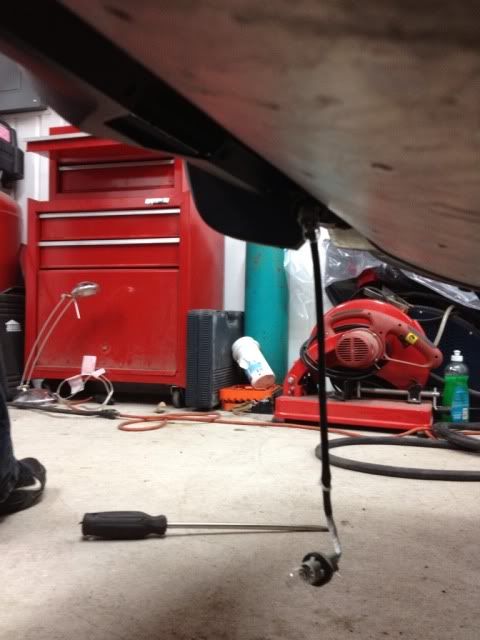 2. using your flat tip screwdriver, pry out the pushpins. [IMG]http://i65.photobucket.com/albums/h219/silverdub/986be***.jpg[/IMG]  3. take your 10mm wrench and remove the 2 bolts seen on the picture below. 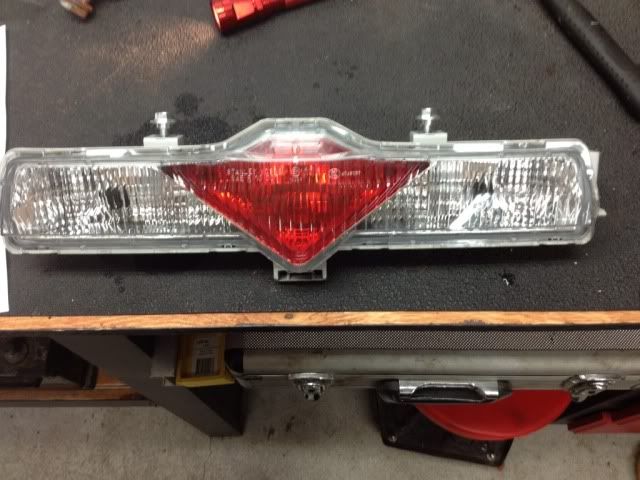 4. using your flat tip scewdriver again, pry open gently the two tabs at the bottom of the lighting assembly. this is not easy so be patient, keep in mind that you dont want to break anything on your brand new car! 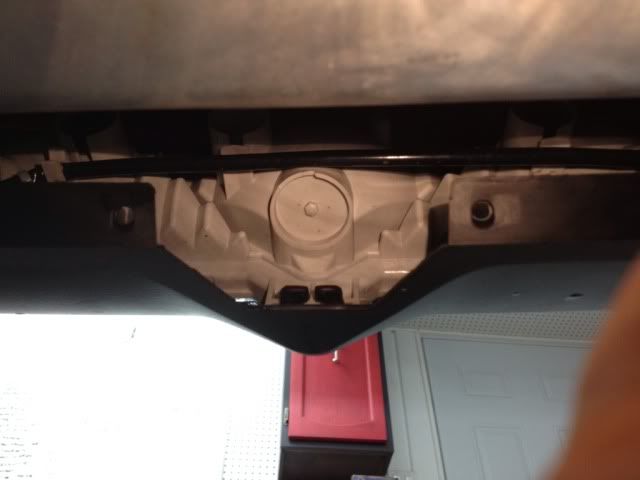 5. Locate the area that you need to make a hole 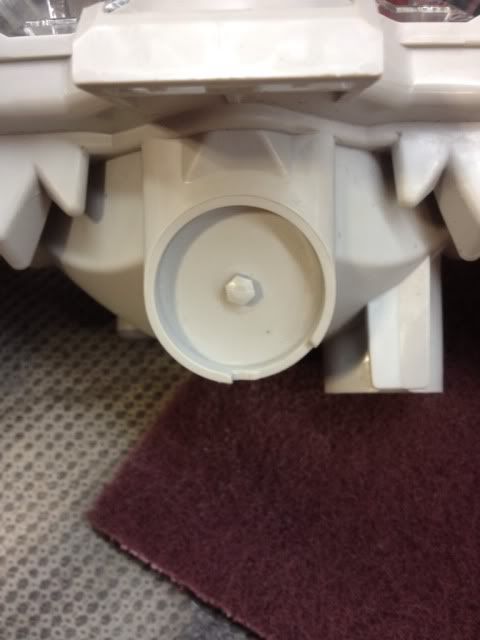 6. Source out an old corner light with the bulb and socket. Cut the old corner light and use for template. Cutting the housing will make some plastic dust in the unit, just blow it out through the hole you just made AND the back up lights holes. Do not attempt to open the housing to clean it or i promise it will break! 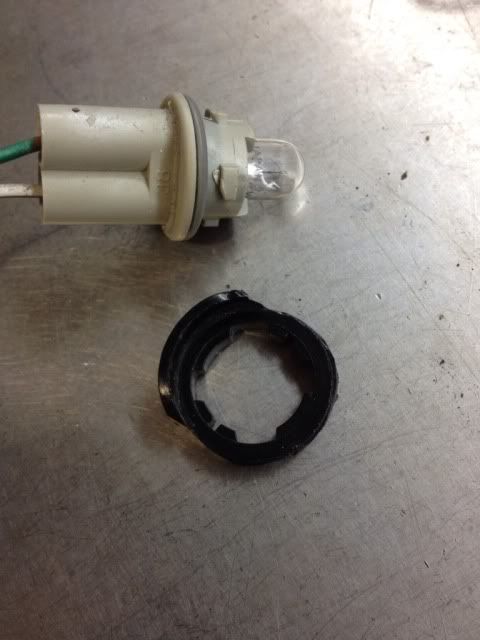 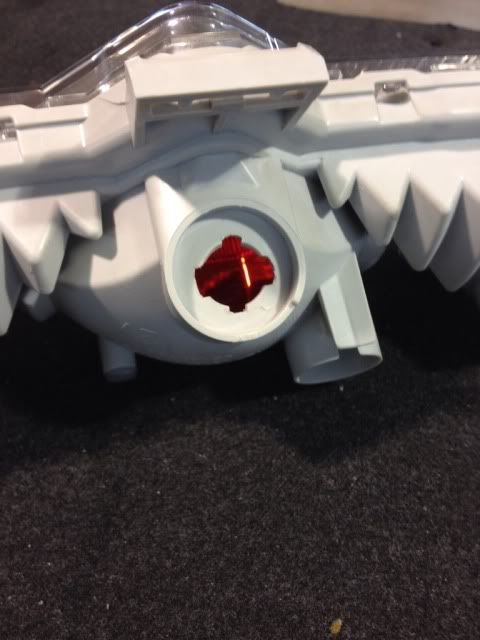 7. Once the hole is done insert the socket and bulb, skin your wires and test the results. 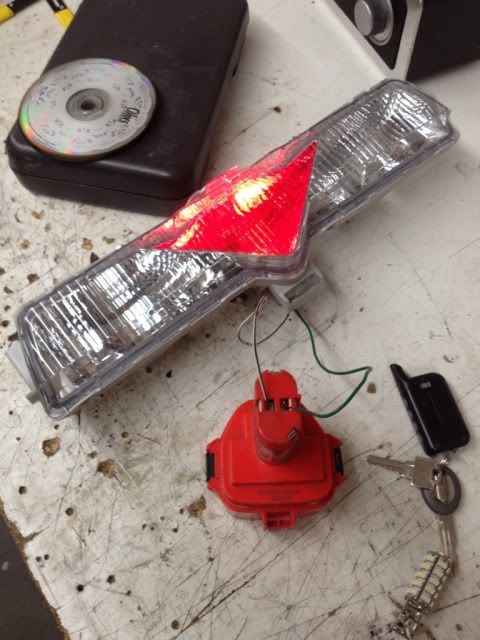 8. Open the trunk, take the carpet out and then using a srewdriver pry the trunk latch close in order to save your battery life. 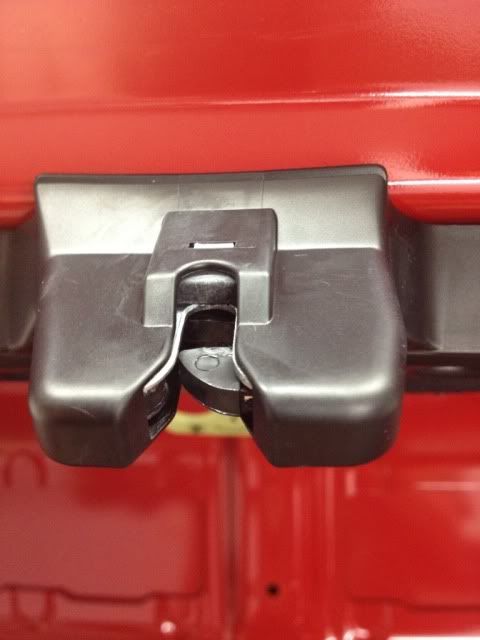 9. Remove the drivers side tool tray by grabbing it with two hands and pulling upwards. You will then hear a loud POP but dont worry its normal  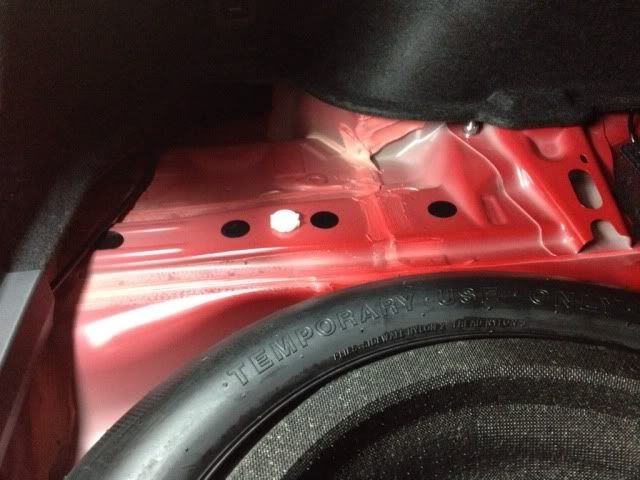 10. Now take this piece out by prying out the 3 pushpins and then pulling the piece upwards 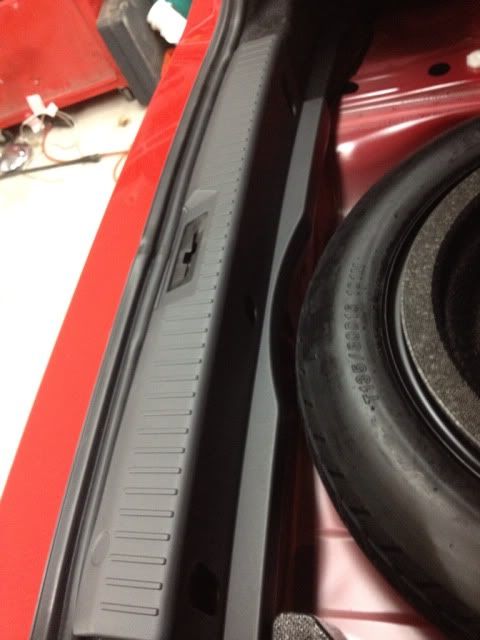 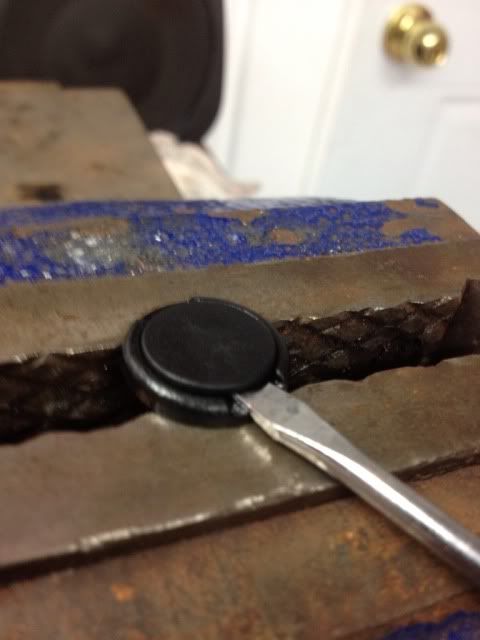 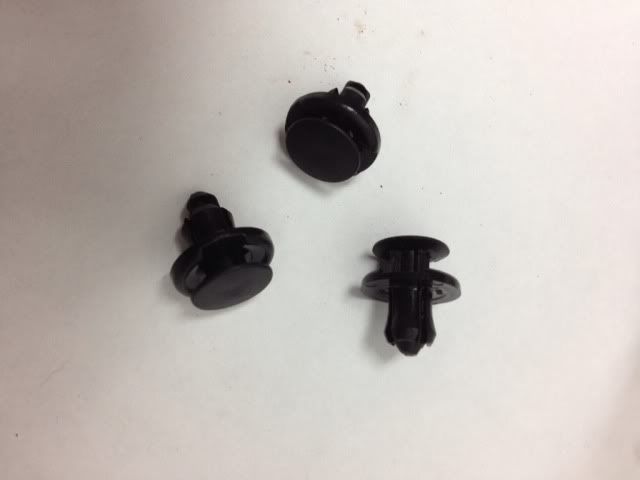 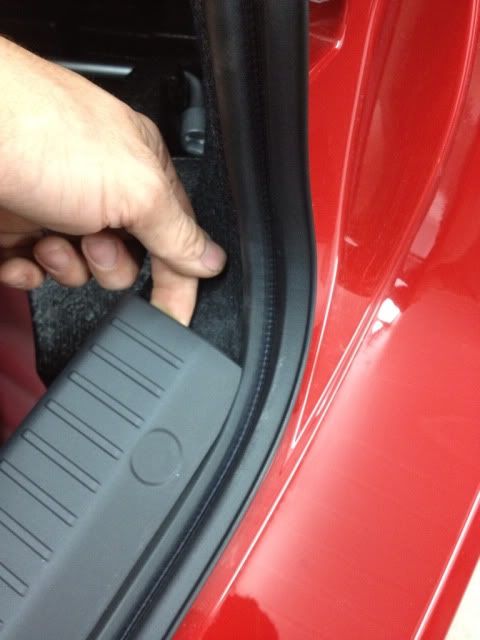 11. Now take out the inner side cover by taking out the clips just like in the previous step. 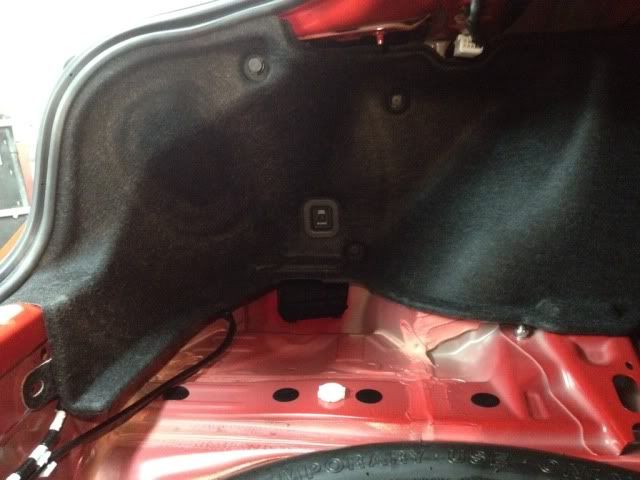 12. Disconnect the trunk bypass switch 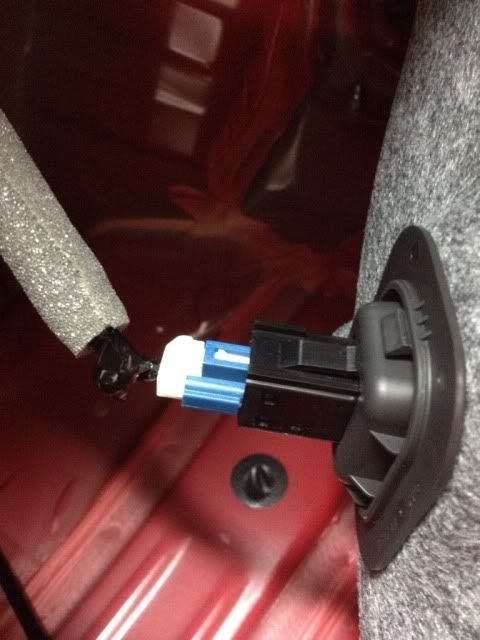 13. Disconnect the backup light connector located below the trunk latch hook. Follow the harness to the grommet and pull it put from underneath the car 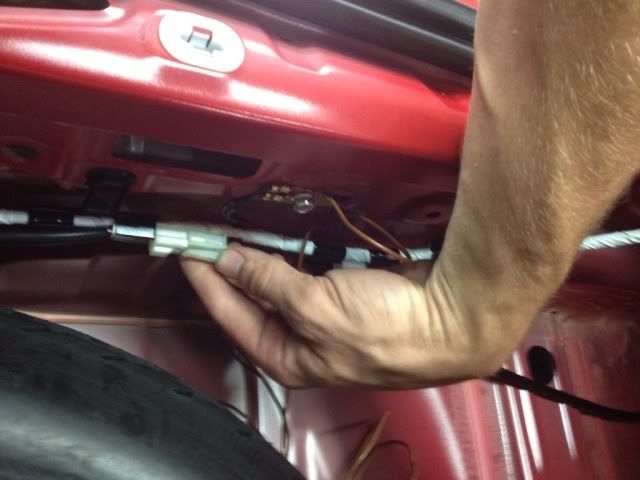 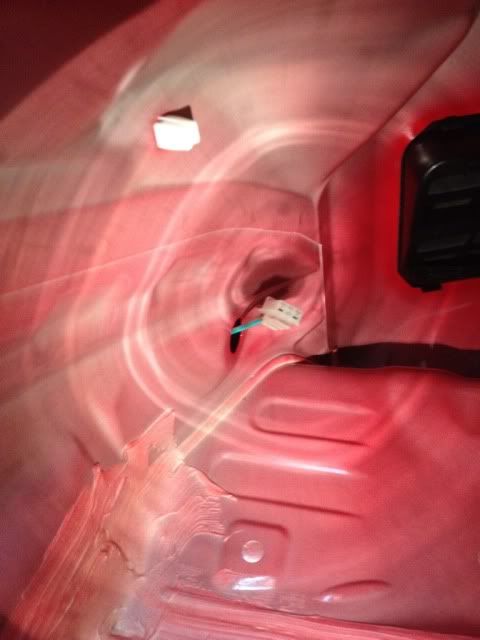 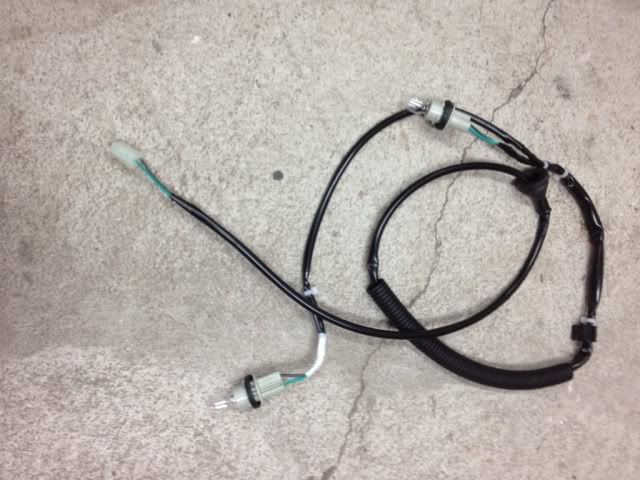 14. Put the sockets back in the assy and solder 2 very long wires approximately 5 feet long. Then remove zip ties from the harness and feed a steel wire starting from the connector. You could also just tape them around the harness. When you are done feeding the wires in the harness put back new zip ties in the exact same location. 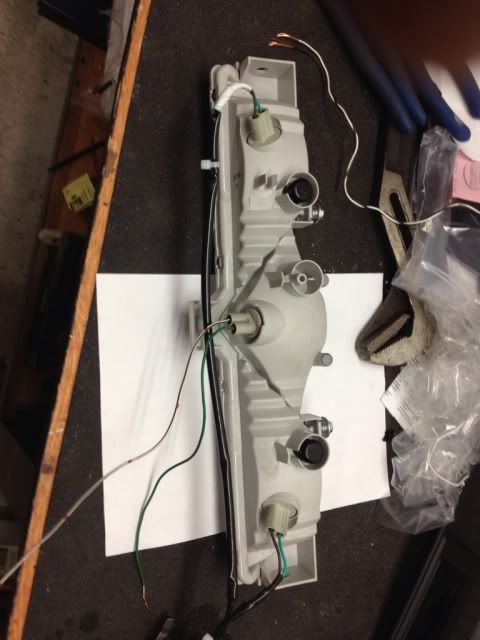 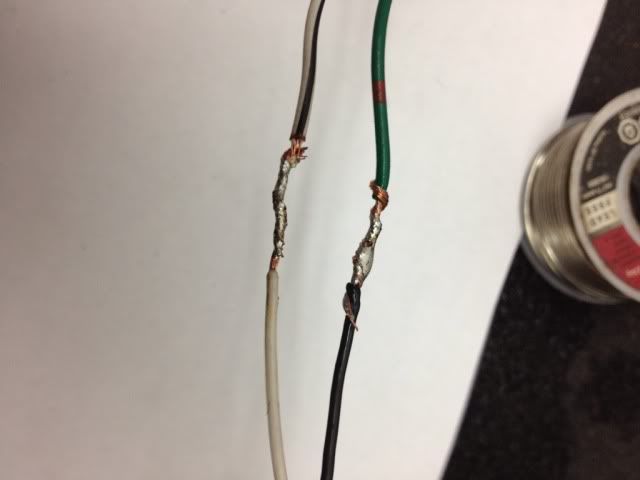 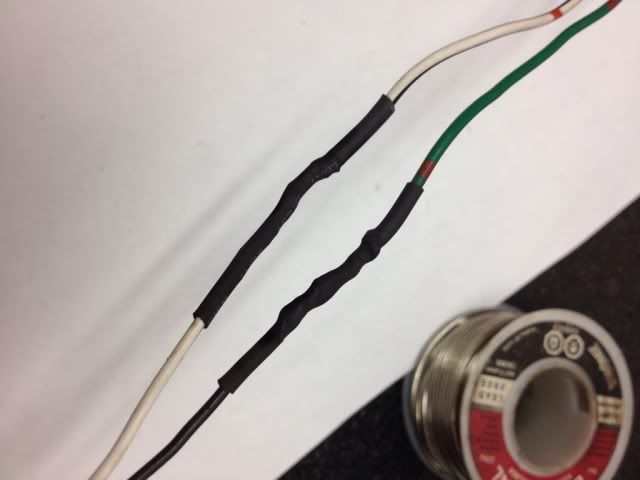 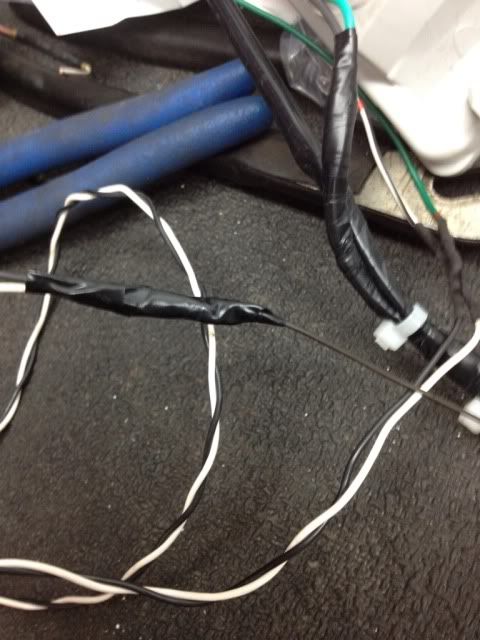 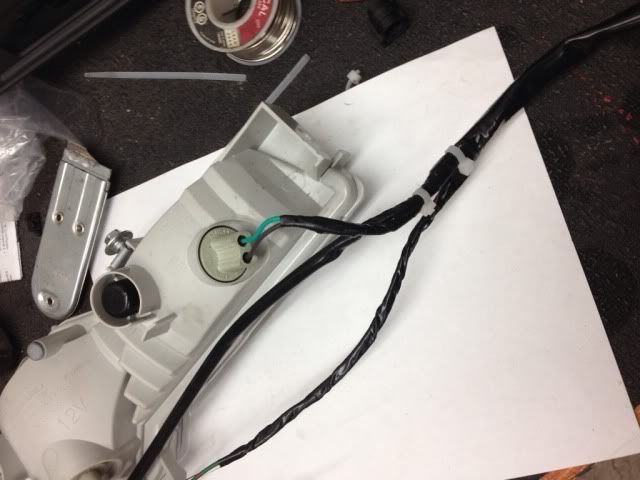 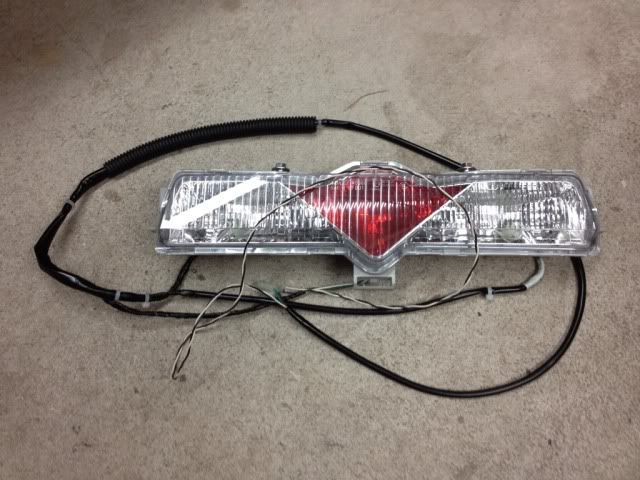 15. Install the lighting assembly and feed the harness the way it was. Make sure the plastic protection is place like the picture below. Then get back in the trunk and cut the ground wire to the desired lenght and hook it up to the oem grounding point where the connector is located. 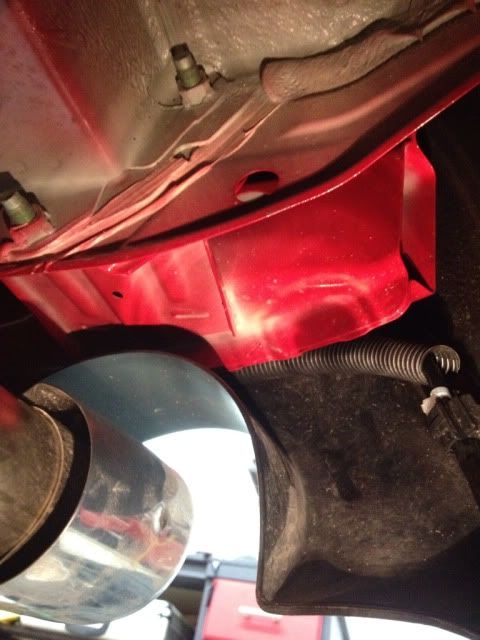 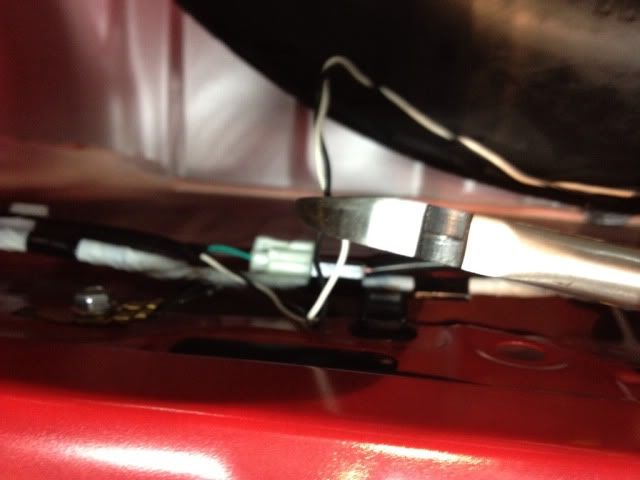 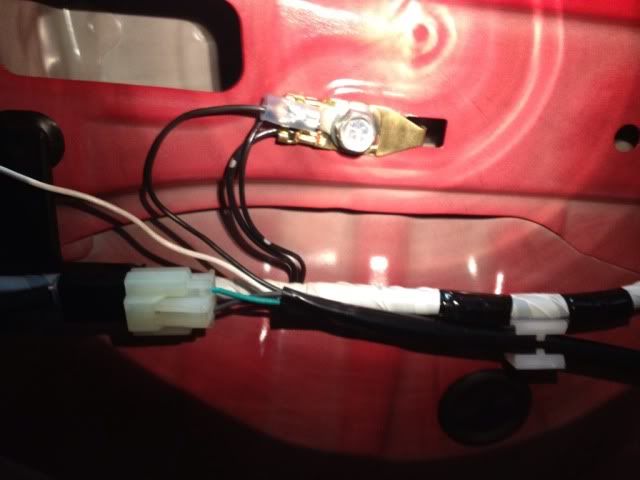 16. Remove the drivers side tail light and skin a small piece of the green/yellow wire and install a short wire and connector. This way, your tail light will be removable in the future without having to cut any wires. Once hooked up protect your connector with tape or something simillar.  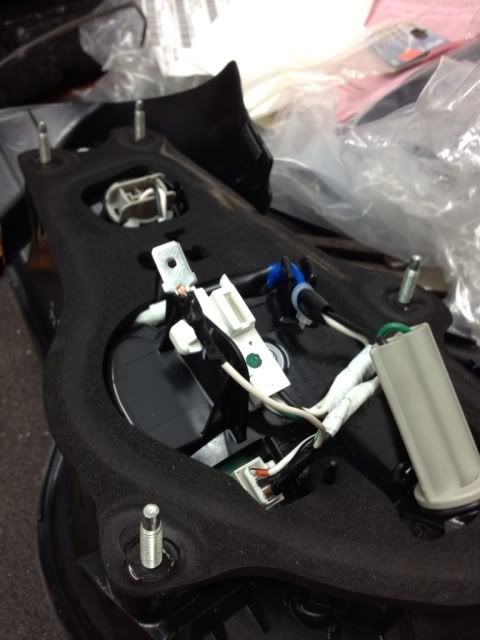 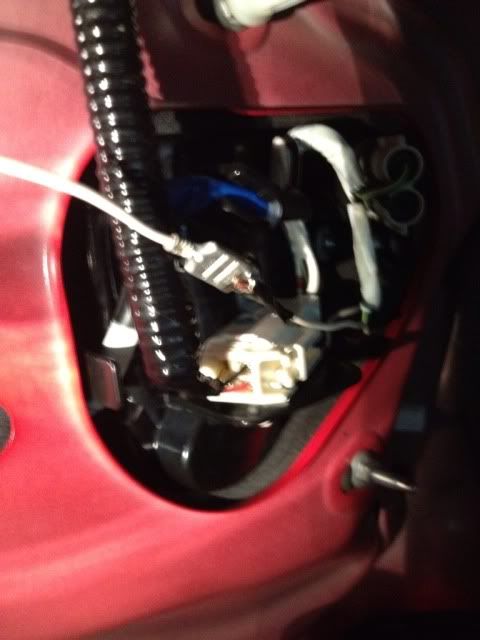 Now put everything back together, turn your headlights on and enjoy!!! 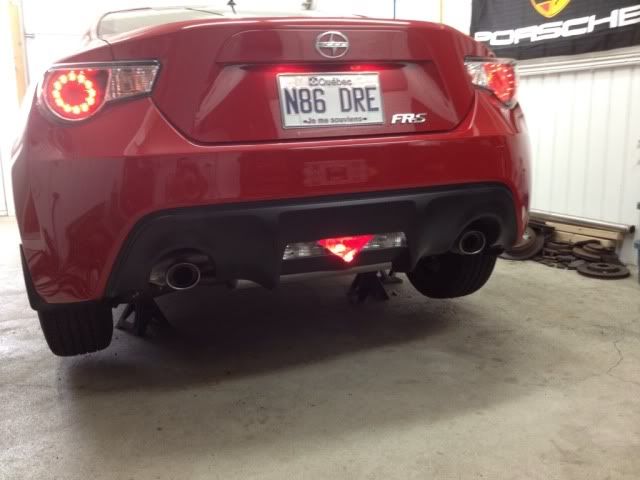 
__________________
Last edited by Silverdub; 06-27-2012 at 06:00 PM. |

|

|
| The Following 24 Users Say Thank You to Silverdub For This Useful Post: | 5th 86 (05-19-2013), benjoke (06-30-2012), cmspooner (06-27-2012), Dadhawk (06-27-2012), FLYFISHR (09-30-2013), FTEIGHTSIX (06-29-2012), GregV (08-22-2012), Guff (07-02-2012), Gunman (05-20-2013), jacobzking (06-18-2013), Jamifra (06-27-2012), Jayp (06-28-2012), kwood9000 (08-23-2012), LeeMaster (02-14-2013), Lil Abner (06-27-2012), MannyO (06-28-2012), NickD (06-27-2012), rcm47 (06-27-2012), Sall (06-28-2012), Sigh-on-Rice (06-28-2012), Slartibartfast (06-29-2012), Texaz Boy (01-30-2014), zex (06-27-2012), ZILLA (06-30-2012) |
|
06-27-2012, 01:14 AM
|
#2 |
|
Senior Member

Join Date: Apr 2012
Drives: Subaru WRB BRZ Limited
Location: Richmond Hill, Ontario, Canada
Posts: 471
Thanks: 282
Thanked 65 Times in 52 Posts
Mentioned: 9 Post(s)
Tagged: 0 Thread(s)
|
Looking forward to the full DIY
|
|
|
|
|
06-27-2012, 01:58 AM
|
#3 |
|
NW Region Moderator

Join Date: Mar 2010
Drives: FR-S No More
Location: Portland OR
Posts: 5,156
Thanks: 1,134
Thanked 3,186 Times in 1,091 Posts
Mentioned: 300 Post(s)
Tagged: 4 Thread(s)
|
Added to DIY Directory:
http://www.ft86club.com/forums/showthread.php?t=7365
__________________
|
|
|
|
|
06-27-2012, 12:13 PM
|
#4 |
|
Boostin'
Join Date: Jun 2012
Drives: FRS-T
Location: Montreal
Posts: 1,042
Thanks: 337
Thanked 489 Times in 241 Posts
Mentioned: 4 Post(s)
Tagged: 0 Thread(s)
|
Just updated point 5 to 7 as promised!
__________________
|
|
|
|
|
06-27-2012, 05:47 PM
|
#5 |
|
Senior Member
Join Date: Jun 2012
Drives: 2013 FR-S, 6MT, Ultramarine
Location: Dublin, OH
Posts: 161
Thanks: 6
Thanked 123 Times in 22 Posts
Mentioned: 0 Post(s)
Tagged: 0 Thread(s)
|
I'm very glad to see you using an OEM twist style! I have mine sitting in front of me, and plan to do this next week.

|
|
|
|
|
06-27-2012, 06:03 PM
|
#6 |
|
Boostin'
Join Date: Jun 2012
Drives: FRS-T
Location: Montreal
Posts: 1,042
Thanks: 337
Thanked 489 Times in 241 Posts
Mentioned: 4 Post(s)
Tagged: 0 Thread(s)
|
Just finished the write up! I hope you guys have as much fun as i did doing this and that my write up helps you out!
Max
__________________
|
|
|
|
|
06-27-2012, 06:06 PM
|
#7 |
|
Senior Member
Join Date: Jun 2012
Drives: 2013 FR-S, 6MT, Ultramarine
Location: Dublin, OH
Posts: 161
Thanks: 6
Thanked 123 Times in 22 Posts
Mentioned: 0 Post(s)
Tagged: 0 Thread(s)
|
Question on the brightness. Looks like the fog lights are a 921 bulb. You used a 194/168 bulb for the fog. Have you tried a 921 in the fog housing? Or is it bright enough?
|
|
|
|
|
06-27-2012, 06:37 PM
|
#8 |
|
Boostin'
Join Date: Jun 2012
Drives: FRS-T
Location: Montreal
Posts: 1,042
Thanks: 337
Thanked 489 Times in 241 Posts
Mentioned: 4 Post(s)
Tagged: 0 Thread(s)
|
It is a 194 but i find it bright enough, if not i will switch the bulb to an LED 194. Keep in mind that this is what i had on hand this morning. You could use which ever bulb you want to make it brighter!
__________________
|
|
|
|
|
06-27-2012, 08:54 PM
|
#9 |
|
White Paper Connoisseur
Join Date: Jun 2012
Drives: 2008 VW Jetta
Location: SC
Posts: 27
Thanks: 3
Thanked 8 Times in 5 Posts
Mentioned: 0 Post(s)
Tagged: 0 Thread(s)
|
Just to confirm: These function as rear fog lights, that turn on when the front fogs are used? From following the directions it seems they're always on?
Where did you out-source the light socket from?
__________________
2003 Toyota Corolla
2003 Toyota Corolla 2009 Mazda RX-8 R3 2008 VW Jetta Wolfsburg ??? |
|
|
|
|
06-27-2012, 09:56 PM
|
#10 |
|
Senior Member

Join Date: May 2012
Drives: 13' SSM BRZ
Location: Alaska
Posts: 250
Thanks: 21
Thanked 72 Times in 52 Posts
Mentioned: 6 Post(s)
Tagged: 0 Thread(s)
|
where did you get your connector for the rear fog light?
|
|
|
|
|
06-28-2012, 12:52 AM
|
#11 |
|
Master Troll

Join Date: May 2012
Drives: 2013 BRZ Limited
Location: Charleston, SC
Posts: 399
Thanks: 110
Thanked 77 Times in 46 Posts
Mentioned: 1 Post(s)
Tagged: 0 Thread(s)
|
Soldering>Crimping. Glad to see someone else doing it the good way.

|
|
|
|
|
06-28-2012, 09:31 AM
|
#12 | |
|
Boostin'
Join Date: Jun 2012
Drives: FRS-T
Location: Montreal
Posts: 1,042
Thanks: 337
Thanked 489 Times in 241 Posts
Mentioned: 4 Post(s)
Tagged: 0 Thread(s)
|
Quote:
__________________
|
|
|
|
|
|
06-28-2012, 09:32 AM
|
#13 | |
|
Boostin'
Join Date: Jun 2012
Drives: FRS-T
Location: Montreal
Posts: 1,042
Thanks: 337
Thanked 489 Times in 241 Posts
Mentioned: 4 Post(s)
Tagged: 0 Thread(s)
|
Quote:
__________________
|
|
|
|
|
|
06-28-2012, 10:19 AM
|
#14 |
|
Sallbaru

Join Date: Dec 2011
Drives: raven FRS
Location: socal
Posts: 335
Thanks: 234
Thanked 60 Times in 36 Posts
Mentioned: 0 Post(s)
Tagged: 0 Thread(s)
|
i love this forum
|
|
|
|
|
|
|
|
 |
|
|
 Similar Threads
|
||||
| Thread | Thread Starter | Forum | Replies | Last Post |
| Automation Lighting offers HID xenon headlight + foglight kits | jjdrivesajazz | Exterior Parts - Lighting | 138 | 01-13-2014 01:19 AM |
| rear seats? | EJ20 | BRZ First-Gen (2012+) -- General Topics | 67 | 11-12-2012 07:15 PM |
| Rear Bumper Foglight | kanundrum | Cosmetic Modification (Interior/Exterior/Lighting) | 2 | 06-08-2012 12:47 AM |
| 215/40-17 front, 225/40-17 rear? | ZDan | Wheels | Tires | Spacers | Hub -- Sponsored by The Tire Rack | 5 | 01-21-2012 02:08 PM |


