


 12-12-2020, 10:57 AM
|
#71 | |
|
4k Garage

Join Date: Dec 2020
Drives: Rocket Bunny V2 Toyota GT86
Location: Brighton, UK
Posts: 8
Thanks: 0
Thanked 1 Time in 1 Post
Mentioned: 0 Post(s)
Tagged: 0 Thread(s)
|
Quote:
Great post!  I'll keep my options open in regards to the ECU and wiring harness, i'm no mechanic personally, ironically i'm a computer nerd which is probably why i have zero interest in actually learning eletronics, etc. I can do very basic things but the idea of splicing apart a whole wiring harness just sounds like a nightmare to me and I don't really have an inclination to learn it as it sounds far too much like work, just one of those things i suppose! In regards to headers i'd just end up keeping it easy and using Sikky's headers as well, as you say their kit is made with both RHD and LHD and i'm lead to believe they have various transmissions in mind from the T56, TR6060 and CD009 in mind so i'd like to just keep everything simple in that regard. The CD009 is pretty strong, very common, much easier to buy clutches for and has nicer ratio's I believe unlike the T56 with its double overdrive but in the grand scheme of things by the time you buy a CD009 and the conversion kit i'd only have saved $500 or so over buying a T56 but that's a much easier pill to swallow for me than the £3-3.5k that a T56 costs, just in my case i'm 28, trying to get my first house so bit of a silly game to be playing but at the same time I'll definitely get it done even if it just takes a year or so to save alongside silly things like a mortgage 
__________________
Project 4k86: Rocket bunny V2 kitted GT86 fitted with Air Ride Suspension, Work wheels, Big brakes and one day an LS3!
Project Thread: https://tinyurl.com/y5egxjzg Youtube: https://tinyurl.com/y239bpas |
|

|

|
|
12-12-2020, 03:03 PM
|
#72 |
|
Senior Member

Join Date: Nov 2019
Drives: 2013' Toyota 86 (EU spec)
Location: Germany
Posts: 160
Thanks: 32
Thanked 139 Times in 56 Posts
Mentioned: 4 Post(s)
Tagged: 1 Thread(s)
|
Hmm, dont underestimate the double overdrive. I have already a very long ratio diff. Pretty much the smallest ratio I know about for the OEM diff. The wheel diameter of the 86 is pretty small, so you need high axle rpm to make use of the possible Vmax. Same time this engine has plenty of torque. So a 1st gear ending at 60 or 70 kph is completely useless. You pretty much Lose this gear. It will make you slower instead of faster if you Start in 1st. My ratio for 1st is ending some where at 85 kph and this is a pretty good point as I learned. I was very concerned in the beginning if this long 1st is maybe not a good idea. But now I have to say it was the best thing to do. 1st is still in a range where you can spin tires even on a good grip level with warm rubber. Second gear ends close to 130kph and, at good grip level, doesnt slip. This helps with effective speed and drivability of the car.
Sure, you can chose a shorter ratio and have a Show of easily spinning gears in 2nd or 3rd, but thats what it is, show of. Not more. What you said about the clutch is not realy correct. You buy the clutch for the clutch and engine combination, true, but you buy it much more for the engine than for the tranny. The clutch needs to fit the LS at first. I dont know how the pilot can be fitted to the input shaft of the CD009, put for the T56 there are OEM solutions out there. For a combination of LS to CD009 there will at least be less possible clutch options since its not a OEM combination. With an Tremec trans you can use anything between an OEM LS3/7 clutch and a multi disc racing clutch. Sure, there will be far than more options for an LS with CD009. But I would guess definately less than for a LS/T56 combination. Concerning wiring, again, its not that hard to do if you are able to understand a DC circuit and you have the circuit diagramms available. But of course, you shouldnt touch things you are not feeling comfortable with. But I've read thru your thread of the biuld you've done and I realy have to say that I think you are more than able to do this wiring on your own. As well if you are on a budget and want to save money with the CD009 (and I think you already understood that I'm not under the impression that this will come true in the end) I definately would not go out and spend money for someone doing a job you could do yourselfe. But please never mind, Im just making suggestion, you have to decide on your own what you feel comfortable with.
__________________
Last edited by TRS; 12-14-2020 at 05:46 PM. |
|
|
|
|
12-31-2020, 09:10 AM
|
#73 |
|
Senior Member
Join Date: Nov 2019
Drives: 2013' Toyota 86 (EU spec)
Location: Germany
Posts: 160
Thanks: 32
Thanked 139 Times in 56 Posts
Mentioned: 4 Post(s)
Tagged: 1 Thread(s)
|
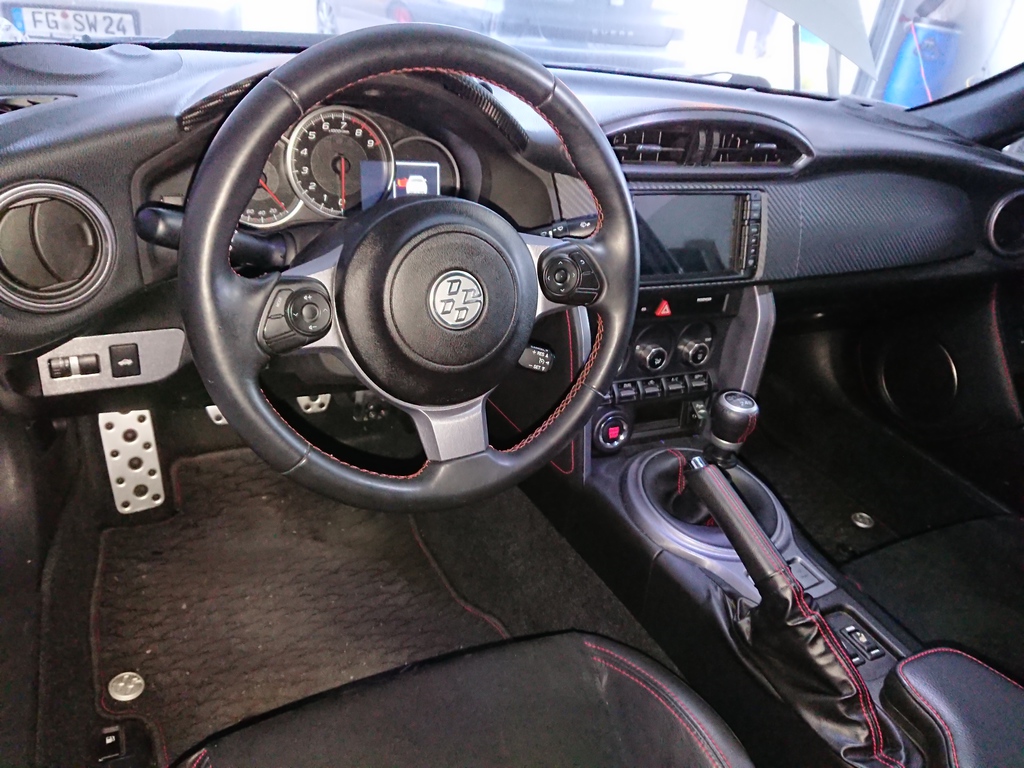
Paint work done and Facelift steering wheel and cluster also completely installed and working:
__________________
|
|
|
|
| The Following 8 Users Say Thank You to TRS For This Useful Post: | DaveB.inVa (01-02-2021), Dzmitry (03-08-2021), Irace86.2.0 (03-07-2021), Lonewolf (12-31-2020), ls1ac (12-31-2020), MrSkubi (01-15-2021), ripper (02-09-2021), Zer0 (01-01-2021) |
|
01-08-2021, 11:35 AM
|
#74 |
|
Junior Member
Join Date: Jan 2021
Drives: BRZ (Soon!)
Location: Newfoundland
Posts: 2
Thanks: 0
Thanked 1 Time in 1 Post
Mentioned: 0 Post(s)
Tagged: 0 Thread(s)
|
Hi there, excellent work on your build! I've been following along with the hopes of completing a similar swap myself. That's beginning to look feasible so I thought I'd register and dive deeper into my research.
I'm wondering what size tires you are currently running, and if you are using the Magnum-F with the 2.66 first gear ratio. I have some excel sheets put together for comparing rear end ratios, transmission ratios along with tire size. I'm trying to determine the best setup possible. Thanks in advance! |
|
|
|
|
01-12-2021, 05:07 PM
|
#75 | |
|
Senior Member
Join Date: Nov 2019
Drives: 2013' Toyota 86 (EU spec)
Location: Germany
Posts: 160
Thanks: 32
Thanked 139 Times in 56 Posts
Mentioned: 4 Post(s)
Tagged: 1 Thread(s)
|
Quote:
Many swappers (and also shops) seem to use stock axel and/or wide transmission ratio. In my book this is pointless. You pretty much lose 1st gear. Even with the long ratio tires are spinning in 1st without clutch kick and under good grip conditions. Tires are 245/35R18 Federal RS-R on a 9.5J ET35 square. So diameter is identical to Stock. The long 1st gear might be more challanging if you Plan to run on a hot cam. (I have LS3 stock cam, so 550rpm idle) But I tend to say that even a 1000rpm idle would be absolutely driveable and streetable. If you run a bad ass cam which needs 1500 idle I think streetable is nothing you are looking for, so it still should be fine. In short, I cant find any reason to use a shorter 1st or axel ratio. Only thing this would be good for is ruining your 0-60 times.
__________________
|
|
|
|
|
|
02-09-2021, 05:46 PM
|
#76 |
|
Senior Member
Join Date: Nov 2019
Drives: 2013' Toyota 86 (EU spec)
Location: Germany
Posts: 160
Thanks: 32
Thanked 139 Times in 56 Posts
Mentioned: 4 Post(s)
Tagged: 1 Thread(s)
|
Finally my big brake kit arrived some days ago. Took only 9 Month to get it.
During installation I learned that a big brake kit and roll center correction ball joints can be a tough combination. Furtunately I bought the 356mm version of this brake. A 330mm kit will pretty likely interfere with RC correction joints. Nevertheless I had to remove the OEM dust shields to get the necesary space. Now its pretty tight, but there is some air. Once the car is on its wheels it even gets better since the control arms outer edge is moving outward but also upward and therefore it "climbs" above the inner diameter of the friction ring and "dives" into the center bell. Anyway, the dust shields didnt fit any longer and they also had a to small outer diameter. So I decided to manufacture own dust shields. Today I received the laser cut blanks and started deep-drawing them. I was pretty surprised how good this worked out already with the first design of the blanks and second try of deep-drawing, especially when taking into consideration that it was the first time for me to do something like that. 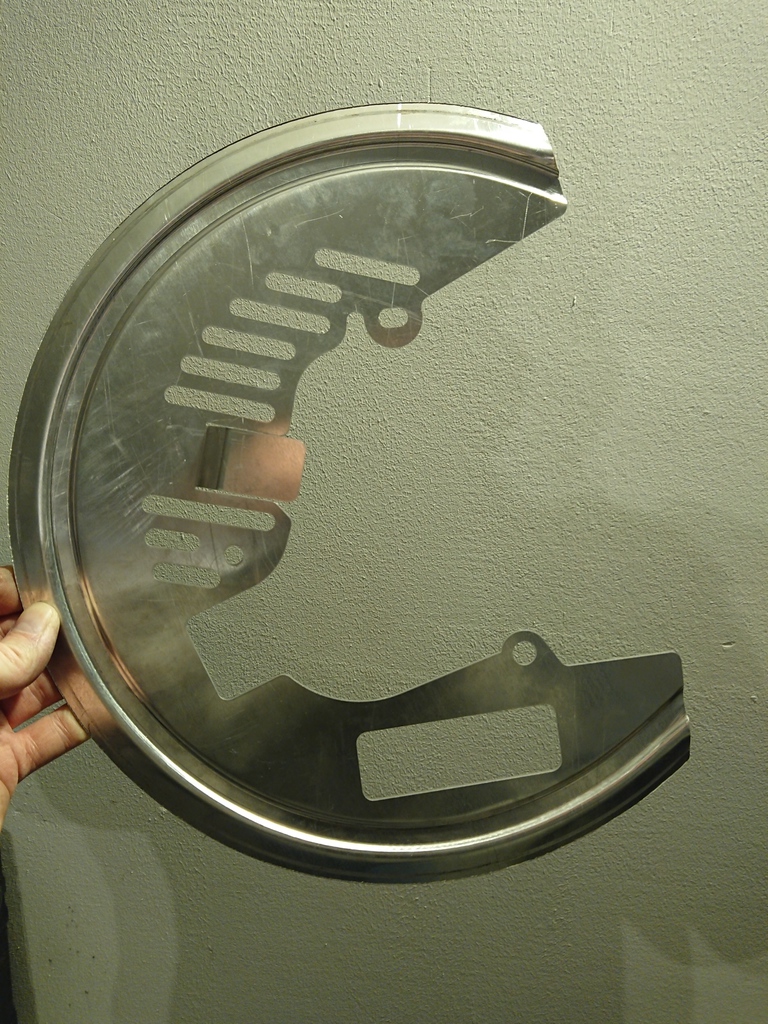 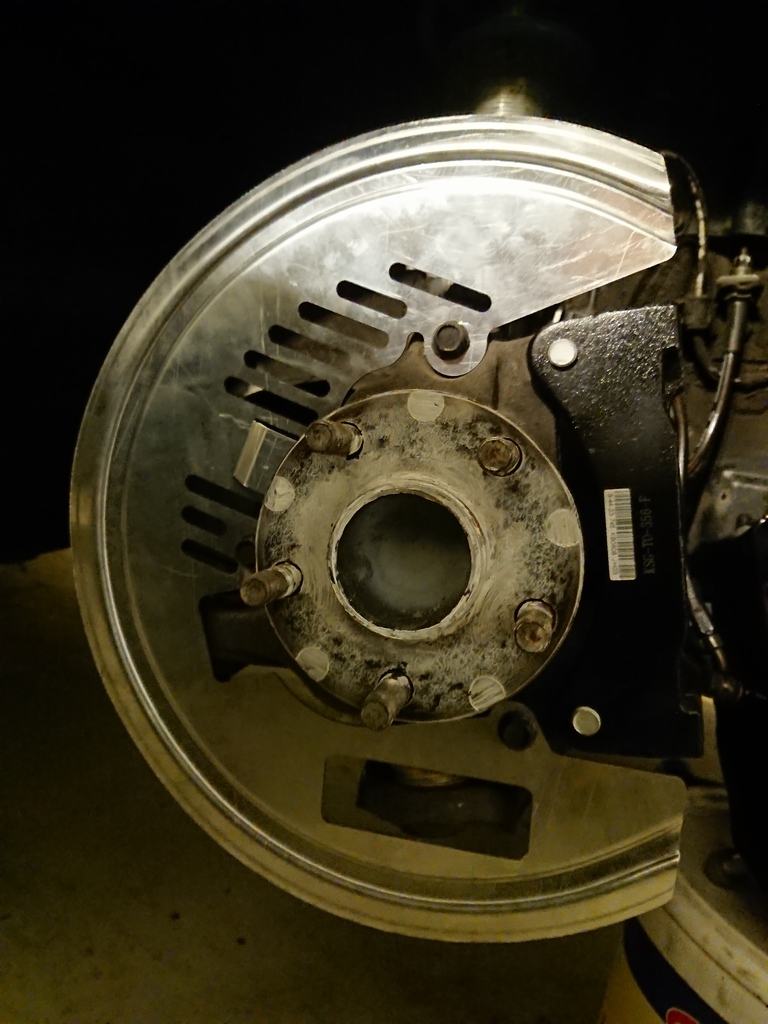    
__________________
|
|
|
|
| The Following User Says Thank You to TRS For This Useful Post: | MrSkubi (02-12-2021) |
|
03-07-2021, 07:25 AM
|
#77 |
|
Senior Member
Join Date: Nov 2019
Drives: 2013' Toyota 86 (EU spec)
Location: Germany
Posts: 160
Thanks: 32
Thanked 139 Times in 56 Posts
Mentioned: 4 Post(s)
Tagged: 1 Thread(s)
|
After several days of work and overall three versions the exhaust system is now finalized. Goal was to remove some resonances, change the sound a little more towards european style V8, get rid of some points where very little distance was left between exhaust and chassis (stabilizer, steering column, tunnel), get everything a little higher arround the transmission to Improve ground clearance and add a port for a wideband O2.
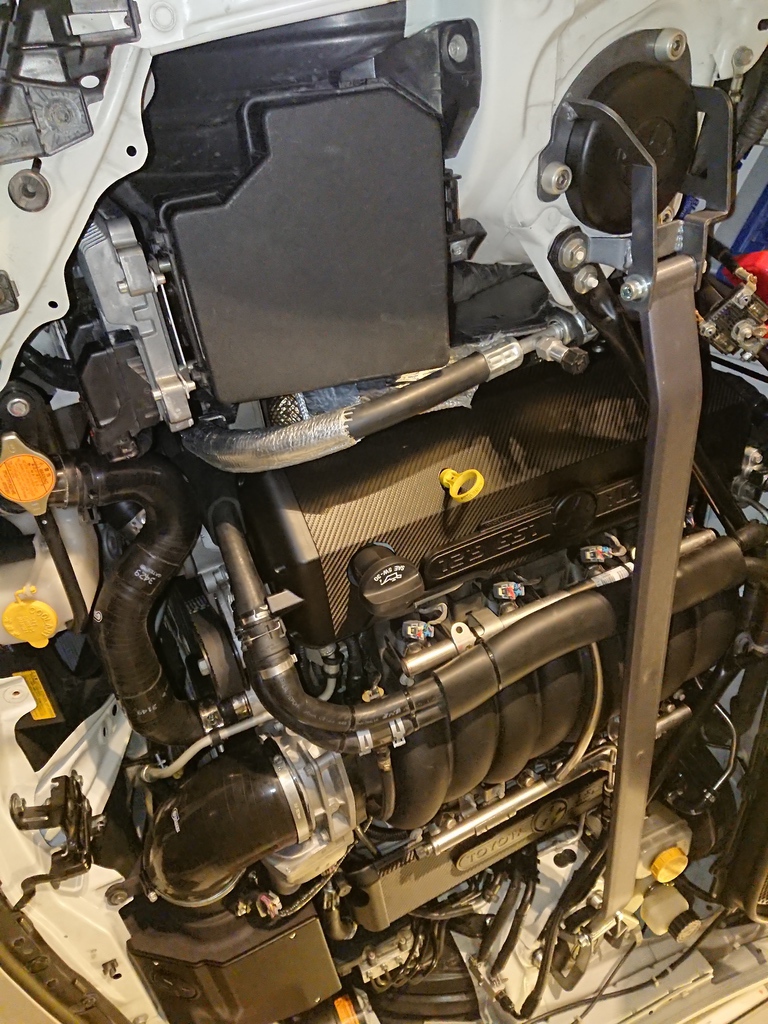
Overall it went out to be pretty tricky to achieve All those goals at once. As well material supply is not as usual those days so we had to improvise some parts. In the end it was much more work/time than I expected for this little optimization, but Im very satisfied with the comeout now. I would say the project is now realy close to the finish line. Only the new propshaft is missing. I hope it will arrive until end of March. Overview: 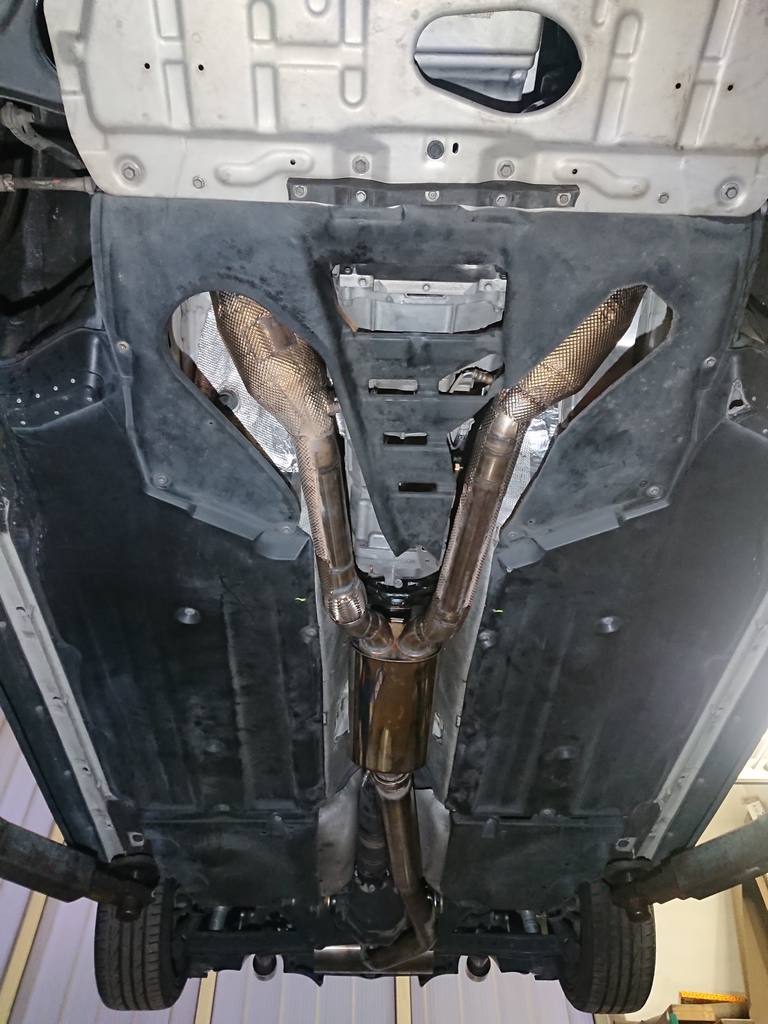  Wideband O2 port, accessible thru left wheelwell: 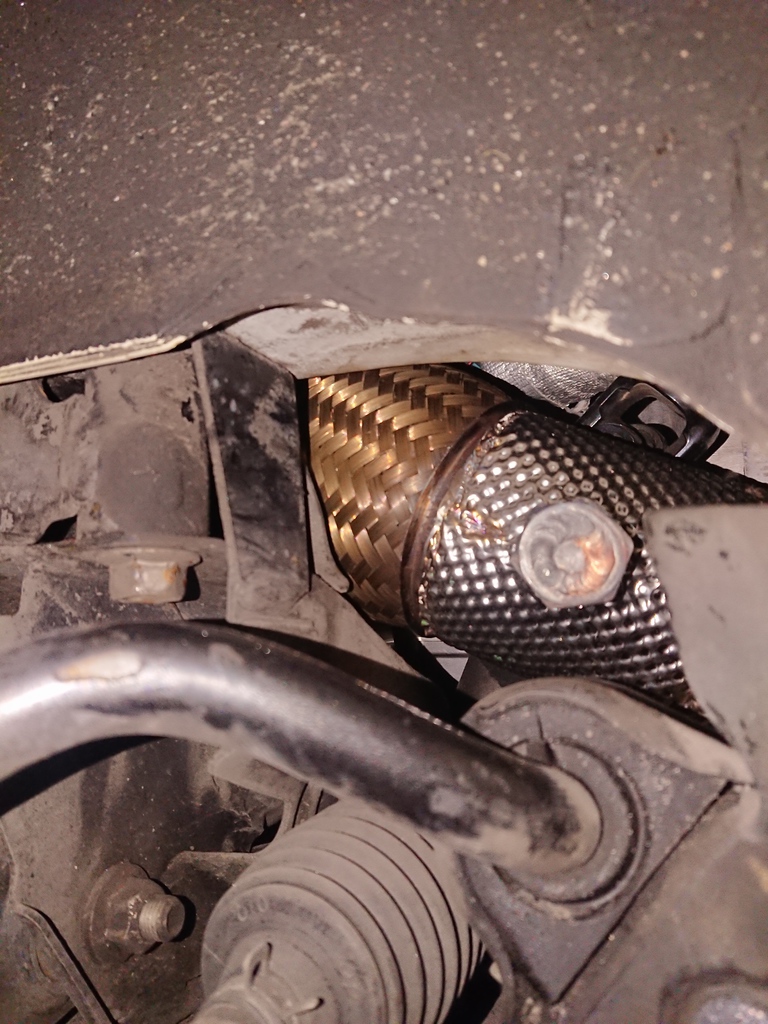 Improved (close to OEM) ground clearance: 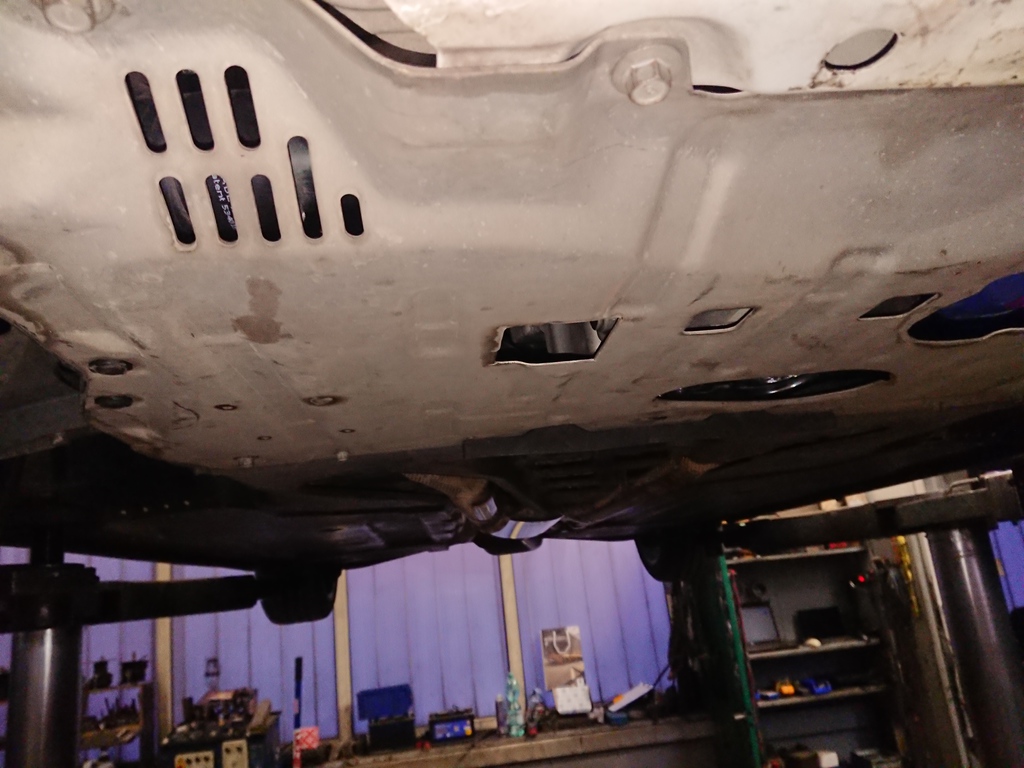 Maximum packaging in the tunnel: 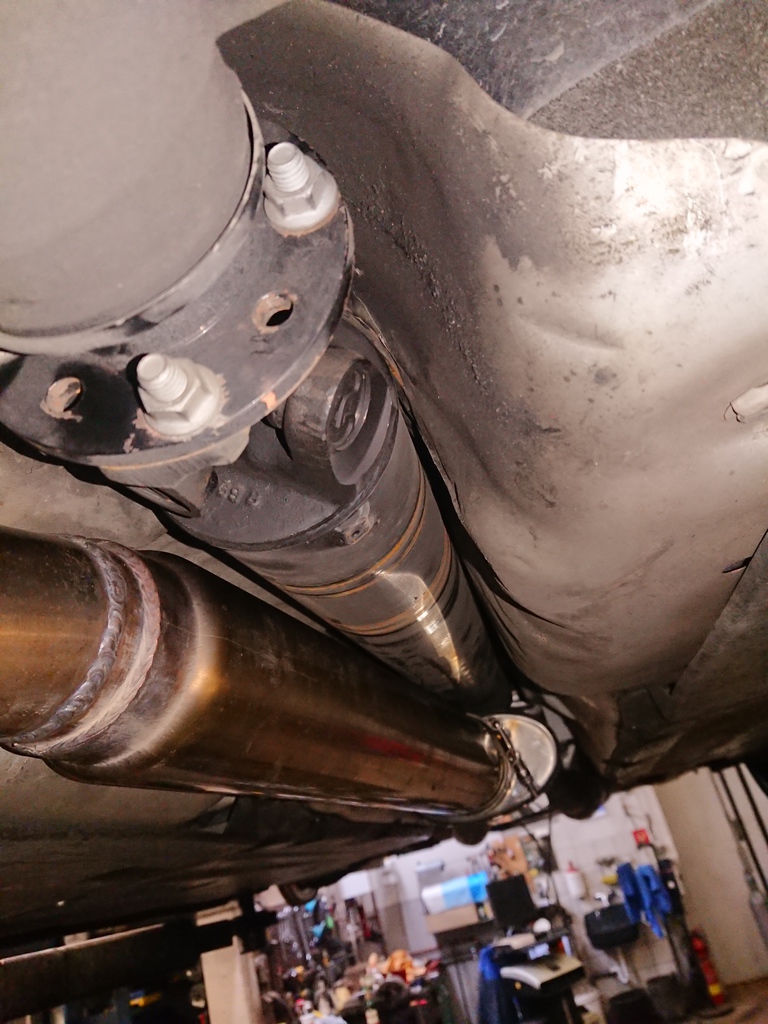 To keep everything street legal the exhaust system included two HJS converters with E5 coating, pre-and middle-silencer plus muffler. This is pretty much the maximum of material that can be stuffed in the 86' chassis tunnel. The diameter of the current steel propshaft will be reduced by switching to a carbon unit. While beeing smaller in diameter and therefore giving more space with in the tunnel it is stronger than the steel version. The drivetrain then is mechanicaly prepared for 600whp and 200mph Vmax. Only a external diff cooler would be necessary in addition. Since I plan to stay at the LS3 OEM setup I dont feel this will be necessary for now.
__________________
|
|
|
|
| The Following 2 Users Say Thank You to TRS For This Useful Post: | Dzmitry (03-08-2021), Irace86.2.0 (05-30-2021) |
|
03-07-2021, 04:26 PM
|
#78 |
|
Meow

Join Date: Aug 2017
Drives: GT86, Volvo 996
Location: France
Posts: 532
Thanks: 314
Thanked 444 Times in 236 Posts
Mentioned: 1 Post(s)
Tagged: 0 Thread(s)
|
Do you have a sound clip of the car with the new exhaust?
|
|
|
|
|
03-07-2021, 05:53 PM
|
#79 |
|
Senior Member
Join Date: Nov 2019
Drives: 2013' Toyota 86 (EU spec)
Location: Germany
Posts: 160
Thanks: 32
Thanked 139 Times in 56 Posts
Mentioned: 4 Post(s)
Tagged: 1 Thread(s)
|
Not jet. I only was able to hear it from the drivers seat since we finished. I have a special license plate which is only valid during the summer season. This type of plate is used in Germany to save some insurance and tax during winter for cars which are driven only during summer time and vice versa.
The idea is to give the two volume flows of the two banks a better chance to mix, what is done in the pre-silencer and (As before) the part of system between pre-silencer and Muffler, which is a single pipe and includes the middle-silencer. The newly added pre silencer also has a perforated section before the Y pipe, what means that the asymetric pulses due to the cross plane firing order can flow over to the opposite side before the actual mix takes place. All together this takes out the typical US V8 "bubbling" or "rumble". Overall I would say it is generating a european V8 sound as known from BMW. (while one needs to keep in mind that also some of those sound a little different on the US market due to US specific exhaust systems) Since the european manufacturers also use crossplane crank mostly (if not talking about Ferraris and so on), they also have a asymetric firing order. But the Sound is different since its not completely identical in the typical firing order and, of course, the sound design is done in a different way, whats the much more decisive aspect in that case. (meaning you can make a Audi or BMW V8 Sound very US kind of style by a corresponding exhaust design) My attempt was to get something between the bubbling US sound and the screaming sound of e.g. a Ferrari flat plane V8. The most effective mix of the two volume flows is how I tried to address this. On the other hand Im running shorty headers, what kind of counter acts to this effect. I was very uncertain how this would turn out in the beginning, since I never did stuff like that on V8 engines. But overall Im satisfied with the comeout. This beeing said, everything we are taking about here is on a very low noise level compared to US standards. But I also didnt want to have a car which is always point of intrest since US V8 sounds are still very unusual arround here. If this is combined with high loudness you are Kind of a red corsshairs for any cop out there. As well I like the idea of understatement.
__________________
Last edited by TRS; 03-10-2021 at 05:38 PM. |
|
|
|
| The Following User Says Thank You to TRS For This Useful Post: | Dzmitry (03-08-2021) |
|
03-08-2021, 03:57 AM
|
#80 |
|
Meow
Join Date: Aug 2017
Drives: GT86, Volvo 996
Location: France
Posts: 532
Thanks: 314
Thanked 444 Times in 236 Posts
Mentioned: 1 Post(s)
Tagged: 0 Thread(s)
|
Yeah, us Europeans tend to have a much, much milder approach to exhaust mods. There's a stronger stigma against modified, loud cars here and it's very easy to cross into obnoxious territory.
I was very surprised to see how open-minded people seemed to be in the US when it came to heavily modified cars. |
|
|
|
|
03-08-2021, 09:50 PM
|
#81 | |
|
Senior Member

Join Date: Mar 2017
Drives: Q5 + BRZ + M796
Location: Santa Rosa, CA
Posts: 7,883
Thanks: 5,668
Thanked 5,804 Times in 3,299 Posts
Mentioned: 70 Post(s)
Tagged: 0 Thread(s)
|
Quote:
__________________
My Build | K24 Turbo Swap | *K24T BRZ SOLD*
|
|
|
|
|
| The Following User Says Thank You to Irace86.2.0 For This Useful Post: | TRS (03-11-2021) |
|
04-30-2021, 06:54 PM
|
#82 |
|
Senior Member
Join Date: Nov 2019
Drives: 2013' Toyota 86 (EU spec)
Location: Germany
Posts: 160
Thanks: 32
Thanked 139 Times in 56 Posts
Mentioned: 4 Post(s)
Tagged: 1 Thread(s)
|
Carbon driveshaft installed today. Was already sitting in the garage for about a month. Didnt had time to proceed earlier due to some health issues. Now I whiped of the dust and put the "black gold" finally in:
  Weigth savings are only moderate. About 1-2kg. Didnt do a measurement. But its obvious when Handling the shaft that 80% of the mass are the pretty massive aluminium flanges, which are necessary to bond the carbon tube. So very low weight in the critical center area of the tube, what could stress the shaft under high rpm. Inertia should also be much less, since diameter is smaller and weight distribution is more towars center of the rotation axis. Not sure if this is just subjective, but I would say that I fell a stronger effect then by the slightly lightened fly wheel. Besides diff the drivetrain in ready for 900Nm now. But I dont think to ever need those margins. So far Im happy with the gained space. No grinding between shaft and fuel tank heat shields any longer. As well, the work of the DSS guys looks pretty good for now. Lets see if it can keep the promisses in the next high speed test. Only thing I didnt like that much is, that cast iron yokes and flanges are raw and not painted. (to prevemt corrosion) Will change that myself once I testen the unit intensively.
__________________
|
|
|
|
|
05-01-2021, 09:12 AM
|
#83 | |
|
Senior Member
Join Date: Oct 2016
Drives: 2017 WR BLUE BRZ
Location: San Jose
Posts: 641
Thanks: 608
Thanked 502 Times in 249 Posts
Mentioned: 15 Post(s)
Tagged: 0 Thread(s)
|
Quote:
I also had a Carbon Shaft from DSS. Beautiful piece, but the heat in the transmission tunnel was too high and after a few thousand miles, A balance weight fell off (the adhesive that held the weight on had turned orange from the heat). A few months later the flange at the transmission end came loose from the carbon. I spoke with Tad at DSS and about it some time later. He told me they would have warranted it which is awesome. I had a had a local drive shaft shop that I deal with often build a replacement aluminum shaft as I wanted to eliminate that problem from happening again...additionally, my complete exhaust is coated in swaintech white lightning ceramic coating which was not enough to help the driveshaft. A few pics and vids from when it let go https://www.instagram.com/p/CH3Ktwen...=1f4qujbkwexo5 . Last edited by ILLSMOQ; 05-01-2021 at 09:27 AM. |
|
|
|
|
| The Following User Says Thank You to ILLSMOQ For This Useful Post: | Irace86.2.0 (05-30-2021) |
|
05-01-2021, 07:24 PM
|
#84 |
|
Senior Member
Join Date: Nov 2019
Drives: 2013' Toyota 86 (EU spec)
Location: Germany
Posts: 160
Thanks: 32
Thanked 139 Times in 56 Posts
Mentioned: 4 Post(s)
Tagged: 1 Thread(s)
|
Thanks @ILLSMOQ for that report. Yes, Im also sensible concerning possible heat issues. I was told to have at least 3/4 of an inch to the exhaust. This is given, and in addition it is "only" the silencer, not the pipe, where I have this distance. As well, 148°C is the specified max temp for this shaft as given from DSS. Based on the coloring, the silencer has 200°C extreme temp, the naked pipe about 280-300, but with much more distance.
Anyway, I will perform test driving with heat measurement by adhessive indicator stripes and as well further measurements after stop to make sure the specs are enheld. Unfortunately a aluminium shaft, what would have been my favorit, is not possible. I had a 4" Steel shaft before and as you see on the pics, it is to large for the 86' tunel. This beeing said, this 4" are still not enough for my Vmax specs. A aluminium shaft would need also 4" diameter to Match the specs. (A proper steel shaft would have been at 4,5 to 5", whats an impossible fitment.) So I only had the option to stick with carbon. If I use steel or aluminium in a diameter fitting the tunel I would need to limit the top speed to arround 250kph. A 3.5" aluminium shaft would have no issue to hold the torque at the strip or track racing on a course with not too long straights. But it will not withstand the ~10-11k rpm @320kph. The 4" Steel shaft was perfectly balance in the beginning, but it started vibrating at 270kph. Once this speed was reached and the vibration started it was a quick process that the vibration started more early, finally at arround 240kph. So I programmed a limiter at 250kph, were the vibrations were as strong as I felt it would be acceptable at least for short periods. Well, a speed limiter clearly wasnt my goal for my project and the german Autobahn, so I decided for the carbon shaft... This is the downside of my concept of using the Magnum F instead of the XL. The F trans is a perfect fit for the chassis, but it requires a longer driveshaft. This in turn causes much more stress for the shaft at Vmax rpm compared to a 10 or 15cm shorter version. If the attempt of the carbon one piece shaft fails due to temperature issues, a steel two piece shaft will be the last ressort. But such a driveshaft as a custom build is pretty complex and I still want to avoid this option. But if nothing else works I will have to reactivate the brakets for the center bearing, which I didnt remove from the chassis (even if this would have made some space issues with the exhaust easier) with exactly those thoughts in mind. From my perspective, I dont see it as "usual" build. I try to handle it like an automotive product development, but with much less Budget and for sure different goals. The point is, development includes the possibility to fail and the necessity of further iterations.
__________________
Last edited by TRS; 05-02-2021 at 05:12 AM. |
|
|
|
|
|
|
|
 |
| Tags |
| cad, diy, ls swap, ls3 |
|
|
 Similar Threads
|
||||
| Thread | Thread Starter | Forum | Replies | Last Post |
| 2JZ Swap - Looking for Labor Info from Swap Shops/XP'd Members | Cookiemonster | Engine Swaps | 18 | 05-25-2019 12:40 PM |
| Dead RB25 Swap, Alive 2jz swap | -Phil | Engine Swaps | 72 | 09-15-2018 02:35 PM |
| Pentosin Trans Fluid Swap | Motul 300 Diff Swap | Impressions | Dezoris | Mechanical Maintenance (Oil, Fluids, Break-In, Servicing) | 15 | 06-06-2017 10:54 PM |
| Ls or 2jz swap? | sgoldberg01 | BRZ First-Gen (2012+) -- General Topics | 13 | 03-22-2016 03:07 PM |


