


|
||||||
| DIY (Do-It-Yourself) Guides For all DIYs. |
 |
|
|
Thread Tools | Search this Thread |
 09-29-2012, 02:12 PM
|
#1 | |
|
@Executive_chicken
Join Date: Jun 2012
Drives: Firestorm FR-S, Audi A3 E-tron
Location: SoCal
Posts: 1,157
Thanks: 106
Thanked 469 Times in 289 Posts
Mentioned: 16 Post(s)
Tagged: 0 Thread(s)
|
Installing JDM Window Visors
Type: Cosmetic
Time: 30-40 min Tools: heat gun/hair dryer (optional depending on area) I got these from Nigel-jdmparts.com I ordered them on a Tuesday and got them on a Monday. Very fast ordering process and delivery  In the box you get the left and right visors plus some very detailed instructions and two guides so that you set both visors in the correct area. First you want to roll, down th windows and prepare the area by rubbing some alcohol where the visors will be attached to the body. Per the instructions you want to do one wipe from the front to the back. Next you need to place the guides. The back one lines up with the line where the front and rear trim pieces meet:  The front one lines up with where the body panel lines up with wind shield: 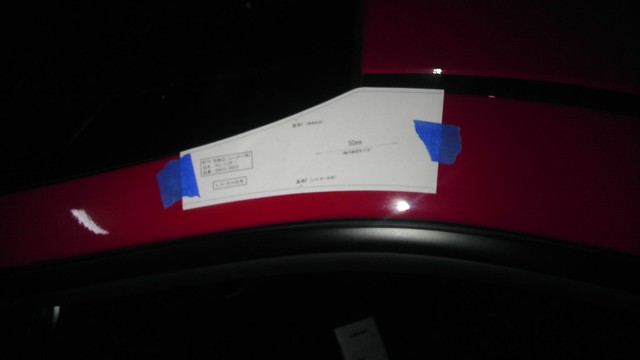 The rear of the visor is marked with a tab. Pull up the tab so that the sticky part is exposed:  Place on the car to line it all up. DO NOT press down on the sticky end yet:  The tabs (seen below)go between the black trim piece and the body. Note that there is a small chanel between the front part of the trim and the back. The visors will not go in and you might break the tabs if you force it down in this area. 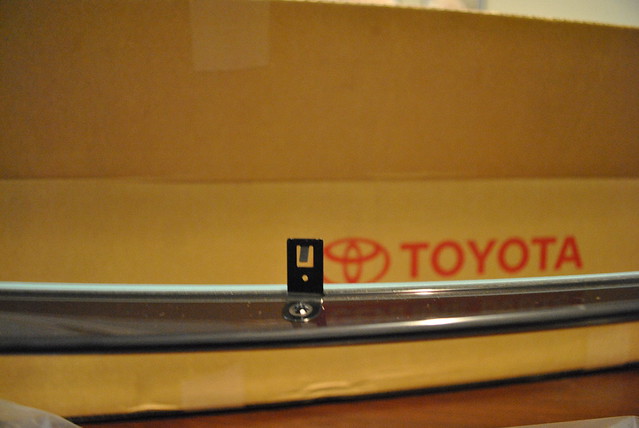 You will hear a 'click' once the tabs have gone in correctly. To make sure they are in by gently trying to lift the visors out. You will not be able to lift them out and will feel a small tug. Once it is lined up with the rear press down on the part with the exposed sticky end to set the visor in place: 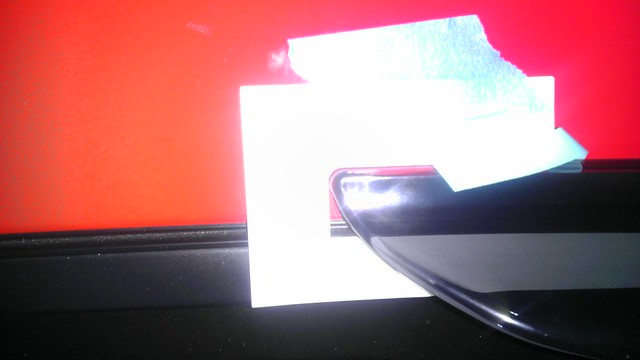 The back of the visor lines up with the guide you placed on the the rear of the black trim. The front will not line up but there should be an even gap between the visor and the guide. Remove the sticker backing to expose the sticky end along the entire visor and press down on the visor starting at the rear and going to the front. Press down on the visor a couple of times to make sure that it all sticks. Optional for colder areas: instructions say to heat the area from under the visor on the window side to help the visor to stick. It's been close to 100 here is other California so I didn't do this part.
__________________
Club 4AG | Apex'i | HKS | GrimmSpeed | TRD | Beat Sonic | ENKEI | Cusco | Fujitsubo
  Quote:
Last edited by Calidrifter; 10-23-2012 at 02:51 AM. |
|

|

|
| The Following 7 Users Say Thank You to Calidrifter For This Useful Post: | dennyhendrix (03-24-2016), GregV (11-24-2012), ill86 (12-27-2012), PNW FRS (04-26-2013), Ricky Racer (03-11-2013), Thunder86 (06-28-2020), ZeN6 (10-17-2012) |
|
09-29-2012, 02:28 PM
|
#2 |
|
Attack By Demons

Join Date: Feb 2012
Drives: 2022 BRZ (pre ordered)
Location: Riverside
Posts: 2,070
Thanks: 750
Thanked 440 Times in 254 Posts
Mentioned: 20 Post(s)
Tagged: 0 Thread(s)
|
pics pics!!
__________________
#attackbydemons #imcomingbackbish
|
|
|
|
|
09-29-2012, 02:31 PM
|
#3 |
|
Senior Member
Join Date: Jul 2012
Drives: 2013 Scion FRS whiteout
Location: Garage
Posts: 395
Thanks: 322
Thanked 169 Times in 95 Posts
Mentioned: 14 Post(s)
Tagged: 0 Thread(s)
|
Daylight pics please lol.
|
|
|
|
| The Following User Says Thank You to boonFRS For This Useful Post: | civicdrivr (09-29-2012) |
|
09-29-2012, 02:39 PM
|
#4 |
|
Senior Member
Join Date: Sep 2012
Drives: 2013 BRZ SWP 6AT Ltd
Location: Alexandria, VA.
Posts: 1,607
Thanks: 859
Thanked 776 Times in 485 Posts
Mentioned: 37 Post(s)
Tagged: 1 Thread(s)
|
Need moar pics!
|
|
|
|
|
09-29-2012, 03:17 PM
|
#5 |
|
Registered you sir
Join Date: Feb 2010
Drives: 99 impreza coupe
Location: DC / CT
Posts: 1,666
Thanks: 259
Thanked 380 Times in 207 Posts
Mentioned: 3 Post(s)
Tagged: 0 Thread(s)
|
Is this OEM? Usually called rain gaurds around here.
|
|
|
|
|
09-30-2012, 05:42 PM
|
#6 | |
|
Banned
Join Date: Aug 2012
Drives: A nice one
Location: San Diego
Posts: 89
Thanks: 1
Thanked 30 Times in 14 Posts
Mentioned: 2 Post(s)
Tagged: 0 Thread(s)
|
Quote:
Do you not know how to read the thread title? |
|
|
|
|
|
09-30-2012, 07:12 PM
|
#7 | |
|
Registered you sir
Join Date: Feb 2010
Drives: 99 impreza coupe
Location: DC / CT
Posts: 1,666
Thanks: 259
Thanked 380 Times in 207 Posts
Mentioned: 3 Post(s)
Tagged: 0 Thread(s)
|
Quote:
And take your foot out of your mouth before you respond, nowhere does it say OEM. 
|
|
|
|
|
|
10-01-2012, 12:18 AM
|
#8 |
|
Senior Member
Join Date: Jan 2012
Drives: 2013 FR-S
Location: PA
Posts: 197
Thanks: 45
Thanked 16 Times in 14 Posts
Mentioned: 1 Post(s)
Tagged: 0 Thread(s)
|
update on pics?
|
|
|
|
|
10-01-2012, 09:29 AM
|
#9 | |
|
Senior Member
Join Date: Sep 2012
Drives: 2013 BRZ SWP 6AT Ltd
Location: Alexandria, VA.
Posts: 1,607
Thanks: 859
Thanked 776 Times in 485 Posts
Mentioned: 37 Post(s)
Tagged: 1 Thread(s)
|
Yes, per the title these are the OEM, JDM, Toyota Rain Guards for the 86 model line-up that is also named the BRZ and FR-S in other world markets
Quote:
|
|
|
|
|
|
10-01-2012, 12:42 PM
|
#10 |
|
Senior Member
Join Date: May 2012
Drives: 2008 Mazda3 GT Hatchback
Location: Toronto
Posts: 137
Thanks: 5
Thanked 26 Times in 19 Posts
Mentioned: 0 Post(s)
Tagged: 0 Thread(s)
|
Yes, daytime pics please.
Also, how much did these run you? |
|
|
|
|
10-01-2012, 10:12 PM
|
#11 | |
|
@Executive_chicken
Join Date: Jun 2012
Drives: Firestorm FR-S, Audi A3 E-tron
Location: SoCal
Posts: 1,157
Thanks: 106
Thanked 469 Times in 289 Posts
Mentioned: 16 Post(s)
Tagged: 0 Thread(s)
|
Ok, ok I'll get the daylight pics as soon as I can. Forgot to take my DSLR to the Tanabe/Club 4AG meet. I'll try to get some pics tomorrow in the daylight.
Yes, these are OEM JDM parts.
__________________
Club 4AG | Apex'i | HKS | GrimmSpeed | TRD | Beat Sonic | ENKEI | Cusco | Fujitsubo
Quote:
|
|
|
|
|
|
10-01-2012, 10:16 PM
|
#12 | ||
|
@Executive_chicken
Join Date: Jun 2012
Drives: Firestorm FR-S, Audi A3 E-tron
Location: SoCal
Posts: 1,157
Thanks: 106
Thanked 469 Times in 289 Posts
Mentioned: 16 Post(s)
Tagged: 0 Thread(s)
|
Quote:
OEM JDM Groupbuy
__________________
Club 4AG | Apex'i | HKS | GrimmSpeed | TRD | Beat Sonic | ENKEI | Cusco | Fujitsubo
Quote:
|
||
|
|
|
|
10-01-2012, 10:52 PM
|
#13 | |
|
Senior Member
Join Date: May 2012
Drives: 2008 Mazda3 GT Hatchback
Location: Toronto
Posts: 137
Thanks: 5
Thanked 26 Times in 19 Posts
Mentioned: 0 Post(s)
Tagged: 0 Thread(s)
|
Quote:
|
|
|
|
|
|
10-01-2012, 11:00 PM
|
#14 |
|
Senior Member
Join Date: Jun 2012
Drives: ZC6, Junk of ALL sorts
Location: Ohio
Posts: 516
Thanks: 111
Thanked 288 Times in 171 Posts
Mentioned: 7 Post(s)
Tagged: 0 Thread(s)
|
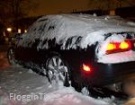
Been said. Daylight picture request.
 I call them smokers vents BTW. Great for smokin. I usually-always have the windows down a bit. Ohh... more pics.
__________________
# 1. Always know where your towel is.
ZC6-CBS, is home  Last edited by Floggin Tires; 10-01-2012 at 11:13 PM. |
|
|
|
|
|
|
|
|
| Thread Tools | Search this Thread |
|
|
 Similar Threads
|
||||
| Thread | Thread Starter | Forum | Replies | Last Post |
| Installing BRZ Trunk Interior Liner into FR-S | DarrenDriven | DIY (Do-It-Yourself) Guides | 30 | 11-19-2016 02:06 AM |
| DIY: Alarm installing wiring diagram | trueno86power | DIY (Do-It-Yourself) Guides | 17 | 02-07-2014 09:03 PM |
| How necessary is alignment after installing new springs? | switchlanez | Suspension | Chassis | Brakes -- Sponsored by 949 Racing | 47 | 11-22-2012 11:52 AM |
| Installing GT86 AC unit? | SupraLove | Cosmetic Modification (Interior/Exterior/Lighting) | 10 | 09-07-2012 02:08 PM |
| [FR-S] Installing New Subwoofer and Mono Amp | hx3 | Electronics | Audio | NAV | Infotainment | 0 | 08-09-2012 07:12 PM |


 Firestorm AT FR-S


