


|
||||||
| Electronics | Audio | NAV | Infotainment Anything related to in-car electronics, navigation, and infotainment. |
 |
|
|
Thread Tools | Search this Thread |
 03-31-2013, 05:35 PM
|
#1 |
|
Member
Join Date: Mar 2013
Drives: minivan
Location: Austin, TX
Posts: 41
Thanks: 1
Thanked 58 Times in 9 Posts
Mentioned: 0 Post(s)
Tagged: 0 Thread(s)
|
BRZ Limited Backup Camera Step by Step (WARNING long post, many pictures)
Edit from 2017
-------- That's what I get for piggy-backing off of a dropbox account I don't control I guess. Here's another link to the pdf. https://www.dropbox.com/s/yeoqhrc1yh...6CLUB.pdf?dl=0 Edit from leap year 2016 -------- First of all, I'm sorry for picking such a crappy image hosting provider. I promise I'll go back at some point and fix that. In the meantime, a user has helpfully hosted a PDF on dropbox. I'm putting the link at the top so you don't have to wade through the whole thread: https://dl.dropboxusercontent.com/u/...0by%20Step.zip Original post ---------- I installed a back-up camera in my BRZ Limited yesterday and wanted to document my experience. This does not replace what's already been written, but hopefully adds to it. I started off having no idea what to do, but there were a number of threads that were absolutely essential to my being able to do this. I'm hoping to provide a detailed set of step by step that takes the best of each of these. Now, I'm not a ham-fisted ogre and I am "slightly handy", but I've never done anything like this and certainly have no experience with electrical work, soldering, audio electronics installation, etc. If you are even slightly interested, you CAN do this, it really is pretty simple as long as you have a plan for what to do. Hopefully my post helps. I suggest you read through this post in its entirety in addition to the posts listed at the end for a complete picture of how to do this. Good luck! Things I bought for this:
Other tools you will need/find useful for the install:
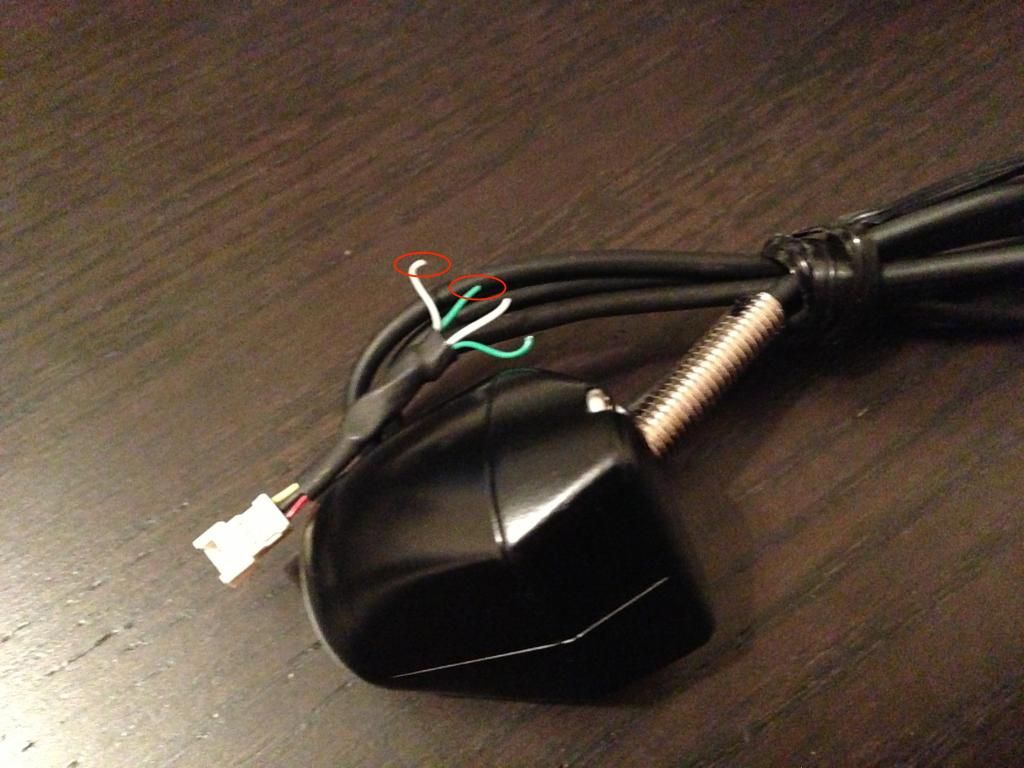 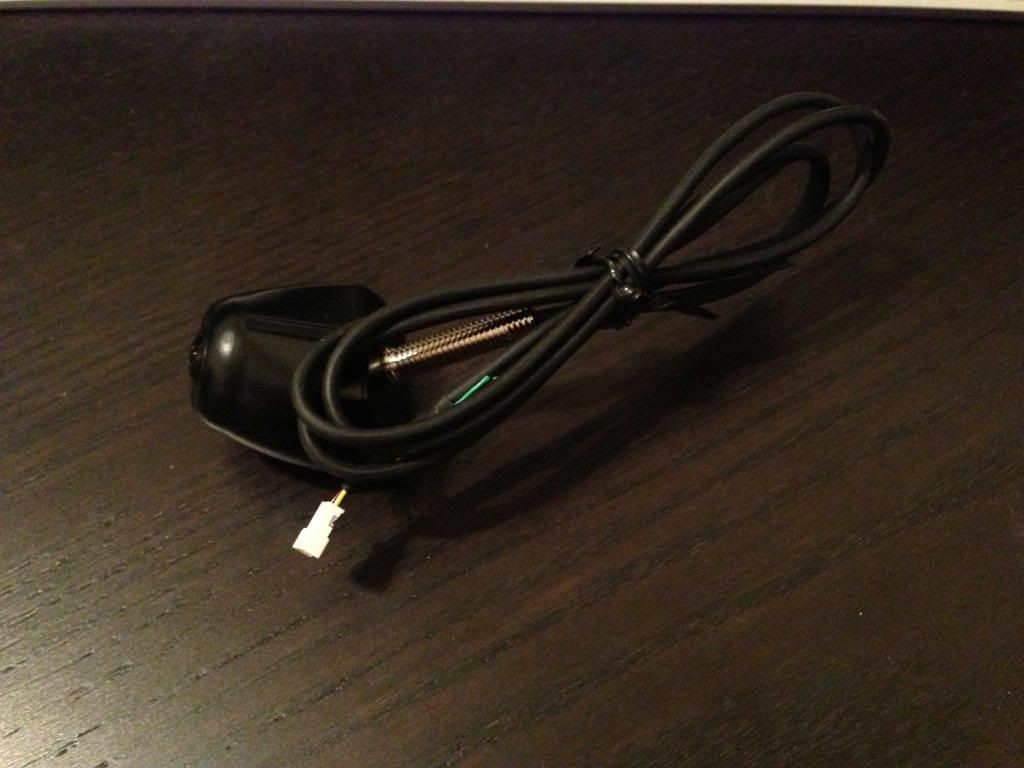 An overview of the camera itself. The camera body is made of metal and feel pretty sturdy. I'm curious if the $20 ones on eBay have the same build. My camera came in three segments, the camera end itself, which terminates in a 3-pin male connector, the middle end which has the matching 3-pin female connector on one end, and what looks like an s-video connector on the other end, and finally, the head unit end, which has the s-video connector on one end, and an RCA composite video out (male) and two bare wires (red +, black -) on the other end. There were two loops of wires near the connector (white and green, although the instructions call the green wire "blue"). Cutting the white wire flipped the imagine for mounting above the license plate (where the the lights for the license plate are located). Cutting the green wire removed the grid-lines generated by the camera itself. In my installation, I cut both since I was using the above plate mounting (instead of mounting in a license plate hole), and since the factory head unit provides grid lines (which btw, cannot be removed), you didn't want the camera to provide duplicate grid lines. 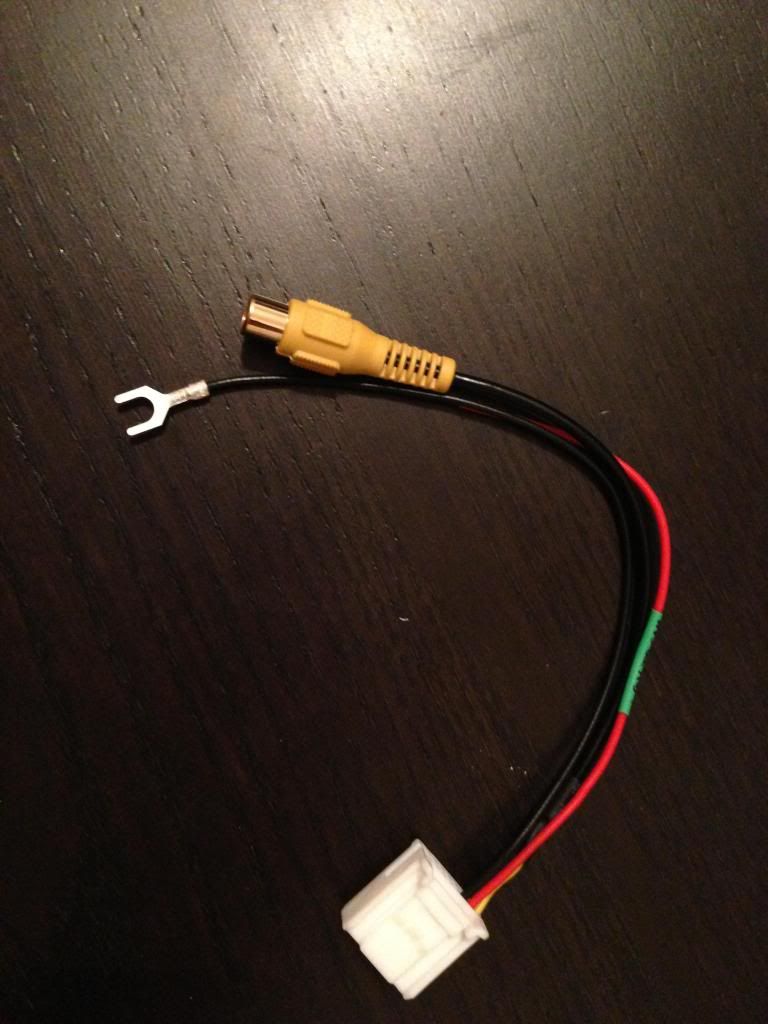 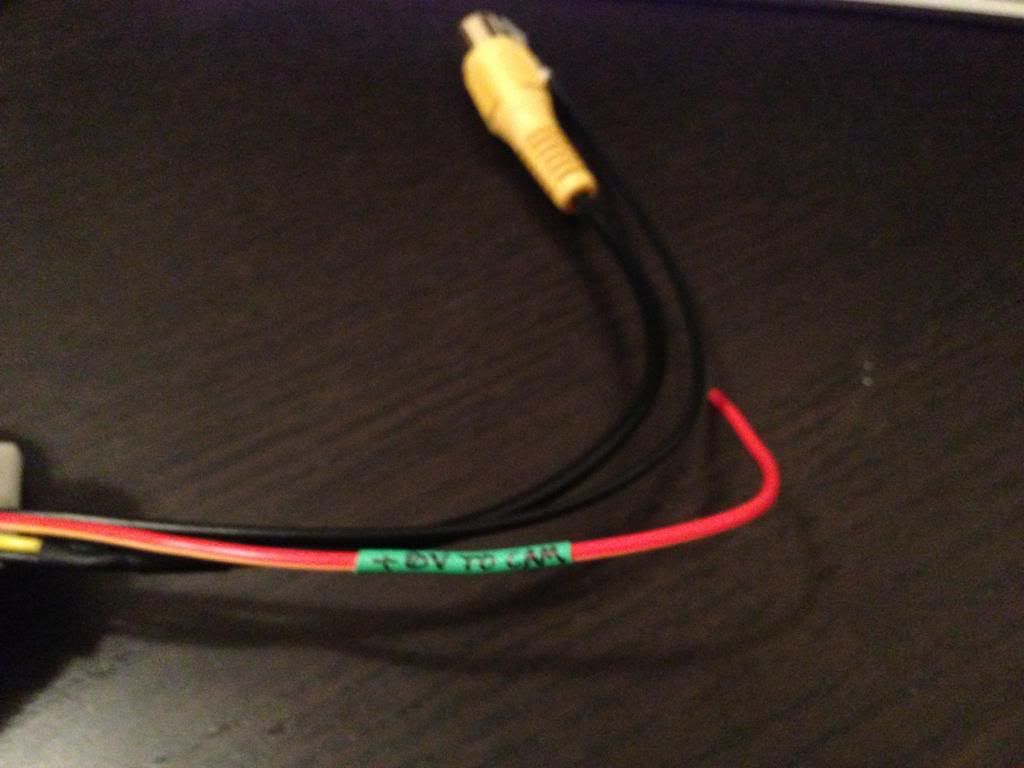 The SVXdc harness consists of a 16-pic connector which attaches to the back of the head unit (replacing the factory 16-pin connector). The other end contains an RCA composite video IN (female), a head unit power wire (red wire with yellow stripe, labelled "+6V to cam", and a fork terminal wire which is meant to be attached to ground). You will need to strip about 1/4" of the end of the head unit power cable using the wire stripper to expose the metal core. Testing the camera: When you get your camera, before you even THINK about touching the car, you should test the camera so you don't waste a ton of time installing the camera only to find it doesn't work. This was a particular concern for me because I received a refurbished unit. The easiest way to test the camera is to hook up the composite video male output to your TV. Just about every TV made in the last 20 years should support a composite video IN (usually yellow, do NOT use component video). To power the camera, you need a 6-12V (in the case of my camera) DC power source. I happened to have a 12V battery for my portable drill which did the trick. Do NOT use the battery from an 18V as it very likely will ruin your camera from excess voltage. In short, hook up the camera video out to the TV, set the TV to the correct input and connect the red (+) wire to the positive terminal of your 12V battery and the black wire (-) to the negative terminal. You should see the image from the camera. Do NOT proceed with installation until you can make this work. This is exactly how it works when you've got it installed so if you can't make this work, it won't magically start working when wired into your car. Sorry, I didn't take any pictures of this step, but if anyone has questions, let me know. Testing the camera connected to the car: Now, we will test the camera, wired into the head unit. Again, don't bother mounting the camera, routing wiring until this is working. 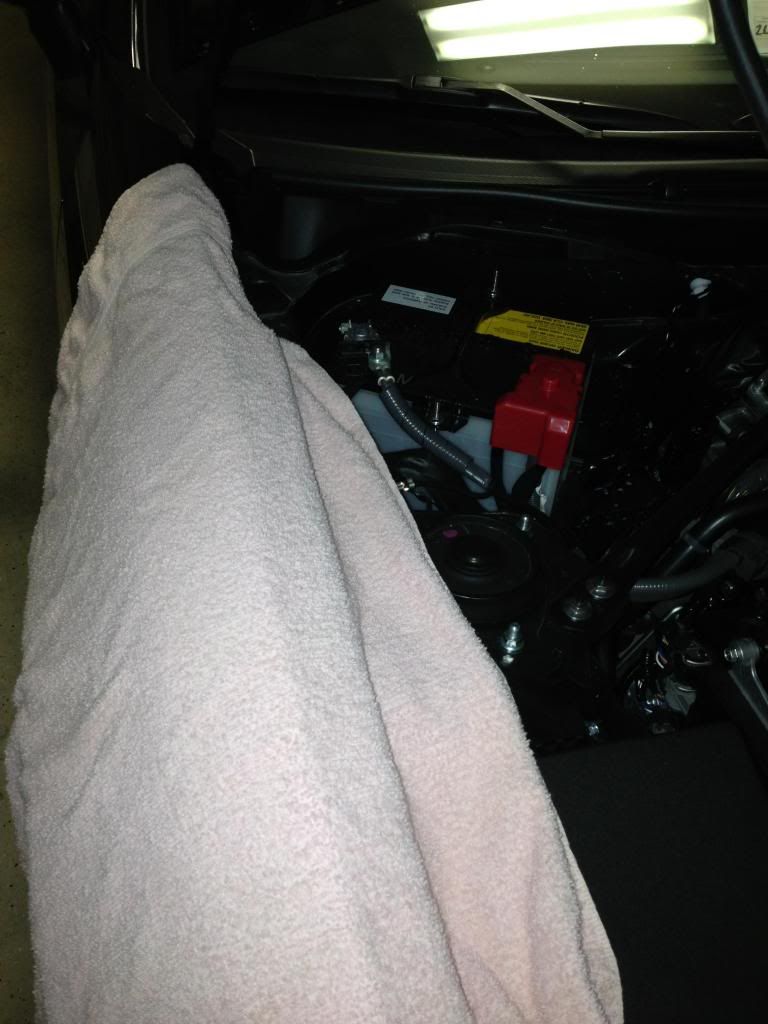 First lay a towel across the passenger-side fender of the car. Always do this to prevent a belt or button from scratching the paint. 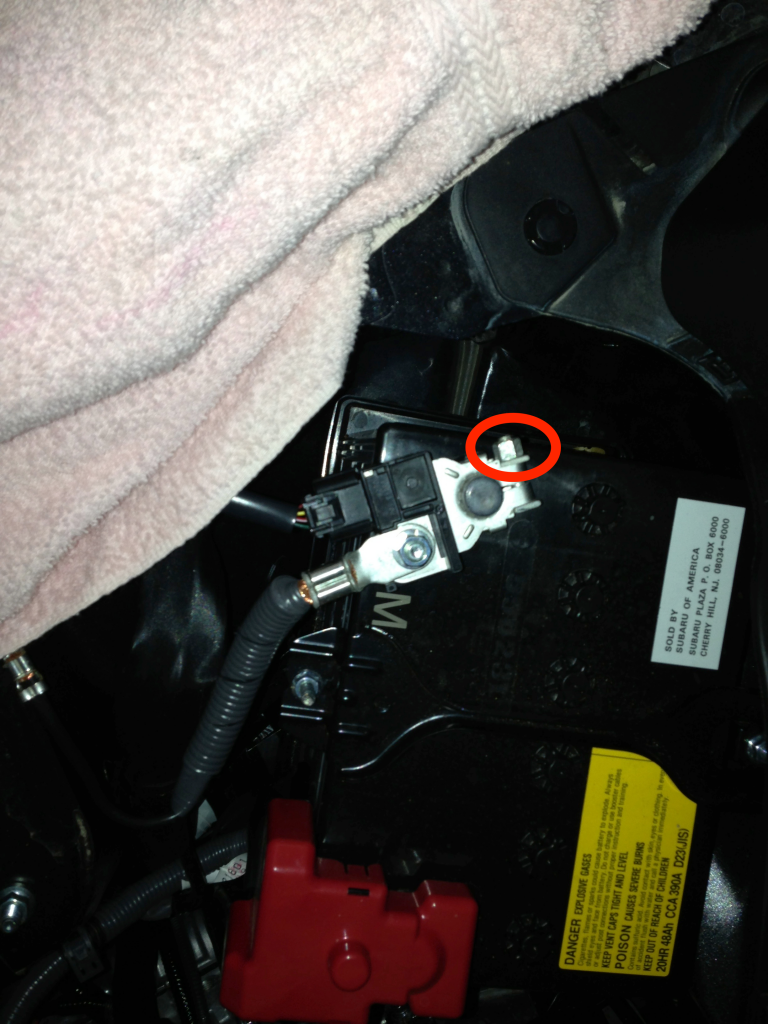 Disconnect the negative terminal of the car battery by loosening the 10mm nut. This is a tight fit so use the shallowest 10mm socket you have. You don't want the car to have power while you are messing with wiring. First, you don't want to get a shock from touching something, and secondly, you don't want to fry electronics in case you accidentally short a wire. 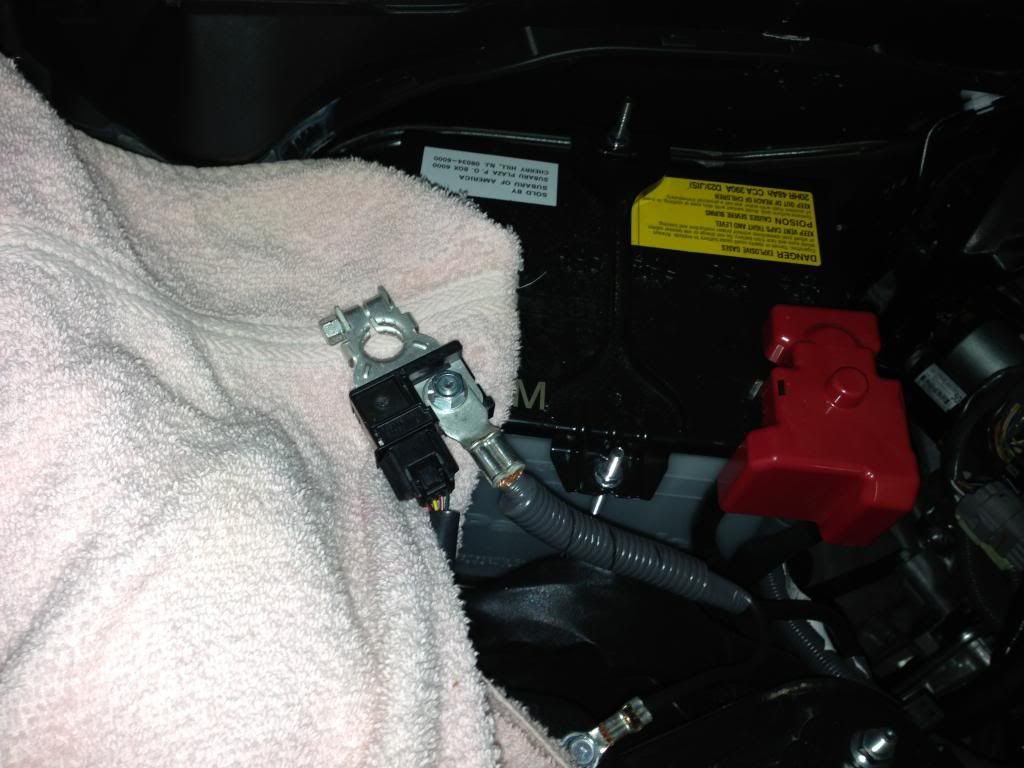 Once you've disconnected the negative terminal, cover it with the towel and put the negative terminal connector on top of the wire. The ensures that you will not have accidental power connection. 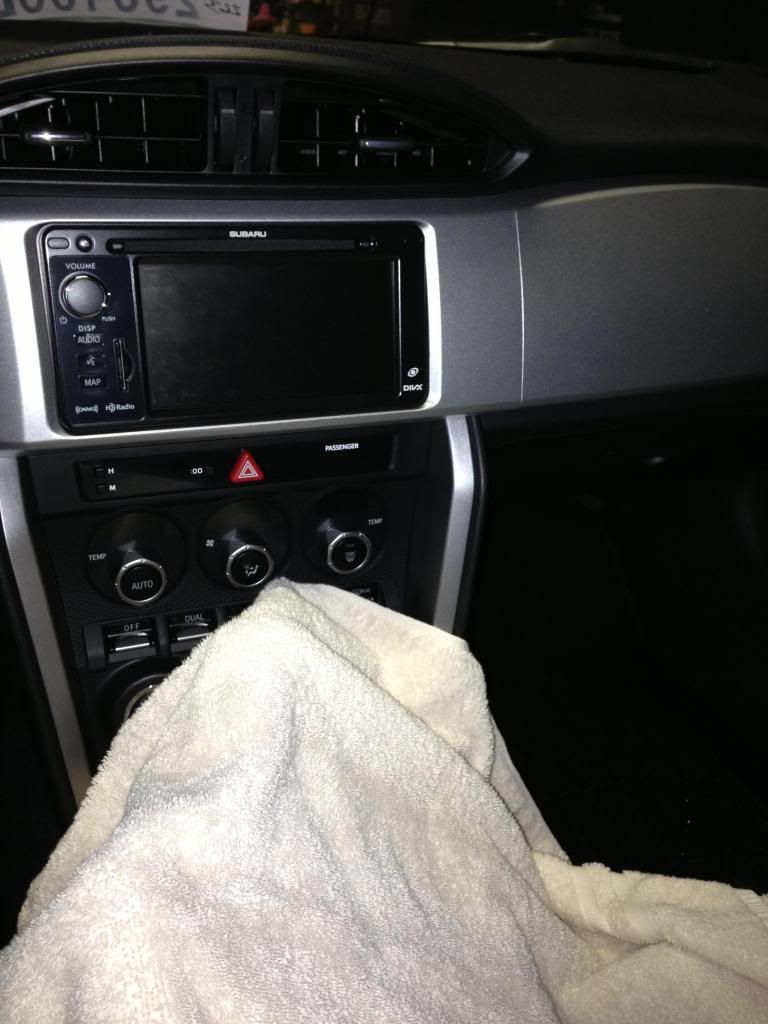 Cover the shifter area with another towel to prevent it getting scratched 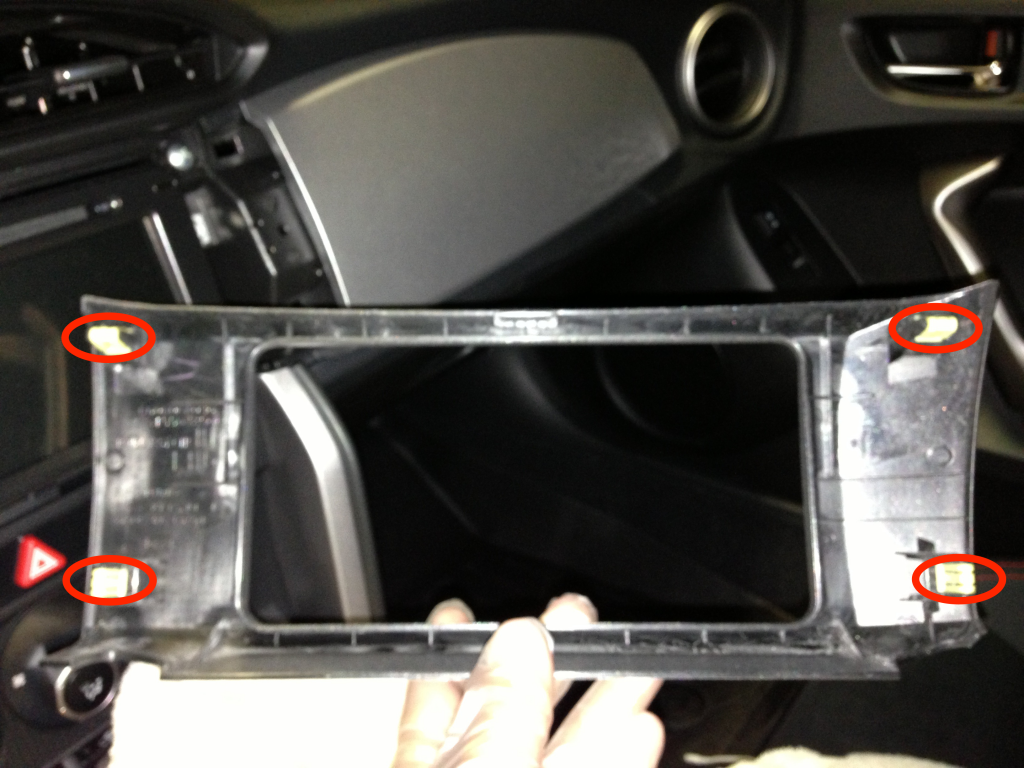 Pull off the head unit trim panel. If you have a plastic wire/panel tool, this might help. I was able to pull this out simply with friction from the pair of vinyl gloves that I was wearing. Do not use a metal pry tool (certainly not a screw driver) so as to not scratch the trim panel. 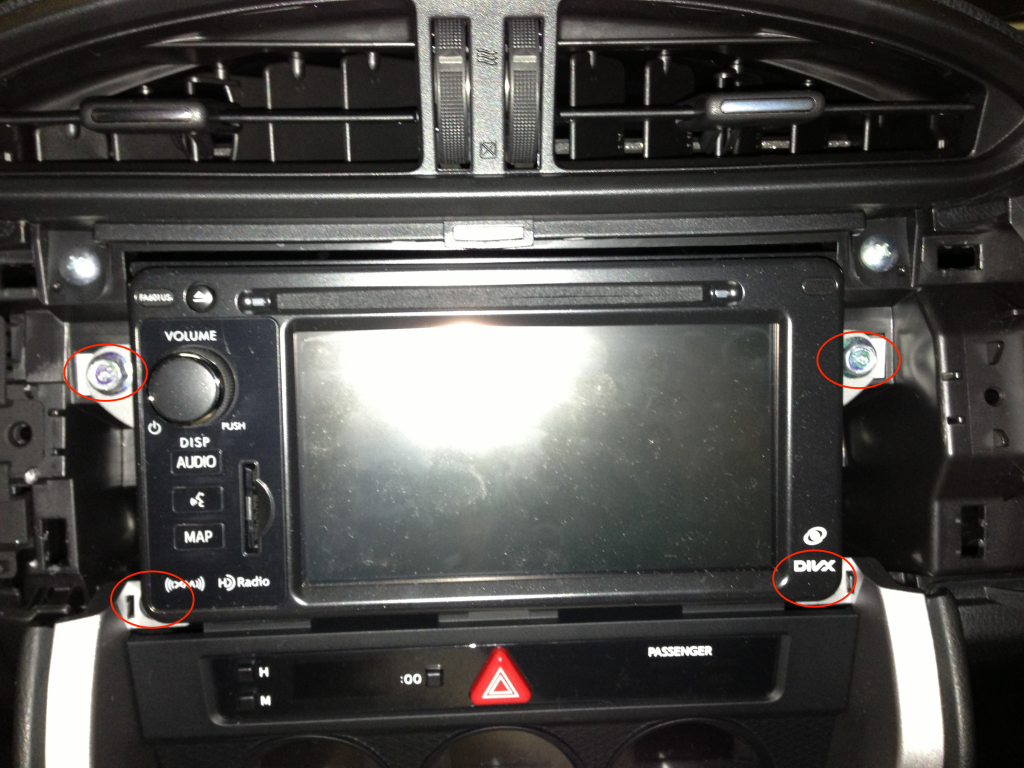 With the trim panel removed, use a deep 10mm socket to remove the four bolts holding the head unit in. Be careful not to drop any of these bolts as you will be dooooomed if you lose one (j/k, just be careful). Gently pull back the head unit and rest it on top of the towel, which is covering the shifter. You do NOT have to disconnect all of the connectors on the back of the head unit. In fact, don't because you don't want to have to remember what went where. 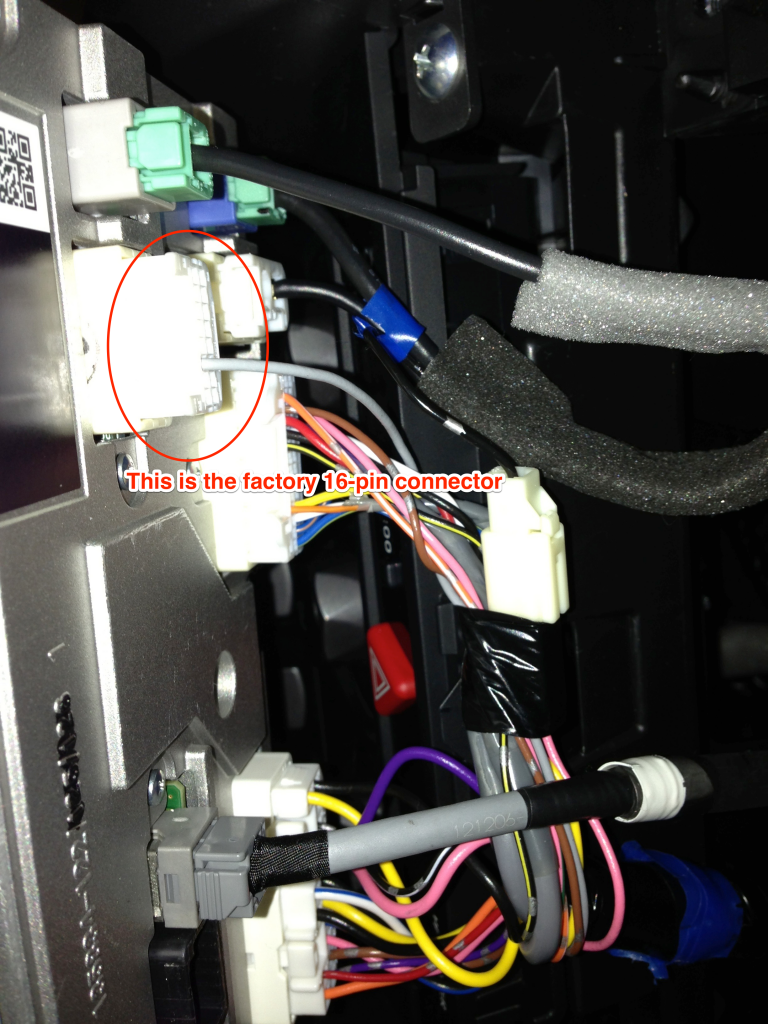 Find the factory 16-pin harness, it should look like the SVXdc harness but have only one gray wire coming off of it. 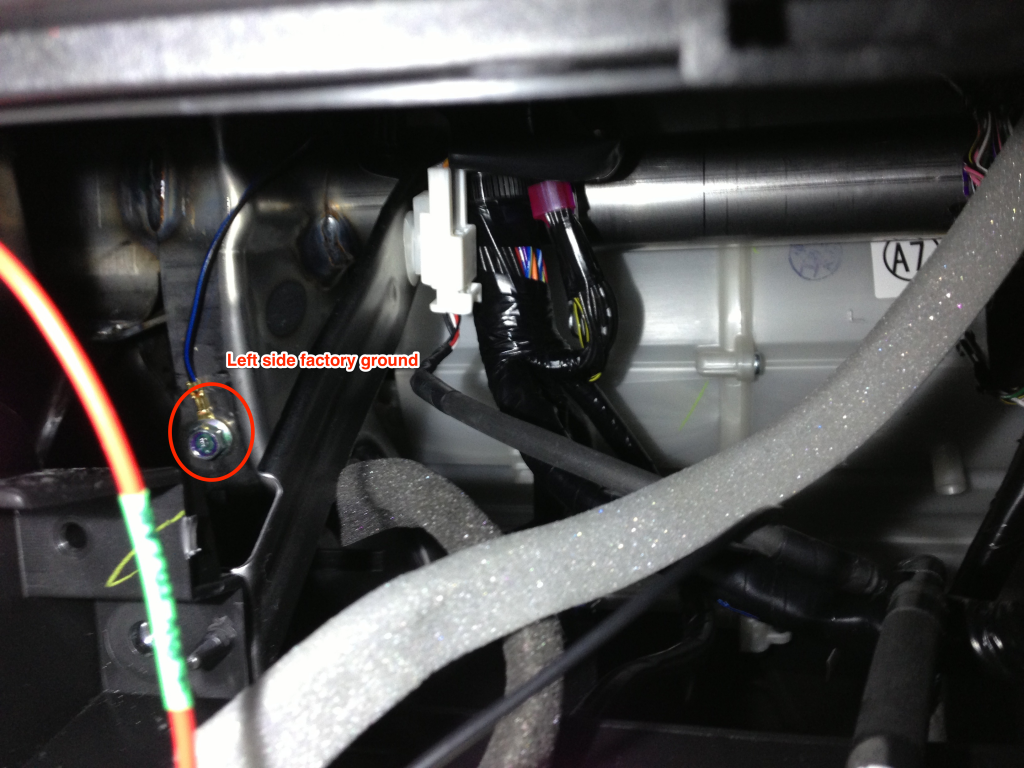 Find the factory ground location in the head unit cavity (might need a flashlight to see inside). There's one of the left and one on the right. I used the left side one because the ground wire coming off of SVXdc's harness isn't really that long and won't reach the right side ground bolt. Loosen this bolt slightly with a shallow 10mm socket. Do not pull the bolt out, definitely don't lose the bolt. You just need to loosen it enough to slide the fork terminal from the SVXdc harness onto the bolt. 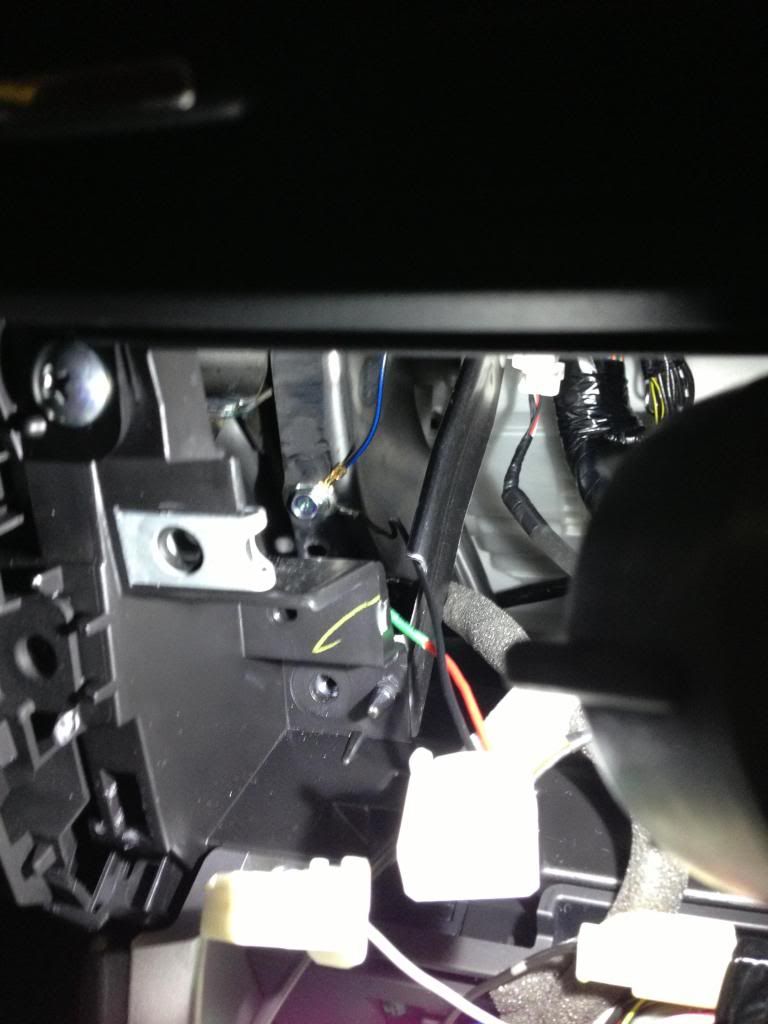 Now tighten the bolt back, making sure that the harness ground connector is securely attached. Take your camera (all three segments should be connected now) and temporarily attach the camera + terminal (red) to the harness (+6V to cam) wire using electrical tape. Attach the camera video male to the composite video female on the harness. Temporarily electrical tape the camera - terminal wire (black) to either the factory ground bolt, or some part of the chassis that's metal. Now attach the SVXdc 16-pin harness to the back of your head unit, making sure not to disconnect any of the temporary wires. Re-connect the battery negative terminal, tighten the 10mm nut. 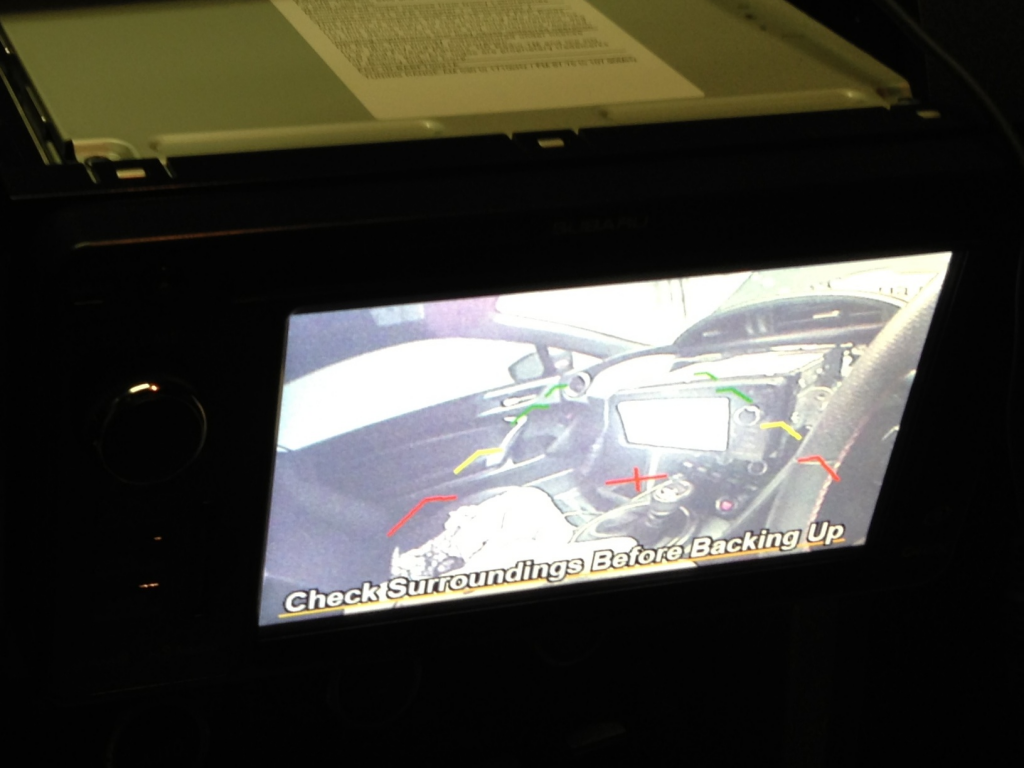 Now test the camera by powering up the car, you don't need to start the engine, just turn it "on" (for me, it was two presses of the start button with the clutch NOT depressed). This powers the head unit. Now if you shift into reverse, the head unit should power up the camera and you should see the camera image in the head unit. If it doesn't work, re-check all connections. Make sure this works before proceeding. The benefit to using the factory power lead on the harness is that the factory head unit will power up the camera when its first starting, if it detects a camera within 30 seconds or so, then when you shift into reverse it will provide power to the camera and enable the rear review image. Thus, the camera is only getting power when it's needed. If you tap some other 12V power source, the disadvantage is that the camera is powered on the entire time (which you may or may not care about). If you were to wire the camera into the reverse lights, then unless you start the car in reverse, the head unit won't detect a camera when it first starts, in which case it will not enable the camera later when you DO shift into reverse. In short, the factory power is the idea way to power the camera (see post at the bottom to see a list of cameras known to work) If everything worked, disconnect the car battery negative terminal (10mm socket) and cover with a towel. Disconnect the 16-pin harness from the head unit (be very careful as the short length of the ground wire doesn't afford you a lot of working space) and disconnect the camera from the harness. Loosen the ground bolt and take the SVXdc harness out completely. Mounting the camera and running the wire Okay, now it's time to actually mount the camera, and run the wire. In my installation, I wanted to mount the camera to the piece of trim right above the rear license plate. There appears to be an outline of where a factory camera might have gone (had subaru offered a factory camera accessory). 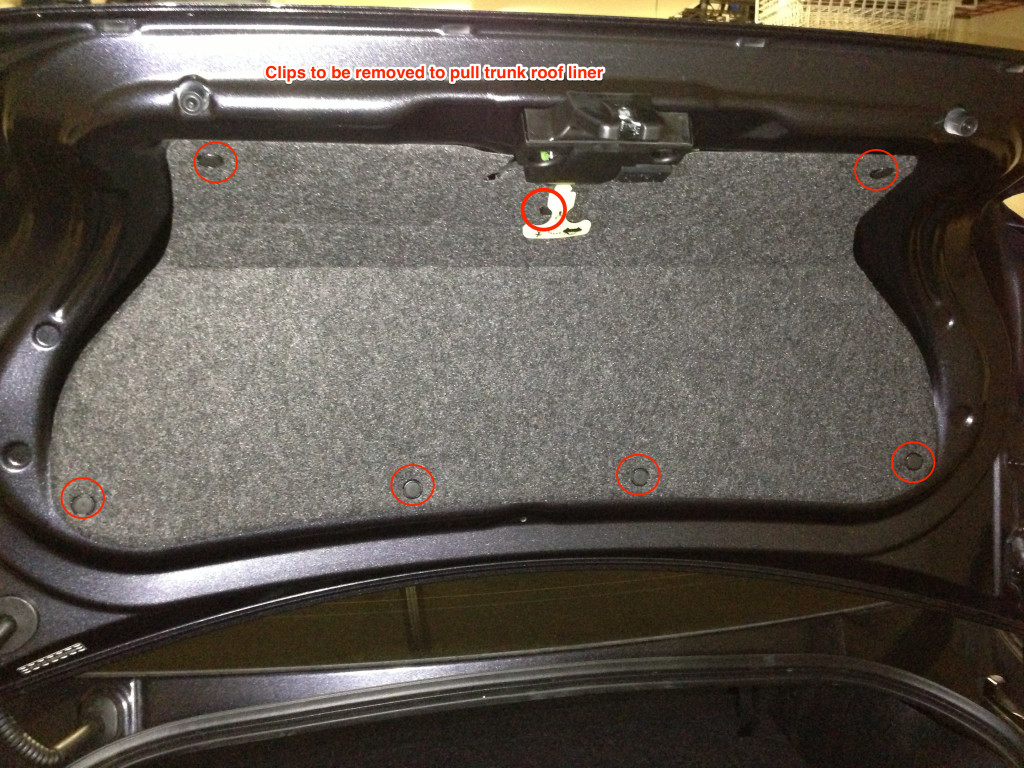 In my car, there's a carpet covering the roof of the trunk. You will need to remove this by popping the seven clips holding it on. Gentle pry the center of the clip out using the tip of a flat blade screw driver. Once you loosen the clip, it may not be easy to pull the clip out, in this case, gently lift the carpet away from the trunk (just make sure the clip doesn't go flying off). Set the carpet aside. Now would also be a good time to remove the liner for the floor of the trunk. With the bare metal trunk roof exposed, twist the light sockets for the light plate lights and pull them out. They twist in opposite directions on each side. Disconnect the trunk release button. It's the wire running from the trunk release on the trim piece. It's connected using a brown connector clip. 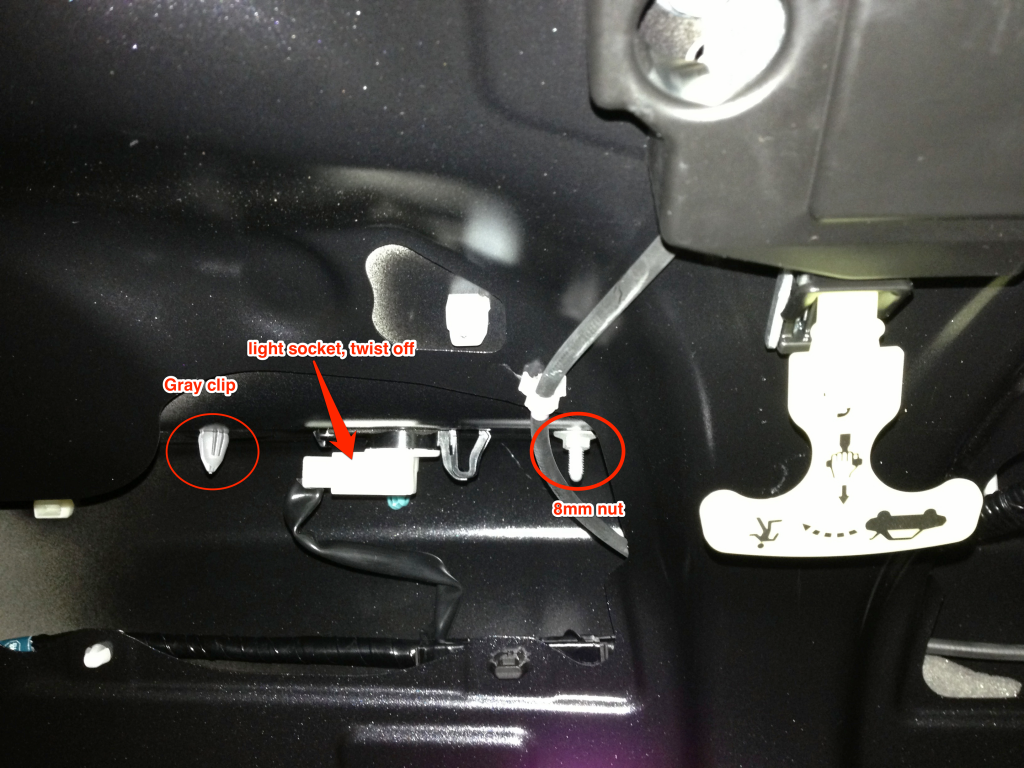 The trim piece is now attached using five 8mm nuts and a gray-colored clip. Two of these 8mm nuts are holding the trunk lock in place. Remove the two nuts holding the trunk lock (right most nuts) and gentle pull the trunk lock off and let it dangle. Now remove the three remaining 8mm nuts. Using your fingers, gently pull the trim piece off, there's still a gray clip holding it down so you will need to use some force to tease it loose. Take care not to break the plastic clip. Now gently pull up at the rubber grommet which is holding the trunk release wire. WIth the grommet detached, gently pull the wire and the end of the brown clip through the hold in the trunk. 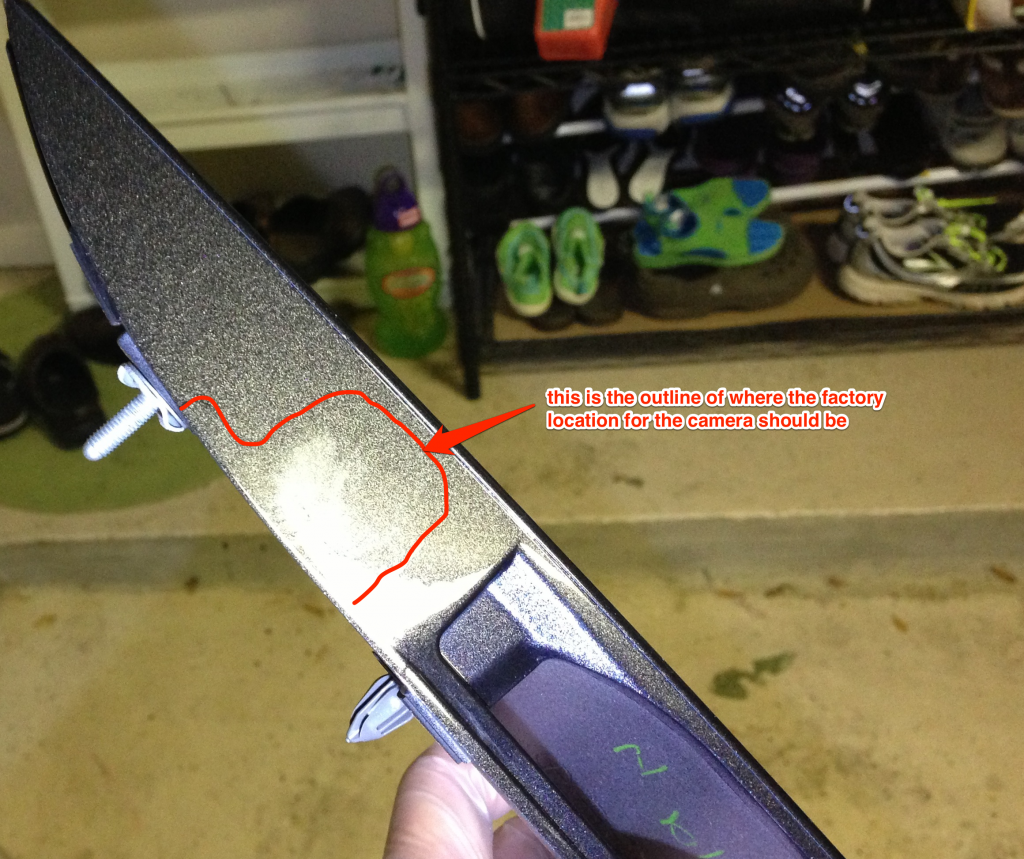 With the trim piece off, identify where you want to mount the camera. Again, there appears to be an outline on the trim piece for where a factory camera should go (the default grid line orientation of the head unit expects the camera here). 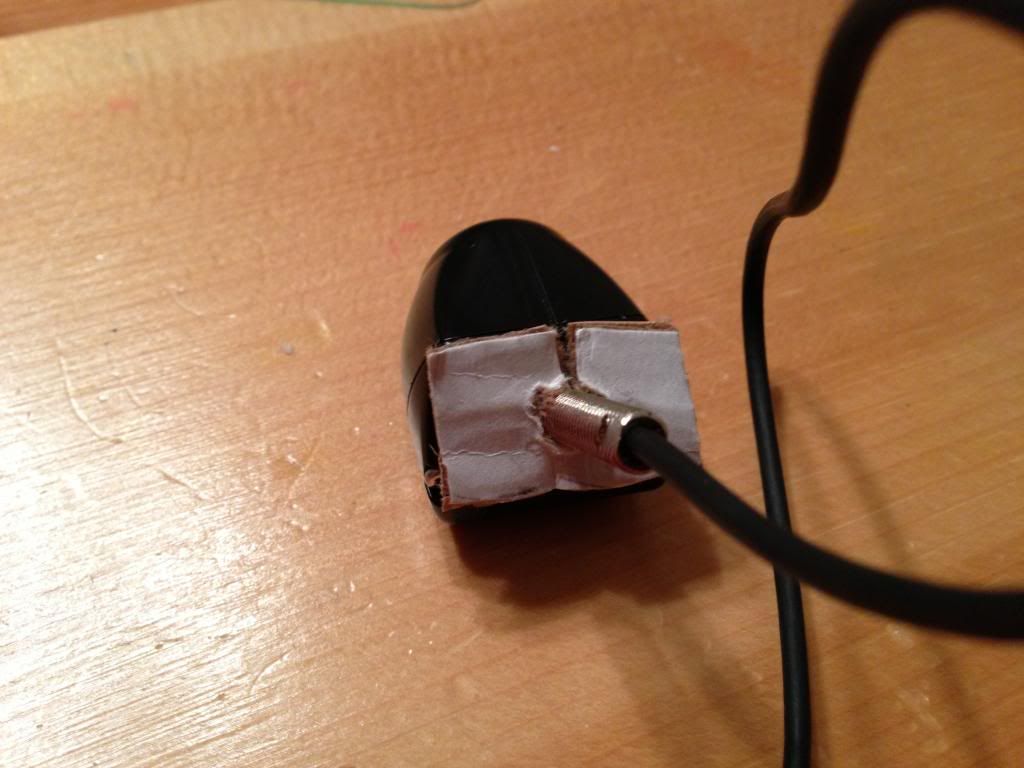 To help position the hole that you will now need to drill in the trim piece, make a card board template of the footprint of the side of the camera that will face the trim piece.  Attach your template to the trim piece using blue tape, take care to measure and make sure the camera will fit. In my installation, I placed the camera slightly towards the back of the car, in many others, I've seen the camera mounted further towards the front of your car. Ultimately, you just want to make sure that with the camera attached, it won't interfere with re-mounting the trim piece. 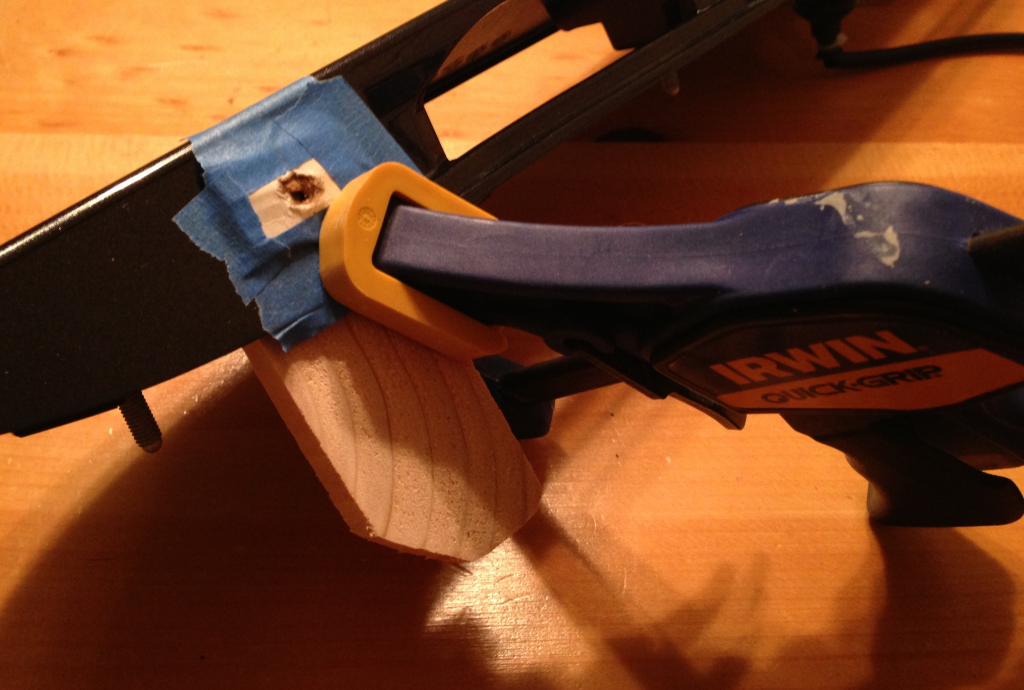 This is a woodworking trick. Clamp a piece of wood to the back of the trim piece to prevent splintering the back side of the hole you'll drill. It isn't strictly necessary, but you really get one shot at this so a little insurance can't hurt. Measure and make sure the hole is exactly where you want it to be (again). 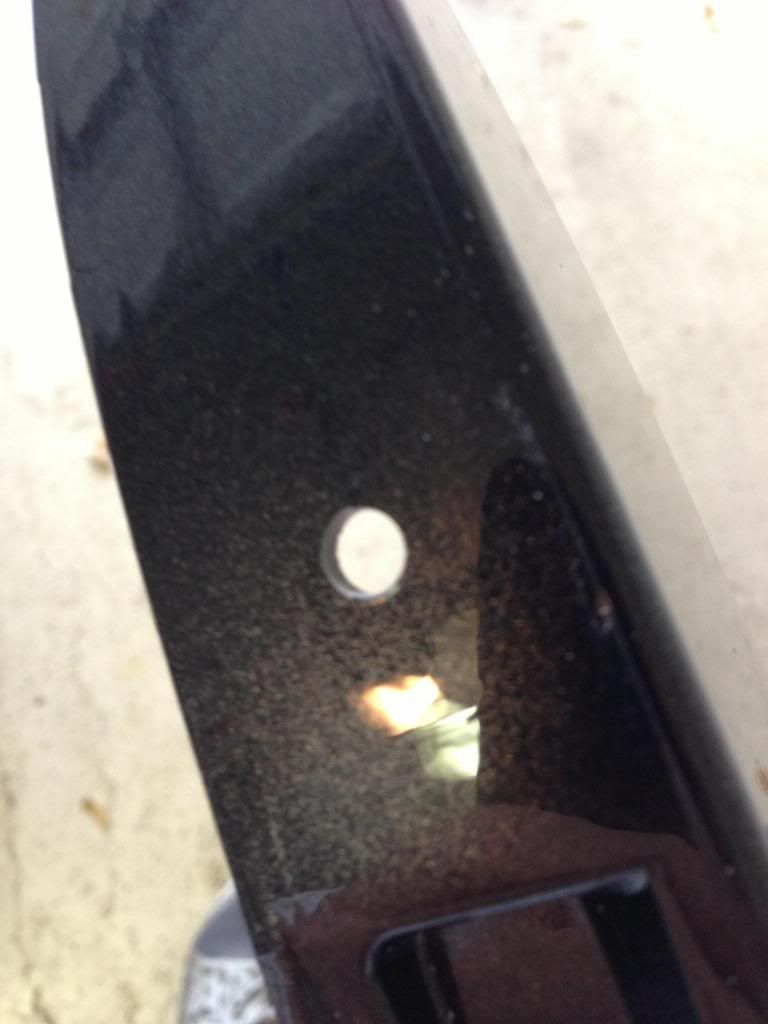 Now drill the hole, for my camera, I needed a 1/4" drill bit. Be careful not to over-drill and damage any other part of the trim. Clean up the edges of the drilled hole with sand paper to avoid sharp edges (this is optional, but again, I'm going for completeness). 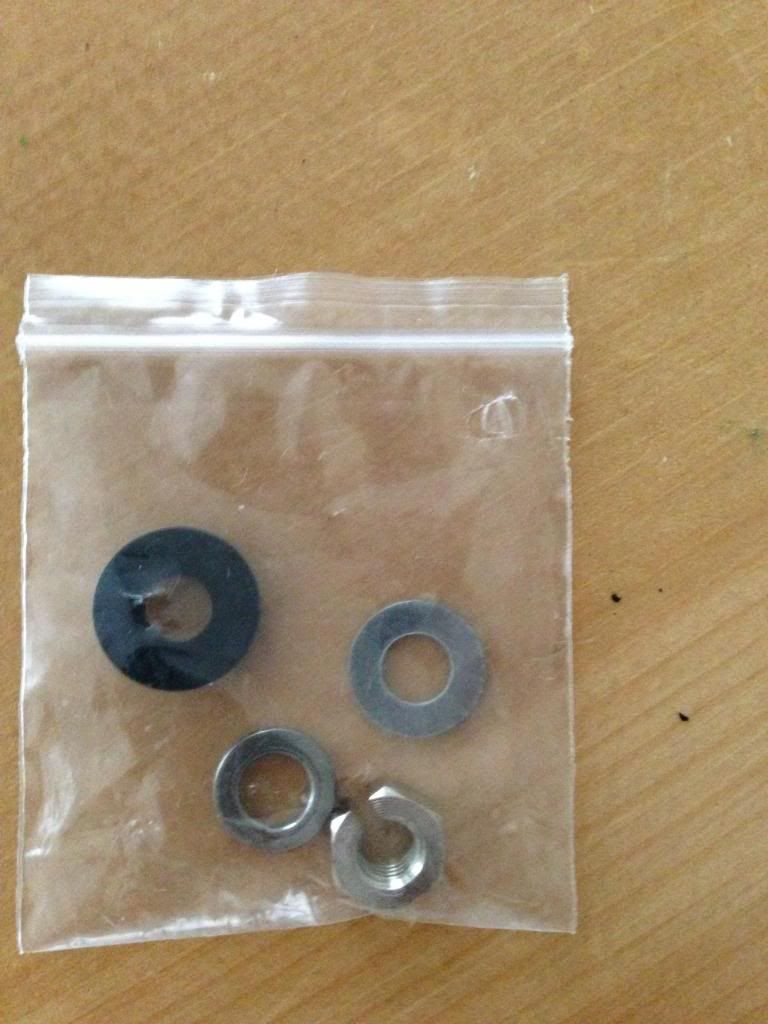 Now mount the camera through the hole. My camera came with 4 pieces of mounting hardware: a rubber gasket, a flat washer, a lock washer, and a nut. The order in which this is attached is basically this: camera, gasket, trim piece, flat washer, lock washer, nut. Position the camera how you want, once you've attached the trim piece, it will not be easy to adjust the camera so take some care here. 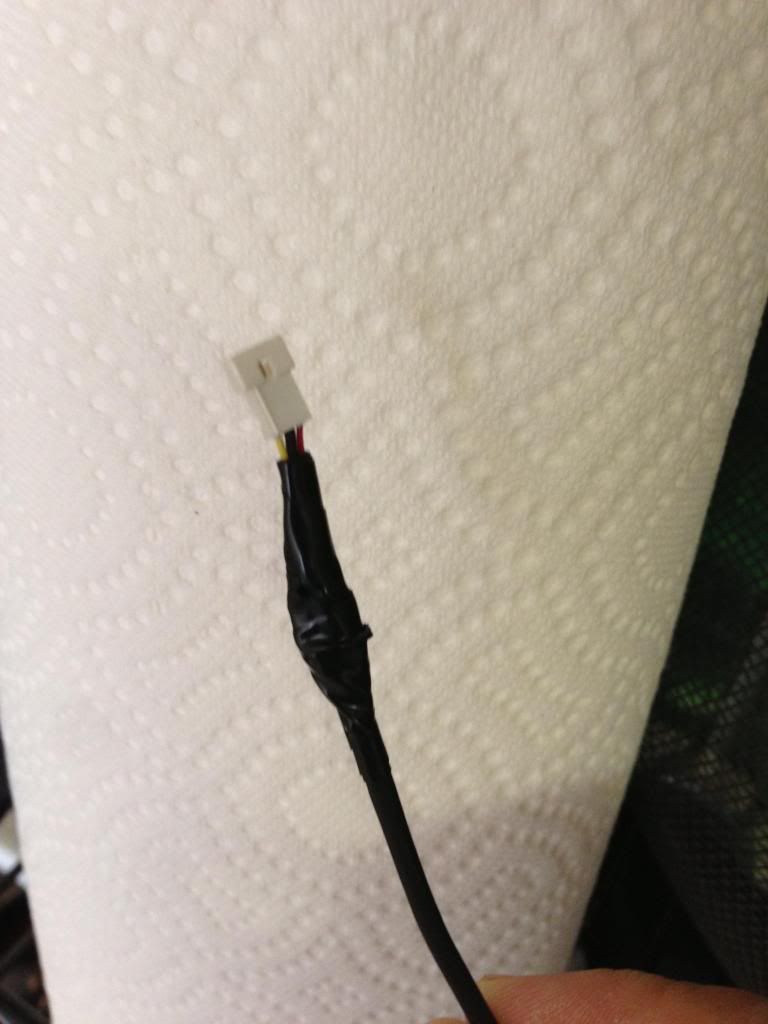 Now wrap any slightly exposed wiring with electrical tape to protect against wire chafe, etc. 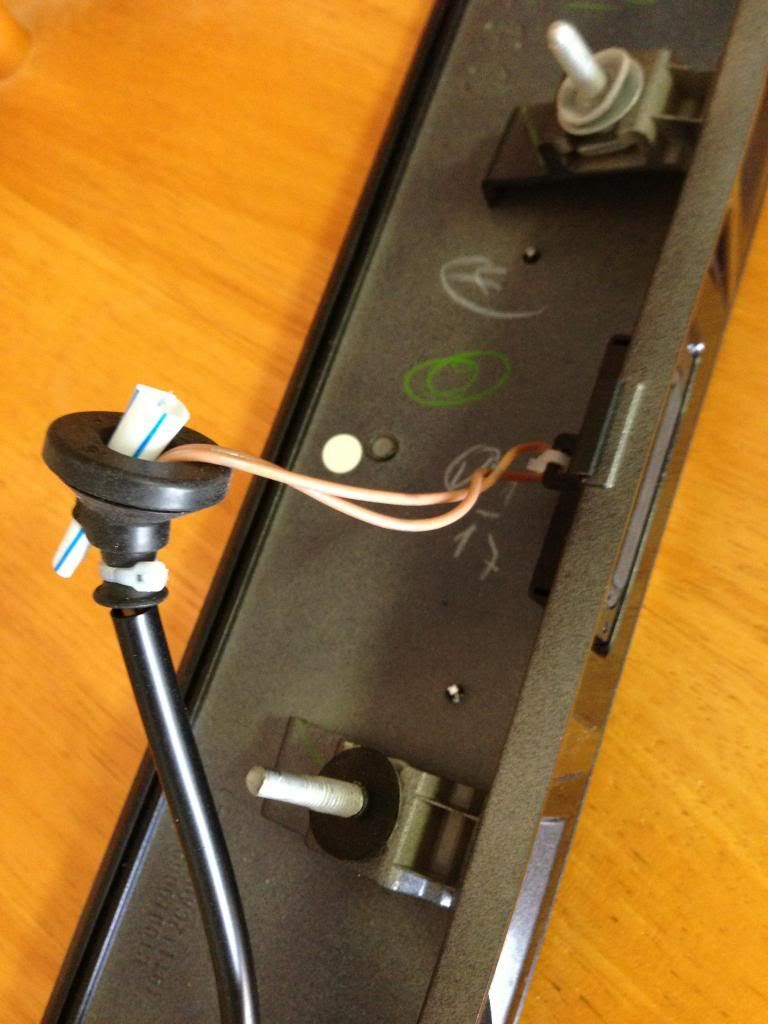 You will need to punch a hole through the grommet for the trunk lock button and pass the camera wire through this hole. This is actually tremendously difficult because unless you cut away a part of the grommet, shoving the camera wire through is hard. Instead, what I did is I used a nail set, stuck it through a short length of plastic straw and shoved the entire thing through the rubber grommet. On retracting the nail set, the plastic straw is now left in the hole. This provides a lower friction conduit through which you can pass the camera wire. Oddly enough, this is exactly how you start an IV (though clearly not with a nail set). 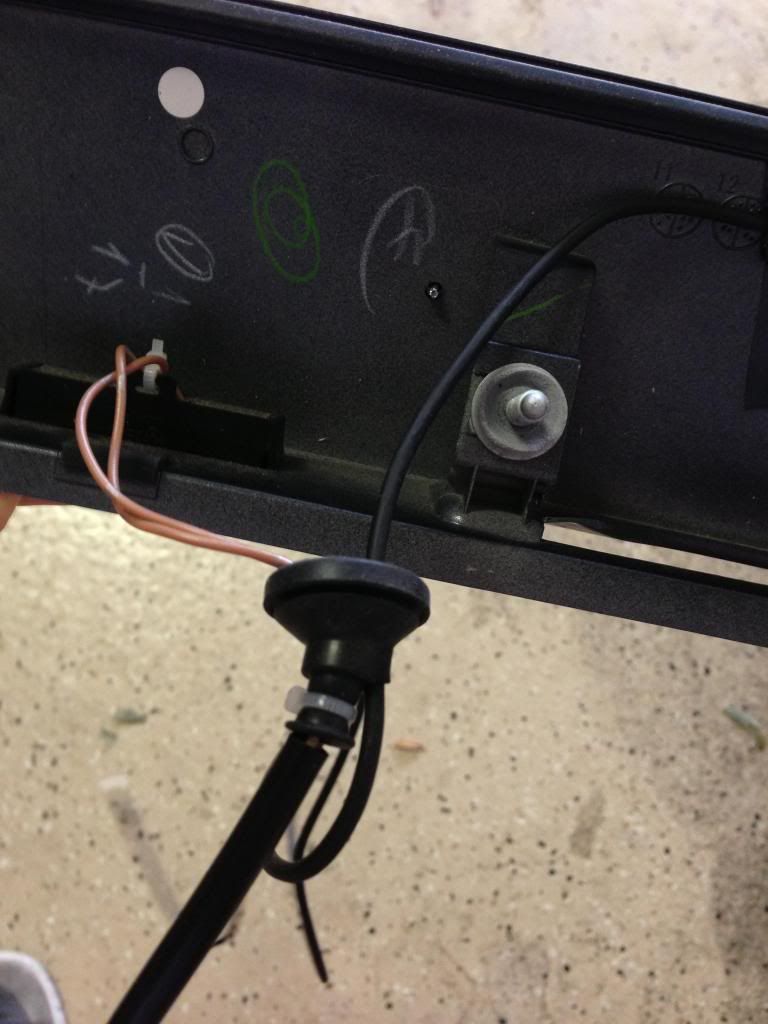 Using the straw, pass the camera wire through the grommet. Leave enough wire to provide slack should you need to pull the trim piece off the trunk later. 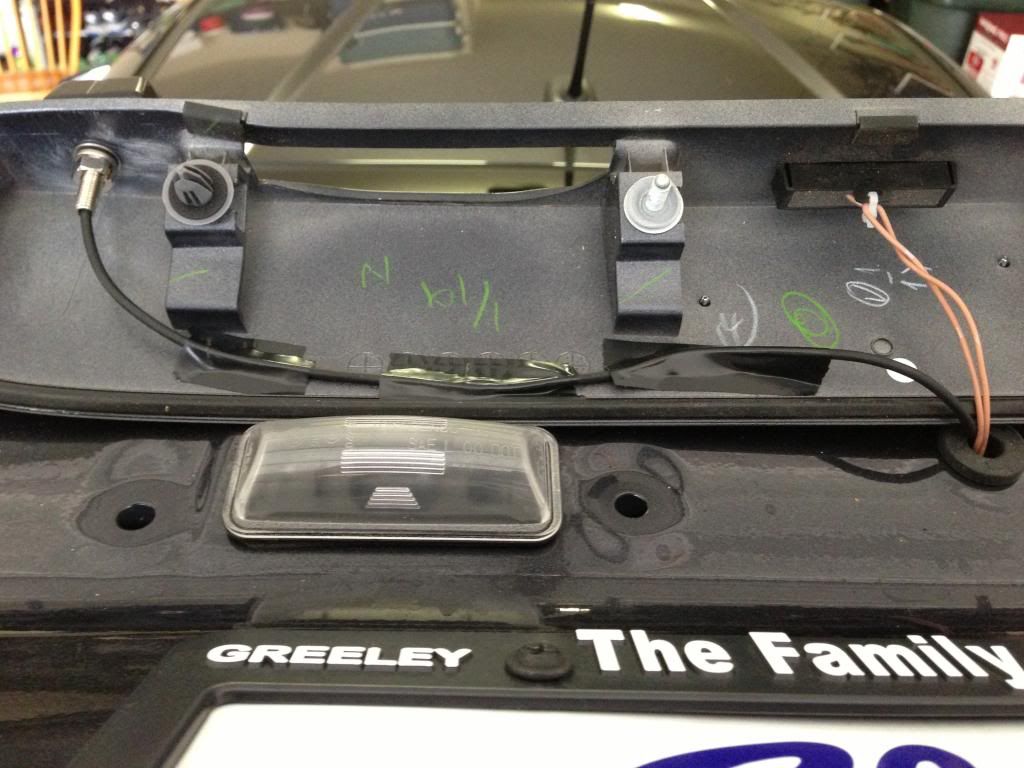 Using electrical tape, make a clean route for the wire on the inside of the trim piece to make sure it doesn't get pinched when you re-attach the trim piece. Pass the camera wire and the trunk lock button wire through the hole in the trunk and re-seat the grommet in place. Re-attached the trim piece by pushing down on the gray clip. Now re-attach the three left-most 8mm nuts and then attach the trunk lock using two 8mm nuts. Again, once you've done this, it will be difficult to adjust the camera so make any adjustments before doing this, or just attach the trim piece using the gray clip only and continue the rest of the hook up. Once you are satisfied that everything is in good shape, you can re-attach the five 8mm nuts. 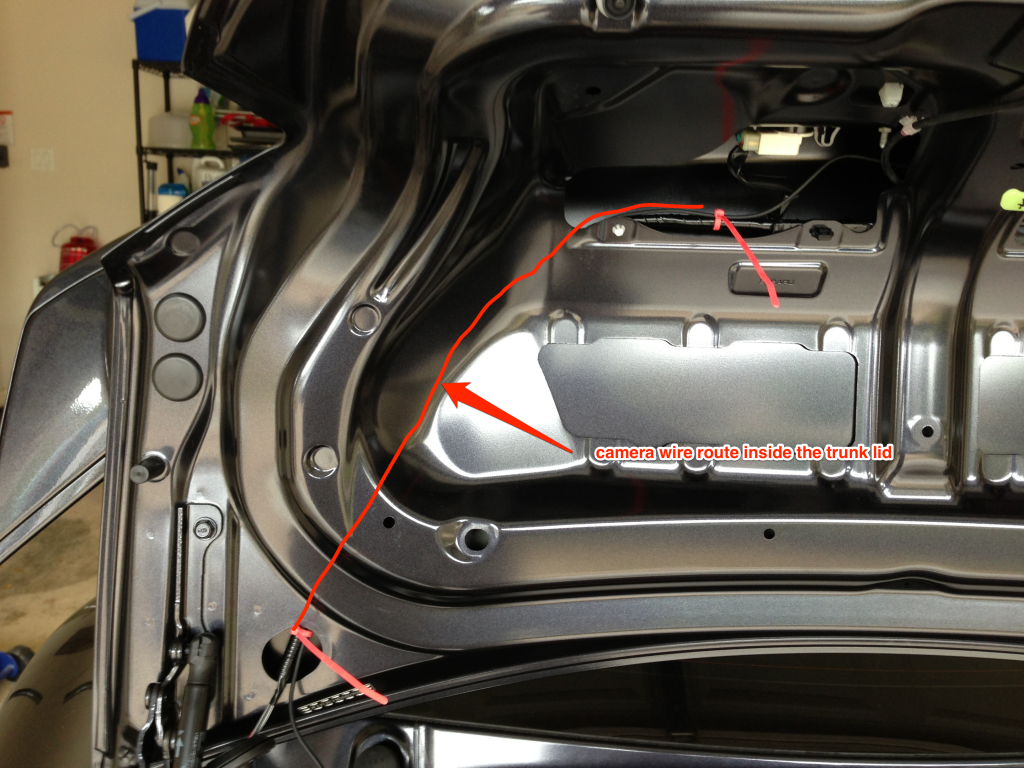 route the camera wire through the top of the trunk, using zip ties to secure the camera wire to the existing factory wiring. I purposed used pink zip ties, partly because they were the only ones I had that were small and plus I wanted to make it clear which ties were the ones I installed. Don't trim any zip tie ends until you are ready to clean up.  Now, gently pull out the two ends of the rubber conduit connecting the trunk to the body of the car (one side is labelled Door and the other is labelled Body). We will now need to pass the camera wire through here. This is probably the hardest part of the whole install. To make things easier: make sure you pass the smallest part of the wire through this conduit. That may mean feeding the butt-end of the wire instead of the head end (I failed to do this and it took forever to feed the wire). I also suggest using a screw driver to feed a length of string (I used a shoestring) through. That way, you can both push on the end of the wire to feed it through the conduit AND by tying the string around your wire, pull it through the conduit as well. Either way, this took me a good 30 minutes to successfully get through. 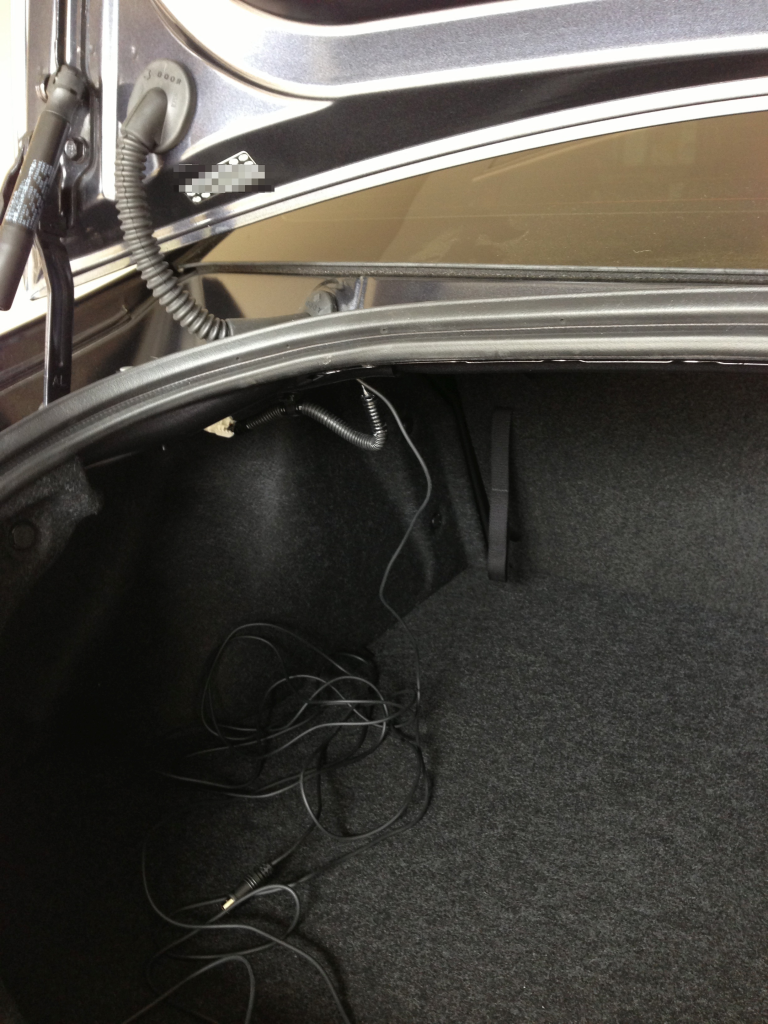 Once the camera wire is through the conduit, push both ends of the conduit back into their respective holes in the trunk and the body. This should leave you with a bundle of camera wire sitting in your trunk. Now it's time to start removing panels and running wire. 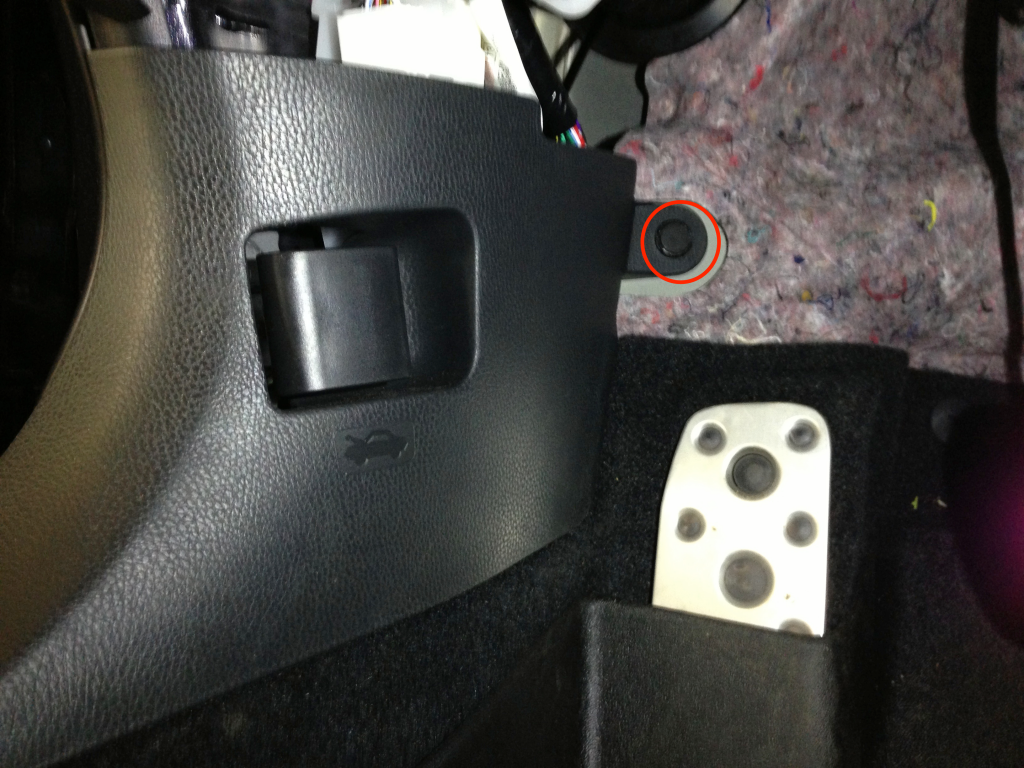 Start with the left-side kick-panel in the driver's side footwell. It's held on by one clip (similar to the clips holding the trunk roof liner). Loosen this clip and pull the panel out and back. It should come off. 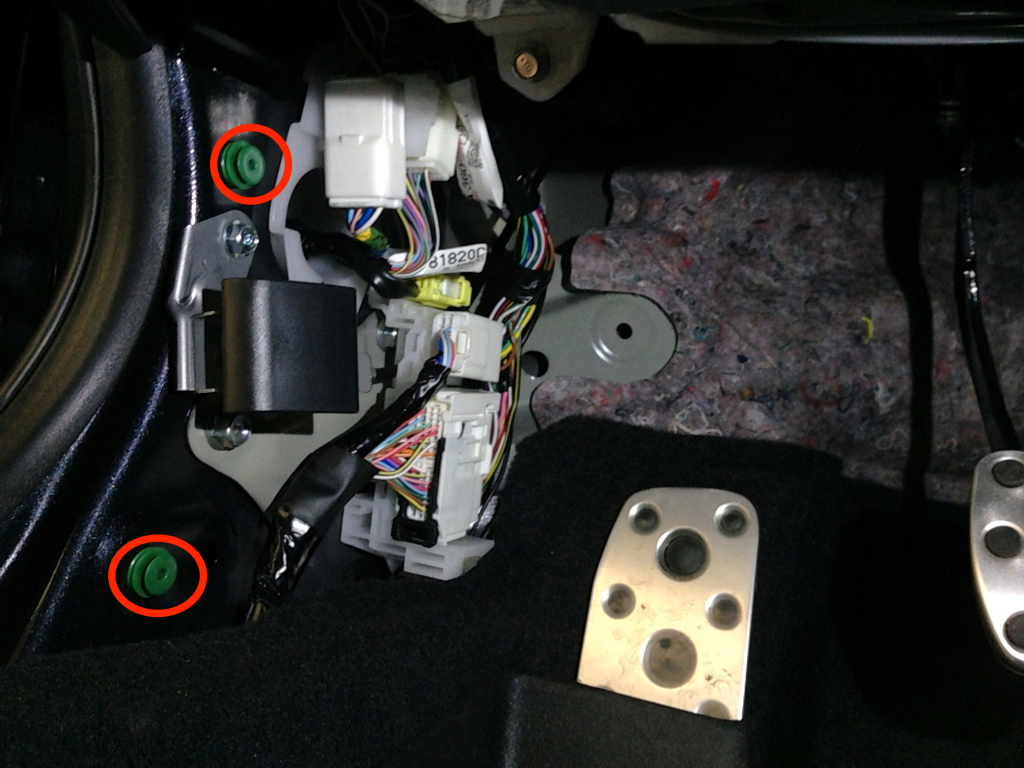 There's two green clips that are supposed to with on the panel. I was never able to remove them and just left them on the body of the car. If you care, you can pop them off using a panel tool (I didn't have one) and re-attach them to the kick-panel. I didn't bother with this 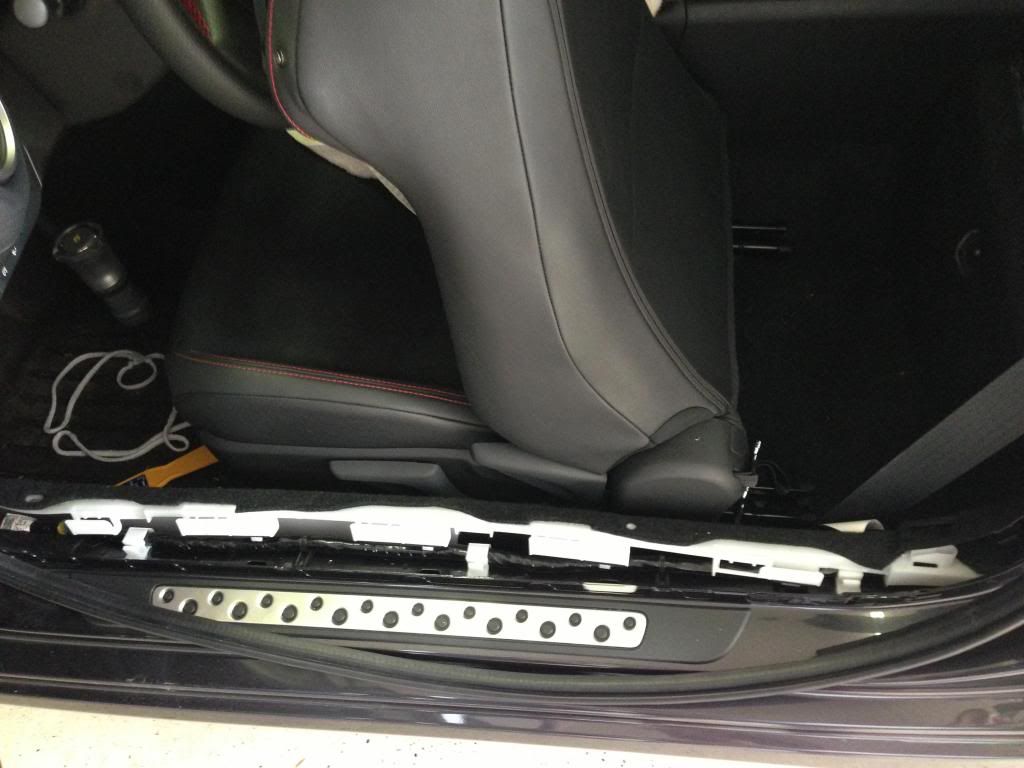 Now remove the door threshold trim. Pull gently along the edges to loosen the clips holding it in. You may find that using a panel tool or something will help you pry it loose. I used a plastic putty knife. Either way, don't force it. 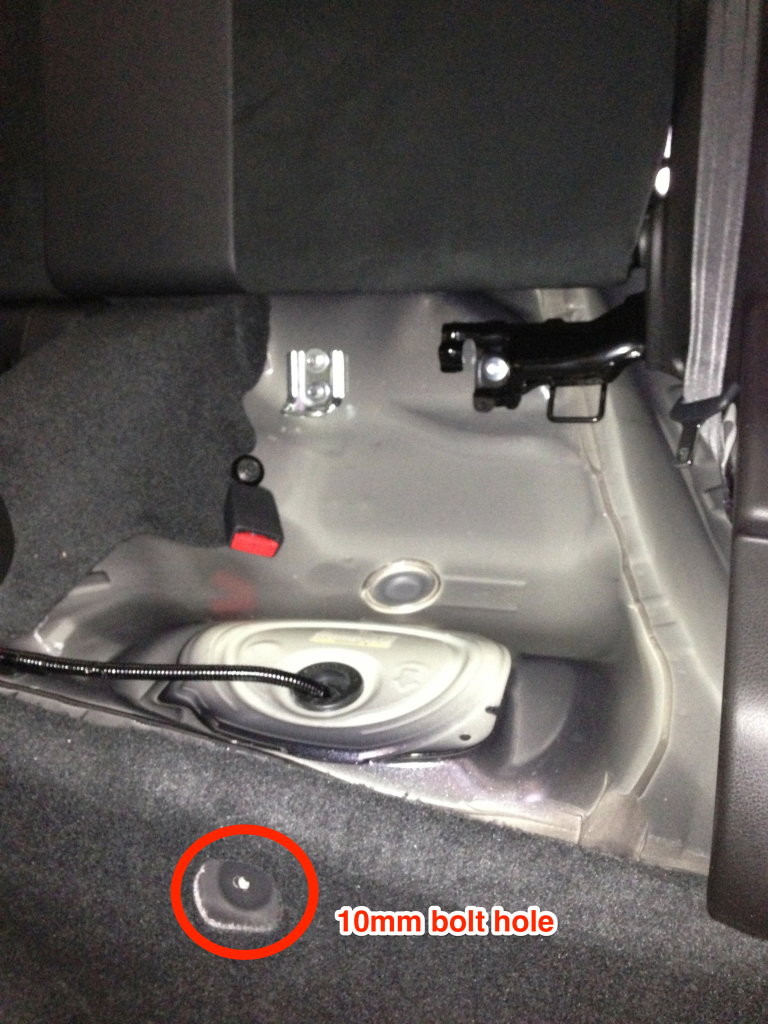 Using a 10mm socket, remove the bolt holding the driver's side rear seat bottom in place. Firmly push on the back side of the seat bottom and slide the seat off. 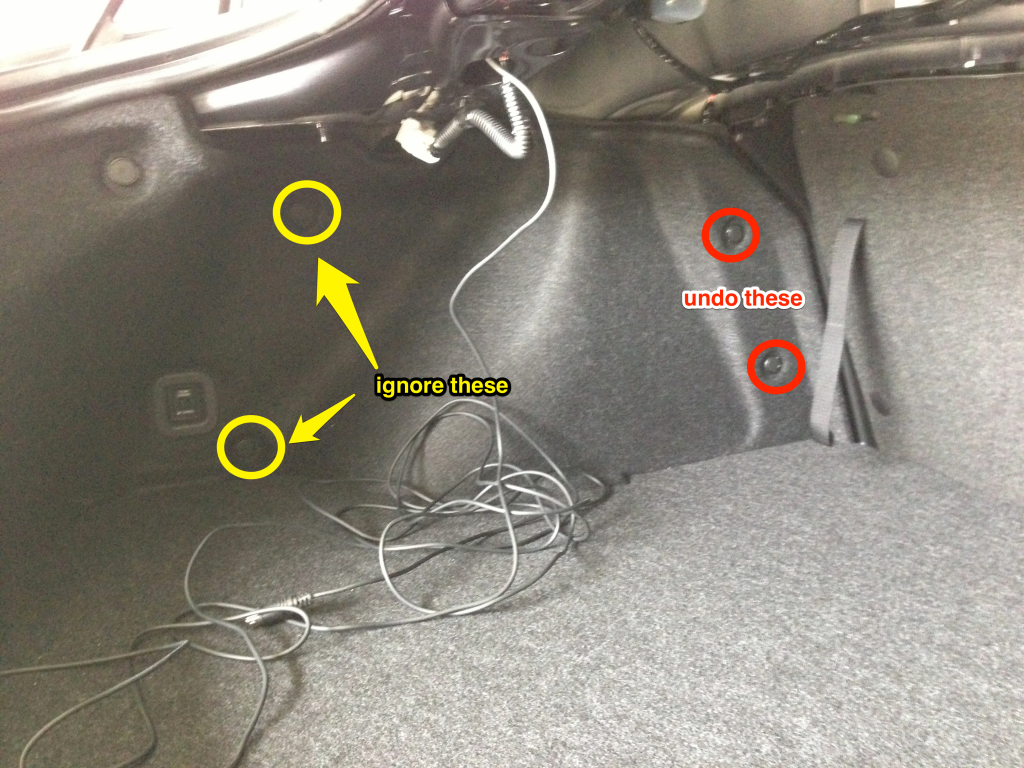 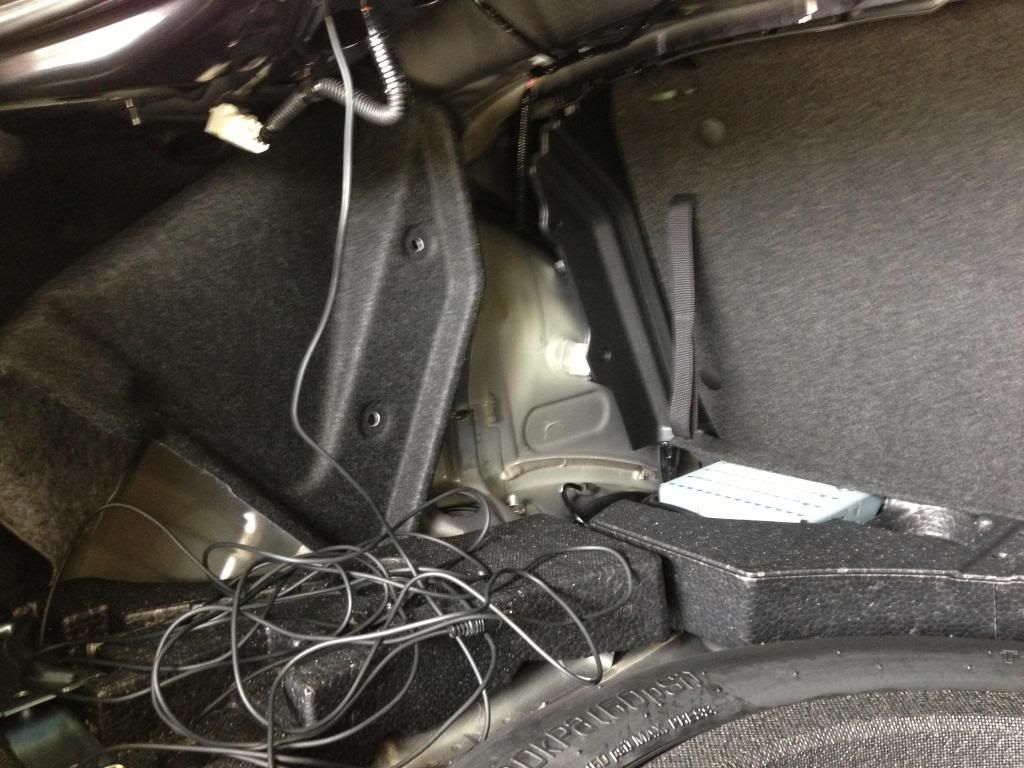 Remove the two clips in the trunk holding the driver's side trunk liner to the body. Fold the trunk liner back but do not remove the trunk liner (there's still two clips holding it on 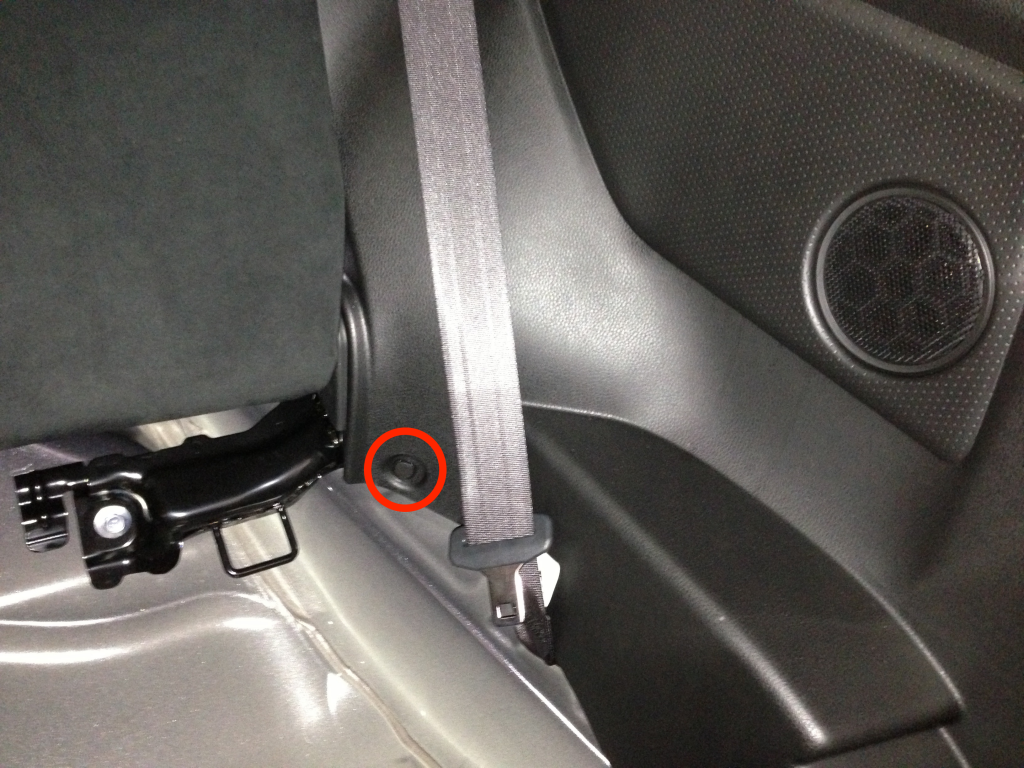 Now, remove the clip holding the driver's side rear panel (exposed by removing the rear seat bottom) Gently pull back the weather strip around the door, it's not glued in so just pull it back. You don't need to remove much, just enough to expose the driver's side rear panel. Gentle tug at the bottom edge of the panel. There's a boatload of clips still holding it in. You don't need to remove the panel, just create enough space for you to reach through and pass the cable. If you had a wire fish tape, you might even be able to do this without move the panel/loosening clips at all. I HAD a wire fish tape, but couldn't find it. Loosen the carpet next to the door by pulling on the white clips. Pull back slightly on the carpet, enough to see the factory wiring running underneath. 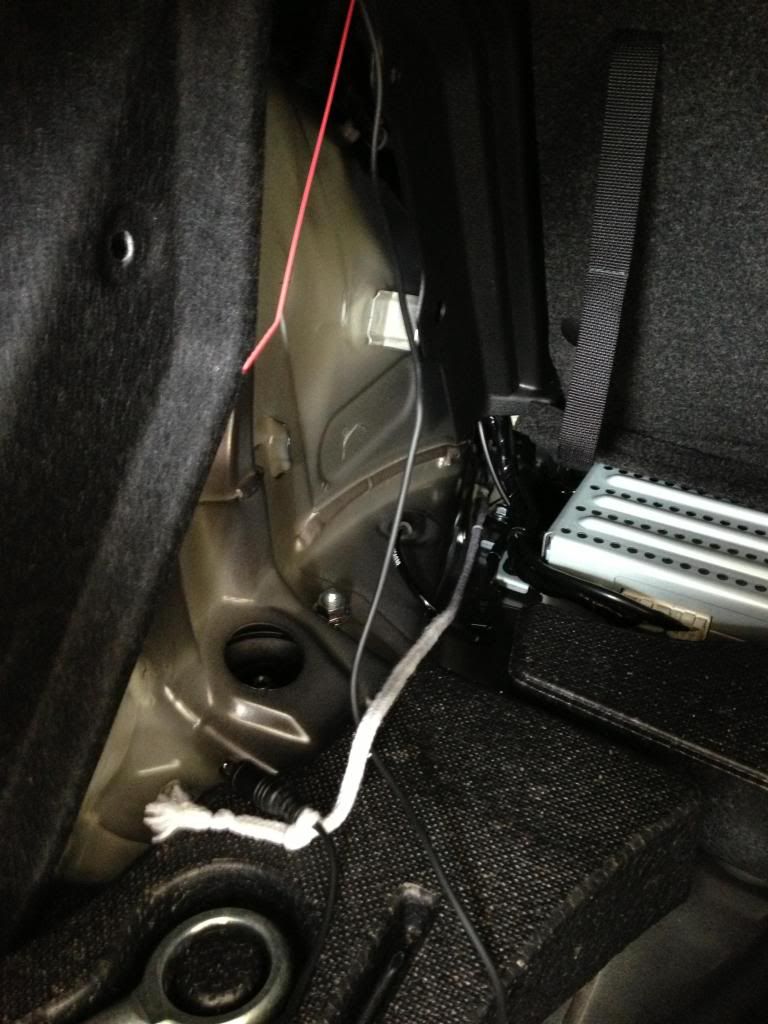 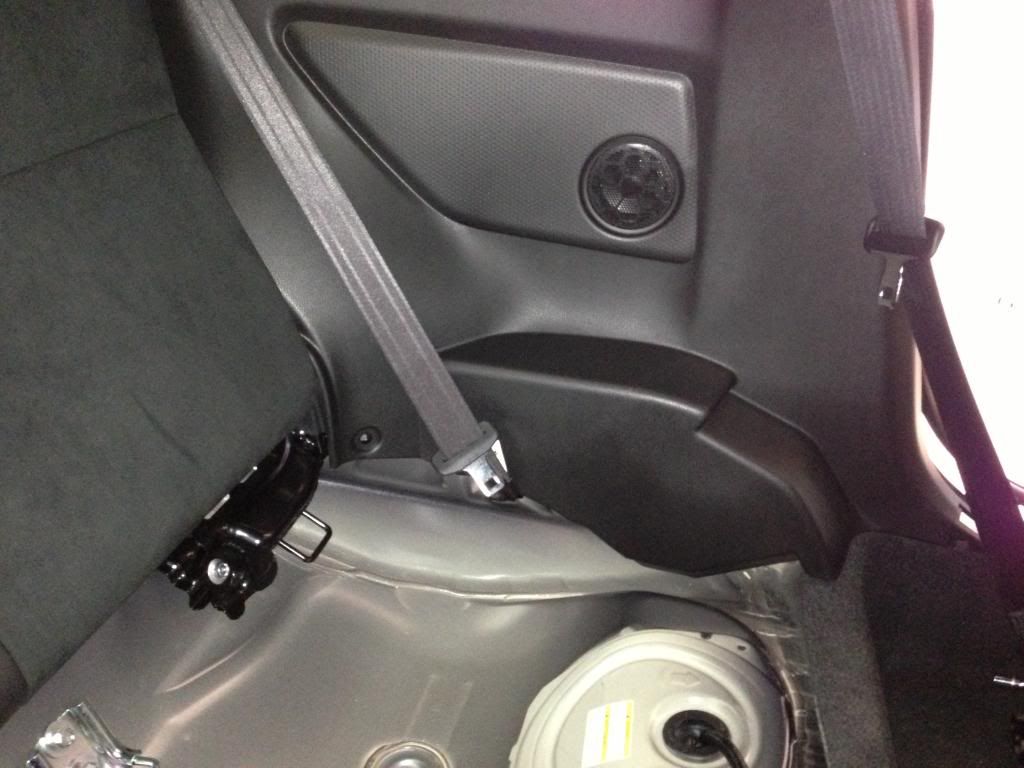 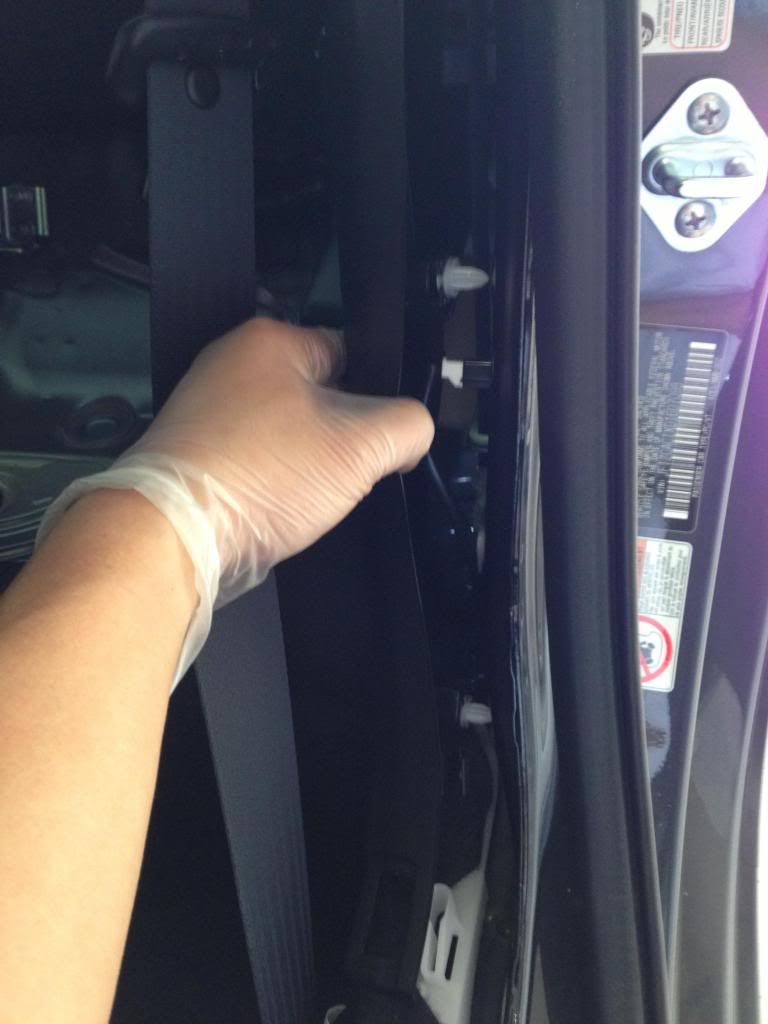 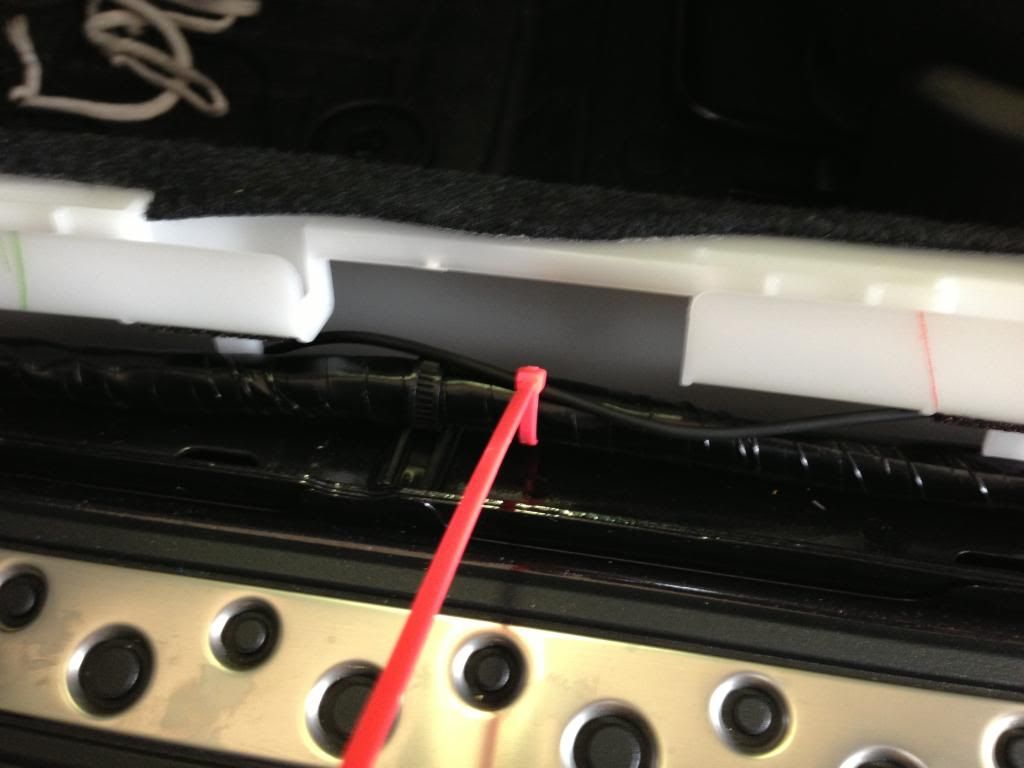 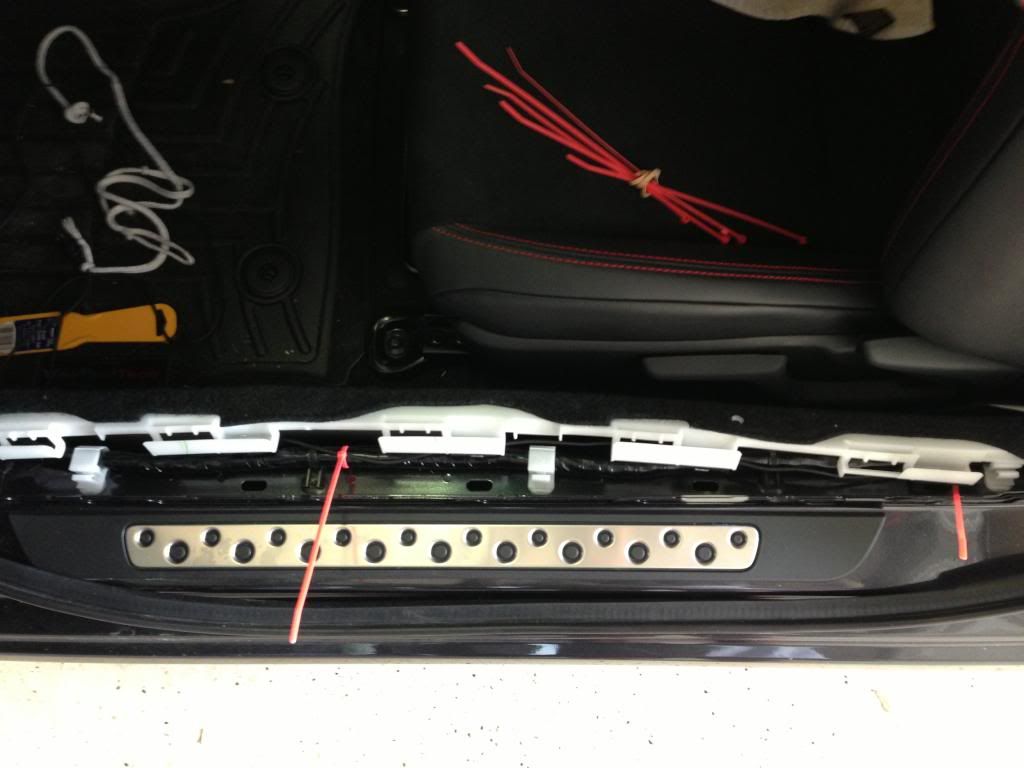 Shove a length of shoestring through the driver's side rear panel and make sure there's enough exposed on both sides. Tie the camera wire to the shoe string and use the shoe string to pull the camera wire through the gap in the panel. Work the wire along the existing factory wiring underneath capet, using zip ties to secure the camera wire. 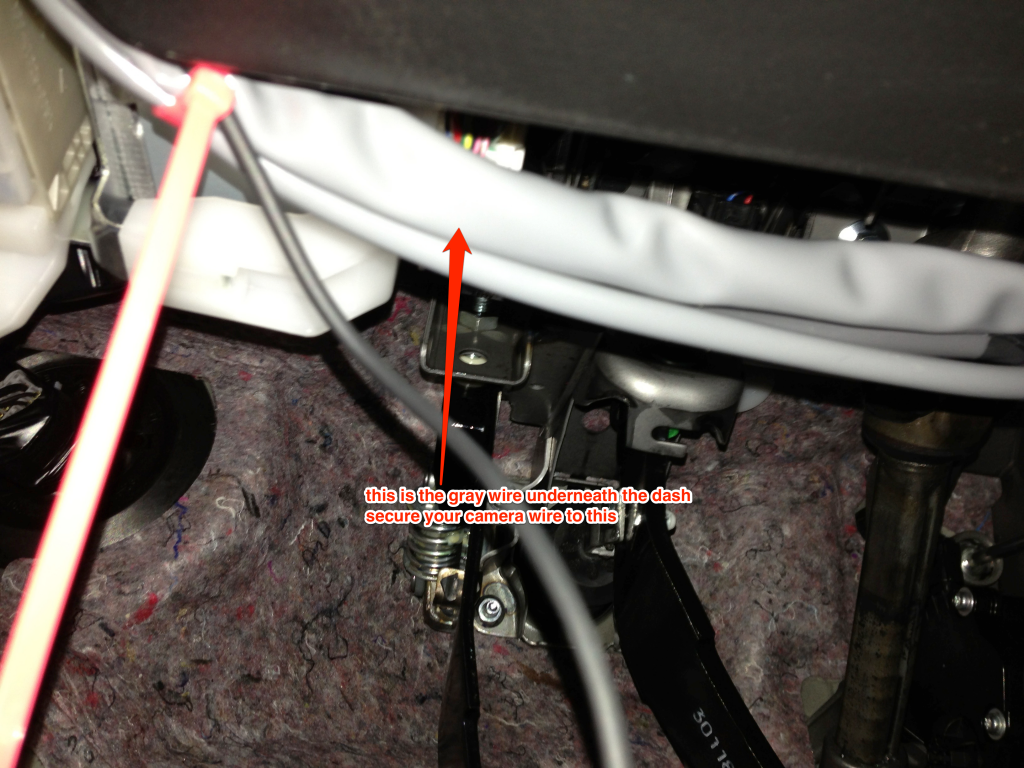 Work your way towards the front of the car. Underneath the dash, there's a thick gray wire to which you can secure the camera wire. Eventually, feed the camera wire into the head unit cavity. Now we are going to attach the camera's head end to the SVXdc harness permanently. If you don't have a head end that detaches, make sure you do this BEFORE feeding any wire through the car. I chose to use solder mostly because I could borrow a soldering iron and I have a EE-major wife who can do soldering. If I didn't have both, then I would use some alternative means of attaching wire (wire nuts, crimp connectors, posi-twists, whatever). Thus, for this next part, the stunt hand will be that of my wife. 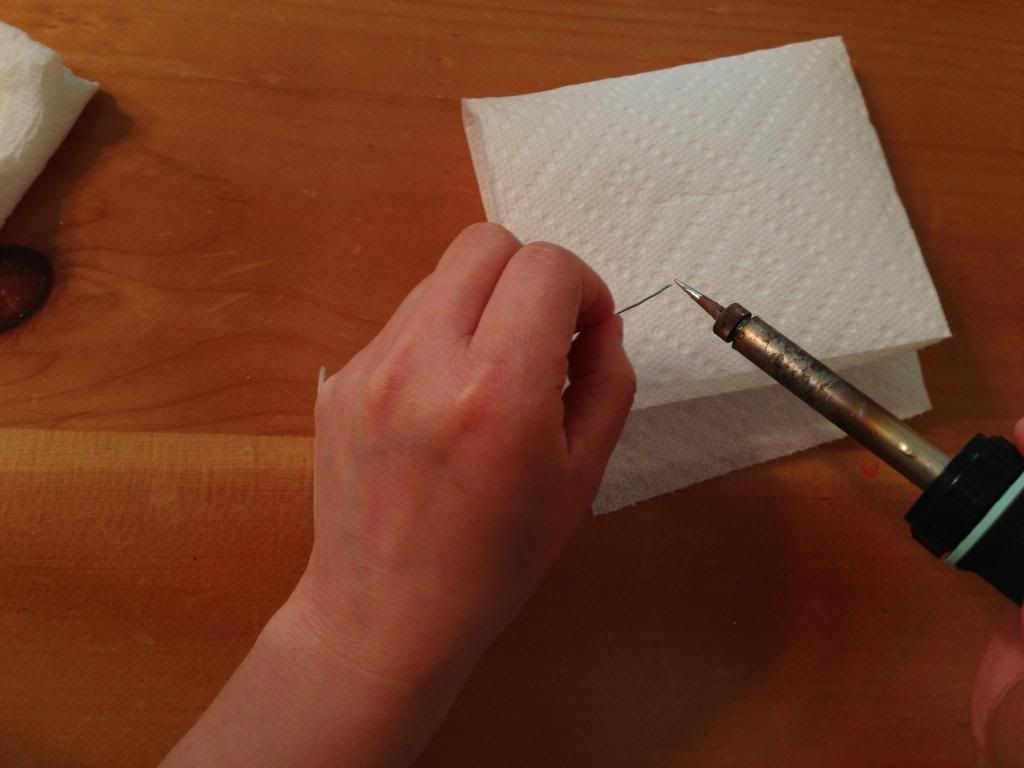 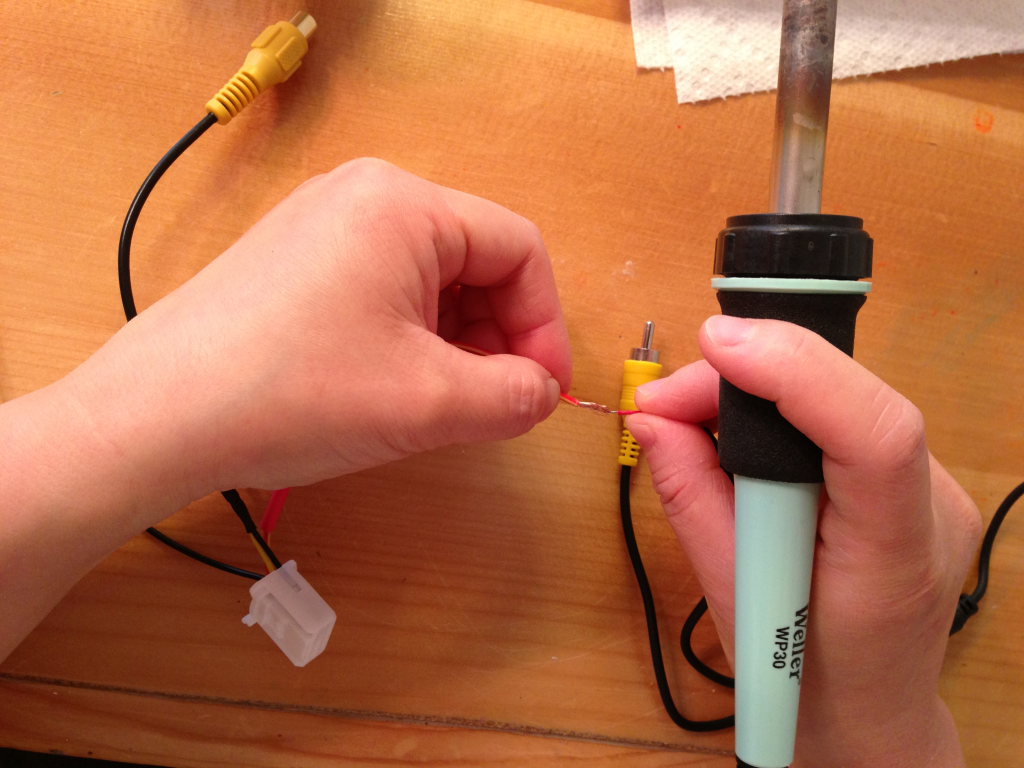 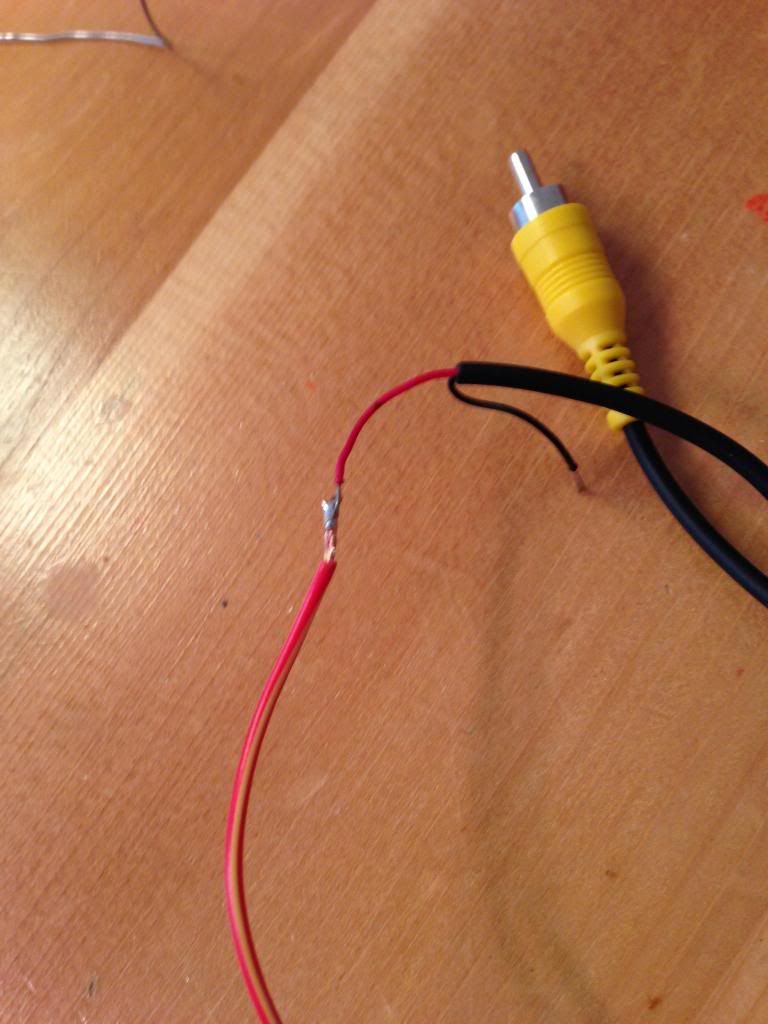 Soldering is tricky work (at least to me). But your goal is to get a thin bead of solder to attach the harness power wire (red/yellow) to the camera + (red) wire. Heat shrink/electrical tape or do something to protect the bare wire connection. 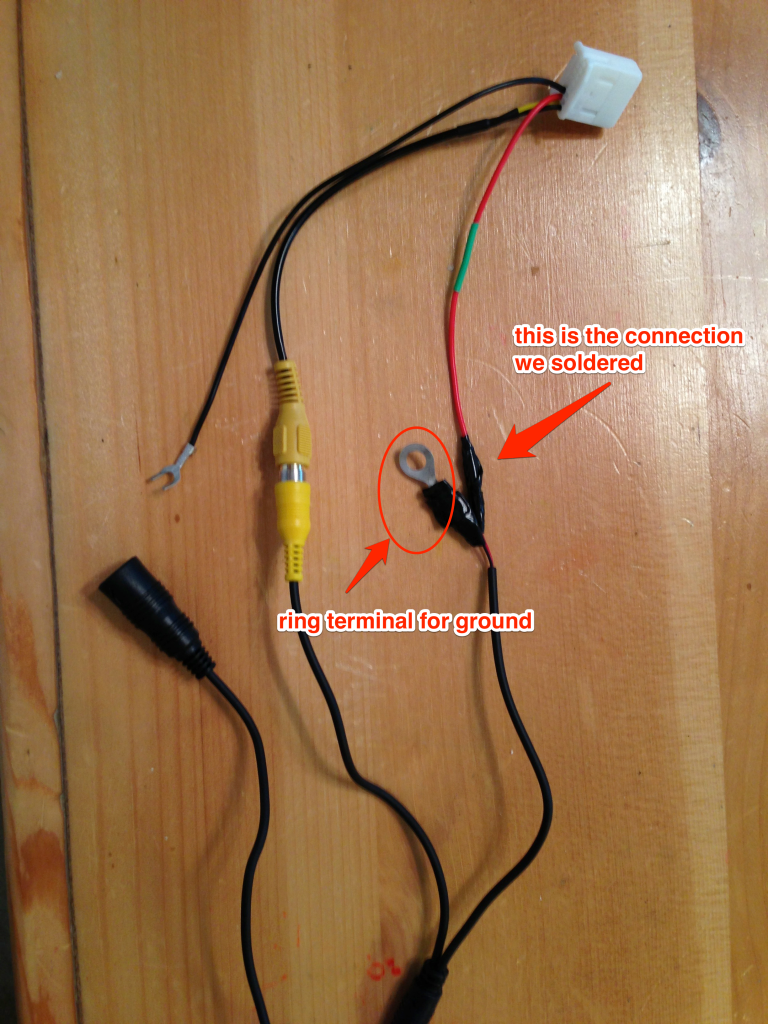 You will also need to solder (or crimp) a ring terminal to the camera - (black) wire. Now hook up the camera composite video cable to the harness. Okay, now take the connected end back to the car. Hook up the end of the camera wire to the camera wire you fed into the head unit cavity. Remove the factory ground bolt using a 10mm shallow socket. DO NOT DROP THIS BOLT. Put the ring terminal from the camera negative wire onto the bolt and re-attached to the bolt to the chassis. At the same time, gently fit the fork connector for the harness ground onto this bolt and tighten down. Finally, attach the 16-pin harness to the head unit. If you happen to have extra length of camera wire, bundle it together with a zip tie, also secure the original factory 16-pin connector somewhere so that it doesn't rattle around. Push the head unit back into the cavity, again don't force it if it feels "stuck/caught". Secure the head unit using the four 10mm bolts (and BE CAREFUL NOT TO DROP THE BOLTS, can you tell I lost one and spent forever finding it?) Re-attach the battery negative terminal and turn the car on (again, don't have to start the engine). Test to make sure the camera works. If everything's okay, then proceed to re-attaching panels. Re-attaching panels Start by pushing the driver's side rear panel back in place. If you only pulled it loose, just gently press the panel back. You may need to use your fist to hammer it back in places. Take care doing this, you do NOT want to loose one of the clips behind the panel and have it rattling around back there. Re-attach the clip holding the panel near the bottom of the seat. Fold back the felt panel in the trunk and re-attach using two clips. Re-attach the carpet using the white clips. Push the weather seal back into place. Re-install the door threshold trim by pushing it down. Re-attach the driver's side kick-panel and secure using the clip. Put the trunk liner back in. Re-attach the trunk roof liner using the seven plastic clips. 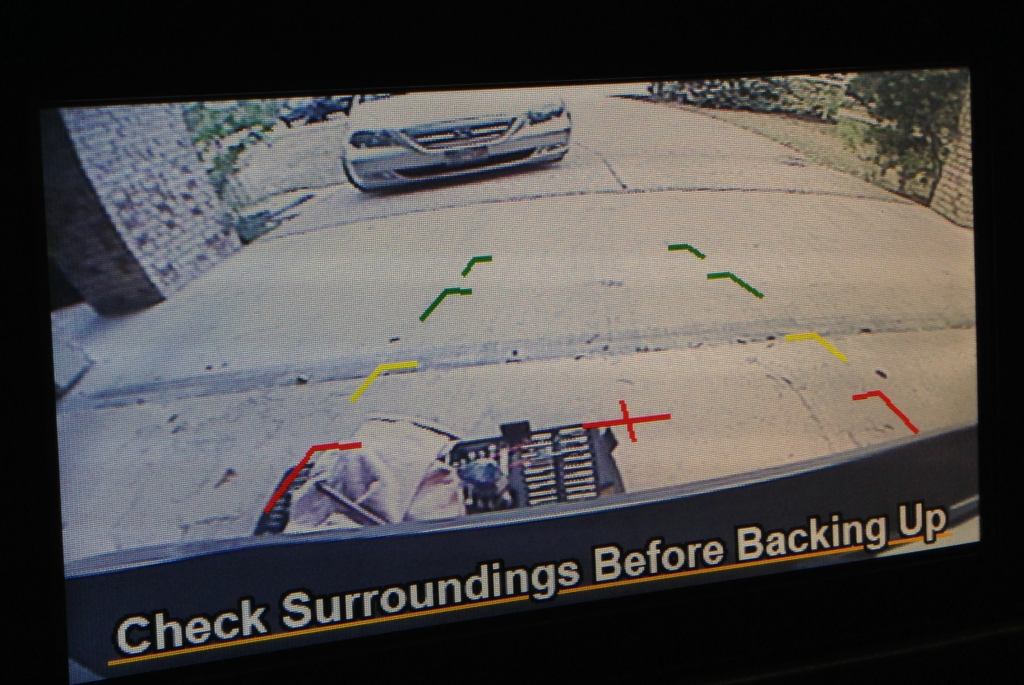 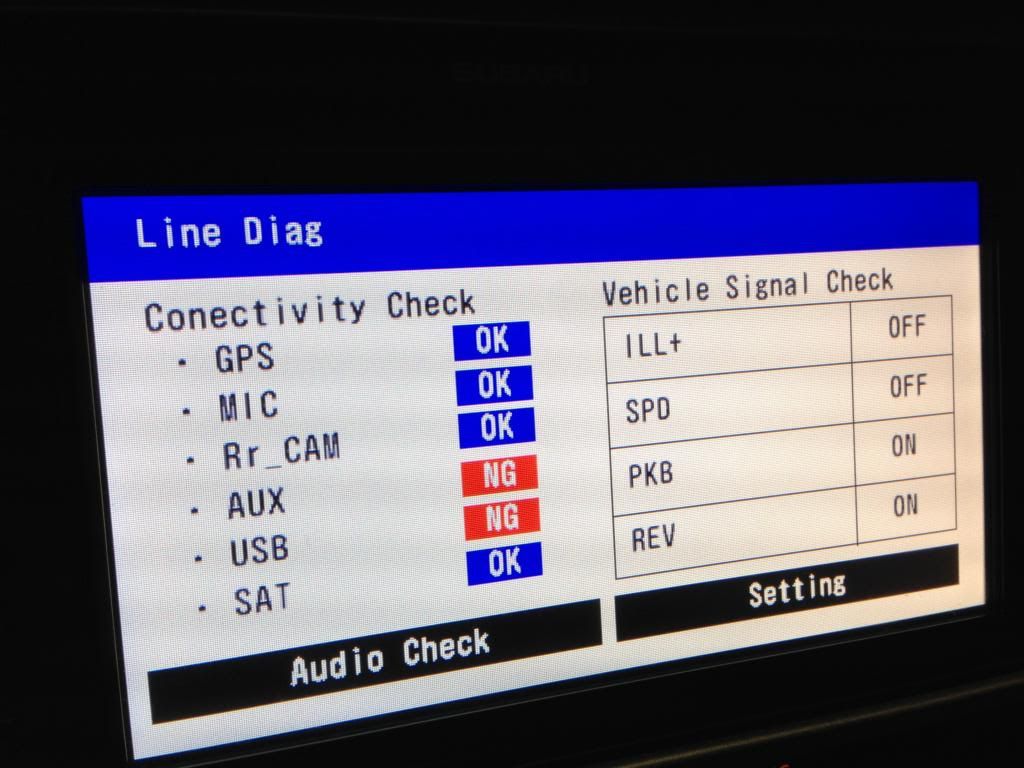 Whew, you are just about done. Only thing left to do is possibly adjust grid lines on the camera. To do that, you need to put the head unit into diagnostics mode. To do that, turn power OFF to the radio/iPod, etc. Then hold all three buttons below the volume knob at the same time for three seconds (that is, the Audio, Voice Command, and Map buttons). You should see a line diag menu, whereupon touching "Settings" will allow you to adjust the head unit grid lines. I strongly suggest you lay some wood, tape measure etc to figure out the distance that each grid line corresponds to with respect to distance from your car. 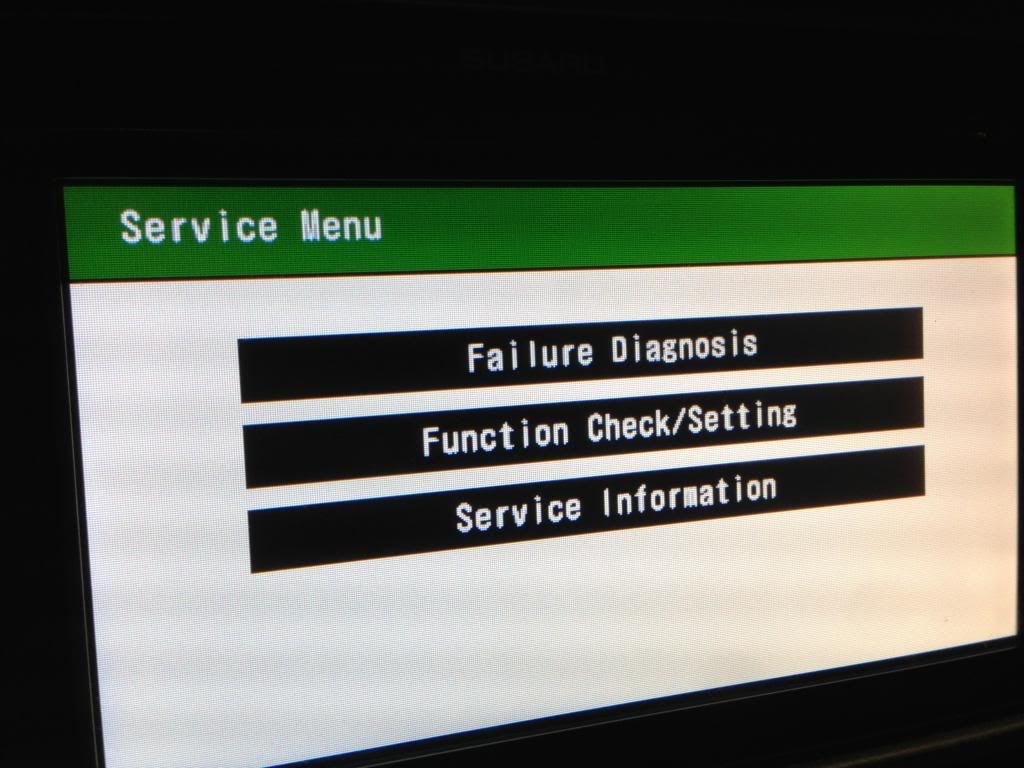 If you get into the service menu, which honestly I'm not sure how I did, you will NOT find adjustments for the camera. Either way, to exit service or line diag menu, just hold down the Audio button for three seconds. That's it, all done. Here's the camera installed. 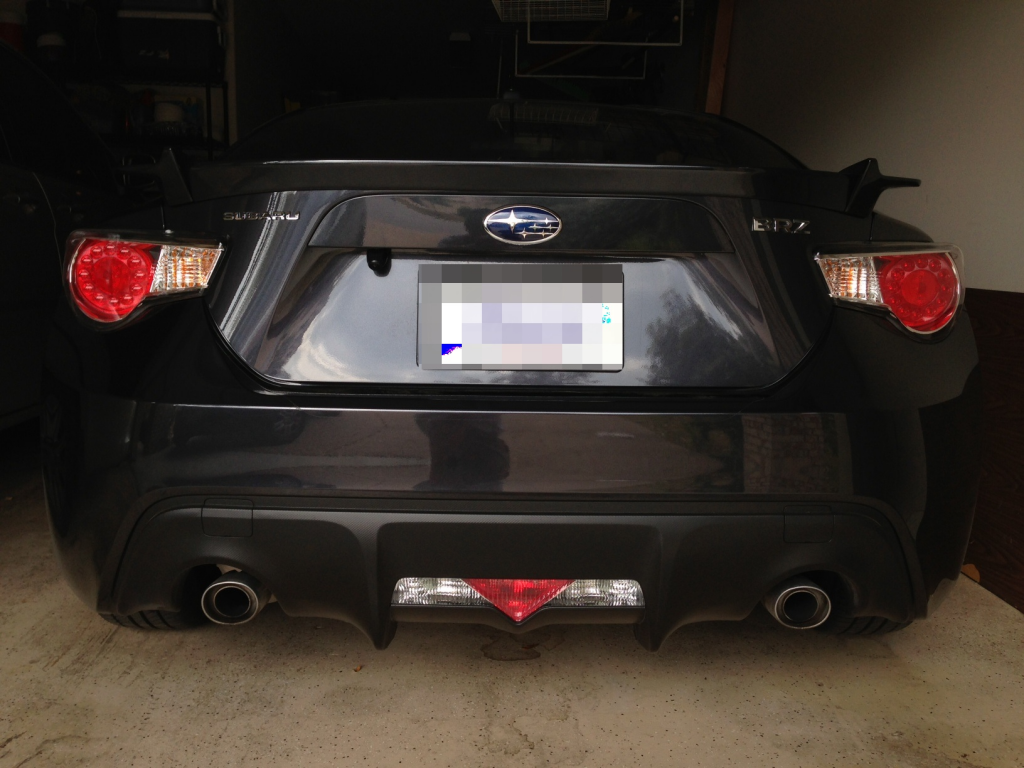 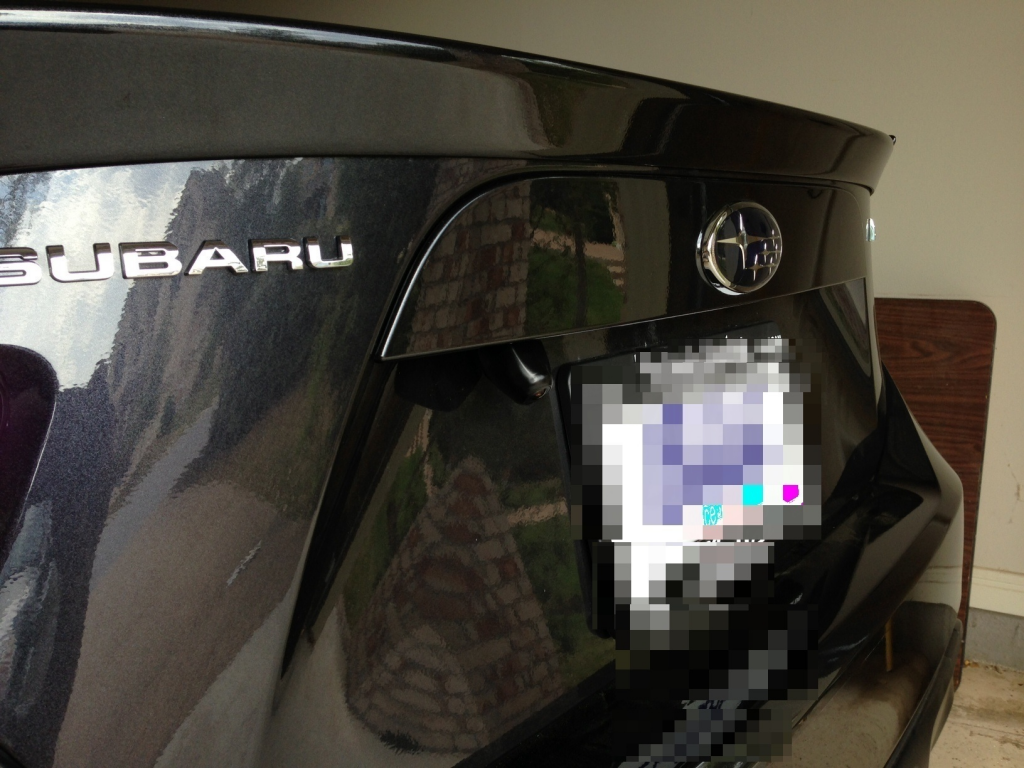 These are a list of highly useful posts that I wanted to highlight. Read through through them (and the rest of the thread) to form a complete picture of how to do this.
Last edited by runny_yolk; 10-17-2017 at 10:22 AM. |

|

|
| The Following 35 Users Say Thank You to runny_yolk For This Useful Post: | aegisdrgn (03-02-2015), amaciose (12-13-2013), Anomie (12-10-2013), a_dee (07-09-2015), B L U E S L A T E (04-02-2013), BabaYaga (08-14-2014), BareZ (01-13-2016), Bonburner (12-28-2017), ChiefG (12-01-2013), Choco (12-27-2014), CoolBReeZe (09-26-2013), davesbrz (12-31-2013), diddy (04-13-2013), ethan160222 (09-08-2015), exE36M3 (12-31-2014), FlyLow (11-28-2013), JS + BRZ (01-01-2014), Kiske (11-09-2013), kludger (04-01-2013), kwood9000 (06-06-2013), Lonewolf (01-31-2021), michaelahess (04-04-2013), microbionic (04-01-2013), nicertoy (07-31-2013), notout86 (08-16-2014), Ornelas66 (03-03-2015), RavioliG (03-21-2014), SeanBlader (12-06-2013), Sensisnow (04-08-2013), SirBrass (11-14-2013), TM (11-09-2013), tobin (10-22-2016), tripjammer (04-12-2013), Xx-Ness-xX (11-09-2015), zinzan (03-24-2014) |
|
04-01-2013, 02:50 PM
|
#4 |
|
Senior Member

Join Date: Oct 2012
Drives: '13 Boxter S, '13 BRZ(gone)
Location: SE PA
Posts: 235
Thanks: 309
Thanked 103 Times in 57 Posts
Mentioned: 9 Post(s)
Tagged: 0 Thread(s)
|
Great job documenting the full thing, especially like the part about routing the wires from the trunk.
|
|
|
|
|
04-01-2013, 03:04 PM
|
#5 |
|
Audio & Bacon Junkie

Join Date: May 2011
Drives: 2013 WRB BRZ Ltd
Location: Jax, FL
Posts: 160
Thanks: 87
Thanked 81 Times in 35 Posts
Mentioned: 3 Post(s)
Tagged: 0 Thread(s)
|
Excellent post! I added it to the Audio Directory.
|
|
|
|
|
04-02-2013, 12:32 AM
|
#6 |
|
Senior Member

Join Date: May 2012
Drives: 13' SSM BRZ
Location: Alaska
Posts: 250
Thanks: 21
Thanked 72 Times in 52 Posts
Mentioned: 6 Post(s)
Tagged: 0 Thread(s)
|
Where did you tap power from? the 6volt?
|
|
|
|
| The Following User Says Thank You to Furtive For This Useful Post: | e46m3 (08-31-2013) |
|
04-02-2013, 01:07 AM
|
#7 |
|
Senior Member
Join Date: Nov 2012
Drives: 2013 BRZ Limited 6MT GBS
Location: Walnut Creek - Bay Area
Posts: 426
Thanks: 83
Thanked 112 Times in 64 Posts
Mentioned: 4 Post(s)
Tagged: 0 Thread(s)
|
this is great! been waiting for this for days!
best deal on a ryden duo for those who want one! http://www.al-eds.com/Rydeen-Mobile-...2239.html#tabs
__________________
2014 infiniti Q50 Daily 1996 Mazda Miata Racecar
 SOLD -> Galaxy Blue Silica Subaru BRZ Limited 6MT SOLD -> 2003.5 Infiniti G35 Sedan Emerald Mist |
|
|
|
|
04-02-2013, 07:03 AM
|
#8 | |
|
Member
Join Date: Mar 2013
Drives: minivan
Location: Austin, TX
Posts: 41
Thanks: 1
Thanked 58 Times in 9 Posts
Mentioned: 0 Post(s)
Tagged: 0 Thread(s)
|
Quote:
|
|
|
|
|
|
04-03-2013, 12:19 AM
|
#9 |
|
Godzilla Konvert

Join Date: Jan 2013
Drives: DMG BRZ Limited 6MT 2013
Location: Somewhere on earth
Posts: 215
Thanks: 47
Thanked 45 Times in 34 Posts
Mentioned: 5 Post(s)
Tagged: 6 Thread(s)
|
Thanks
I will definitely use this guide when I do my install
__________________
2013 Subaru BRZ Limited MT (DMG)
CO>CA Cartel |
|
|
|
|
04-03-2013, 08:07 AM
|
#10 |
|
Senior Member

Join Date: Nov 2012
Drives: 86 GTS
Location: brisbane
Posts: 270
Thanks: 46
Thanked 102 Times in 65 Posts
Mentioned: 0 Post(s)
Tagged: 0 Thread(s)
|
this is great, thanks
I had a bit of a play with mine tonight. I found that by pressing the buttons in a different sequence I could access either the line diag menu or the service menu.... you have to do it really fast but pressing and holding the 3 in order audio->voice->map then i got into the line diag menu pressing and holding map->voice->audio in sequence got me into the service menu I had to do this really quick, almost instantaneously but it was definitely repeatable. you will need to play a bit to get the knack of it! |
|
|
|
|
04-03-2013, 11:10 AM
|
#11 | |
|
Member
Join Date: Mar 2013
Drives: minivan
Location: Austin, TX
Posts: 41
Thanks: 1
Thanked 58 Times in 9 Posts
Mentioned: 0 Post(s)
Tagged: 0 Thread(s)
|
Quote:
|
|
|
|
|
|
04-03-2013, 11:00 PM
|
#12 | |
|
Senior Member
Join Date: Nov 2012
Drives: 86 GTS
Location: brisbane
Posts: 270
Thanks: 46
Thanked 102 Times in 65 Posts
Mentioned: 0 Post(s)
Tagged: 0 Thread(s)
|
Quote:
|
|
|
|
|
|
04-05-2013, 04:00 AM
|
#13 | |
|
Senior Member
Join Date: May 2012
Drives: 13' SSM BRZ
Location: Alaska
Posts: 250
Thanks: 21
Thanked 72 Times in 52 Posts
Mentioned: 6 Post(s)
Tagged: 0 Thread(s)
|
Quote:
|
|
|
|
|
|
04-08-2013, 01:25 AM
|
#14 |
|
Member
Join Date: Mar 2013
Drives: Subaru WRB BRZ
Location: Vancouver, Canada
Posts: 5
Thanks: 2
Thanked 5 Times in 5 Posts
Mentioned: 0 Post(s)
Tagged: 0 Thread(s)
|
awesome write up!
|
|
|
|
|
|
|
|
|
| Thread Tools | Search this Thread |
|
|
 Similar Threads
|
||||
| Thread | Thread Starter | Forum | Replies | Last Post |
| WRB BRZ - 2 step paint correction & Opti-Coat by Mr. Sparkle Detailing - Long Island | Mr. Sparkle | Cosmetic Maintenance (Wash, Wax, Detailing, Body Repairs) | 4 | 02-10-2013 10:04 PM |
| step 1 :buy frs in phx, step 2: drive to pikes peak | haymaker | FR-S & 86 Photos, Videos, Wallpapers, Gallery Forum | 15 | 08-21-2012 10:44 AM |
| [StreetFX] License Plate LED light upgrade, and DIY step by step guide (GT and GTS) | WTF | Australia Classifieds | 0 | 07-11-2012 11:38 AM |
| [StreetFX] BRIGHT Boot/Trunk LED light upgrade & DIY step by step guide (GT and GTS) | WTF | Australia Classifieds | 0 | 07-11-2012 11:27 AM |


 F DR1VR

 Hachi
Hachi
 BRZ
BRZ


