


 05-30-2022, 01:54 AM
|
#379 |
|
Senior Member

Join Date: Jul 2016
Drives: BRZ, WRX
Location: Sydney, Australia
Posts: 291
Thanks: 105
Thanked 962 Times in 233 Posts
Mentioned: 2 Post(s)
Tagged: 0 Thread(s)
|
Speaking of DIY, yesterday I made this adaptor to mount my Bosch DBW throttle body to the new intake manifold.
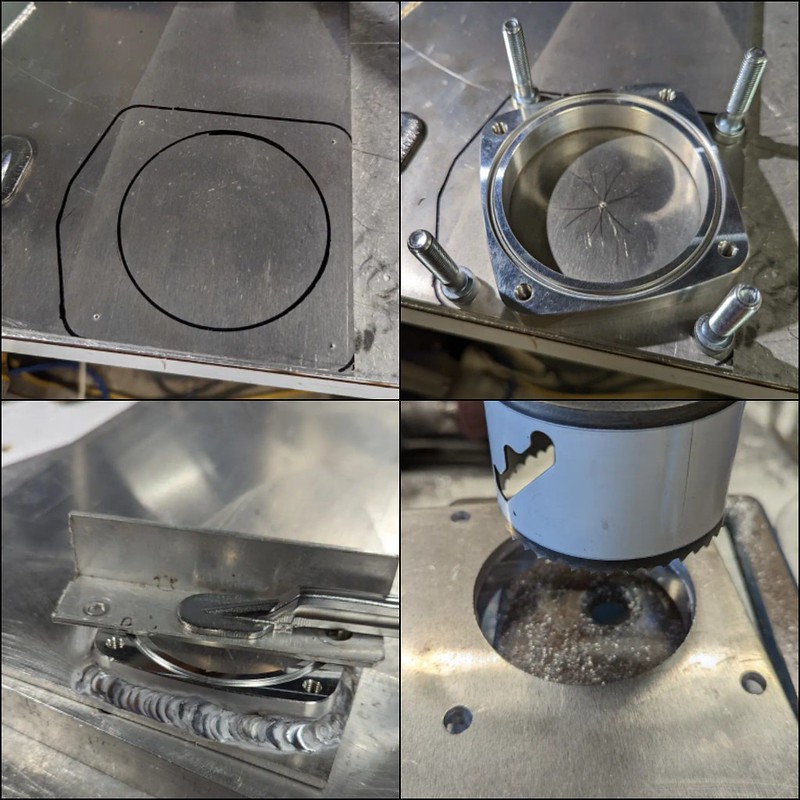 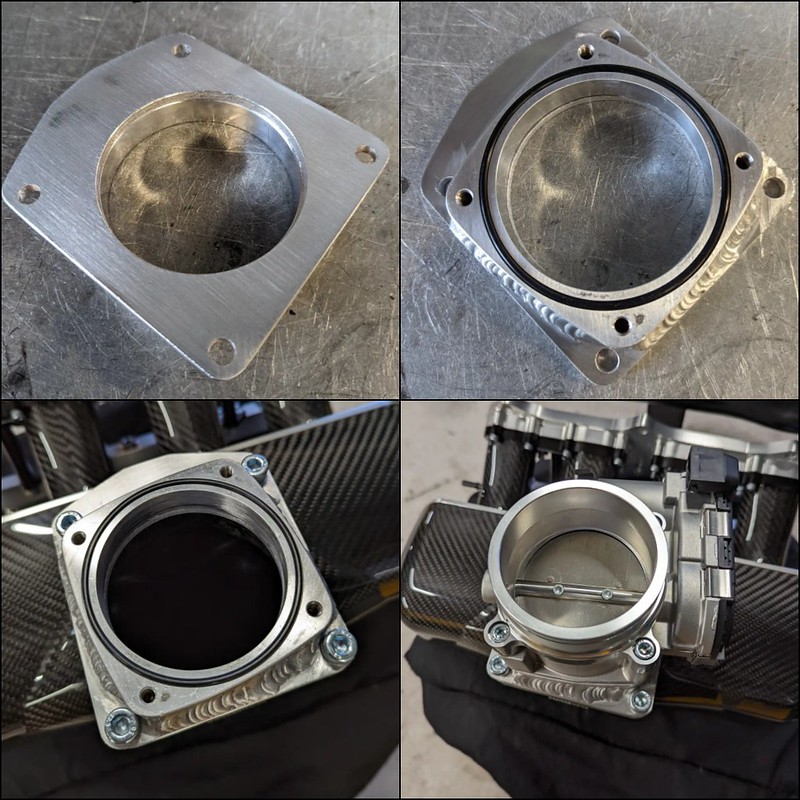 It turned out pretty neat and now I can finish making the cold side tube to connect it to the intercooler. 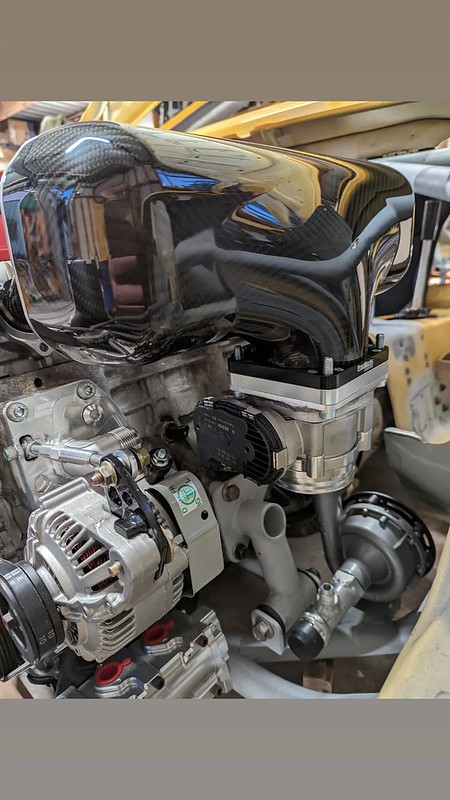
__________________
|

|

|
| The Following 6 Users Say Thank You to DIY For This Useful Post: | ballsdeep (07-20-2022), DustinS (10-22-2022), Irace86.2.0 (05-31-2022), jflogerzi (05-30-2022), RedReplicant (11-20-2022), Wally86 (11-21-2022) |
|
05-30-2022, 08:20 AM
|
#380 | |
|
Senior Member

Join Date: Feb 2014
Drives: C5 Corvette, '17 Toyota 86, Jeep XJ
Location: New Castle DE
Posts: 1,500
Thanks: 1,436
Thanked 914 Times in 528 Posts
Mentioned: 5 Post(s)
Tagged: 0 Thread(s)
|
Quote:
Joel the intake looks amazing by the way
__________________
 |
|
|
|
|
| The Following User Says Thank You to SuperTom For This Useful Post: | DIY (05-30-2022) |
|
05-30-2022, 09:18 PM
|
#381 |
|
Dysentery Enthusiast

Join Date: Mar 2020
Drives: 2017 toyota 86
Location: south dakota
Posts: 42
Thanks: 38
Thanked 13 Times in 10 Posts
Mentioned: 0 Post(s)
Tagged: 0 Thread(s)
|
I really just can't wait to see this thing on a track somewhere. I'm in awe of your commitment and investment of time into your car.
|
|
|
|
| The Following User Says Thank You to RuyGuy2 For This Useful Post: | DIY (05-30-2022) |
|
05-31-2022, 02:57 AM
|
#382 |
|
Member
Join Date: Dec 2015
Drives: Ocho-Seis
Location: desktop
Posts: 25
Thanks: 16
Thanked 11 Times in 7 Posts
Mentioned: 0 Post(s)
Tagged: 0 Thread(s)
|
Epic build, the role model for all K series swaps!
Do you have a clever idea for a cold air intake or airbox?? Last edited by ballsdeep; 05-31-2022 at 02:57 AM. Reason: spelling |
|
|
|
|
05-31-2022, 05:16 AM
|
#383 | |
|
Senior Member
Join Date: Jul 2016
Drives: BRZ, WRX
Location: Sydney, Australia
Posts: 291
Thanks: 105
Thanked 962 Times in 233 Posts
Mentioned: 2 Post(s)
Tagged: 0 Thread(s)
|
Quote:
I haven't put these photos up on here yet but I already have made a 4" pipe going into the turbo, I had to use some tight radius bends to clear the steering linkage. On the other end will be a large pod filter inside some kind of box that will take fresh air from the front bumper. 
__________________
|
|
|
|
|
| The Following 4 Users Say Thank You to DIY For This Useful Post: |
|
05-31-2022, 09:23 AM
|
#384 |
|
Member

Join Date: Jun 2016
Drives: '02 S2000; '22 GR86
Location: South Florida
Posts: 46
Thanks: 15
Thanked 45 Times in 24 Posts
Mentioned: 2 Post(s)
Tagged: 0 Thread(s)
|
What valve cover is that? Loving this build!
|
|
|
|
|
05-31-2022, 07:54 PM
|
#385 | |
|
Senior Member
Join Date: Jul 2016
Drives: BRZ, WRX
Location: Sydney, Australia
Posts: 291
Thanks: 105
Thanked 962 Times in 233 Posts
Mentioned: 2 Post(s)
Tagged: 0 Thread(s)
|
Quote:
__________________
|
|
|
|
|
|
06-09-2022, 02:46 AM
|
#386 |
|
Senior Member
Join Date: Jul 2016
Drives: BRZ, WRX
Location: Sydney, Australia
Posts: 291
Thanks: 105
Thanked 962 Times in 233 Posts
Mentioned: 2 Post(s)
Tagged: 0 Thread(s)
|
I have finished all the intercooler and turbo plumbing now.
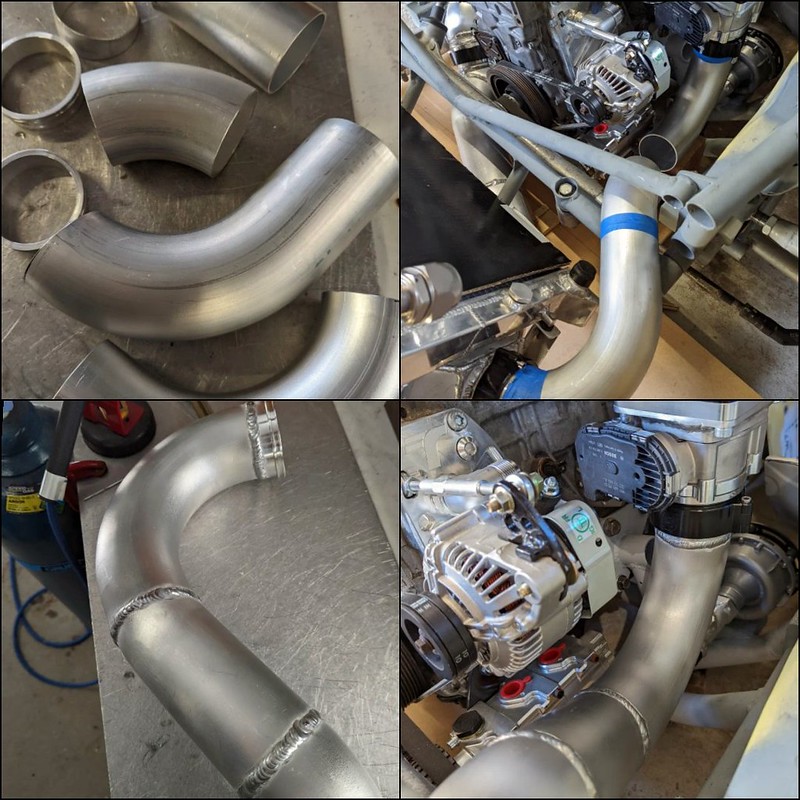 Part of the reason I changed to a center feed intake manifold is that it moves the throttle body away from the front of the engine and as you can see in the photo below I now have unrestricted space behind the radiator for a fully ducted hood exit. 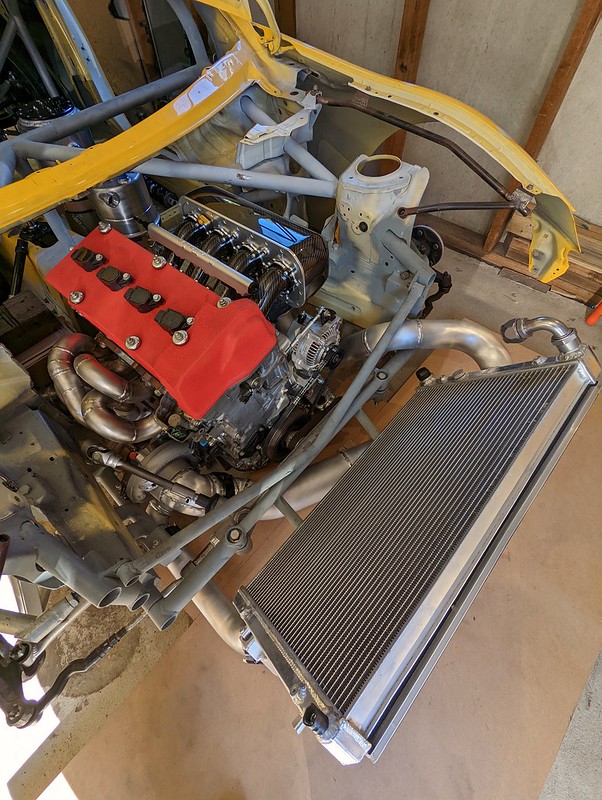 Next thing I'm doing is to replace the firewall in the engine bay. I've bought some big sheets of cardboard for making templates, then I will have to remove the engine and weld in the sheet metal based off those cardboard templates. This video is a pretty good overview of where the car is at now https://www.instagram.com/tv/CedWQES..._web_copy_link .
__________________
Last edited by DIY; 06-09-2022 at 05:41 AM. |
|
|
|
| The Following 8 Users Say Thank You to DIY For This Useful Post: | Ash_89 (07-16-2022), Busybee (08-20-2022), Code Monkey (06-09-2022), Irace86.2.0 (06-11-2022), RedReplicant (11-20-2022), RToyo86 (04-01-2023), TheBoss77 (06-09-2022), Wally86 (11-21-2022) |
|
07-14-2022, 11:03 PM
|
#387 |
|
Senior Member
Join Date: Jul 2016
Drives: BRZ, WRX
Location: Sydney, Australia
Posts: 291
Thanks: 105
Thanked 962 Times in 233 Posts
Mentioned: 2 Post(s)
Tagged: 0 Thread(s)
|
Just a small update for you guys.
I have mocked up the replacement firewall using cardboard templates. Removed the engine and now I am busy transferring those templates over to sheet metal to be welded into the car. Removing the engine is fast and easy with the way I have designed everything. 
__________________
|
|
|
|
| The Following 14 Users Say Thank You to DIY For This Useful Post: | AgentBlue243 (07-19-2022), Ash_89 (07-16-2022), ballsdeep (07-20-2022), Busybee (08-20-2022), Code Monkey (07-15-2022), H380 (07-15-2022), Irace86.2.0 (07-18-2022), Kiske (07-17-2022), Racecomp Engineering (07-16-2022), RedReplicant (11-20-2022), RToyo86 (07-15-2022), T0rt0r0 (07-15-2022), TheBoss77 (07-15-2022), Wally86 (11-21-2022) |
|
08-20-2022, 07:56 PM
|
#388 |
|
Senior Member
Join Date: Jul 2016
Drives: BRZ, WRX
Location: Sydney, Australia
Posts: 291
Thanks: 105
Thanked 962 Times in 233 Posts
Mentioned: 2 Post(s)
Tagged: 0 Thread(s)
|
I've had a bit of a break from working on the car but yesterday I spent the day turning my cardboard templates into a steel firewall. I don't really have much experience working with sheet metal and I don't have any tools for it either but I'm pretty happy with how this is coming together.
Just a video of the process for now, I'll get some photos once everything is complete. https://www.instagram.com/reel/CheY7...d=MDJmNzVkMjY= .
__________________
|
|
|
|
|
09-17-2022, 05:31 AM
|
#389 |
|
Senior Member
Join Date: Jul 2016
Drives: BRZ, WRX
Location: Sydney, Australia
Posts: 291
Thanks: 105
Thanked 962 Times in 233 Posts
Mentioned: 2 Post(s)
Tagged: 0 Thread(s)
|
Some more work on the firewall replacement today. I have now finished cutting and bending all the sheet metal so now it's just a matter of welding it all in place.
 I ended up using more than one piece of sheet metal to do the tunnel replacement, simply because it's easier to manipulate smaller pieces rather than one big complex shape.  I found that even if my cardboard template fits perfectly there was no guarantee I would be able to make the steel bend in the same way, at least with my skills anyway. 
__________________
|
|
|
|
|
10-20-2022, 03:26 AM
|
#390 |
|
Senior Member
Join Date: Jul 2016
Drives: BRZ, WRX
Location: Sydney, Australia
Posts: 291
Thanks: 105
Thanked 962 Times in 233 Posts
Mentioned: 2 Post(s)
Tagged: 0 Thread(s)
|
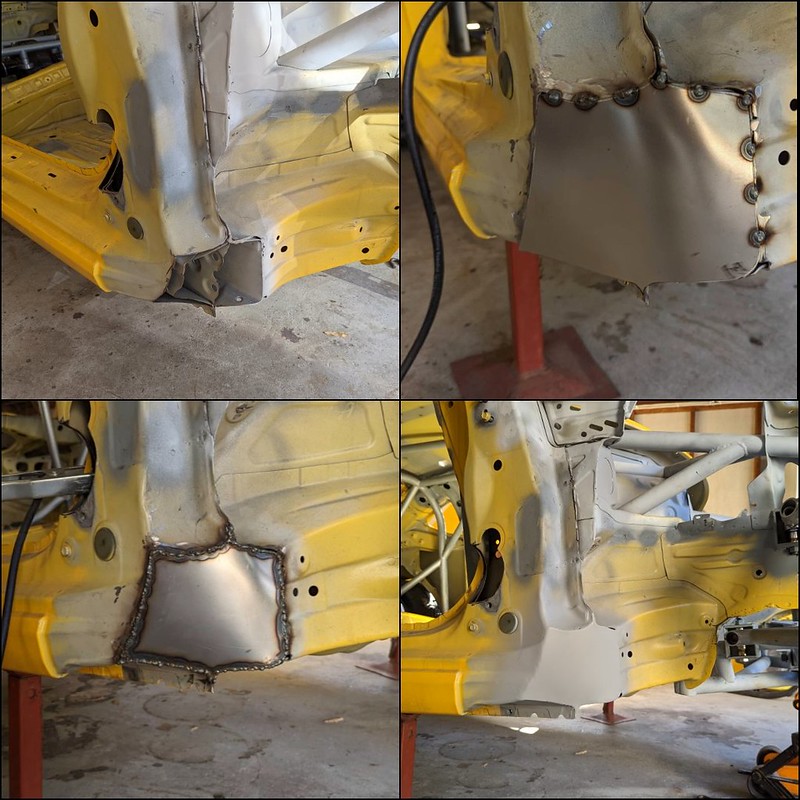
Time for an update.
The firewall is finished. If you are late to the game the reason for the new firewall was that I am allowed to move the motor back 51mm behind the original firewall under the WTAC rules. The original firewall was cut out, the engine was mounted in its permanent position, cardboard templates where made with the engine in place and then a new firewall was made based on those templates.  I used a plug weld technique to attach the new sheet metal basically mimicking the original construction. It was a lot of drilling around all of the perimeters. I used a weld-through primer on the back side before doing the plug welds with my MIG. After welding there was a lot of grinding with a flap disc to give a smooth finish but I think it came up really good. 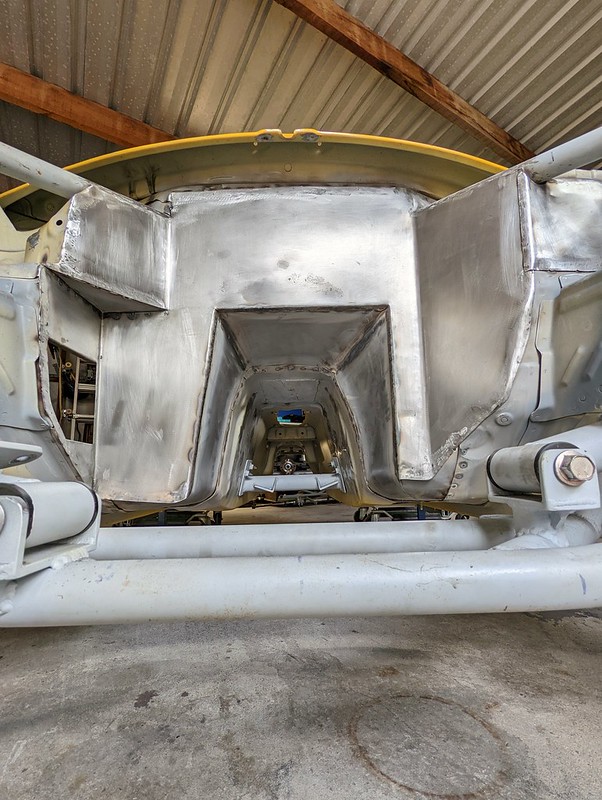 The whole lot has been primed now to prevent any surface rust while the build continues.  Here is a video of the inside and out https://www.instagram.com/reel/Cjw7d..._web_copy_link With the firewall finished I am moving on with the front pushrod suspension. I have purchased all the rod ends and bearings for the bellcranks and pushrods. A friend at work has been putting my bellcrank design into Fusion360 so we can first 3D print the bellcranks for testing and mounting and then later have them CNC machined from aluminium. 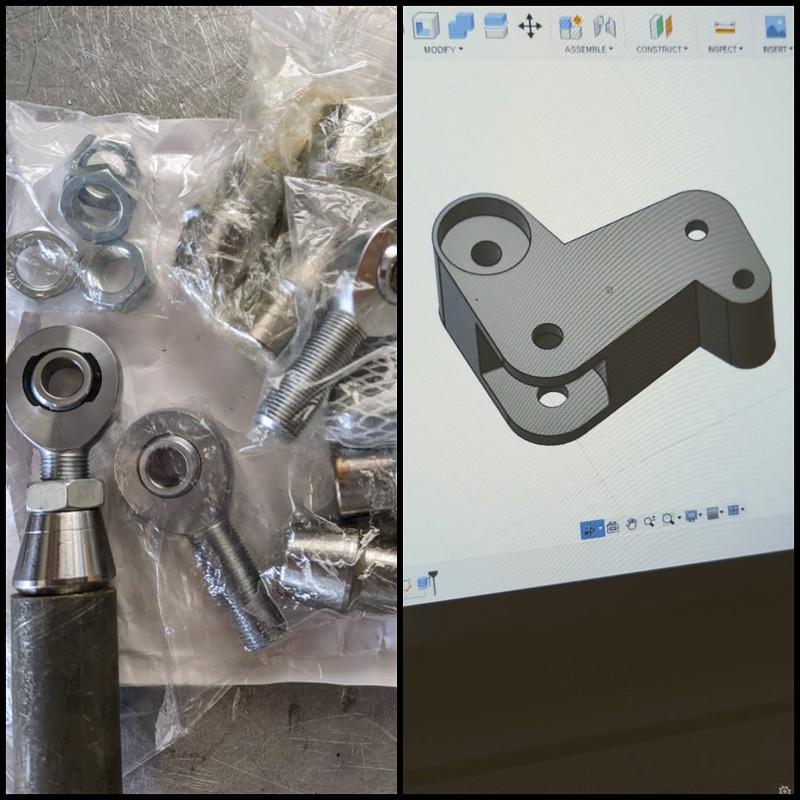
__________________
|
|
|
|
| The Following 12 Users Say Thank You to DIY For This Useful Post: | AgentBlue243 (10-25-2022), Ash_89 (10-20-2022), Busybee (10-20-2022), Code Monkey (10-20-2022), gt5759 (10-20-2022), Irace86.2.0 (10-21-2022), jay_reef15 (10-20-2022), Jdmjunkie (10-20-2022), ML (10-20-2022), RToyo86 (11-21-2022), villainous_frx (10-20-2022), Wally86 (11-21-2022) |
|
10-30-2022, 06:33 AM
|
#391 |
|
Senior Member
Join Date: Jul 2016
Drives: BRZ, WRX
Location: Sydney, Australia
Posts: 291
Thanks: 105
Thanked 962 Times in 233 Posts
Mentioned: 2 Post(s)
Tagged: 0 Thread(s)
|
A little streamlining of the wheel well exits to help the air evacuate. After doing all that sheet metal work on the firewall I figured now was the perfect time to finish this job.
 Both sides came out really nice. 
__________________
|
|
|
|
| The Following 8 Users Say Thank You to DIY For This Useful Post: | AgentBlue243 (10-30-2022), Busybee (04-03-2023), Code Monkey (10-30-2022), DustinS (10-31-2022), gt5759 (11-03-2022), ML (10-30-2022), RToyo86 (04-01-2023), Wally86 (11-21-2022) |
|
11-20-2022, 07:25 PM
|
#392 |
|
Senior Member
Join Date: Jul 2016
Drives: BRZ, WRX
Location: Sydney, Australia
Posts: 291
Thanks: 105
Thanked 962 Times in 233 Posts
Mentioned: 2 Post(s)
Tagged: 0 Thread(s)
|
I have been working on the front pushrod suspension. The design I made for the bellcranks have been transferred into CAD software and then 3D printed by my friend at work. This allows me to fabricate shock mounts and bellcrank mounts on the main frame rail and also the pushrod mounts on the lower control arms.
Some revisions will be made and this is the beauty of 3D printing them first but eventually they will be CNC machined from aluminium alloy. 
__________________
|
|
|
|
| The Following 12 Users Say Thank You to DIY For This Useful Post: | AgentBlue243 (11-20-2022), Busybee (04-03-2023), Code Monkey (11-20-2022), DustinS (11-21-2022), Dzmitry (11-22-2022), gt5759 (11-21-2022), Irace86.2.0 (11-24-2022), Jdmjunkie (11-20-2022), RedReplicant (11-20-2022), RToyo86 (11-21-2022), Takumi788 (11-21-2022), Wally86 (11-21-2022) |
|
|
|
|
 |
|
|


 Blue Toy Yoda