


|
||||||
| DIY (Do-It-Yourself) Guides For all DIYs. |
| View Poll Results: Was this at all helpful? | |||
| Yes! |
|
3 | 33.33% |
| No! |
|
1 | 11.11% |
| Needs better instructions |
|
1 | 11.11% |
| Needs more pictures |
|
4 | 44.44% |
| Voters: 9. You may not vote on this poll | |||
 |
|
|
Thread Tools | Search this Thread |
 07-23-2013, 07:56 PM
|
#1 |
|
Junior Member

Join Date: Jul 2013
Drives: FR-S White and black
Location: Orlando
Posts: 6
Thanks: 0
Thanked 0 Times in 0 Posts
Mentioned: 1 Post(s)
Tagged: 0 Thread(s)
|
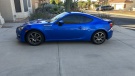
Black out reflectors in tail lights
So I just did this the other day and thought to would share a few of the things I did compared to the other DIY instructions.
First off YES you do have to cut apart the tail light which at first scared the crap out if me, since I haven't done anything this invasive yet. But honestly it's not to hard. You just have to go for it. THINGS I USED, Soldering iron nothing fancy. I got one for $10 from Walmart Dremle* (can't spell) I used mostly a tip that was basically a metal abrasive rod looking thing. I used plastidip for paint matte black Really any sealant I saw an all weather adhesive automotive sealant which should work alright Unfortunately I didn't take step by step pictures but I can explain a lot of it. First. Remove the tail light. You have to open your trunk and remove (2) black push tabs 1 on each side. Use a flat head screw driver. Second remove the 4 nuts that hold the tail lights in. Twist out the bulbs from the back of the housing. Third, pull the tail light out it comes out straight back. Fourth I used the SOLDERING iron to melt a line into the black top piece of plastic. You'll need to cut this piece off to be able to make a clean cut on the actual housing. Don't worry it can be reattached. Now that the L shaped black piece is off the tail light you can start cutting the actual black back piece of the housing. I used the dremel for this. Don't cut to far in on the housing because you'll need to remove the chrome piece but don't cut to far to the clear lens because .... Well i don't know why that's just what everyone says. YOU will see that their is a little ledge that you can follow pretty easily which is what I did. Once you cut all the way around giggle the black pice till it falls out. Most likely you'll have missed some spots because the plastic almost melts a little. Just be patient. Their will be lots of black plastic everywhere and once separated I used water to wash all the black out. Also be careful not to scratch the lens!! Paint with what ever paint you want. I did 5 light coats of plastidip. ALSO I almost forgot. You need to unscrew I think it's 3-4 screws on the back of the black plastic piece which attaches it to the chrome reflector. Once you paint and put everything back together you'll notice they are definitely not going to fit back together perfect. this is where the soldering iron came in handy. With the pieces together melt small spots together with the iron which is basically like tack welding and that will hold it in place. I the. Worked my way all the way around the cut and (welding) melting the two pieces back together. You will have lots of plastic around the initial cut and just melt it all back into the crack/ cut this helps seal and hold the two pieces togeather. Once you have filled the crack all the way around use the sealant to just make sure no moisture can get in . Apply around the weld* re weld / melt the black L shaped piece on and your all good . Basically what I did differently was melting the two back together with the soldering iron. Makes it a lot easier. HINT: try your best not to cut too deep as you'll cut into the reflector. WARNING: it may be different for other people but I can see the cut I made when I look close into my tail lights . Last edited by tylerweaver; 07-23-2013 at 08:00 PM. Reason: More pictures |

|

|
|
07-23-2013, 08:02 PM
|
#2 |
|
Junior Member
Join Date: Jul 2013
Drives: FR-S White and black
Location: Orlando
Posts: 6
Thanks: 0
Thanked 0 Times in 0 Posts
Mentioned: 1 Post(s)
Tagged: 0 Thread(s)
|
More pics
More pics
|
|
|
|
|
07-23-2013, 08:03 PM
|
#3 |
|
Junior Member
Join Date: Jul 2013
Drives: FR-S White and black
Location: Orlando
Posts: 6
Thanks: 0
Thanked 0 Times in 0 Posts
Mentioned: 1 Post(s)
Tagged: 0 Thread(s)
|
Pics
Pics
|
|
|
|
|
07-23-2013, 10:33 PM
|
#4 |
|
Junior Member
Join Date: Jul 2013
Drives: FR-S White and black
Location: Orlando
Posts: 6
Thanks: 0
Thanked 0 Times in 0 Posts
Mentioned: 1 Post(s)
Tagged: 0 Thread(s)
|
Pics
Pic
|
|
|
|
|
07-23-2013, 10:34 PM
|
#5 |
|
Junior Member
Join Date: Jul 2013
Drives: FR-S White and black
Location: Orlando
Posts: 6
Thanks: 0
Thanked 0 Times in 0 Posts
Mentioned: 1 Post(s)
Tagged: 0 Thread(s)
|
Pic
Pic
|
|
|
|
|
07-23-2013, 10:43 PM
|
#6 |
|
Banned
Join Date: Nov 2012
Drives: TRD Ultramarine '13
Location: Calgary
Posts: 1,377
Thanks: 190
Thanked 766 Times in 347 Posts
Mentioned: 24 Post(s)
Tagged: 0 Thread(s)
|
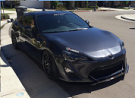
Looks good, but then again, anything with a dark accent looks good on a whiteout. Need to see it done on other colours for me to judge if I like it or not, especially Ultramarine, since that's what I own.
|
|
|
|
|
07-23-2013, 10:53 PM
|
#7 |
|
Senior Member
Join Date: Jun 2012
Drives: '13 WRB 6MT BRZ Limited
Location: Mesa, AZ
Posts: 188
Thanks: 38
Thanked 33 Times in 25 Posts
Mentioned: 6 Post(s)
Tagged: 0 Thread(s)
|
I have Ultramarine also and think it will look best on ours.
__________________
2013 BRZ Limited WRB
|
|
|
|
|
07-23-2013, 11:12 PM
|
#8 |
|
Senior Member
Join Date: May 2012
Drives: JRSC'd Asphalt FR-S
Location: SoCal
Posts: 1,317
Thanks: 868
Thanked 436 Times in 260 Posts
Mentioned: 9 Post(s)
Tagged: 1 Thread(s)
|
Looks really nice good job! haha I would do this if I wasn't so scared of opening my tails. Doing my headlights was scary enough haha.
|
|
|
|
|
07-23-2013, 11:51 PM
|
#9 |
|
Banned
Join Date: Jul 2013
Drives: Whiteout FR-S
Location: Southeast
Posts: 24
Thanks: 0
Thanked 3 Times in 3 Posts
Mentioned: 0 Post(s)
Tagged: 0 Thread(s)
|
Looks good!
|
|
|
|
|
07-24-2013, 12:16 AM
|
#10 |
|
Senior Member

Join Date: May 2013
Drives: The silvertrooper 10 series
Location: Las Vegas
Posts: 1,671
Thanks: 1,072
Thanked 665 Times in 376 Posts
Mentioned: 158 Post(s)
Tagged: 3 Thread(s)
|
Looks Good, I would like to see it with only red circles. A little tint on the reflector would make it look better IMO
|
|
|
|
|
07-24-2013, 08:39 AM
|
#11 |
|
Junior Member
Join Date: Jul 2013
Drives: FR-S White and black
Location: Orlando
Posts: 6
Thanks: 0
Thanked 0 Times in 0 Posts
Mentioned: 1 Post(s)
Tagged: 0 Thread(s)
|
The seam
|
|
|
|
|
|
|
|
|
|
|
 Similar Threads
|
||||
| Thread | Thread Starter | Forum | Replies | Last Post |
| DIY: Black Housing Tail Lights | sw20kosh | DIY (Do-It-Yourself) Guides | 151 | 11-21-2016 04:08 PM |
| Valenti LED Tail lights Black And Orange on FR-S | mboory | Cosmetic Modification (Interior/Exterior/Lighting) | 65 | 10-24-2016 04:44 PM |
| Black Housing Tail Lights (FR-S) | sw20kosh | Cosmetic Modification (Interior/Exterior/Lighting) | 20 | 04-13-2016 11:38 PM |
| **PHASTEK** Spyder Tail Lights in Chrome, Black, or Smoke | PhastekSport | Exterior Parts - Lighting | 222 | 04-08-2015 06:57 PM |
| Interior Door Reflectors/Lights | Gitsum3x | Cosmetic Modification (Interior/Exterior/Lighting) | 3 | 03-14-2013 10:19 AM |


 Cory's FR-S