


 11-01-2021, 08:38 PM
|
#127 |
|
Member
Join Date: Sep 2021
Drives: brz
Location: Tennessee
Posts: 55
Thanks: 4
Thanked 10 Times in 9 Posts
Mentioned: 0 Post(s)
Tagged: 0 Thread(s)
|
There's plenty of videos on youtube of how to tig weld.

|

|

|
|
11-01-2021, 09:49 PM
|
#128 | |
|
Senior Member

Join Date: Mar 2017
Drives: Q5 + BRZ + M796
Location: Santa Rosa, CA
Posts: 7,883
Thanks: 5,668
Thanked 5,804 Times in 3,299 Posts
Mentioned: 70 Post(s)
Tagged: 0 Thread(s)
|
Quote:
Irregardless, thin gauge metal will still have a tendency to crack when heat stressed or when it sees a lot of vibrations and external forces. A butt weld, which is joining two ends tip to tip isn't terrible for thicker gauge metal like the type of thicker gauge metals that are used on factory exhaust manifold or turbo headers, but even these welds fail, irregardless of whether these were steel, MIG, machine welded or steel, TIG, hand welded. Type cracked, exhaust-manifold welds into a Google search, and you will see thick factory manifolds to thin quality or cheap headers and other components fracturing. Ace headers have cracked and eBay headers have cracked. The downpipe will see enough stress from the heat cycles, engine torque, exhaust movement and weight that I just want to minimize my risks. Cracks don't always show up as CELs or allow someone to drive home without potentially compromising the car if there is a significant fracture, so that is another issue. For all the reasons above, I would rather reinforce the joints with a better joint for an amateur TIG welder, which would be creating a slip end that stabilizes the two ends, so there is less stress on the joint, and then to do a penetrating lap weld with enough filler to create a butt weld too. The aluminum intercooler pipes are subject to more pressure than the exhaust, but will see far less heat. None of the pipes will be hard mounted or overly stressed with weight, so the risk is low, but I also will play it safe and shoot for longevity. There is little downside. The radius decrease is negligible. The benefit is less waste of time and material blowing holes in the pipes and stronger joints. I'll be practicing some more beforehand, so I may find my welds are adequate enough without the slip piece.
__________________
My Build | K24 Turbo Swap | *K24T BRZ SOLD*
|
|

|
|
|
11-12-2021, 09:34 PM
|
#129 |
|
Member
Join Date: Sep 2021
Drives: Garbage.
Location: Cincinnati
Posts: 23
Thanks: 0
Thanked 21 Times in 16 Posts
Mentioned: 6 Post(s)
Tagged: 0 Thread(s)
|
I don't mean to hijack your thread but I finished my K24 swap with a lot of helpful insight from your posts and obv's the kpower kit last week. Currently fighting some dumb BS with the oil feed line on the turbo, mainly waiting on a banjo bolt restrictor from ATP that's taking forever to arrive.
Items unmentioned worth noting: 1. You'll want to remove the t-stat as without the large diameter 1" return going through the housing the t-stat never opens. 2. The honda alternator LAMP does not perform the same high/low states for charging as the Subaru did, I may just need to put a FET inline to show proper state or maybe just a resistor to 12v to float it up? Have not investigated. 3. You have to hammer the crap out of the tunnel to move the trans, make sure you do that before you mount anything in there. 4. I recommend you unbolt the front sway bar and chassis brackets so it drops down, this makes putting the engine in MUCH easier.. you'll have to do it assembled to the trans. 5. The JDM K24A uses the timing mark under the water pump, not the arrow.. this is critical for timing the engine and setting base ign timing. Also waiting on a Radium catch can for the driver side and an overflow tank since the intercooler pipe occupies that space now. I chose the over the radiator route and with the 2.5" couplings it has lots of room, I wasn't excited to try snaking plumbing through the headlight/apron areas. My car is a lot different than the KPower base setup, I used their bridge adapter but I mapped out the interface and re-terminated all the wiring onto an ECUMaster EMU Black. Below is a picture showing the CAN integration working, I had a check engine for the flex fuel sensor (unplugged) which is nice to see also functioning properly. I made my own engine harness as well, my car has Flex, IAT, CLT, OT, OP, DBW, 2 Wire knock, EBCS, VVT, VTEC, Alt, AC, Both Cams, CAM 1 mapped as exhaust (fixed) and CAM 2 mapped to Intake for VVT. Happy to answer any questions, thanks a lot for your effort on documenting your swap. Sorry for the 
Last edited by visbits; 11-12-2021 at 09:56 PM. |
|
|
|
| The Following 3 Users Say Thank You to visbits For This Useful Post: |
|
11-13-2021, 01:29 PM
|
#130 | |
|
Senior Member
Join Date: Mar 2017
Drives: Q5 + BRZ + M796
Location: Santa Rosa, CA
Posts: 7,883
Thanks: 5,668
Thanked 5,804 Times in 3,299 Posts
Mentioned: 70 Post(s)
Tagged: 0 Thread(s)
|
Quote:
1. You are saying the coolant thermostat doesnt open with the larger port blocked off using the Hybrid Racing plug? This doesnt sound right only because I have seen no one mentioning this being an issue or needing to remove the thermostat. Did you just have trapped air? I feel like Kpower would have mentioned this in their instructions too. 2. Are you using the USDM alternator or the JDM one? I have both, but I converted to USDM. Do you know if that matters? I think the JDM one is smaller. I dont know about the specs or issues you are running into. 3/4. Are you saying you didnt hammer enough? Are you saying Kpower didnt mention other areas that need to be hammered out? I have already hammered out the spot they mentioned on the trans tunnel. There is maybe an inch to an inch and a half to the corner that is remaining. I flattened the fuel line bracket hopefully enough. I didnt hammer the header spot because I am running a turbo like you. Are there other spots that need hammering? I asked Kpower, and they said I could mount the engine and then attach the transmission after, but clearance is tight, so it would be harder, but it sounds like you are saying it is impossible, and it is hard enough with the trans attached that I should drop the sway bar and subframe. 5. I feel like I did my timing right, but you are making me second guess myself. I used the video. It is the same as the writeup below. My chain had dark links with obvious timing marks, so I dont know exactly what is different from what you have. I didnt see any marks under the JDM water pump. Do you have a picture? Do you have a link to a discussion on the subject that might expand on this topic? https://www.k20a.org/threads/how-i-i...rmation.46559/ Very impressive work! Add a picture to the K-swap owners thread. Ill add you to the owners list.
__________________
My Build | K24 Turbo Swap | *K24T BRZ SOLD*
|
|
|
|
|
|
11-13-2021, 03:11 PM
|
#131 | ||||
|
Member
Join Date: Sep 2021
Drives: Garbage.
Location: Cincinnati
Posts: 23
Thanks: 0
Thanked 21 Times in 16 Posts
Mentioned: 6 Post(s)
Tagged: 0 Thread(s)
|
Quote:
Quote:
Quote:
Quote:
My TDC is this mark on the JDM K24A, its under the water pump to the FAR RIGHT (facing engine) side of the cover. 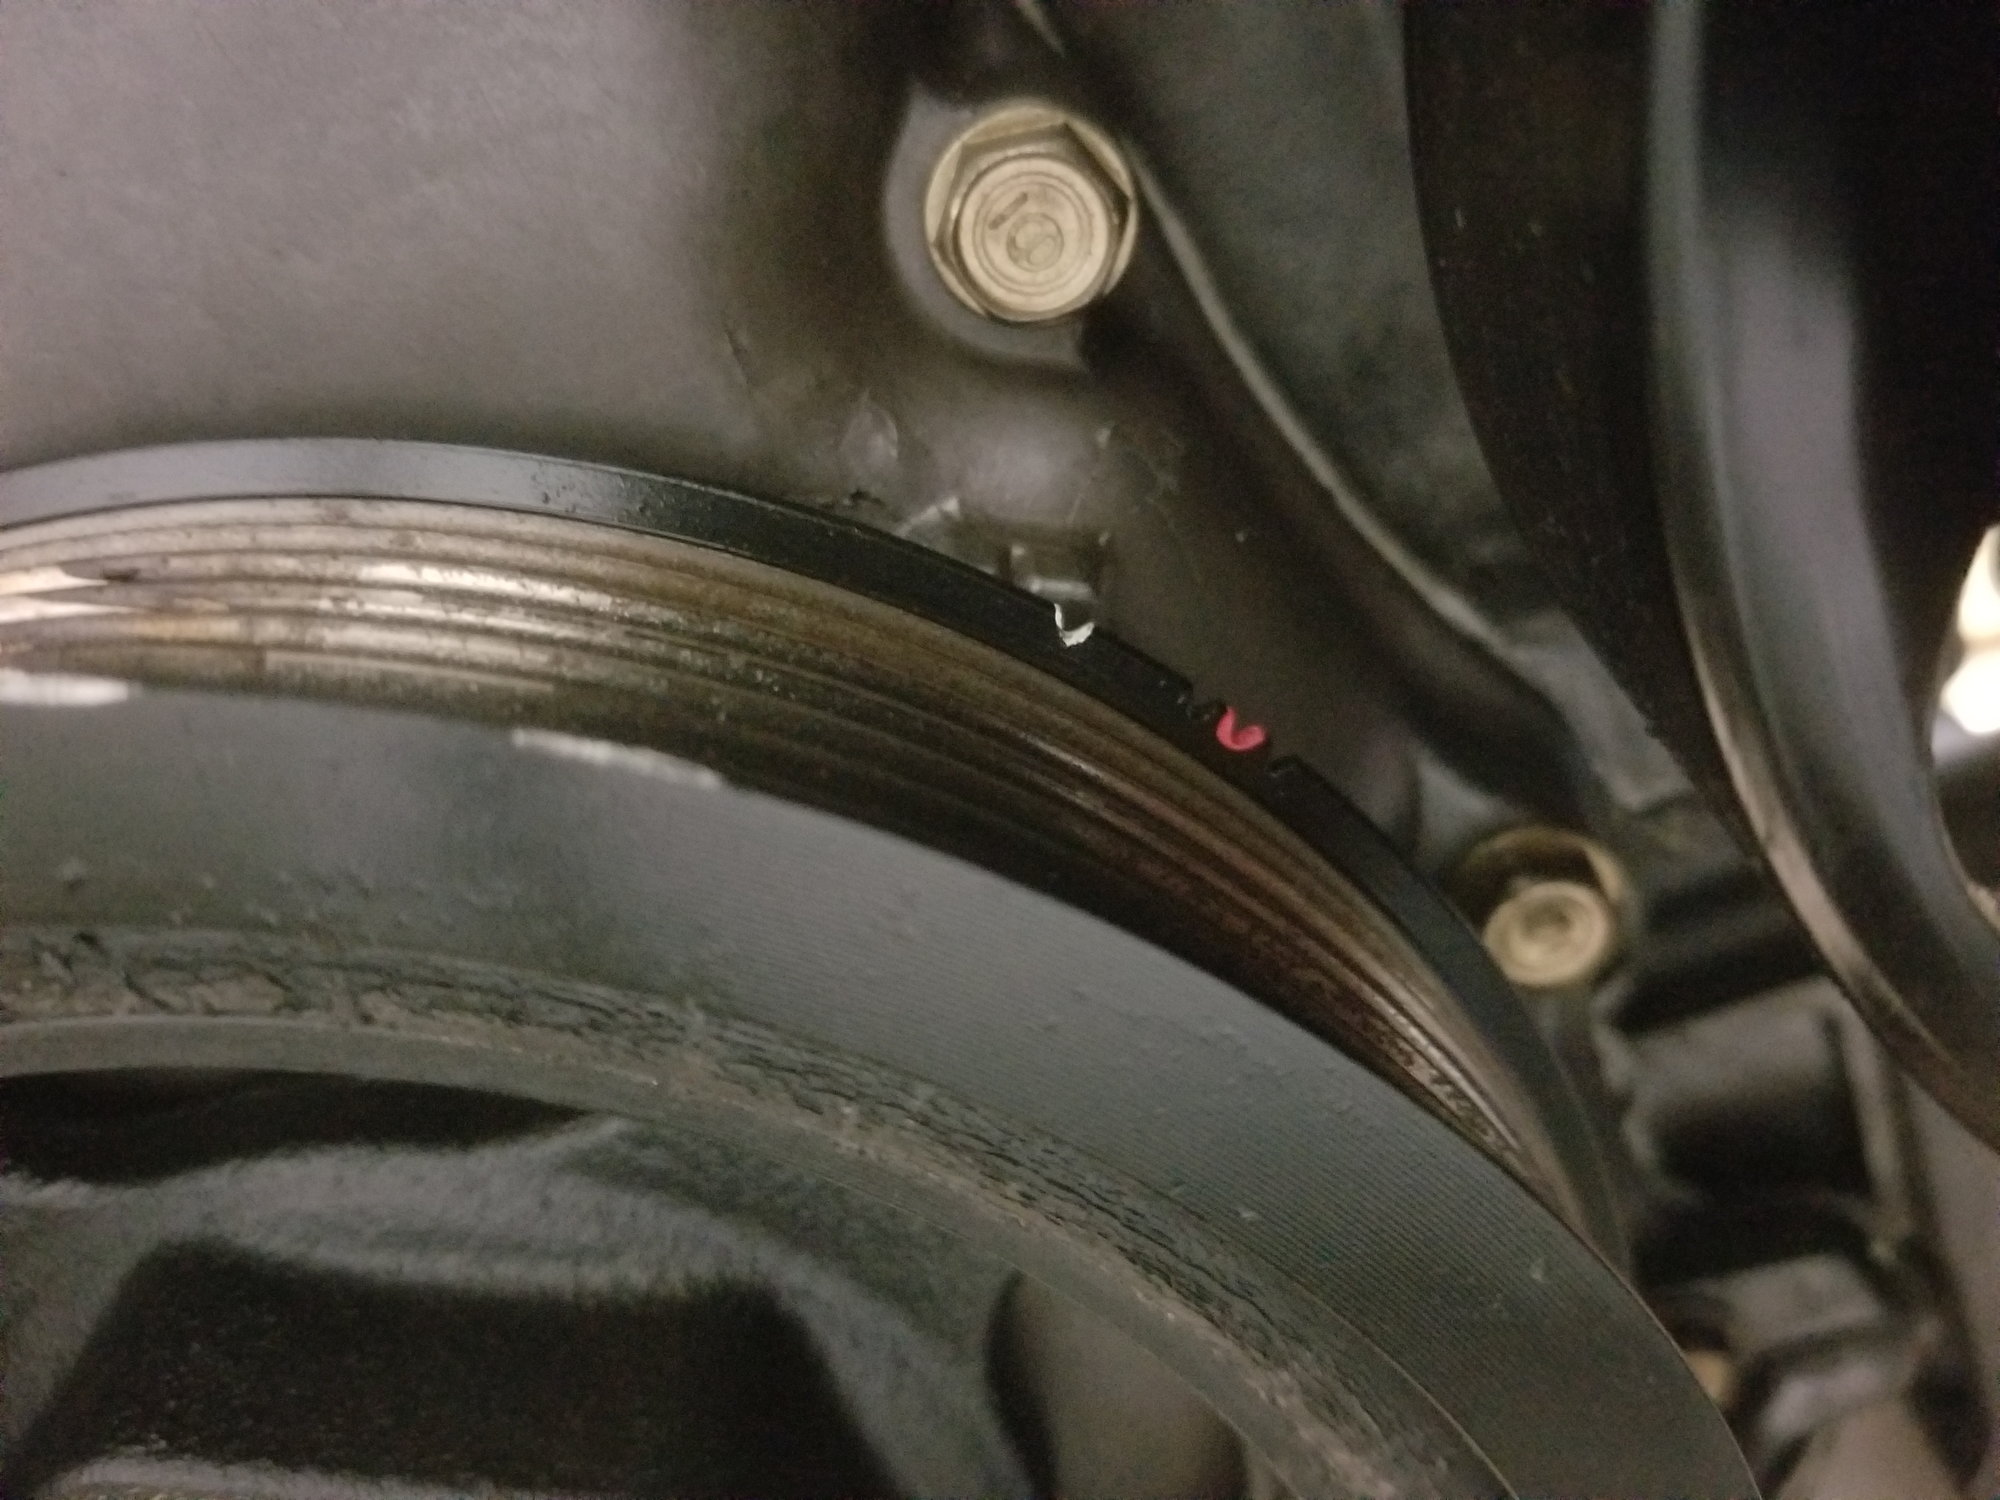
|
||||
|
|
|
| The Following User Says Thank You to visbits For This Useful Post: | Irace86.2.0 (11-13-2021) |
|
11-13-2021, 03:19 PM
|
#132 |
|
Senior Member
Join Date: Mar 2017
Drives: Q5 + BRZ + M796
Location: Santa Rosa, CA
Posts: 7,883
Thanks: 5,668
Thanked 5,804 Times in 3,299 Posts
Mentioned: 70 Post(s)
Tagged: 0 Thread(s)
|
 I laid down some nice line with the TIG welder. I then tried to just do some passes without filler on some practice tubing, and it went ok, but much harder. I added filler, and it was tough to maintain gap with 90 degrees to not overheat the metal. Im sure I will learn one day, but I dont have the time, materials or time for ordering potentially destroyed parts, so I might just hire a mobile welder or something. I tried laying passes with the spool gun on the MIG welder, but the splatter with MIG aluminum is just out of control, even with anti-splatter spray, and the beads on thin aluminum was less than ideal for boost, even if I cleaned them up. Most of my experience is with welding steel of all sizes with MIG, but aluminum is a different beast. For the thick bungs it was doable, but Im throwing in the towel early for the IC piping. I might still do the exhaust. Ive watched lots of videos, but at this point I can make more money working than paying someone to do it right, so Ill do that and just keep practicing for future builds. If I wasnt also in nursing school then I would have more time to practice on some blanks, but I just dont have the time or much will left. I just want to get this done. I laid down some nice line with the TIG welder. I then tried to just do some passes without filler on some practice tubing, and it went ok, but much harder. I added filler, and it was tough to maintain gap with 90 degrees to not overheat the metal. Im sure I will learn one day, but I dont have the time, materials or time for ordering potentially destroyed parts, so I might just hire a mobile welder or something. I tried laying passes with the spool gun on the MIG welder, but the splatter with MIG aluminum is just out of control, even with anti-splatter spray, and the beads on thin aluminum was less than ideal for boost, even if I cleaned them up. Most of my experience is with welding steel of all sizes with MIG, but aluminum is a different beast. For the thick bungs it was doable, but Im throwing in the towel early for the IC piping. I might still do the exhaust. Ive watched lots of videos, but at this point I can make more money working than paying someone to do it right, so Ill do that and just keep practicing for future builds. If I wasnt also in nursing school then I would have more time to practice on some blanks, but I just dont have the time or much will left. I just want to get this done. 
__________________
My Build | K24 Turbo Swap | *K24T BRZ SOLD*
|
|
|
|
|
11-13-2021, 03:25 PM
|
#133 |
|
Member
Join Date: Sep 2021
Drives: Garbage.
Location: Cincinnati
Posts: 23
Thanks: 0
Thanked 21 Times in 16 Posts
Mentioned: 6 Post(s)
Tagged: 0 Thread(s)
|
I've been tig welding for about 9 years for hobby and I'm just now getting to the point I'm not ashamed of my welds lol
|
|
|
|
| The Following 2 Users Say Thank You to visbits For This Useful Post: | DIY (11-13-2021), Irace86.2.0 (11-13-2021) |
|
11-13-2021, 06:15 PM
|
#134 | ||||
|
Senior Member
Join Date: Mar 2017
Drives: Q5 + BRZ + M796
Location: Santa Rosa, CA
Posts: 7,883
Thanks: 5,668
Thanked 5,804 Times in 3,299 Posts
Mentioned: 70 Post(s)
Tagged: 0 Thread(s)
|
Quote:
Quote:
Quote:
Quote:
__________________
My Build | K24 Turbo Swap | *K24T BRZ SOLD*
|
||||
|
|
|
|
11-13-2021, 07:23 PM
|
#135 | |
|
Senior Member

Join Date: Jul 2016
Drives: BRZ, WRX
Location: Sydney, Australia
Posts: 291
Thanks: 105
Thanked 962 Times in 233 Posts
Mentioned: 2 Post(s)
Tagged: 0 Thread(s)
|
Quote:
__________________
|
|
|
|
|
| The Following 2 Users Say Thank You to DIY For This Useful Post: | Irace86.2.0 (11-13-2021), NoHaveMSG (11-15-2021) |
|
11-15-2021, 04:53 PM
|
#136 |
|
Senior Member
Join Date: Mar 2017
Drives: Q5 + BRZ + M796
Location: Santa Rosa, CA
Posts: 7,883
Thanks: 5,668
Thanked 5,804 Times in 3,299 Posts
Mentioned: 70 Post(s)
Tagged: 0 Thread(s)
|
@visbits
Did you use the stock, Honda, plastic, IAT sensor, and if so then where do you mount it? Kpower uses a spot on the intake. K-tuned makes an adapter with a bung, and I figured I could get that and have it welded to the IC pipe before the throttle body. https://k-tuned.3dcartstores.com/Int...ter_p_554.html Does the Kpower intake manifold have any NPT ports for running a boost signal for a gauge or anything? I see some ports under the manifold in the pictures.
__________________
My Build | K24 Turbo Swap | *K24T BRZ SOLD*
|
|
|
|
|
11-16-2021, 08:22 AM
|
#137 | |
|
Member
Join Date: Sep 2021
Drives: Garbage.
Location: Cincinnati
Posts: 23
Thanks: 0
Thanked 21 Times in 16 Posts
Mentioned: 6 Post(s)
Tagged: 0 Thread(s)
|
Quote:
No I used a GM fast response sensor and its in a 3/8 npt bung just after the intercooler behind the radiator in the front of my car, Also using a Bosch Motorsport 68mm DBW throttle. Sensor: https://www.bmotorsports.com/shop/pr...oducts_id/4172 K connectors: https://www.bmotorsports.com/shop/static.php/post/k24 I drilled holes in the intake manifold and tapped them to 1/8 npt to service FPR, ECU and BOV. Last edited by visbits; 11-16-2021 at 11:08 AM. |
|
|
|
|
| The Following User Says Thank You to visbits For This Useful Post: | Irace86.2.0 (11-16-2021) |
|
11-16-2021, 11:55 AM
|
#138 |
|
Senior Member
Join Date: Mar 2017
Drives: Q5 + BRZ + M796
Location: Santa Rosa, CA
Posts: 7,883
Thanks: 5,668
Thanked 5,804 Times in 3,299 Posts
Mentioned: 70 Post(s)
Tagged: 0 Thread(s)
|
Some of the Honda boys file down the plastic on the OEM Honda sensor, so it is faster acting.
I feel like that is the ideal placement for the sensor, so it reads the cooled air, but also gets airflow over the back of it for heat-soak reasons, yet I don’t think the Kpower harness is likely to reach. I’ll have to see what are my limitations when I the kit arrives.m I know some Hondas have a brass threaded sensor, some have two bolts, and others are plastic held-in, and I don’t know if they are all compatible with Kpower’s harness and signal parameters. I’m sure it wouldn’t be too hard to change with Haltech, but I’m trying not to get too custom to reduce chances of issues.
__________________
My Build | K24 Turbo Swap | *K24T BRZ SOLD*
|
|
|
|
|
11-16-2021, 08:06 PM
|
#139 | |
|
Member
Join Date: Sep 2021
Drives: Garbage.
Location: Cincinnati
Posts: 23
Thanks: 0
Thanked 21 Times in 16 Posts
Mentioned: 6 Post(s)
Tagged: 0 Thread(s)
|
Quote:
Dude just cut the harness off where IAT is an put a 2 pin DTM connector and extend it.. lol Scaling for the GM sensor is CAKE and probably a preset drop down in haltech. I would strongly recommend being less scared about making changes. |
|
|
|
|
|
11-16-2021, 11:14 PM
|
#140 | |
|
Senior Member
Join Date: Mar 2017
Drives: Q5 + BRZ + M796
Location: Santa Rosa, CA
Posts: 7,883
Thanks: 5,668
Thanked 5,804 Times in 3,299 Posts
Mentioned: 70 Post(s)
Tagged: 0 Thread(s)
|
Quote:
 I had figured what the hell; it would be better than the stock plastic piece. I had figured what the hell; it would be better than the stock plastic piece.
__________________
My Build | K24 Turbo Swap | *K24T BRZ SOLD*
|
|
|
|
|
|
|
|
|
 |
| Tags |
| worst.build.ever. |
|
|
 Similar Threads
|
||||
| Thread | Thread Starter | Forum | Replies | Last Post |
| Irace86.2.0 Build | Irace86.2.0 | Member's Car Journals | 195 | 03-25-2024 12:29 AM |
| KPower Industries K24 swap | PulsarBeeerz | Engine Swaps | 1756 | 03-13-2024 01:42 PM |
| Turbo or swap | Fastend | Forced Induction | 35 | 06-11-2020 07:12 PM |
| Built Turbo K24 Swap? | Calmwhiteguy | Engine Swaps | 31 | 02-13-2018 05:07 PM |
| IRACE86's Build | Irace86 | Member's Car Journals | 25 | 01-10-2017 04:35 PM |


