


 05-12-2022, 01:40 AM
|
#71 |
|
Senior Member
Join Date: Jan 2017
Drives: 2020 BRZ Sport Tech RS
Location: Canada
Posts: 355
Thanks: 407
Thanked 239 Times in 139 Posts
Mentioned: 2 Post(s)
Tagged: 0 Thread(s)
|
ECUTEK tuning kit and ACE A350 headers!
It's been a good day for my BRZ today!
I bought the full ECUTEK kit with the RaceROM BRZ add-on so I can self-tune (courtesy of Zach @ CounterSpace Garage), and picked up a lightly-used set of ACE A350 headers (bought through the Member Classifieds on the forum from a local guy who has upgraded from a BRZ tS to a Supra). After receiving the ECUTEK gear from the UPS driver this morning, I already loaded up the license and stock ROM, configured the ECU Connect app and did my first couple of datalogs on my drive to/from picking up the headers this evening. I had *just* gotten to where I had resigned myself to sticking with the stock header for emissions and cost reasons when these popped up on the forum. These headers were what I had on my list of planned mods for years as I waffled back and forth over buying a BRZ, and then not long after I finally took the plunge and bought my car, they were discontinued! With their great condition and local availability (no shipping!), the deal on these was just too good for me to pass up. The seller even still had the original box and packing materials!  Since I had to dig into some funds I had earmarked for debt reduction to jump on that deal, I've decided to "delay gratification" and wait until those debts are paid off (end of this year, maybe next February at the latest) before I'll allow myself to install the headers. That will also give me some time to figure out how I explain / justify them to my wife...LOL. Before I do that, I also need to invest in some STI motor mounts and rear transmission mount to minimize the chances of rubbing, etc. with that fat overpipe, and I'm also planning to get them ceramic coated locally before using them, even though I do really like the golden / copper colour of the heat-cycled stainless steel. That will all cost me another $500-600 or so, which I'm not going to incur more debt to do. A further upside, the seller also threw in some Whiteline diff mount inserts he had and a couple of bottles of Subaru coolant. I most likely won't use the inserts due to the increased NVH, but now I have the option, I guess! Here are some pics of the headers: With the original box! 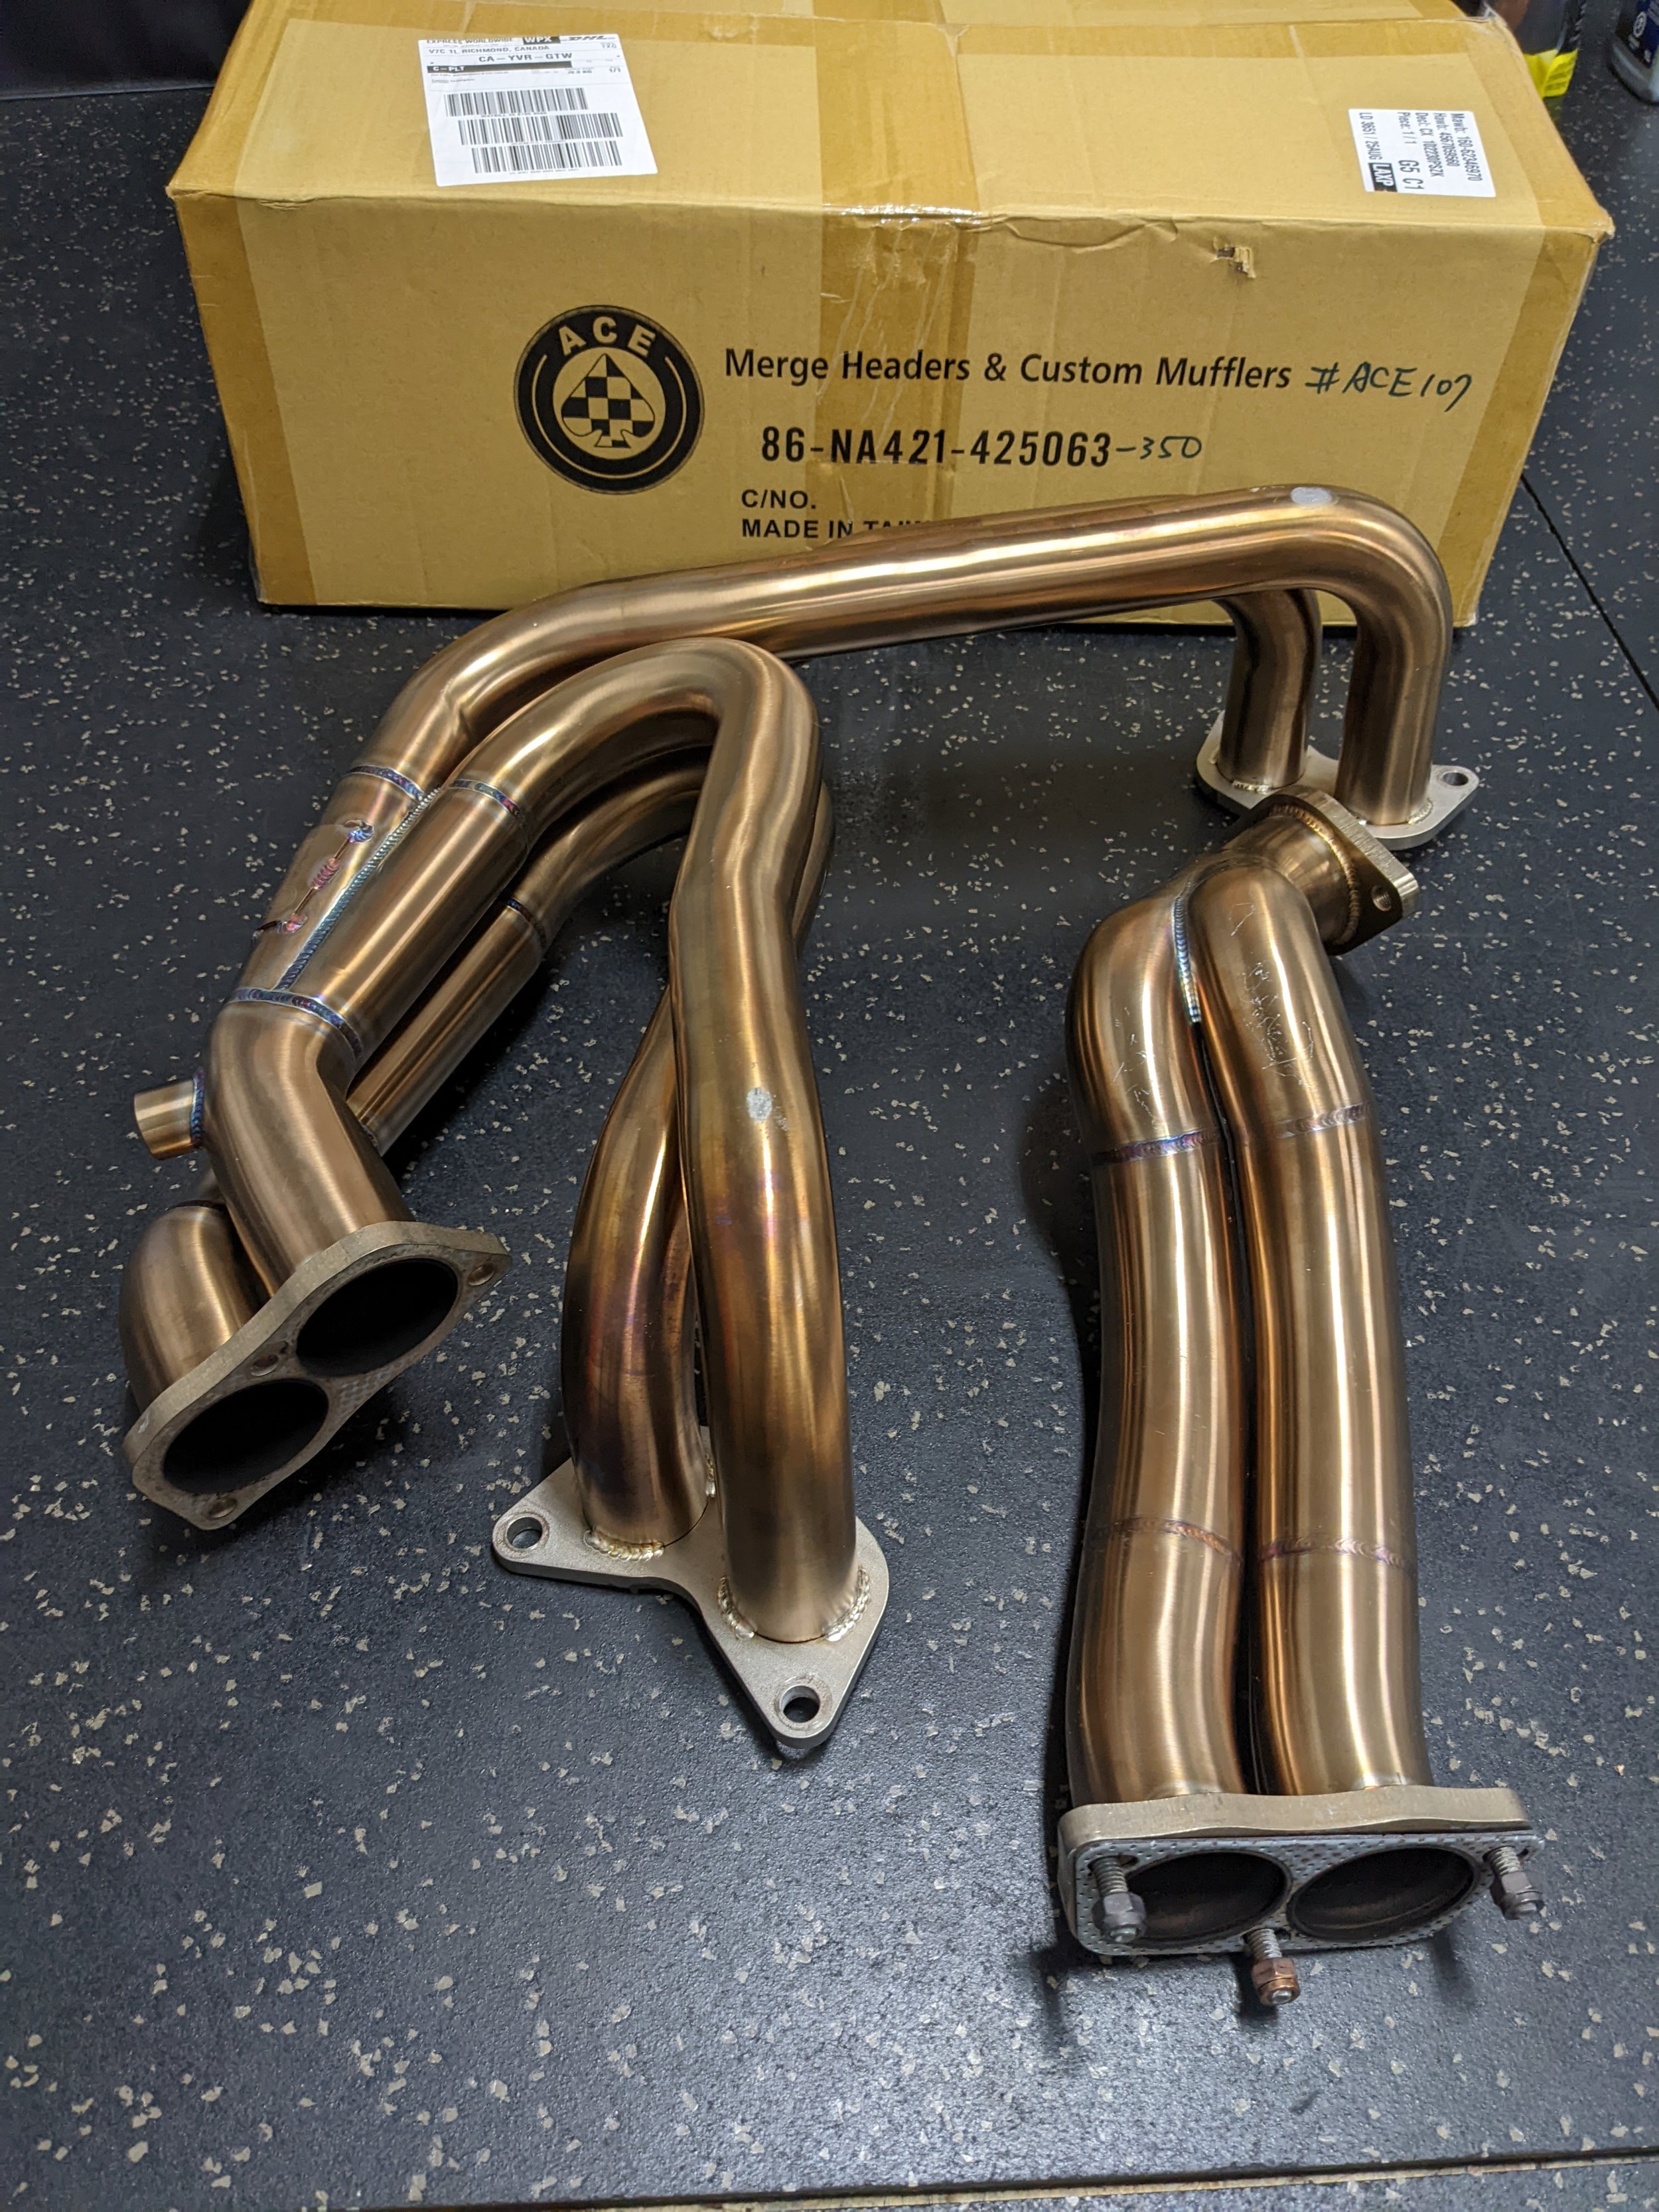 Man, those welds are GORGEOUS! 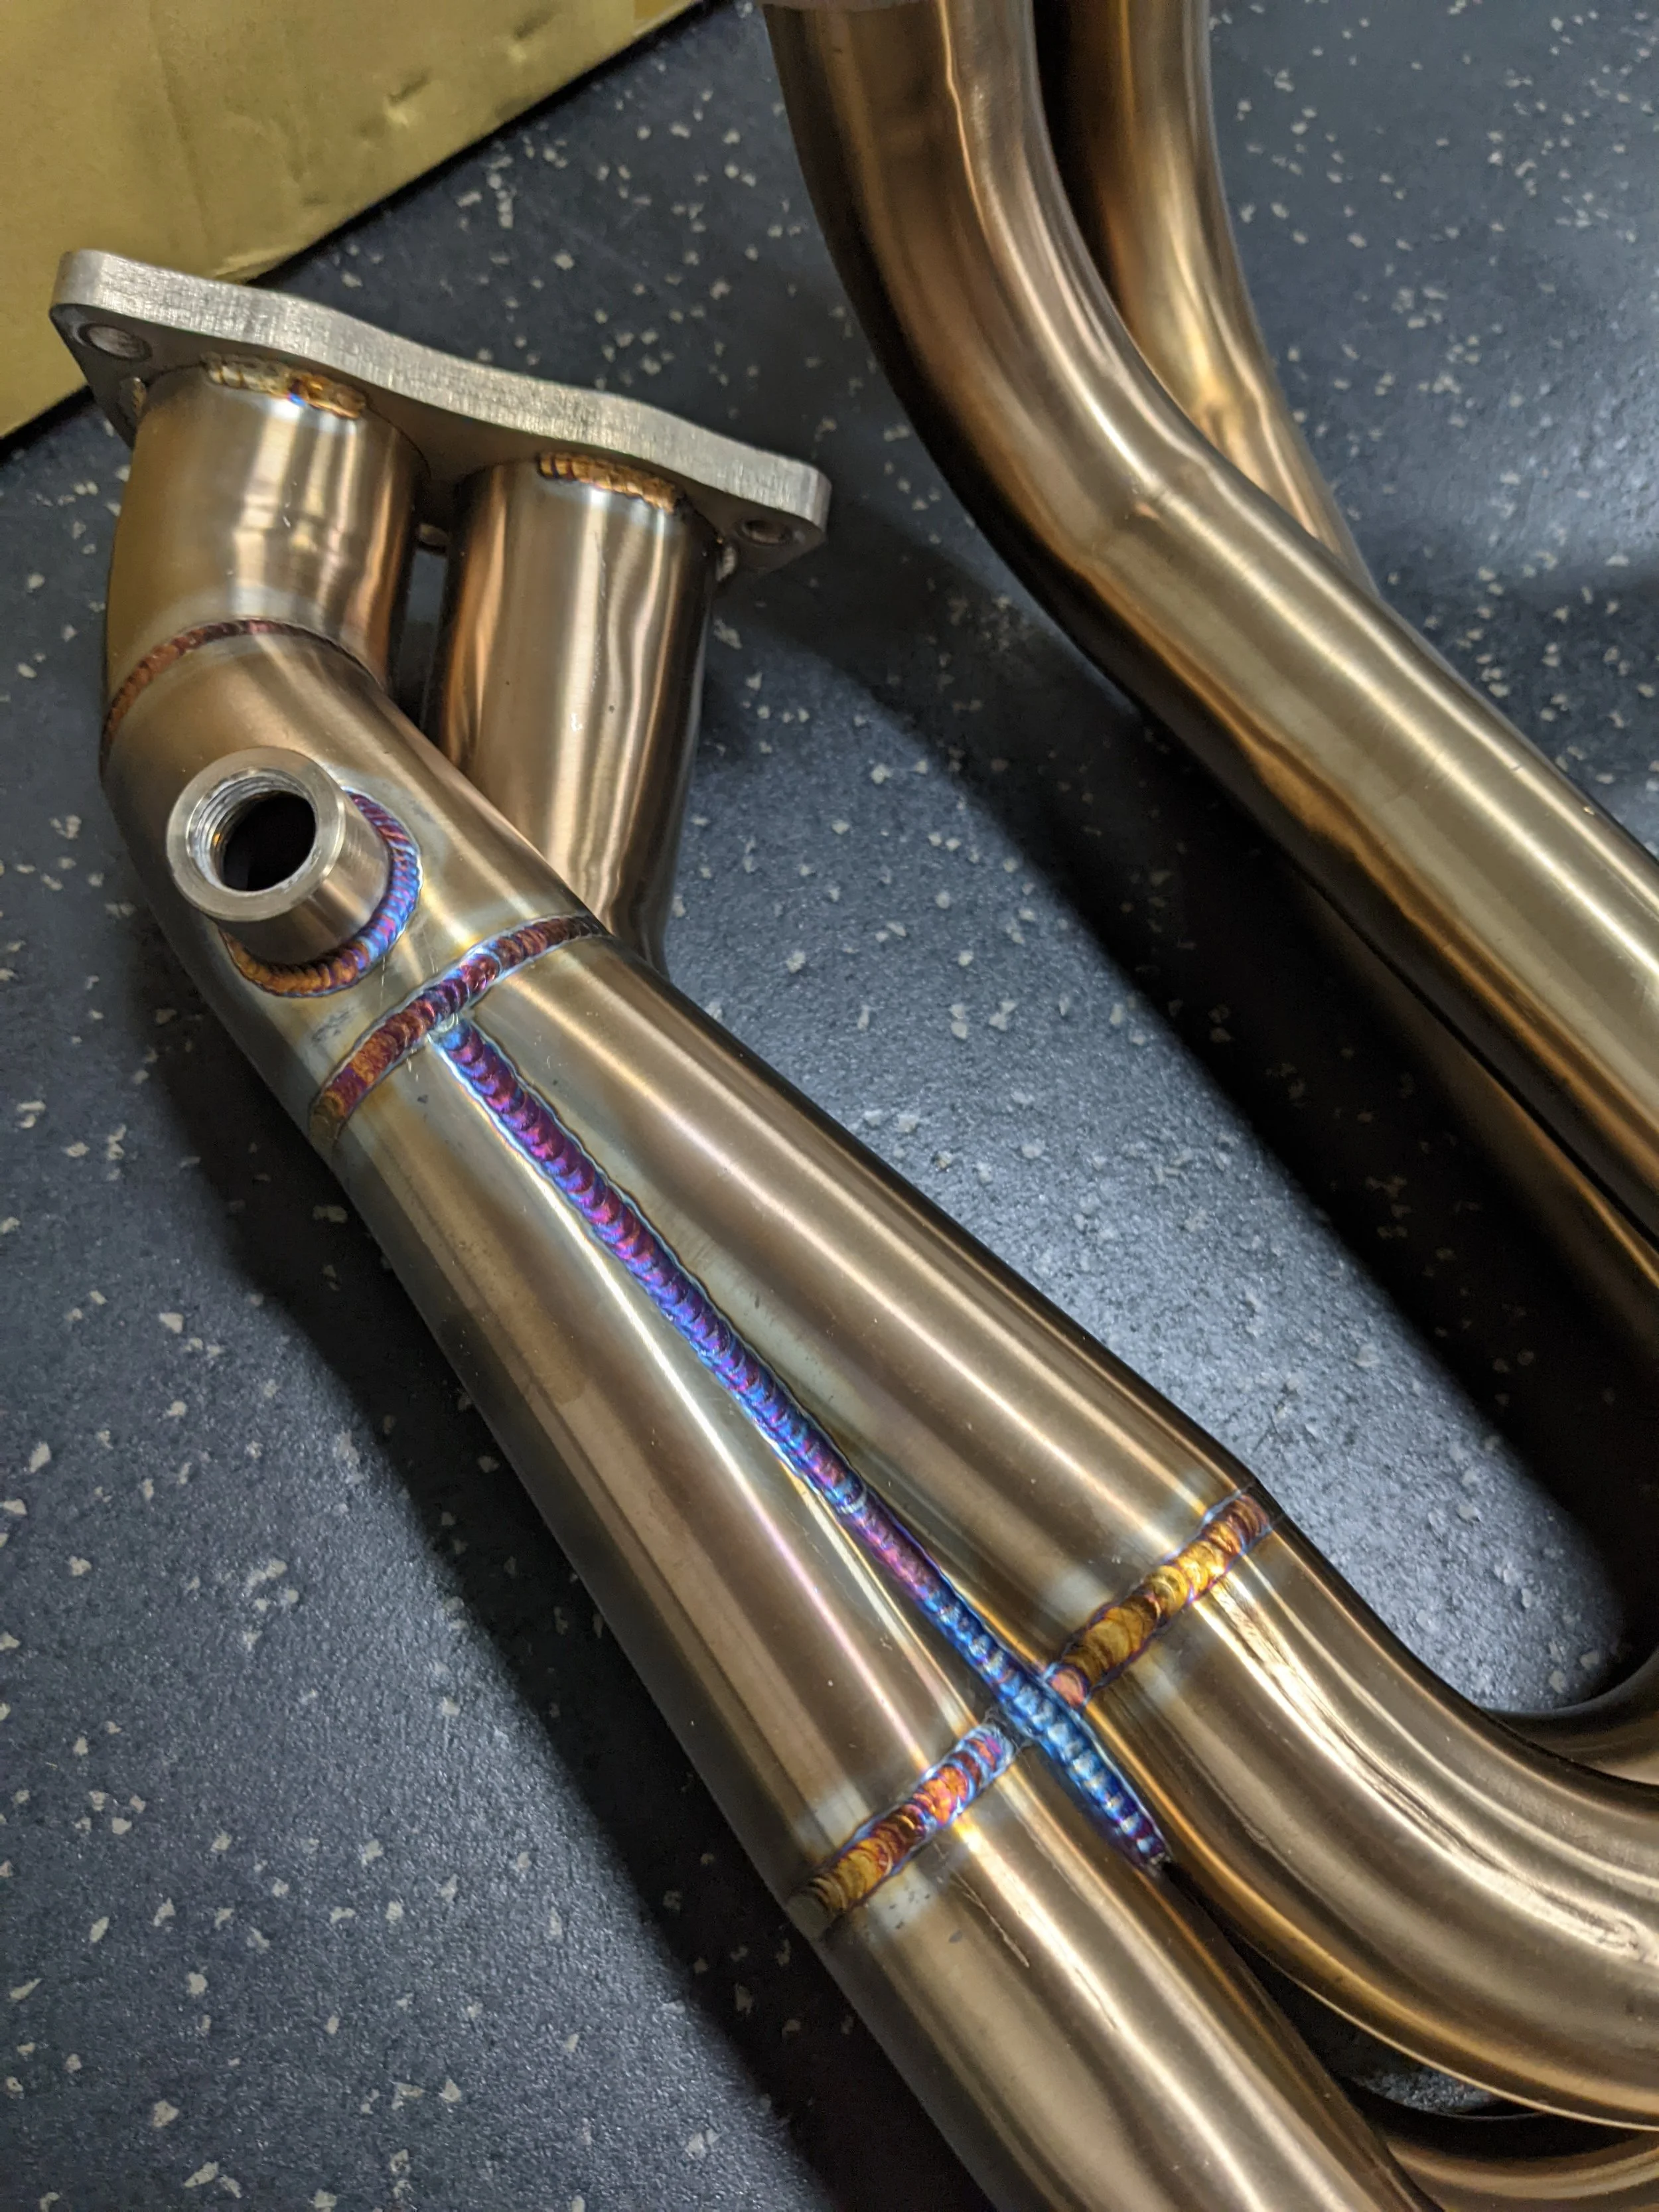 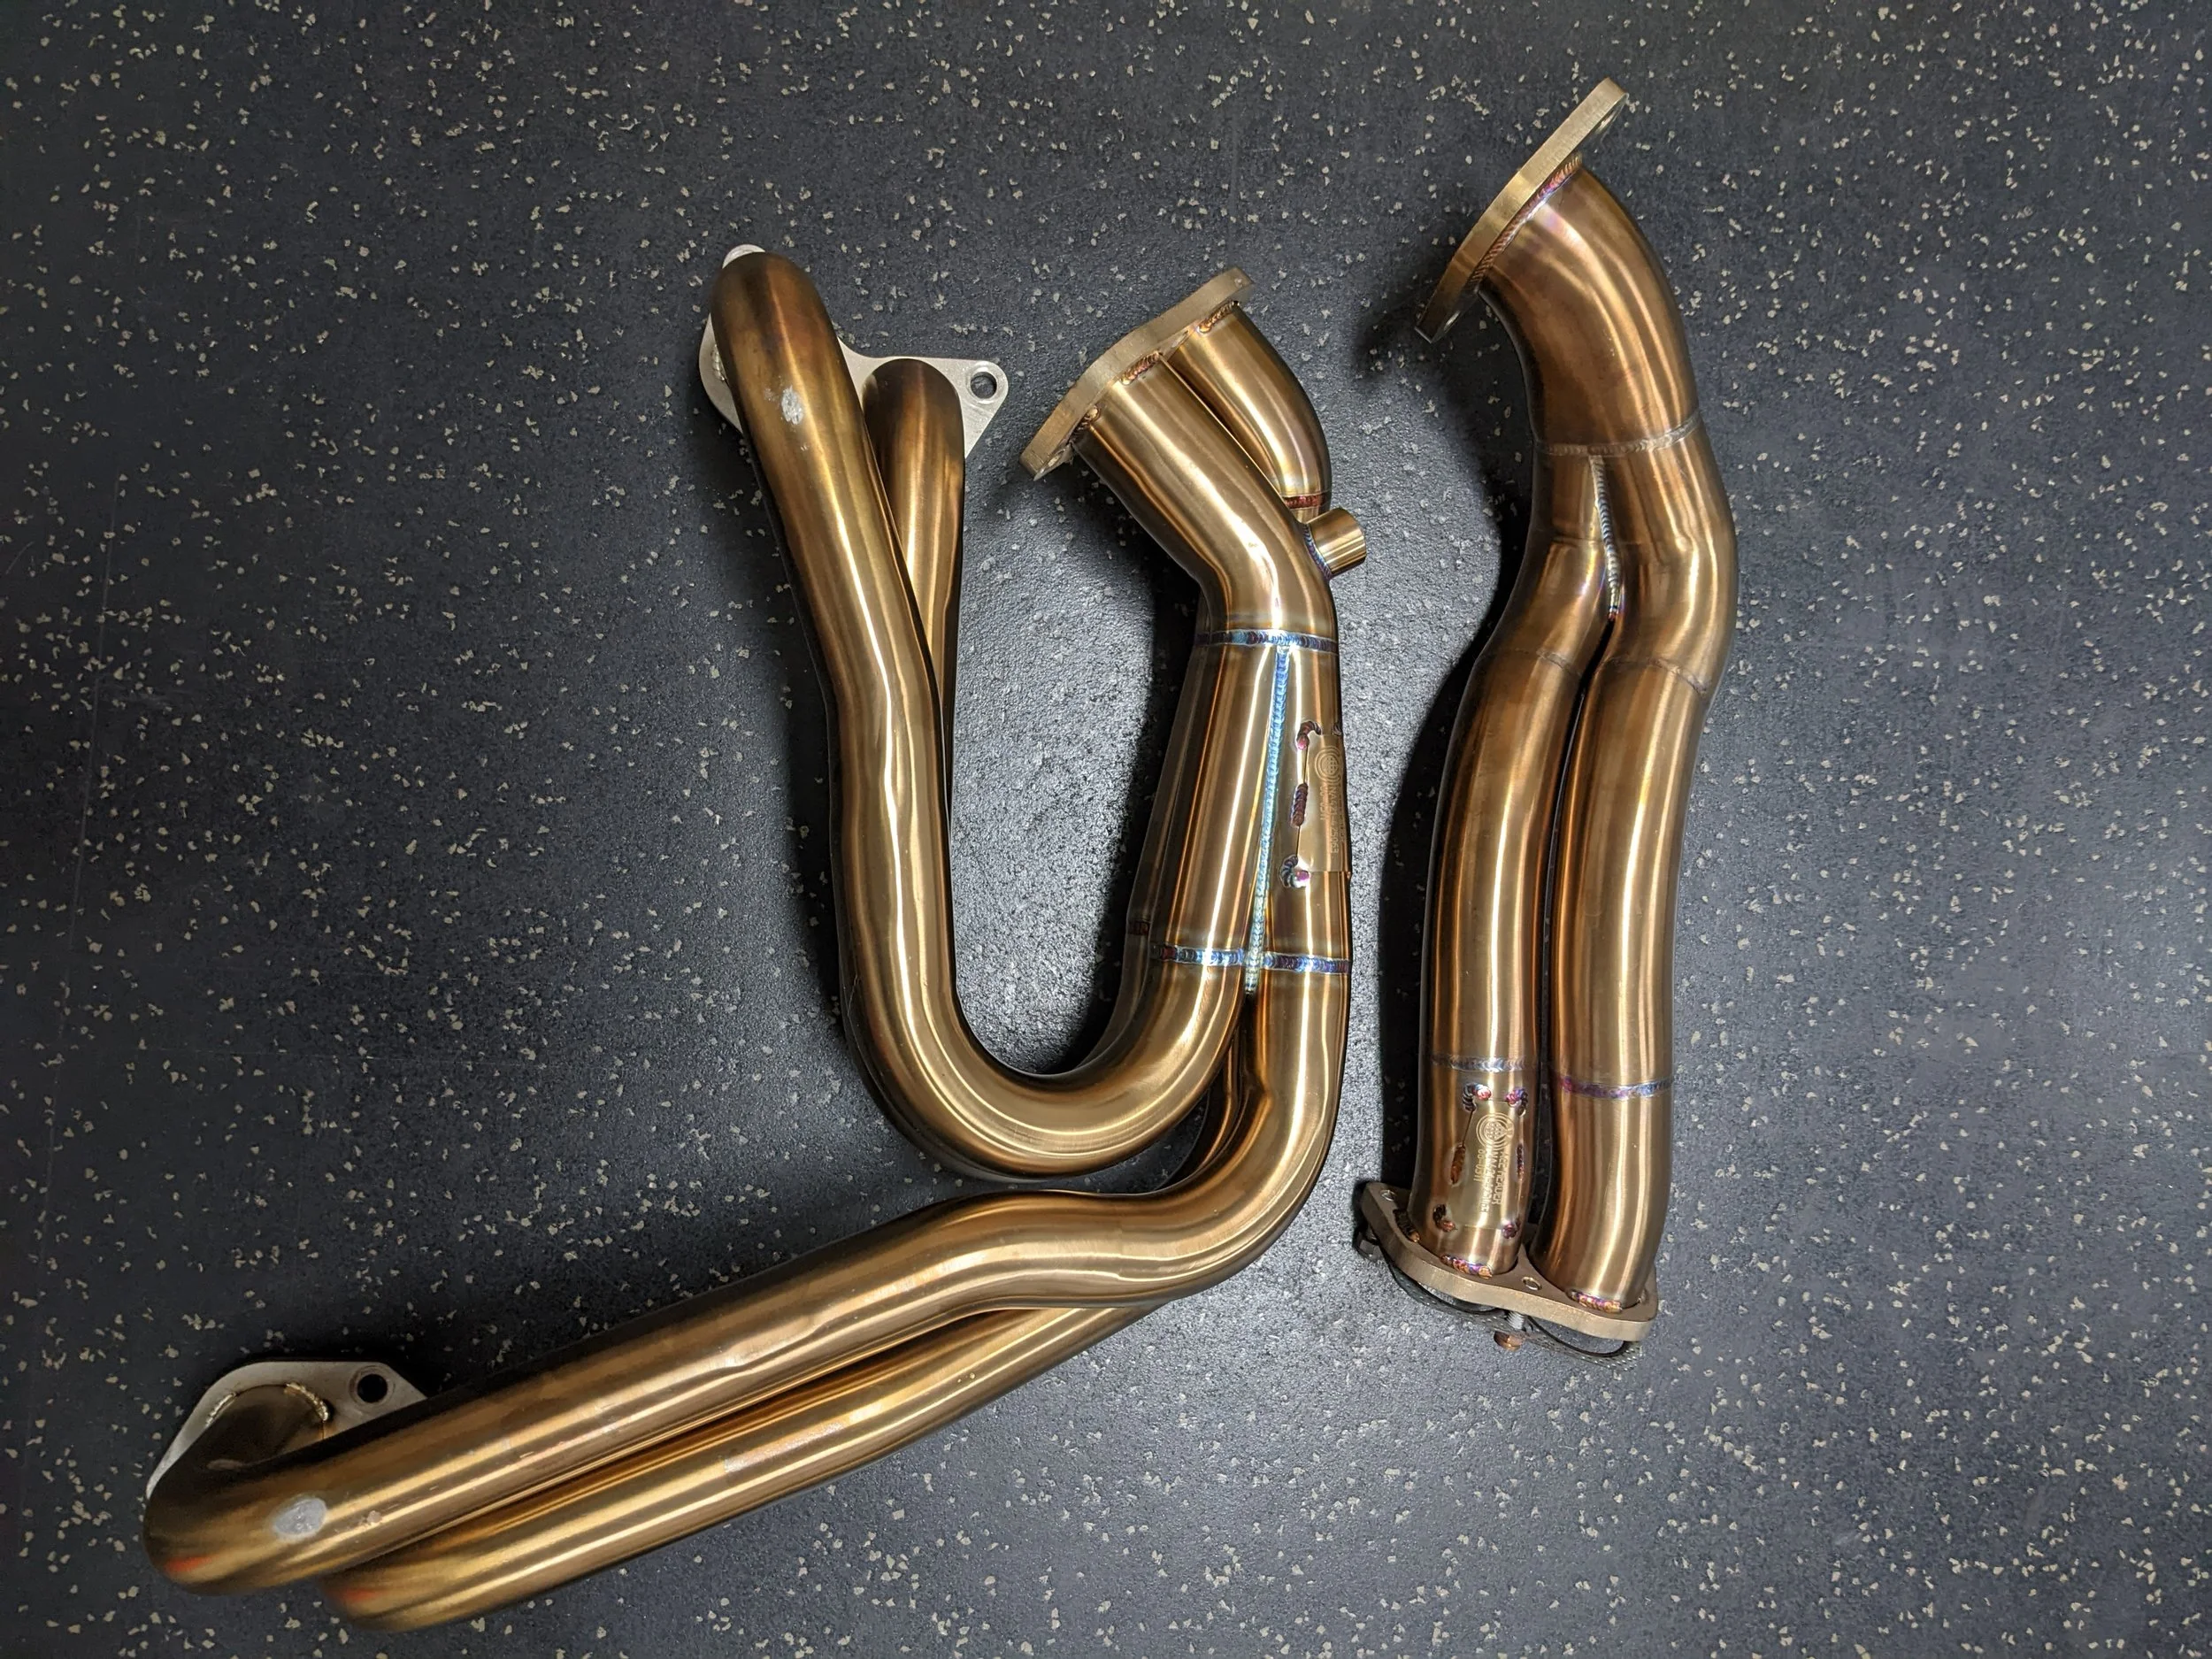 Now on to learning the ins and outs of tuning this motor in stock form before I see what I can do with the headers and other mods I have planned... 
__________________
|

|

|
|
05-12-2022, 02:09 AM
|
#72 |
|
Senior Member
Join Date: Jan 2017
Drives: 2020 BRZ Sport Tech RS
Location: Canada
Posts: 355
Thanks: 407
Thanked 239 Times in 139 Posts
Mentioned: 2 Post(s)
Tagged: 0 Thread(s)
|
First datalogs - checking long-term trims to confirm MAF scaling is OK
I did my first couple of datalogs today to see where my FTLT's (Fuel Trim Long Term %) were at, and they saw a max of +5.6% and minimum of -5.1%. From my understanding so far, that's pretty much within the expected range of variance with a properly-scaled MAF, so it looks like my current MAF scaling is OK.
__________________
|
|
|
|
|
05-12-2022, 04:42 AM
|
#73 | |
|
Senior Member

Join Date: Nov 2017
Drives: 17 BRZ ,21 GR Yaris, 23 GR86
Location: Poland
Posts: 150
Thanks: 395
Thanked 134 Times in 77 Posts
Mentioned: 1 Post(s)
Tagged: 0 Thread(s)
|
Quote:
Anyway congrats on your purchase - I'm sure you'll love it once the car gets tuned 
|
|

|
|
| The Following User Says Thank You to MrSkubi For This Useful Post: | Tatsu333 (05-12-2022) |
|
05-28-2022, 01:10 PM
|
#74 |
|
Senior Member
Join Date: Jan 2017
Drives: 2020 BRZ Sport Tech RS
Location: Canada
Posts: 355
Thanks: 407
Thanked 239 Times in 139 Posts
Mentioned: 2 Post(s)
Tagged: 0 Thread(s)
|
Next mod on the way (but not to be installed until late this year / early next, when I get the headers installed):
2018 BRZ tS front crossmember and flexible draw stiffener (bought used from another member here).  This is another one of those "too good to pass up" kind of things for me, as my plan has always been to get the flexible draw stiffener, but I was hesitant about getting the 2018/2020 tS version (which requires the crossmember as well) due to the cost of buying the parts new (just under $1,400 CDN), plus the labour cost of swapping out the crossmember (which I don't want to do myself). For less than a third of the cost for the new parts locally and about half the cost of buying them new in the US, that frees up some significant budget to get the installation done, and to put towards the 2018/2020 tS flexible V-bars down the road. This also takes care of my OCD-ness over the asymmetry of the JDM/STI draw stiffener, which was my other option...LOL. I'm going to hold off on having this installed until I'm ready to install the ACE headers (and STI motor and transmission mounts), since combining the labour costs on those things makes sense.
__________________
|
|
|
|
|
06-03-2022, 06:20 PM
|
#75 |
|
Senior Member
Join Date: Jan 2017
Drives: 2020 BRZ Sport Tech RS
Location: Canada
Posts: 355
Thanks: 407
Thanked 239 Times in 139 Posts
Mentioned: 2 Post(s)
Tagged: 0 Thread(s)
|
Next Mod: Exhaust Tip Extensions
Inspired by the Killer B Motorsports exhaust tip extenders, but unwilling to pay the UPS extortion rates available at the time to ship them (only options last week were at least 50% the cost of the $69 parts for shipping), I decided to DIY my own extensions.
Of course, since then, Killer B has added a cheaper shipping option, so I've now placed an order for the genuine article. I highly recommend going that route, since their extenders are stainless, and are EXACTLY the right size, rather than being the not-so-perfect fit of this DIY option. You can order Killer B's extenders here. Anyway, I ordered a couple of Walker/Dynomax 41953 exhaust hardware reducers (2-1/4" OD to 2" ID) and a couple of 2-1/4" narrow band clamps (I splurged on some Vibrant stainless clamps, since I wanted to make sure they wouldn't end up seized on), all from Amazon. FWIW, total cost ended up being about 3/4 the cost of buying the extenders from Killer B, but with galvanized piping instead of stainless. Again, I HIGHLY recommend getting theirs instead now that the shipping cost is reasonable. I had a 2-1/2" deep slot cut into one side of the flared end of each of the reducers to allow for the "nub" on the stock exhaust piping. It was a VERY tight fit to get the flared ends onto the piping, but I eventually got it sorted with some encouragement from a mallet and a block of wood. The OEM tips easily slid onto the narrow end of the reducers, but they're not quite "perfect". I had to very deliberately hold them in place to get the right alignment while tightening down the set screws, but it worked out OK. We'll see if they stay aligned or not... Again, I've now placed an order for the Killer B ones, so will be swapping them for these at some point. Getting these off will be...interesting, I think. I foresee some cursing. Anyway, here are some pics! The parts:  Before:  After: 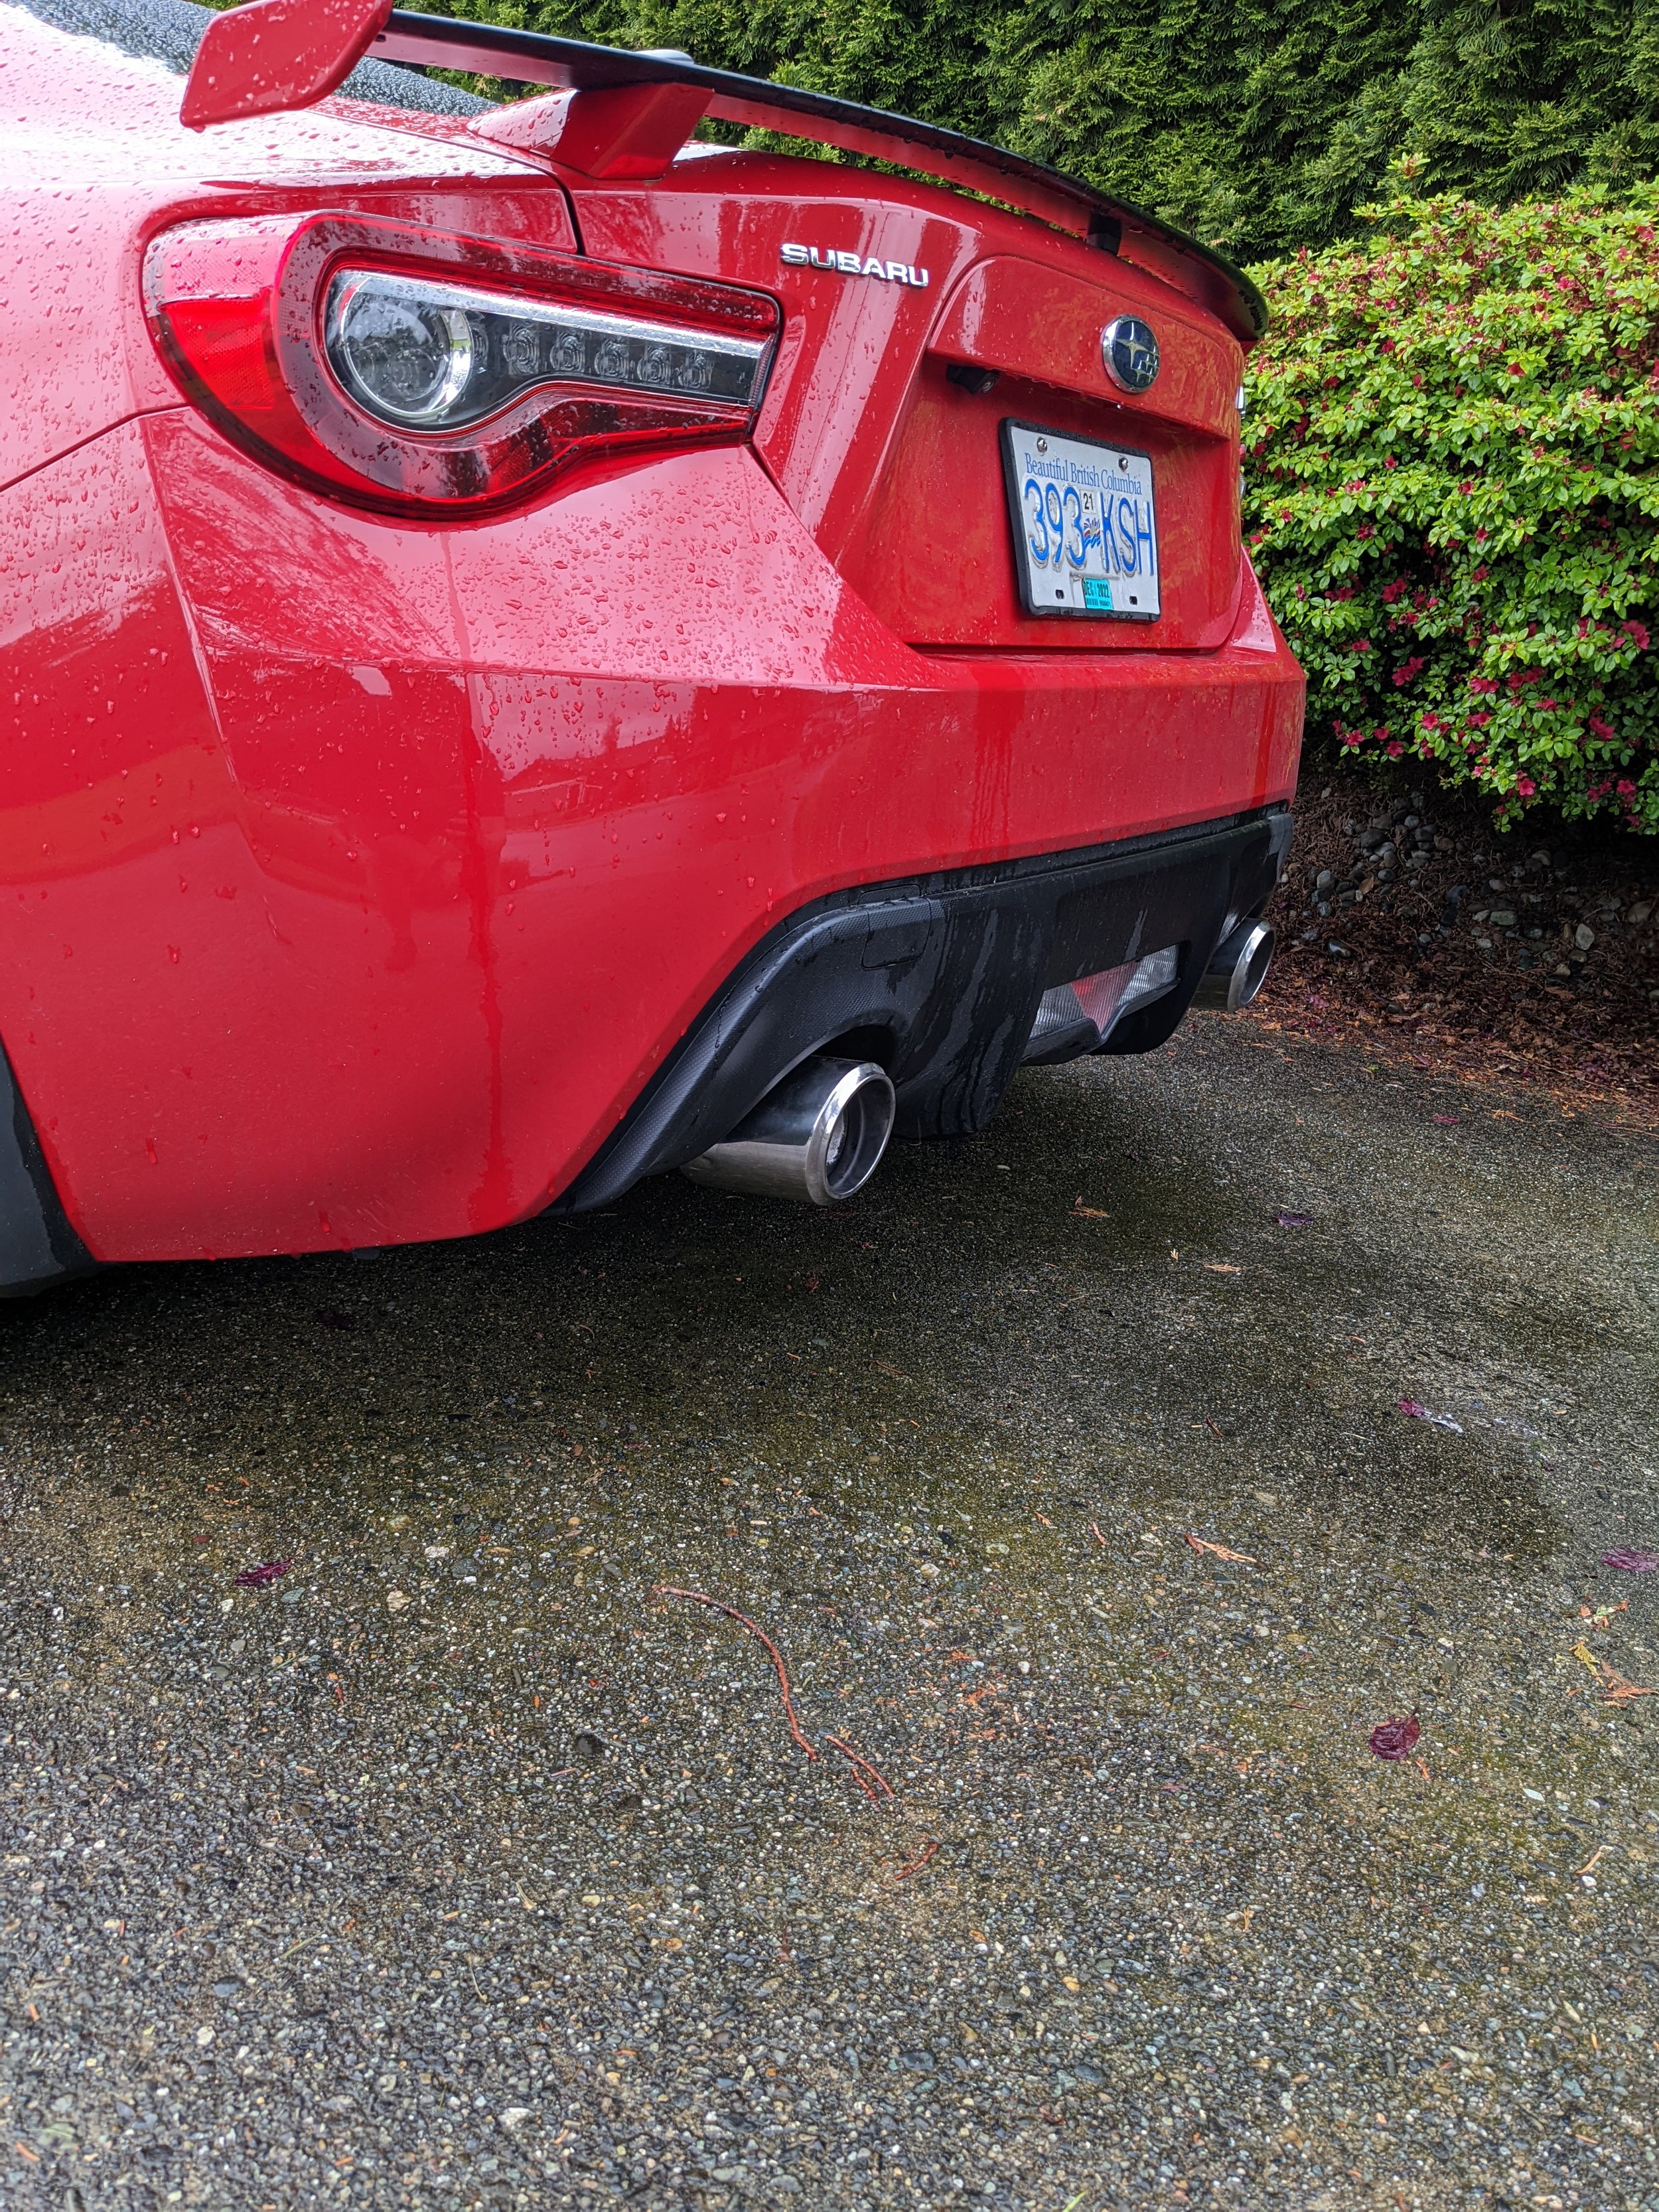 Rear (After):  Above (After - Passenger Side):  Above (After - Driver's Side):  Profile (After):  They look pretty much the same amount of projection as the pics of the JDM BRZ's with their longer piping and longer tips to me, but I think I'd like them to be about 1/4" further in maybe? Anyway, good enough for now!
__________________
Last edited by Tatsu333; 06-04-2022 at 03:52 AM. |
|
|
|
| The Following User Says Thank You to Tatsu333 For This Useful Post: | Busybee (06-23-2022) |
|
06-04-2022, 05:22 AM
|
#76 |
|
Senior Member
Join Date: Jan 2017
Drives: 2020 BRZ Sport Tech RS
Location: Canada
Posts: 355
Thanks: 407
Thanked 239 Times in 139 Posts
Mentioned: 2 Post(s)
Tagged: 0 Thread(s)
|
Next Mod: Billet Power Blocks (Knock-Offs, Unfortunately...)
Also arrived today (well, I guess it's yesterday now...LOL) were a set of knockoff billet power blocks (copied from Crawford's Billet Power Blocks).
First, why am I installing the power blocks? Thing is, the power blocks seem to be a bit controversial, despite a couple of threads (here and here) speaking really highly of them. There was also an article from Moto IQ that, again, was very enthusiastic about the results. In those threads and that article, they call the BPB's a "no brainer" and "pretty much the best bang for your buck" for an NA car. In other threads scattered throughout the forums, though, folks talk crap about them for various reasons. I think a large part of it is that the peak-to-peak HP gains aren't huge (generally only few hp) and they do lose power at the *very* top end of the rev range in exchange for their gains down lower. Some argue that they can get "the same gains" with tuning alone, or that "any benefit they give disappears" with any further tuning, though both seem a bit illogical to me due to the nature of the mod. I decided that, for my use case, where the car is my daily driver and occasional canyon road carver, I don't really care too much about the very top-end of the powerband and instead want a bit fatter upper-midrange, and that's exactly what these are designed to do. They should also complement the gains I should see from the ACE headers through the torque dip and midrange once I get those installed and sort out all the tuning. That's a ways away though, so I'll focus on trying to dial in the tune with these and the stock headers for now. Second, why knockoffs? Generally speaking, I'd much rather give my money to the guys that spend the time to develop and test a product, and am willing to pay a premium to have the "real deal". Given the seeming controversy over whether these really do what they say on the tin, though, I can't help but have a little bit of nagging doubt. This despite having first-hand experience of the effect of longer, larger volume intake runners on my previous car (though that manifold also significantly increased the plenum size, which was badly needed on that motor), and feeling like the theory matches up with what those two really positive posts reported results-wise. I also am not keen on the red anodized finish on the genuine BPB's since it wouldn't *quite* match with my stock red aluminum manifold, and I got no reply from Crawford to an inquiry about having a set anodized a different colour, or even just shipped raw (unfinished). While this ended up being a non-issue since you really can't see them when they're installed anyway, it would have been nice if they would at least reply to my inquiry... Anyway, with all that going back and forth in my head, I was a bit hesitant to pull the trigger on a new set at the full MSRP. Then, I snagged a deal on a used set - HURRAH! But it needed new hardware, because the seller had misplaced the bolts and gaskets after removing the power blocks from their car. No problem - Crawford sells a "reinstall kit" for just that scenario, so I placed an order...and then the deal on the used set fell through, with that kit already on the way! That annoyed me, so I hummed and hawed about it some more, then finally decided to pick up a set of knockoffs in black to test them out relatively inexpensively. If they really "wow" me, I may end up ordering a set of the genuine Crawford ones...but still, maybe not, because of the colour, and the work to re/re them.  OK - on to the install story. I followed the install video from Crawford, and while it was mostly OK, I ran into a few challenges. Not sure if there are some slight differences with how things are lined up / connected on the 2017+ aluminum manifold vs. the video (which was on an older, plastic manifold car), but access to a few of the bolts was MUCH harder than it appeared in the video (in particular the rear bolts on the passenger side crash guard and manifold due to the ICU wiring and other stuff being in the way, and the front bolt on the driver's side of the manifold due to a bunch of lines being in the way). It was also a HUGE pain in the ass to get the driver's side crash guard out around the V-bar. Do yourself a favour, and just undo the four friggin' bolts to take the V-bar out! I also had to undo a bunch of other stuff not noted in the video (hoses and harnesses, cut/remove tape holding some wiring runs together, and cut one clip at the back of the driver's side of the manifold) and unclip the airbox in order to be able to lift the manifold high enough to get the BPB's in place. This would have been *much* better with another pair of hands to lift the manifold while sliding them in, but I was working solo in my garage late at night, so had to struggle through. Eventually, I got them in there, but it took WAY longer than I would have expected or hoped. As far as the quality of the knockoff kit goes, it was a bit of a mixed bag. The power blocks themselves seem good - well machined, nicely finished. They were also packed so fancy, each one bubble-wrapped and tucked into it's own fabric drawstring bag (seriously!). The gaskets included seem "OK". They fit snugly, and they didn't fall out when I was installing. The remaining hardware, on the other hand, definitely leaves something to be desired. Instead of longer versions of the same 12mm bolts as OEM (like the genuine Crawford kit), this kit uses 6 mm Allen head bolts. No problem if you have a 6mm Allen hex bit to use with your sockets and extensions, but I don't. So, I had to work at it using a 6mm allen key, from the short end, which was NO FUN. One bajillion 1/6 turns on the short end later, I was able to tighten down the 10 bolts, but FML, it was frustrating. The coupling and extra bit of hose to extend the PCV line between the manifold and the block seem kind of cheap-ish and the zip ties they include to secure those are a total joke. I've never seen such a flimsy, teeny tiny zip tie in my life! It also seems like the standoffs for reinstalling the crash guards might be a little short as well, because it feels like the crash guards had to be snugged down lower than before (I.E. the little pegs on the manifold they fit over seem to protrude through their holes more). I suppose in retrospect they're meant to be the same height as the BPB's, but I never did check whether they were. The biggest omission, though, was that there was no adapter plate for connecting the bottom mounting / grounding bolt for the Injector Control Unit like the one included in the genuine kit. I managed to cobble something together from a spare bit of IKEA hardware I had laying around, but it ain't great, and while I was able to secure it to the ICU and it's a pretty solid interference fit with the mounting bracket below, I haven't actually been able to screw it onto the bracket. I think my spacing on the holes was off *just* enough that the screw isn't lining up. Here's a pic of my DIY ICU mounting adapter:  Long story short, I wouldn't really recommend a knockoff BPB kit just because of the quality / omissions in the hardware. All the knockoff ones I saw out there seem to be the same, just sold under different vendors. I guess if you have a 6mm hex driver, you'd be better off than I was, but you'd still need to figure out a solution for that ICU mounting / grounding bracket, and the other bits and pieces just seem cheap (no surprise, being a knockoff kit). I still have the Crawford "reinstall kit" on the way, and I think I'll replace the hardware with that stuff eventually, even if I don't replace the blocks themselves. I intend to swap out the adapter mount for the ICU right away though. So, anyway - they're in, and the car fired right up and idled normally as I backed it out onto the driveway, so I'm hoping the gaskets all stayed seated properly during the install and there are no leaks. I guess I won't really know until the motor gets some real vacuum going, so we'll see. I haven't had a chance to go for a drive yet, because it's past 2:00 AM now, and I have to be up in a few hours to drive my daughter to work. I'll update with some driving impressions at some point tomorrow or the next day.
__________________
Last edited by Tatsu333; 06-04-2022 at 03:16 PM. |
|
|
|
|
06-04-2022, 02:07 PM
|
#77 |
|
Senior Member
Join Date: Jan 2017
Drives: 2020 BRZ Sport Tech RS
Location: Canada
Posts: 355
Thanks: 407
Thanked 239 Times in 139 Posts
Mentioned: 2 Post(s)
Tagged: 0 Thread(s)
|
First Run Impressions and Testing with (knockoff) BPB's installed
No leaks, stumbles or anything post-install with the BPB's, so it appears to all have gone well. With that confirmed, I ran a bit of on-the-road testing / logging this morning, and wanted to share my first run impressions and testing results (you can read about my install and knockoff vs. genuine discussion on my build log above).
Since I don't have a dyno in my garage, my comparison testing is done on the road, with as close to the same conditions as possible for each run, and as little time between runs as I can. For comparison, I'm looking at the time deltas between certain RPM ranges (in this case, 600 rpm increments from 3000 - 6600 rpm). All runs are on Shell V-Power Nitro+ 93 octane from the same local gas station. A few caveats / notes with my results here: First, I couldn't, for obvious practical reasons, do back-to-back runs before and after the BPB install, so the stock numbers I'm comparing with are from a different day, but same stretch of road, temperatures within 1-2 degrees Celsius of today and similar weather conditions, so they're not going to be WAY off. Second, after my first run with the BPB's and the stock tune loaded this morning, a speed trap was set up right at my highway on-ramp testing spot...LOL. So, I ended up having to resort to a different, straight and relatively level road afterwards for a couple more runs. I re-did a run with the stock tune, and then switched to my tune with mild cam timing changes to do a back-to-back there, but had to do those on-the-go moving down the same road rather than repeating the exact same stretch since there wasn't any good place to loop back around. I didn't expect to see massive differences between the stock tune and my cam tune anyway, so didn't think it was worth it. Third, I didn't log anything below 2500 rpm previously, so I have nothing to compare to there, but I will say that from 1500-2500 rpm, while still certainly not "strong" by any means (and not where you'd really want to drive anyway), it does feel like it pulls a bit more smoothly / doesn't struggle as much. Even up some small hills at that low rpm, it just pulled smoothly where before it would really be chugging, so I'd agree that there are gains in the lowest range. Fourth, the only changes in my tune are some pretty mild cam timing changes. Fueling / AFR targets and ignition timing are all still stock. Comparison #1 - 100% stock vs. BPB + stock tune (3000 rpm - 6600 rpm tested)
So...WOW! Subjectively, it did feel quite strong from just above 5000 rpm to just above 6000 rpm, but WOW. Over 10% faster (1.321 seconds vs. 1.46 seconds stock). While the other ranges are almost kind of within margin for error from one test to the next (though I do believe anything more than 1.5% could be considered a valid improvement or loss), there's no discounting that magnitude of change. DEFINITE improvement on the road. Comparison #2 - BPB + stock tune vs. BPB + mild cam tune (3000 - 6600 rpm tested)
Again, there were even more gains in that 5400-6000 rpm range with my mild cam tune (about 1 degree more intake advance in that range is all), which suggests there may be more improvement to be found there with a bit more overlap (either more intake advance or exhaust retard). That's a total net improvement vs. stock if you add both comparisons together of about 15%, which is great! My tune was quicker through 3000-3600 rpm on top of the gains from the BPB's alone, recovered and improved on the slight power loss on the stock vs. BPB run in the 3600-4200 rpm range, and was basically dead even from 4200-4800, so a definite (small) improvement through the torque dip area. I feel like there's a bit more to be gained with some further tweaks to cam timing here before I start playing with fuel and ignition timing. Likewise, my cam timing changes gained a moderate bump in the 4800-5400 rpm range vs. a slight power loss on the stock vs. BPB run, leading into the bigger gains from 5400-6000 rpm. While there was a slight loss shown from 6000-6600 rpm, that's a range in which I haven't actually changed anything with my tune, and with it pulling harder in the previous 600 rpm you'd think it would at least break even. Maybe I can chalk that one up to a slight gradient increase on the road I was testing at on the "tuned" run during that range... SUMMARY On my otherwise stock car, the BPB's show measurable improvement even without any tuning changes, including a BIG improvement in the upper mid-range. With only mild cam timing changes, further improvements were found across the board. Next steps for me will be trying out further cam timing changes through the torque dip range to see if we can squeeze out a bit more improvement, and also from 6000 rpm up to see if we can offset a little of the top end drop-off in power that's an expected consequence of lengthening the intake runners with the BPB's. Once I feel like I've gotten all I can out of the cam timing, I'll start tweaking fueling and ignition timing.
__________________
Last edited by Tatsu333; 06-04-2022 at 03:19 PM. |
|
|
|
| The Following User Says Thank You to Tatsu333 For This Useful Post: | Teseo (06-04-2022) |
|
06-07-2022, 04:54 PM
|
#78 |
|
Senior Member
Join Date: Jan 2017
Drives: 2020 BRZ Sport Tech RS
Location: Canada
Posts: 355
Thanks: 407
Thanked 239 Times in 139 Posts
Mentioned: 2 Post(s)
Tagged: 0 Thread(s)
|
Exhaust Cam Timing Tweaks Net *Small* Gains
Now that I've got my process down for back-to-back road-testing my tuning changes, it's giving me something to do with the little bit of spare time I have in my days...LOL.
I had already made some *small* changes to the exhaust cam timing from stock prior to these tests, with the changed timing being used in all my "non-stock tune" runs prior to today. For reference, here's the stock "Cam Timing - Exhaust Low Det" map:  ...and here's my first modified exhaust cam map (using an ECUTEK RaceROM custom map to replace the exhaust cam angle channel output): Note that because of the custom map dimensions, I had to flip the X and Y axes and extend the information out on both axes as well...  For today's test, I didn't bother making a fully stock run, since I already know there were improvements with my first modified map. So, I did one run with the map above enabled, and another with my new map for comparison. My aim was mostly to try and pick up a bit more torque from 3000-4800 rpm, and have it pull a bit smoother into the big bump I got from the BPB's above 5200 rpm or so (where it had kind of been feeling like it was lagging a bit heading into 5200 rpm before pulling HARD from there to 6000 rpm). I figured I'd also try and see if anything could be gained above 6000 rpm. I increased the exhaust retard across the board from 3600 rpm to 4600 rpm to match the value at my stock torque peak @ 3200 rpm, then tapered it down towards 5200 rpm, staying flat from there to redline. Values are increased across the board from 3600 rpm - 7000 rpm by varying amounts. Here's the new map:  Results:
I'll basically ignore anything in the +/-1% range, so it objectively looks like there are *small* gains from 3000-3600 rpm and also from 4200-4800 rpm. The differing *feel* of the pulls would tend to agree - the car seems to pull more evenly from 3000 rpm on up, and it also just sounds a bit smoother / happier pulling through the revs, where it used to be a bit coarse. The smoother pull is a bit deceptive because it doesn't necessarily feel faster (even though it is), maybe because by filling in the dip a bit, it doesn't have that sharp ramp up out of the dip that the stock map does? Not sure. I'll just go with the numbers telling me there's improvement.  I'm going to try a bit more intake cam advance from 3200-4600 rpm next to see if I can pick up a bit more torque there, and then switch my focus to improving the power and "rev-ability" (for lack of a better word) in the 6000-7200 rpm range with cam timing if possible. Once that's done, I'm going to turn my attention to ignition timing, and once I'm pretty happy with it, I might get it put on a dyno for a run.
__________________
|
|
|
|
|
06-08-2022, 12:36 AM
|
#79 |
|
Senior Member
Join Date: Jan 2017
Drives: 2020 BRZ Sport Tech RS
Location: Canada
Posts: 355
Thanks: 407
Thanked 239 Times in 139 Posts
Mentioned: 2 Post(s)
Tagged: 0 Thread(s)
|
Hmmm...first impressions after a quick drive (no logging) tonight is it feels maybe a *little* softer from 3600-4200 rpm, then pulls VERY hard from 4200-5000ish rpm. I didn't go much above 5000 rpm, so hard to say what the top end is like so far.
Unfortunately, there is a pretty unpleasant harshness to it somewhere between 4000-4400, where it almost sounds like it's rattling the heat shields. Unless it's significantly quicker through that range, I think I'd probably detune it to get rid of that... EDIT (2022-06-08): I believe what I'm hearing there is a resonance at WOT similar to what is discussed in this thread: https://www.ft86club.com/forums/showthread.php?t=59475. I'm not really concerned about reliability of the valvetrain, because as noted in some posts there this is still within the operating ranges of the factory map, but the resonance / rattling is annoying. ...and I also just remembered as I was digging through ECUTEK that I had changed the Power AFR Fuel Map for mode 3 a couple of tunes ago to test out a theory and didn't change it back, so it wasn't exactly an apples-to-apples comparison between the two exhaust cam timing maps because mode 3 (the new map) was set to a richer target AFR from 3600-5200 rpm.  Looks like I'll have to re-do my most recent test with the Power AFR Fuel Map fixed, as the slightly leaner target AFR on Mode 2 might have skewed the results. After that, I'll choose whichever exhaust cam timing map seems superior, then I'll return to my plans for testing the updated intake cam timing.
__________________
Last edited by Tatsu333; 06-08-2022 at 10:14 AM. |
|
|
|
| The Following User Says Thank You to Tatsu333 For This Useful Post: | villainous_frx (06-08-2022) |
|
06-08-2022, 11:00 AM
|
#80 |
|
Senior Member
Join Date: Jan 2017
Drives: 2020 BRZ Sport Tech RS
Location: Canada
Posts: 355
Thanks: 407
Thanked 239 Times in 139 Posts
Mentioned: 2 Post(s)
Tagged: 0 Thread(s)
|
Interesting looking at this thread (https://www.ft86club.com/forums/showthread.php?t=47263) where Shiv from OFT details the changes made in their (presumably Stage 1) tune to reduce the torque dip back in 2014.
The stock "Normal" tables he references are the equivalent of the "Base" tables in ECUTEK, where the ones used most of the time appear to actually be the "Low Det" tables in ECUTEK (which I believe are called "Safe" in RomRaider/OFT land). The values in my ECU's stock Low Det maps are quite different from the Base maps already, but they're still not quite what he's showing there (or what I'm trying currently). I also found it interesting that he found the best results from 3200-3800 were with the stock timings for both intake and exhaust. My only concern with flipping back and forth there is the severity of the degree of change, which might contribute to that possible rasp / resonance and/or make it stumble a bit through the transition on the road. I'll give it a try once I get through my next two tests and see what the results are. If I have to give up a tiny bit of power there for a smoother feel and no rasp / resonance, I think I'd probably go that route.
__________________
|
|
|
|
|
06-08-2022, 02:25 PM
|
#81 |
|
Senior Member
Join Date: Jan 2017
Drives: 2020 BRZ Sport Tech RS
Location: Canada
Posts: 355
Thanks: 407
Thanked 239 Times in 139 Posts
Mentioned: 2 Post(s)
Tagged: 0 Thread(s)
|
OK - retest of the exhaust cam timing maps this morning with the Power AFR Fuel clarified things a bit.
From 3000-3600 rpm the "milder" timing settings were 5% faster, but I'm suspecting that maybe there was a bit of run variation there because the timing in that range is virtually identical between the maps. My guess is that slightly slower run start spilled over a bit into the 3600-4200 rpm range (where again, the "milder" settings were 2% faster), so I'm not going to read much into the whole 3000-4200 rpm range. Really, if anything, the "milder" settings were faster across the board by varying amounts. From 4200-4800 rpm, they were 1% faster (which is not significant enough to count), and from 4800-5400 rpm they were about 2% faster (which I would count as an improvement). In that latter range, I was tapering from 23.8 to 21.1 vs. 28 to 25 on the more aggressive map. Where it was quite noticeable was from 5400 rpm on up. From 5400-6000 rpm, it was 10% quicker running 5 degrees LESS exhaust cam retard (20 degrees vs 25 degrees), and from 6000-6000 rpm it was 4% quicker. It also felt like it revved out smoother in that range. This suggests that maybe the additional pumping work needed to evacuate the exhaust gases by opening the exhaust valves later is outweighing the wasted expansion work (based on info from this excellent post). I'll look into trying even less retard at the top end after my next round of testing with the intake cam timing. If anything, the "milder" map is stronger everywhere, so I'm going to use that as the base for the next round of testing on the intake cam timing side. EDIT: The other good thing from today's logs is that the IAM (Ignition Advance Multiplier) is at 1.0 across the board, so it looks like there's some scope for more ignition timing down the road.
__________________
Last edited by Tatsu333; 06-14-2022 at 11:07 PM. Reason: Added note RE: IAM / Ignition Timing |
|
|
|
|
08-15-2022, 05:46 PM
|
#82 |
|
Senior Member
Join Date: Jan 2017
Drives: 2020 BRZ Sport Tech RS
Location: Canada
Posts: 355
Thanks: 407
Thanked 239 Times in 139 Posts
Mentioned: 2 Post(s)
Tagged: 0 Thread(s)
|
Took my used ACE A350 headers to a local fabricator I trust (VND Motorsport) for his opinion on whether the flanges should be seam-welded before I go to the expense of ceramic coating the headers, and he says they look really solid, actually. He wouldn't bother with beefing up the welds.
With the shipping date from ACE on the headers to their original owner being almost exactly one year ago, I'm guessing these are the "late model" version with the beefier flanges CSG has talked about. Next will be looking into getting the ceramic coating done.
__________________
|
|
|
|
| The Following 2 Users Say Thank You to Tatsu333 For This Useful Post: | Stonehorsw (08-16-2022), villainous_frx (08-15-2022) |
|
08-16-2022, 05:35 PM
|
#83 |
|
Senior Member
Join Date: Jan 2017
Drives: 2020 BRZ Sport Tech RS
Location: Canada
Posts: 355
Thanks: 407
Thanked 239 Times in 139 Posts
Mentioned: 2 Post(s)
Tagged: 0 Thread(s)
|
OK - I think the plan will be to get the headers Cerakote ceramic coated with a blend of 2/3 Burnt Bronze and 1/3 Glacier Silver.
I'm actually trying to get close to matching the bronze-ish, heat-cycled stainless steel colour because I quite like it, but I definitely want the thermal barrier of the ceramic coating. EDIT: after looking at the Cerakote colours in person and talking with the guy who does the work, I decided that looking to match the heat-cycled stainless colour was going to be too expensive to be worth doing, and he wasn't super enthusiastic about the durability of the Cerakote finishes either. So, I'm going to be going with a ceramic chrome finish instead (like Cermakrome) which he says is MUCH more durable than the Cerakote finishes and equivalent in thermal performance. Of course, once the headers are installed I won't see them anyway, so it really doesn't matter much what colour they are, but at least *I'll* know they're pretty...LOL.
__________________
Last edited by Tatsu333; 08-23-2022 at 05:13 PM. Reason: Updated notes on colour choice |
|
|
|
|
08-22-2022, 03:53 PM
|
#84 |
|
Senior Member
Join Date: Jan 2017
Drives: 2020 BRZ Sport Tech RS
Location: Canada
Posts: 355
Thanks: 407
Thanked 239 Times in 139 Posts
Mentioned: 2 Post(s)
Tagged: 0 Thread(s)
|
Picked up some used Koni Sport struts from another member. He was running them with TRD / Eibach springs and Pedders top mounts (as pictured).
 I'll be swapping them in for my stock (Sport Tech RS / PP Sachs) struts on my H&R Sport springs and Pedders top mounts in a couple of weeks' time, when I *might* also be tackling the 2018 tS front subframe swap / flexible draw stiffeners install in my garage...
__________________
|
|
|
|
| The Following User Says Thank You to Tatsu333 For This Useful Post: | villainous_frx (08-22-2022) |
|
|
|
|
 |
|
|
 Similar Threads
|
||||
| Thread | Thread Starter | Forum | Replies | Last Post |
| FS: 2017 BRZ Sport-Tech | BRZ.Omar | Canada Classifieds | 0 | 07-29-2020 04:29 PM |
| 2020 Subaru BRZ STI Sport GT CONCEPT | kev0 | BRZ Photos, Videos, Wallpapers, Gallery Forum | 13 | 07-16-2020 07:02 PM |
| Stop Tech Sport Kit | akuhei | Suspension | Chassis | Brakes -- Sponsored by 949 Racing | 26 | 07-10-2018 09:06 PM |
| WTB: BRZ sport-tech (Canada) | AustinSedz | Cars for Sale/Trade | 2 | 11-17-2015 10:50 PM |
| FS: Black Sport-Tech BRZ (AT) | Eddie | Canada Classifieds | 0 | 06-03-2013 07:55 AM |


