


 12-02-2021, 10:36 AM
|
#183 | |
|
Senior Member

Join Date: Mar 2017
Drives: Q5 + BRZ + M796
Location: Santa Rosa, CA
Posts: 7,883
Thanks: 5,668
Thanked 5,804 Times in 3,299 Posts
Mentioned: 70 Post(s)
Tagged: 0 Thread(s)
|
Quote:
Click here for a link to the tape. It isn’t very wide, so it takes time to wrap, but it wraps better around corners because it is strong, thick tape. It doesn’t have much adhesive, so it sticks better to itself than by itself. Just saying. It is a good thing because adhesive would melt. I like how it turned out.
__________________
My Build | K24 Turbo Swap | *K24T BRZ SOLD*
Last edited by Irace86.2.0; 12-02-2021 at 01:10 PM. |
|

|

|
| The Following User Says Thank You to Irace86.2.0 For This Useful Post: | DustinS (12-03-2021) |
|
12-02-2021, 10:59 AM
|
#184 | |
|
Wears Pants
Join Date: Apr 2019
Drives: 14 FRS K24 swap - SOLD
Location: Bella Vista, AR
Posts: 559
Thanks: 380
Thanked 449 Times in 274 Posts
Mentioned: 6 Post(s)
Tagged: 0 Thread(s)
|
Quote:
Link doesn't work for me. This is the stuff I used, and while it wraps super easy and works great, it's REALLY shiny. https://www.amazon.com/gp/product/B0...?ie=UTF8&psc=1 |
|
|
|
|
|
12-02-2021, 01:11 PM
|
#185 | |
|
Senior Member
Join Date: Mar 2017
Drives: Q5 + BRZ + M796
Location: Santa Rosa, CA
Posts: 7,883
Thanks: 5,668
Thanked 5,804 Times in 3,299 Posts
Mentioned: 70 Post(s)
Tagged: 0 Thread(s)
|
Quote:
__________________
My Build | K24 Turbo Swap | *K24T BRZ SOLD*
|
|
|
|
|
| The Following User Says Thank You to Irace86.2.0 For This Useful Post: | captain awesome (12-02-2021) |
|
12-02-2021, 11:52 PM
|
#186 |
|
Senior Member
Join Date: Mar 2017
Drives: Q5 + BRZ + M796
Location: Santa Rosa, CA
Posts: 7,883
Thanks: 5,668
Thanked 5,804 Times in 3,299 Posts
Mentioned: 70 Post(s)
Tagged: 0 Thread(s)
|
I got the AC compressor, alternator, belt all mounted. I got the adapter plate, flywheel and starter bolted up. I did some grinding to get the larger starter to fit. The plan is for the engine to go in tomorrow.
The last pic shows one angle to show the clearance after grinding.
__________________
My Build | K24 Turbo Swap | *K24T BRZ SOLD*
|
|
|
|
| The Following 3 Users Say Thank You to Irace86.2.0 For This Useful Post: |
|
12-03-2021, 08:17 AM
|
#187 | |
|
Member
Join Date: Sep 2021
Drives: Garbage.
Location: Cincinnati
Posts: 23
Thanks: 0
Thanked 21 Times in 16 Posts
Mentioned: 6 Post(s)
Tagged: 0 Thread(s)
|
Quote:
Any reason why? My car makes 400WHP on a Mustang Dyno with 93 octane using a stock jdm k24a with a reasonable FMIC intercooler... car is more than fast.. traction in 1st 2nd and top of 3rd is already a struggle. |
|
|
|
|
|
12-03-2021, 09:43 AM
|
#188 | |
|
Senior Member
Join Date: Mar 2017
Drives: Q5 + BRZ + M796
Location: Santa Rosa, CA
Posts: 7,883
Thanks: 5,668
Thanked 5,804 Times in 3,299 Posts
Mentioned: 70 Post(s)
Tagged: 0 Thread(s)
|
Quote:
I think someday Ill do a ND Miata k24 NA build for something light weight and high revving NA.
__________________
My Build | K24 Turbo Swap | *K24T BRZ SOLD*
|
|
|
|
|
|
12-04-2021, 12:54 AM
|
#189 |
|
Senior Member
Join Date: Mar 2017
Drives: Q5 + BRZ + M796
Location: Santa Rosa, CA
Posts: 7,883
Thanks: 5,668
Thanked 5,804 Times in 3,299 Posts
Mentioned: 70 Post(s)
Tagged: 0 Thread(s)
|
I finished getting the transmission components assembly and attached. Getting the motor in by myself wasnt easy and too some creativity. I hung weights off the transmission to get the angle on the transmission. I also removed the sway bar and beam over the radiator for more clearance. The Fumoto oil drain cleared the front, but everything has close tolerances. Even though I smashed the crap out of the tunnel down to an inch, the transmission is still touching, but I might be able to shift things around or grind down the small part that touches.
I mocked up a few things. The turbo fits, but the downpipe needs working like I imagined, which shouldnt be too hard. The frontpipe will need working too, but I already had plans for it. The intake manifold clears the top of the stock airbox, so I should be able to fit the intercooler pipes with the stock airbox, which easily clears the motor.
__________________
My Build | K24 Turbo Swap | *K24T BRZ SOLD*
|
|
|
|
| The Following 3 Users Say Thank You to Irace86.2.0 For This Useful Post: |
|
12-04-2021, 01:32 AM
|
#190 |
|
Senior Member
Join Date: Mar 2017
Drives: Q5 + BRZ + M796
Location: Santa Rosa, CA
Posts: 7,883
Thanks: 5,668
Thanked 5,804 Times in 3,299 Posts
Mentioned: 70 Post(s)
Tagged: 0 Thread(s)
|
@captain awesome
Here are some pics of the strut tower. Sitting on top of the bolts the strut tower is a quarter inch above the oil cap. There would need to be some pretty thick spacers for it fit as is. I didnt check to see it it clears the hood in that position.
__________________
My Build | K24 Turbo Swap | *K24T BRZ SOLD*
|
|
|
|
| The Following 5 Users Say Thank You to Irace86.2.0 For This Useful Post: | captain awesome (12-04-2021), DustinS (12-04-2021), Ebush (12-04-2021), Jdmjunkie (12-04-2021), venenon (12-04-2021) |
|
12-06-2021, 11:55 PM
|
#191 |
|
Senior Member
Join Date: Mar 2017
Drives: Q5 + BRZ + M796
Location: Santa Rosa, CA
Posts: 7,883
Thanks: 5,668
Thanked 5,804 Times in 3,299 Posts
Mentioned: 70 Post(s)
Tagged: 0 Thread(s)
|
I finalized the clearance of everything, bolted it down and reinstalled the sway bar. A little more leveraged and some die grinding fixed the clearance. Oil drain still clears fine.
__________________
My Build | K24 Turbo Swap | *K24T BRZ SOLD*
|
|
|
|
|
12-06-2021, 11:58 PM
|
#192 |
|
Senior Member
Join Date: Mar 2017
Drives: Q5 + BRZ + M796
Location: Santa Rosa, CA
Posts: 7,883
Thanks: 5,668
Thanked 5,804 Times in 3,299 Posts
Mentioned: 70 Post(s)
Tagged: 0 Thread(s)
|
For the starter, I bent the eyelet into an L in the opposite direction, and I cut off the tabs and one of the lips of the plastic. The negative bolted right up to the block.
__________________
My Build | K24 Turbo Swap | *K24T BRZ SOLD*
|
|
|
|
|
12-07-2021, 12:09 AM
|
#193 |
|
Senior Member
Join Date: Mar 2017
Drives: Q5 + BRZ + M796
Location: Santa Rosa, CA
Posts: 7,883
Thanks: 5,668
Thanked 5,804 Times in 3,299 Posts
Mentioned: 70 Post(s)
Tagged: 0 Thread(s)
|
Considering everyone had some problems with the thermostat and bleeding the system, I figured it would be good to integrate the stock bleed valve into the system. In fact, it made installing the hose that much easier, so I dont know why it isnt utilized.
I was planning to T into the brake booster for my boost gauge, but I took a page from others and used the nipple on the lower part of the manifold. I drilled a hole in the manifold, and I opened up the hole through the tap a little larger.
__________________
My Build | K24 Turbo Swap | *K24T BRZ SOLD*
|
|
|
|
| The Following User Says Thank You to Irace86.2.0 For This Useful Post: | DustinS (12-07-2021) |
|
12-07-2021, 08:41 AM
|
#194 |
|
Wears Pants
Join Date: Apr 2019
Drives: 14 FRS K24 swap - SOLD
Location: Bella Vista, AR
Posts: 559
Thanks: 380
Thanked 449 Times in 274 Posts
Mentioned: 6 Post(s)
Tagged: 0 Thread(s)
|
I'm pretty sure you just pointed out a big flaw in my setup. I don't think I realized that chamber is blocked off!
Also I was looking at that bleed valve after filling the system with coolant. I think it could be helpful but pretty sure both of my heater core lines were getting plenty hot and seemed to be plenty full. I think a bleed nipple on the water neck would be the best option. If you look at Supermaita Coolant Reroute kit they have a built in bleed nipple. Very similar setup but kinda hard to get to when bleeding. 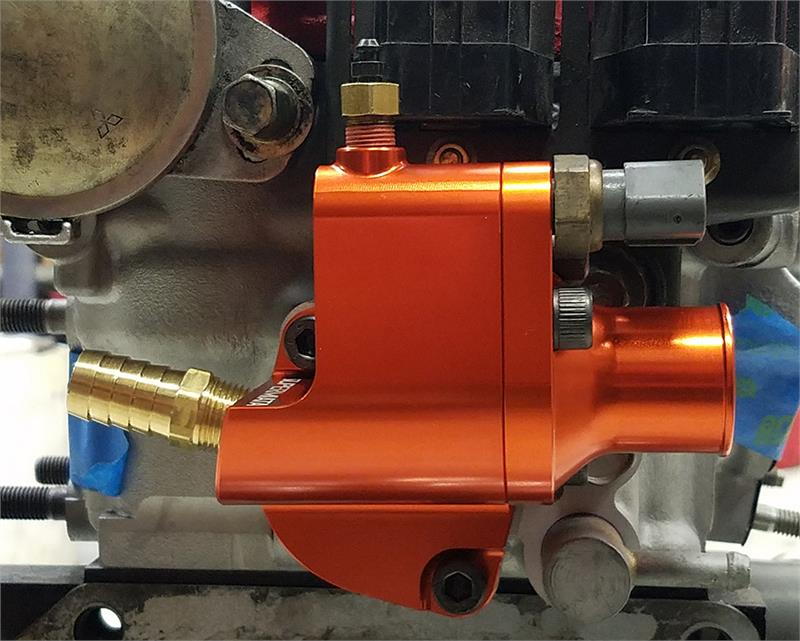
|
|
|
|
| The Following 3 Users Say Thank You to captain awesome For This Useful Post: |
|
12-09-2021, 01:40 AM
|
#195 |
|
Senior Member
Join Date: Mar 2017
Drives: Q5 + BRZ + M796
Location: Santa Rosa, CA
Posts: 7,883
Thanks: 5,668
Thanked 5,804 Times in 3,299 Posts
Mentioned: 70 Post(s)
Tagged: 0 Thread(s)
|
I didn't have much time today, but I got a few things done:
I checked on the fuel lines, and sure enough, the lines are all the same size, and they simply bifurcate, so I decided to pull the extra line out of the car. Then I pulled the EVAP line to the rear. I decided to just cut it and hook up a hose, so it terminates and vents in a nice spot. I don't know if the system is purely mechanical at the rear, meaning the system will vent the canister as pressure builds, or maybe it is electrically controlled. I don't know. Hopefully moisture won't get in. I had a T distribution port with three 1/8 NPT female ends. I found a 1/8 barb for boost, 1/4 for my BOV and a 3/8 to go to the manifold, which is close enough to the 7/16 (I believe) size of the supplied barb. I fit the AC lines on the compressor. They cleared the catch cans, but I made a slight adjustment. I'll do the AN lines tomorrow, so I can mount the intake manifold, TB and fuel rail. Everything seems to fit and clear well enough, at least on the intake side. On the exhaust side, the story is a little different. I took a chance on having the manifold and downpipe custom fabricated for a RWD K24 chassis, but there is no chance that things will clear with the rear coolant line and wastegate in the way it is designed, but it can be salvaged. There is plenty of room if I reverse the wastegate tube on the manifold and turn it down instead of up. With the wastegate down and out of the way, I should be able to route the downpipe in a larger opening that is more to the lateral of the previous location towards the sound tube opening. The plan is to cut the wastagate mount and rotating it 180 degrees, and then I can make modifications to the down pipe. The plan was to custom make the end of it, but I will need to do more. The plan was to transition the 3'' downpipe into a short 3'' flex pipe to a 3'' to 2.5'' transition to a 2.5'' flange that would terminate in the stock location making it possible to run any aftermarket exhaust component without fitment issues, but I will be scrapping all that. I will be running a 3'' downipipe to the 3'' flex pipe and then have it terminate to a 3'' V-band. I plan to cut the Berk pipe at the front of the high flow cat and then weld on a 3'' pipe to a V-band. Everything post the cat will be 2.5''. The wastegate dump tube should be fairly easy to connect to the downpipe at the angle it will be once it is inverted. More work, but it shouldn't be too bad.
__________________
My Build | K24 Turbo Swap | *K24T BRZ SOLD*
|
|
|
|
|
12-09-2021, 04:44 AM
|
#196 | |
|
Senior Member
Join Date: Jul 2015
Drives: 2017 Hot Lava 86
Location: Ohio
Posts: 185
Thanks: 12
Thanked 133 Times in 74 Posts
Mentioned: 1 Post(s)
Tagged: 0 Thread(s)
|
Quote:
|
|
|
|
|
|
|
|
|
 |
| Tags |
| worst.build.ever. |
| Thread Tools | Search this Thread |
|
|
 Similar Threads
|
||||
| Thread | Thread Starter | Forum | Replies | Last Post |
| Irace86.2.0 Build | Irace86.2.0 | Member's Car Journals | 195 | 03-25-2024 12:29 AM |
| KPower Industries K24 swap | PulsarBeeerz | Engine Swaps | 1756 | 03-13-2024 01:42 PM |
| Turbo or swap | Fastend | Forced Induction | 35 | 06-11-2020 07:12 PM |
| Built Turbo K24 Swap? | Calmwhiteguy | Engine Swaps | 31 | 02-13-2018 05:07 PM |
| IRACE86's Build | Irace86 | Member's Car Journals | 25 | 01-10-2017 04:35 PM |


