


|
||||||
| Member's Car Journals Car journals by our members. |
 |
|
|
Thread Tools | Search this Thread |
 07-07-2020, 07:45 AM
|
#43 |
|
Senior Member

Join Date: Jan 2015
Drives: White GT86
Location: UK
Posts: 153
Thanks: 48
Thanked 108 Times in 58 Posts
Mentioned: 0 Post(s)
Tagged: 0 Thread(s)
|
I've just had some new pictures just sent through. Bodyshop are taking their time, I told them there was no rush to get it done so its not their main focus which reflects in the price.
Car is completely painted and has been flatted ready for a polish and the windscreen etc has been reistalled. This morning they polished the roof and as you can see its super shiny:  Untitled by James Baker, on Flickr Untitled by James Baker, on FlickrThey are aiming to complete it this Friday, I cant wait to see it and arrange for it to be dropped back to me.
__________________
 https://www.youtube.com/tweedbean - How To Videos https://www.instagram.com/tweedbean - Latest updates |

|

|
|
07-14-2020, 01:38 PM
|
#44 |
|
Senior Member
Join Date: Jan 2015
Drives: White GT86
Location: UK
Posts: 153
Thanks: 48
Thanked 108 Times in 58 Posts
Mentioned: 0 Post(s)
Tagged: 0 Thread(s)
|
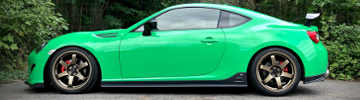
So I finally have the car back from the bodyshop, wow it was worth the wait, colour reveal down below, check it out, I'm so excited to get it built:
__________________
https://www.youtube.com/tweedbean - How To Videos https://www.instagram.com/tweedbean - Latest updates |
|
|
|
| The Following User Says Thank You to tweedbean For This Useful Post: | alphasaur (07-30-2020) |
|
07-14-2020, 05:40 PM
|
#45 |
|
Senior Member
Join Date: Jan 2015
Drives: White GT86
Location: UK
Posts: 153
Thanks: 48
Thanked 108 Times in 58 Posts
Mentioned: 0 Post(s)
Tagged: 0 Thread(s)
|
Here is the photoshop I created which covers my plans for the BRZ based off a yellow STI from Japan, lets see how close I get to it:
 Untitled by James Baker, on Flickr Untitled by James Baker, on FlickrStill a long way to go, it certainly wont remain stock for long, plenty of parts ready to go on it one rebuilt. So pleased with the colour it came out perfect and gives me a matching pair with my Mini.  JUNE 2019 R53 by James Baker, on Flickr JUNE 2019 R53 by James Baker, on FlickrHere are some pics from the body shop while they were polishing it.  Untitled by James Baker, on Flickr Untitled by James Baker, on FlickrDropped off today by transporter:  Untitled by James Baker, on Flickr Untitled by James Baker, on Flickr Untitled by James Baker, on Flickr Untitled by James Baker, on FlickrThe rebuild begins:  Untitled by James Baker, on Flickr Untitled by James Baker, on Flickr
__________________
https://www.youtube.com/tweedbean - How To Videos https://www.instagram.com/tweedbean - Latest updates |
|
|
|
| The Following 4 Users Say Thank You to tweedbean For This Useful Post: |
|
07-16-2020, 04:28 AM
|
#46 |
|
Senior Member
Join Date: Jan 2015
Drives: White GT86
Location: UK
Posts: 153
Thanks: 48
Thanked 108 Times in 58 Posts
Mentioned: 0 Post(s)
Tagged: 0 Thread(s)
|
My second evening of work was a little shorter but got plenty done before it rained.
The passenger door handle plastic section that holds the lock on the inside of the door had come away not allowing me to fit the door handles. It was a tight squeeze but I managed to undo the bolt, manoeuvre it back into place and bolt down so no future issues. Also the interior door handle had become disconnected at the door latch end so I had to remove the locking mechanism from the its mount and use long nose pliers to re-attach the yellow cable. That meant my issues with the doors were fixed. So I refitted all the door seals, door mirrors, front triangular window glass, door cards, wind seals and bits of interior trim next to the doors. All went back perfectly with no left over screws/bolts which is always a bonus. 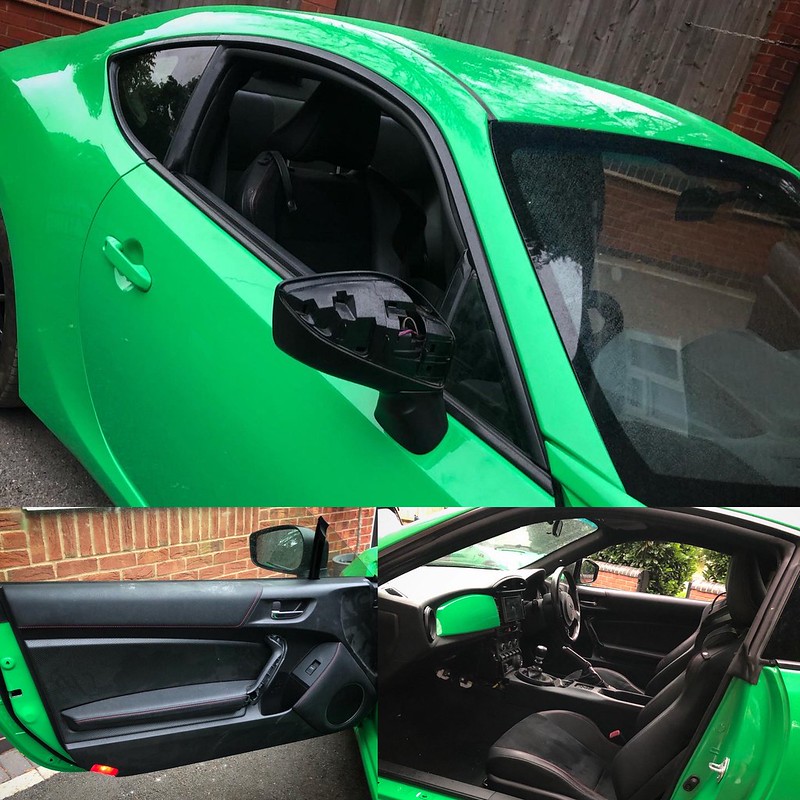 Untitled by James Baker, on Flickr Untitled by James Baker, on FlickrThe door mirror caps are with the body shop still, they are going gloss black and the central dash piece they are filling the hold the BRZ has for an alarm LED and painting that green to match the other section. Please ignore the dusty interior, thats getting blitzed this weekend now that the doors/windows seal properly. Ive also built the side trims back up after clearing off all the old glue from the black pieces and treating them to a layer of Gtecniq C4 plastic restorer to keep them looking tip top:  Untitled by James Baker, on Flickr Untitled by James Baker, on Flickr
__________________
https://www.youtube.com/tweedbean - How To Videos https://www.instagram.com/tweedbean - Latest updates |
|
|
|
|
07-16-2020, 10:18 AM
|
#47 |
|
Senior Member

Join Date: May 2017
Drives: 2014 Subaru Forester
Location: Upstate SC
Posts: 441
Thanks: 501
Thanked 338 Times in 178 Posts
Mentioned: 20 Post(s)
Tagged: 0 Thread(s)
|
I love the color! Definitely eye catching. Do you have any plans to change up the interior colors?
|
|
|
|
| The Following User Says Thank You to tehShirt For This Useful Post: | tweedbean (07-16-2020) |
|
07-16-2020, 01:33 PM
|
#48 | |
|
Senior Member
Join Date: Jan 2015
Drives: White GT86
Location: UK
Posts: 153
Thanks: 48
Thanked 108 Times in 58 Posts
Mentioned: 0 Post(s)
Tagged: 0 Thread(s)
|
Quote:
__________________
https://www.youtube.com/tweedbean - How To Videos https://www.instagram.com/tweedbean - Latest updates |
|
|
|
|
|
07-20-2020, 11:04 AM
|
#49 |
|
Senior Member
Join Date: Jan 2015
Drives: White GT86
Location: UK
Posts: 153
Thanks: 48
Thanked 108 Times in 58 Posts
Mentioned: 0 Post(s)
Tagged: 0 Thread(s)
|
A quick update on progress with the BRZ, had very little time to work on it however its gone pretty smoothly so far. The only major issue I have so far is the fact facelift washer jet covers for the front bumper do not fit pre-facelift headlight washer jets themselves, which is annoying as I had bought them separately as they were missing off the car. Solution is to do away with headlight washers and just stick the covers to the bumper, or a more sensible solution is to source facelift washers, very hard to come by and expensive from the dealer.
Sundays job involved stripping the front end down: - Removing the wings as they werent bolted on properly, they were only on for ease of transport  Untitled by James Baker, on Flickr Untitled by James Baker, on Flickr- Refitting the wings - Fit headlights - Fit HID kit for headlights - Fit bonnet struts from Fensport - Wire in the new aftermarket yellow fog lights - Wire the drivers side repeater as that was destroyed - Sort panel gap  Untitled by James Baker, on Flickr Untitled by James Baker, on Flickr- Fit bumper under tray - Fit front bumper - Refit a load of plastic engine bay trim  Untitled by James Baker, on Flickr Untitled by James Baker, on Flickr Untitled by James Baker, on Flickr Untitled by James Baker, on Flickr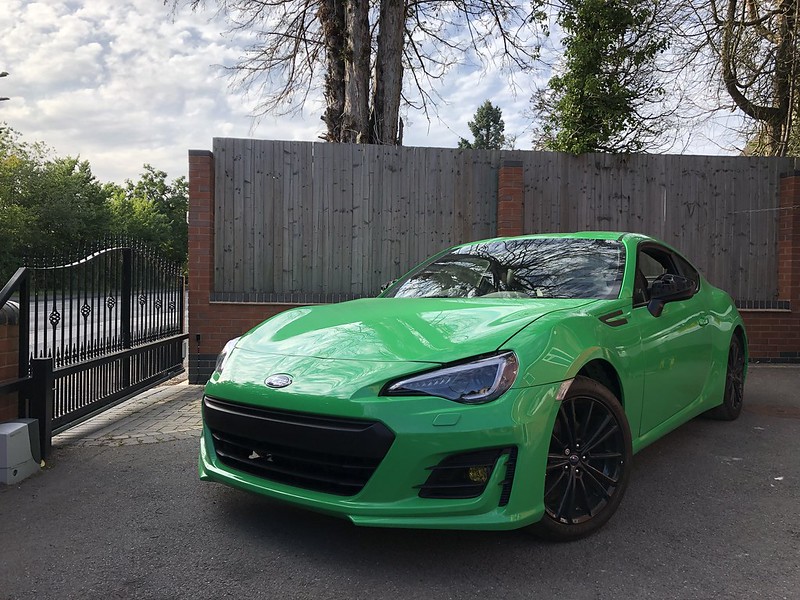 Untitled by James Baker, on Flickr Untitled by James Baker, on FlickrI still have a pile of stock bits to fit like wheel arch liners, number plates etc then its ready for an MOT and back on the road. Then the modding can begin.
__________________
https://www.youtube.com/tweedbean - How To Videos https://www.instagram.com/tweedbean - Latest updates |
|
|
|
| The Following 5 Users Say Thank You to tweedbean For This Useful Post: | alphasaur (07-30-2020), mrg666 (09-29-2020), new2subaru (08-03-2020), tehShirt (07-20-2020), Wally86 (07-20-2020) |
|
07-27-2020, 04:04 AM
|
#50 |
|
Senior Member
Join Date: Jan 2015
Drives: White GT86
Location: UK
Posts: 153
Thanks: 48
Thanked 108 Times in 58 Posts
Mentioned: 0 Post(s)
Tagged: 0 Thread(s)
|
Life has got in the way a little over the last week, so not touched the BRZ, however one update I had was a picture from Grigul Design/LederManZ. I sent them a stock BRZ/86 wheel a couple of weeks ago now for them to retrim. Its looking much tastier now, I cant wait to get my hands on it. Due for delivery in the next 3 days:
 Untitled by James Baker, on Flickr Untitled by James Baker, on FlickrIts looking a top job from what I can see so far with the alcantara/leather mix, red stitching/centre marker, flat bottom and a little bit of extra padding.
__________________
https://www.youtube.com/tweedbean - How To Videos https://www.instagram.com/tweedbean - Latest updates |
|
|
|
|
07-30-2020, 07:07 PM
|
#51 | |
|
Senior Member

Join Date: Jul 2020
Drives: 2014 Subaru BRZ SC & 2018 Tacoma
Location: Oregon
Posts: 103
Thanks: 47
Thanked 56 Times in 34 Posts
Mentioned: 0 Post(s)
Tagged: 0 Thread(s)
|
Quote:
Where did you get the CF pieces for this? I am doing this exact same thing to my car over the winter (it's basically getting the same treatment as yours) and this is the EXACT thing I want to do to it. I have CF wrap I was going to use but if I can just buy them in CF I would much rather go that route **edit** I just noticed those aren't even CF? But holy smokes does it look like it, haha |
|
|
|
|
| The Following User Says Thank You to ArrrBussiere For This Useful Post: | tweedbean (07-31-2020) |
|
07-31-2020, 04:30 AM
|
#52 | |
|
Senior Member
Join Date: Jan 2015
Drives: White GT86
Location: UK
Posts: 153
Thanks: 48
Thanked 108 Times in 58 Posts
Mentioned: 0 Post(s)
Tagged: 0 Thread(s)
|
Quote:
MOT Prep So yesterday afternoon I managed to blitz the car in preparation for its MOT which is booked in for next Tuesday. As its a Cat S it needs a fresh MOT before it gets back on the road and can have its new plates applied to it. I wanted to get the MOT done before I started modding the car, as it will be easier having it taxed/insured and on the road. For example it needs to go to the bodyshop for a final polish now its rebuilt, that will be so much easier and cheaper if I can drive it there myself instead of paying £50 a time to the transport company, plus once thats done I can get the side skirts etc fitted as I didn't want them to have to faff with taping up the new parts to avoid getting polish on them. So dont worry plenty of aftermarket parts coming soon for interior, exterior, suspension and engine bay. I fitted the wheel arch liners so I could secure all the wiring for the new HID kit I fitted previously. I also cleaned up the overspray which ended up on the door glass when the door skins were painted, I used fine wire wool which removed it super easy. I fitted the Geraldjustproject controller for the 2017+ cluster so I can control the LCD screen and at the same time I switch out the grey switches for black JDM ones, I also fitted all my black door handles, gaiter surrounds etc. Fitting video for the controller here: I also sorted the TPMS light which would have impacted the MOT. As my car doesnt have TPMS sensor the car flashes the light thinking they are damaged/faulty, I opened up the cluster, only a couple of clips, lifted the dial face forward and places a piece of foam backed tape across the opening for that single LED so no light can get through. I'm sure this light could be mapped out but this was a quick a free option with the same result, no flashing warning light.  Untitled by James Baker, on Flickr Untitled by James Baker, on FlickrI picked up my painted dash and wing mirror caps from the bodyshop, they did a great job so I got those fitted alongside wiring up the new shark fin aerial. I like the contrast of black mirror caps:  Untitled by James Baker, on Flickr Untitled by James Baker, on FlickrI hate sending a car for MOT with an untidy interior so it finally got a good clean to remove all the dust and grime from the previous owner: Before: 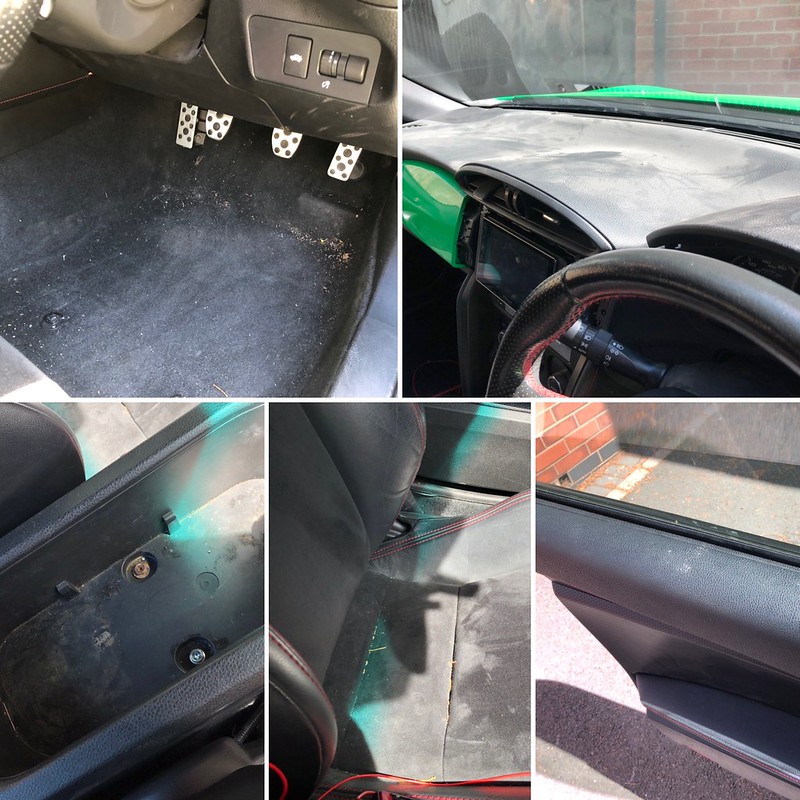 Untitled by James Baker, on Flickr Untitled by James Baker, on FlickrAfter, notice the dash is in without the hole for the subaru alarm flashy light which I had smoothed over:  Untitled by James Baker, on Flickr Untitled by James Baker, on FlickrI also fitted these gates rubber mats, super cheap, £10 from ebay and adds a little splash of colour and a grippy rubber surface. https://www.ebay.co.uk/itm/Gate-Slot...72.m2749.l2649  Untitled by James Baker, on Flickr Untitled by James Baker, on FlickrI addressed the remaining white in the engine bay, as the engine didnt come out the body sprayed as much as they could green. For the rest like the fire wall, I masked bits off, degreased and painted it matt black. In degreased most of the engine bay and cleaned up the battery while it was out.  Untitled by James Baker, on Flickr Untitled by James Baker, on FlickrI also wanted to finish off the head unit install: - So I threw in the new USB retention cable which worked a treat, only cost £13: https://www.ebay.co.uk/itm/OE-Car-St...72.m2749.l2649 - Wired the reverse camera up, connected to the pink wire in the passenger footwell, 5th wire down on the left in this block to get a reverse signal to the head unit: 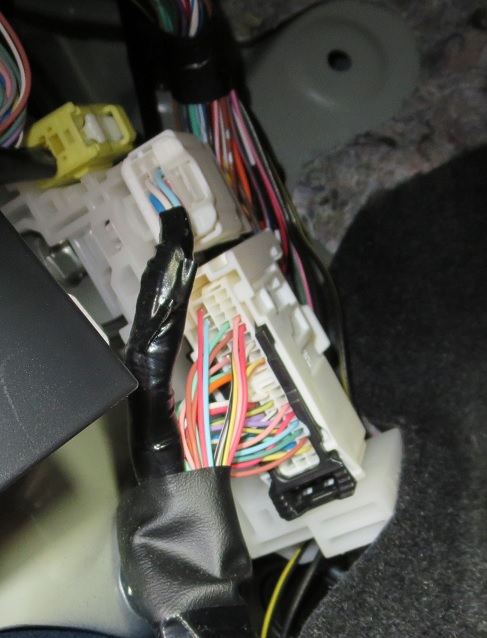 - I ran the camera cable down the passenger side of the car, under the back seat, through the boot, up into the wire rubbers between the boot and the boot lid, using a coat hanger to pull it through so no wires exposed for the OEM look. I then used a dremel tool to cut a square out next to the boot handle opening button and used the mount that came with the camera to fix it to the inside of the boot handle, I hate reverse cameras you can see from the back of the car, so its tucked away for the stealth look and can only be seen when the boot is fully open. Installed Pioneer Nd-bc8 reverse camera   Untitled by James Baker, on Flickr Untitled by James Baker, on FlickrAlso the steering wheel retrim arrived back, Grigul Design did an amazing job:  Untitled by James Baker, on Flickr Untitled by James Baker, on FlickrI also had to change the battery in the spare remote as it didn't work, so I decided to record a how to video, super easy, it turns out the previous owner had installed the incorrect battery, no wonder it didn't work: Finally I fitted the front removable plate holder and rear plate. Then I took it for a quick drive around the neighbouring car park to check brakes etc work as it was the first time I had driven it more than a couple of meters, all was good and now back in my garage until the drive to the MOT station next Tuesday:  Untitled by James Baker, on Flickr Untitled by James Baker, on Flickr
__________________
https://www.youtube.com/tweedbean - How To Videos https://www.instagram.com/tweedbean - Latest updates |
|
|
|
|
| The Following 3 Users Say Thank You to tweedbean For This Useful Post: |
|
08-03-2020, 08:55 AM
|
#53 |
|
Senior Member
Join Date: Jan 2015
Drives: White GT86
Location: UK
Posts: 153
Thanks: 48
Thanked 108 Times in 58 Posts
Mentioned: 0 Post(s)
Tagged: 0 Thread(s)
|
Nearly Back On The Road
So I set out to give a true reflection of what it would take to get the car back on the road. I have done all the work myself minus the frame shop straightening the front end/welding on the new slam panel and the respray itself. If you take out of the consideration any mods I've purchased that weren't needed such as rear lights/headunit/STI parts etc and just look at what it would take to get a similar 86/BRZ back on the road with similar damage I have spent as follows. Exactly as I've done it with facelift front end and new bumper/wings plus full colour change: Total on the road cost: £8930.46 That includes: Crash Damaged BRZ £4200 Used Bonnet £150 Used Crash Bream £50 Used Rad £20 Used A/C rad £20 Used Fans £20 Used Airbox and washer bottle £100 Odd used and new clips, brackets, fog lights, wiring, rear bumper etc £200 New Slam Panel Subaru £306 New Front wings and brackets, top plastic grill trim, 4x rubber bushings for rad assembly Toyota £309 New Vland Headlights £380 New Facelift front bumper with all the brackets, grills etc £617.92 New Headlight rubber seals(BRZ Only) Subaru £58.14 New Headlight washer jet covers Subaru £70 New Various bolts Subaru £29.24 Labour for frame shop to straighten the car £380 Respray in Porsche RS Green £2000 (Note for those that ask why so cheap I did all the labour in terms of stripping the car minus the bonnet/doors/boot lid For that above cost I have a 2013 BRZ with around 40k on the clock, spotless interior, heated seats, spotless exterior which is unique and you wont see another one in that colour, black headlights etc. Yes I could have bought a working 86 for that sort of price (Only seen very rough BRZ's sub £10k) but it would possibly have higher mileage, not as in good condition and certainly not unique. It would also have the pre-facelift front end which im not a massive fan of. So for me I am more than happy with it as it stands and gives me a solid base to start modifying. Getting it on the road even cheaper: Now I could have got it on the road for much cheaper if I had waited around for used parts that matched the body colour and didn't insist on retro fitting a facelift front end. This would have avoided £2000 in bodyshop costs straight away, plus the used body parts would have been a lot cheaper than the new bits I went for like the front bumper and wings. Total on the road cost: £6383.54 That includes: Crash Damaged BRZ £4200 Used Bonnet £150 Used Crash Bream £50 Used Rad £20 Used A/C rad £20 Used Fans £20 Used Airbox and washer bottle £100 Odd used and new clips, brackets, fog lights, wiring, rear bumper etc £200 New Slam Panel Subaru £306 Used Front wings and brackets, top plastic grill trim, 4x rubber bushings for rad assembly £300 New Vland Headlights £380 Used Front Bumper £150 New Headlight rubber seals(BRZ Only) Subaru £58.14 New Various bolts Subaru £29.24 Labour for frame shop to straighten the car £380 Yes I was lucky with some of the used parts coming up super cheap, but if I can find bargains, others can. Sam Nadeem from SJ Autosports is a great source of well priced used parts for 86's/BRZ's in the UK. I did all the work with a Halfords tool kit and a Ryobi impact gun. I've never rebuilt a crashed car before so have learn't a lot along the way. Now its time for its MOT tomorrow, then tax and insurance. Once thats done its off the bodyshop for its final polish now its all back together then modifications begin. Very happy its gone from this: 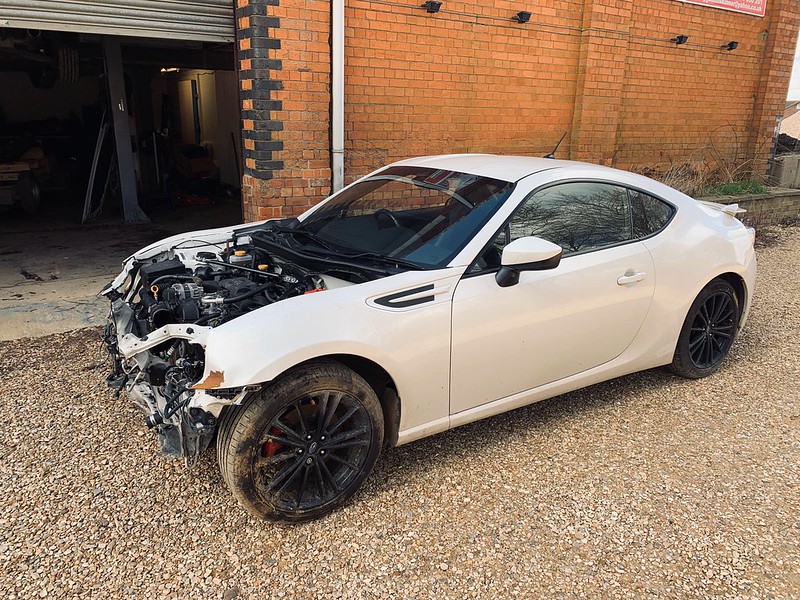 Untitled by James Baker, on Flickr Untitled by James Baker, on FlickrTo This: Untitled by James Baker, on Flickr
__________________
https://www.youtube.com/tweedbean - How To Videos https://www.instagram.com/tweedbean - Latest updates |
|
|
|
|
08-03-2020, 10:20 AM
|
#54 |
|
Senior Member
Join Date: Jan 2015
Drives: White GT86
Location: UK
Posts: 153
Thanks: 48
Thanked 108 Times in 58 Posts
Mentioned: 0 Post(s)
Tagged: 0 Thread(s)
|
I also came across things that people dont tend to document, like how to remove the fuel cap, most people wont need to do it unless they are having the whole car painted, most wrap places dont fully wrap inside their so people dont remove them. The hinge is held to the car with two rivets, these have to be drilled out to remove hinge and cap from the car. Then to refit, I tried my own pop rivet gun but it wouldnt quite fit due to the tight angles. So I ended up using a riv nut gun to provide a thread section to then bolt the hinge to the car. I did take off some material off the back of the hinge where it touches the car to thin it out and ensure the additional depth(a couple of mm at most) of the riv nut leading edge didnt stop the petrol cap sitting flush. A blast over with some paint on the back of the hinge ensured that part was sealed and then I bolted it on with normal bolts and washers. Now sits perfectly, this was literally the last bit of body work back on before the MOT.
 Untitled by James Baker, on Flickr Untitled by James Baker, on Flickr
__________________
https://www.youtube.com/tweedbean - How To Videos https://www.instagram.com/tweedbean - Latest updates |
|
|
|
| The Following 5 Users Say Thank You to tweedbean For This Useful Post: | beltax90 (08-04-2020), mrg666 (09-29-2020), new2subaru (08-03-2020), Wally86 (08-03-2020), Yoshoobaroo (08-03-2020) |
|
08-03-2020, 01:13 PM
|
#55 |
|
Weight Weenie
Join Date: Aug 2015
Drives: 15 FR-S
Location: Canada
Posts: 2,584
Thanks: 5,015
Thanked 2,330 Times in 1,346 Posts
Mentioned: 12 Post(s)
Tagged: 0 Thread(s)
|
A SS button head fastener would look nice there
https://www.mcmaster.com/button-head...-drive-screws/ |
|
|
|
|
08-04-2020, 03:03 AM
|
#56 | |
|
Senior Member
Join Date: Jan 2015
Drives: White GT86
Location: UK
Posts: 153
Thanks: 48
Thanked 108 Times in 58 Posts
Mentioned: 0 Post(s)
Tagged: 0 Thread(s)
|
Quote:
__________________
https://www.youtube.com/tweedbean - How To Videos https://www.instagram.com/tweedbean - Latest updates |
|
|
|
|
| The Following User Says Thank You to tweedbean For This Useful Post: | new2subaru (08-04-2020) |
|
|
|
|
|
|
|
 Similar Threads
|
||||
| Thread | Thread Starter | Forum | Replies | Last Post |
| tweedbean's Orange GT86 | tweedbean | Member's Car Journals | 2 | 12-05-2016 10:51 AM |
| '13 Subaru BRZ rebuild | P3tras | Member's Car Journals | 96 | 01-03-2016 06:05 PM |
| Subaru BRZ 2015 Series Blue rebuild | kilohercas | Member's Car Journals | 75 | 12-28-2015 08:21 AM |
| Looking to rebuild a Scion FRS | miller.4311 | FR-S & 86 Photos, Videos, Wallpapers, Gallery Forum | 4 | 06-24-2015 06:47 PM |
| Rebuild the one from twins | skalinkin | Scion FR-S / Toyota 86 GT86 General Forum | 23 | 11-14-2014 01:58 PM |


