


 08-07-2014, 08:34 PM
|
#71 |
|
Senior Member
Join Date: Jan 2013
Drives: Scion FR-S
Location: Los Angeles
Posts: 686
Thanks: 597
Thanked 257 Times in 174 Posts
Mentioned: 6 Post(s)
Tagged: 0 Thread(s)
|
Another tip for anyone who tries to do this, when you go to remove the bearing races from the housing (if you're replacing bearings), you can do so using a stack of washers and an all thread (I used a .5" all thread with a set of 3/4" washers and a set of .5" washers). You'll need a reaction point with a hole in the middle of it to do so, but it worked well for me (I used a small bench vise that was flat with a track cut down the middle like the below).
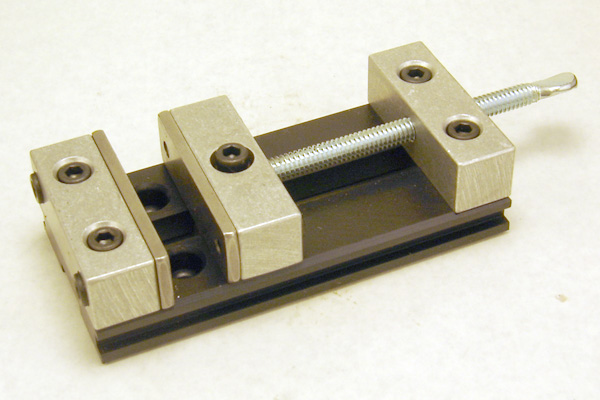 I was able to use the washers without a support to remove the top race near the pinion nut. The lower one I had to rig a bit with a scrap piece of aluminum to give the washers something to sit on. Basically you set it up like this with the all thread through the middle of everything: 1X .5" nut 1X .5" washer 2X .75" washer 1X Bench vise/reaction plate, support against top/bottom of diff housing 1X Bottom of bearing race you are pulling 2X .75" washers (with or without scrap metal to help support the washer/react against) 1X .5" washer 1X .5" nut to complete the stack. Then use two wrenches to tighten the end and it will essentially pull the bearing races out. Hope this helps. I plan on using the same stack of washers to press in the new races in the housing and the new bearings onto the diff (which is what I originally bought them for). |

|

|
|
08-09-2014, 12:38 AM
|
#72 |
|
Senior Member
Join Date: Jan 2013
Drives: Scion FR-S
Location: Los Angeles
Posts: 686
Thanks: 597
Thanked 257 Times in 174 Posts
Mentioned: 6 Post(s)
Tagged: 0 Thread(s)
|
Installed ring gear tonight, super easy.
Put ring in oven at 275F. Put diff in freezer for a couple hours. Slid on and aligned with no resistance. Loosely screw in all the bolts to ensure alignment. |
|
|
|
|
08-09-2014, 01:29 PM
|
#73 |
|
Senior Member
Join Date: Jan 2013
Drives: Scion FR-S
Location: Los Angeles
Posts: 686
Thanks: 597
Thanked 257 Times in 174 Posts
Mentioned: 6 Post(s)
Tagged: 0 Thread(s)
|
Here's what I did to get to the washer between the pinion gear and bearing.
First off, I cut two slots with a dremel 180 degrees apart through the race. Note that this DID cut into the pinion gear. Since I'm not reusing it, that is not a problem. Once I cut it, I was still having issues getting the race off, so I stuck it in the freezer. The next day I was able to wedge a piece of metal between the race and pinion and force the race to move. After the freezer treatment, it slowly moved then cracked in half after a few hits. The bearing race is already a hard (brittle) material, but I think the cold helped lower that transition further. You can see the brittle fracture region in the below photo where the dremel couldn't reach without cutting into the shim. 
|
|
|
|
|
08-14-2014, 09:49 PM
|
#74 |
|
Senior Member
Join Date: Jan 2013
Drives: Scion FR-S
Location: Los Angeles
Posts: 686
Thanks: 597
Thanked 257 Times in 174 Posts
Mentioned: 6 Post(s)
Tagged: 0 Thread(s)
|
Installed the ring gear, bearings, and pinion bearings.
Here's my setup for both. Diff bearings: Use old bearing race to sit on top of new bearings. Then use an all thread, some washers, and some nuts to press the whole setup together. If the bearing looks off center, hit the top of the assembly to straighten it out. It should remain straight after it's more fully seated.   Pinion bearings. holy shit this was a pain and I had to improvise. Basically two all threads, a bench vice, square tubing, some washers, and a spacing piece (I used a metal plumbing fitting for this) to push on the bearing. I also had a small piece of aluminum between the lower square tube and the pinion to prevent damage.  
|
|
|
|
|
08-22-2014, 06:01 AM
|
#75 |
|
Senior Member
Join Date: Jan 2013
Drives: Scion FR-S
Location: Los Angeles
Posts: 686
Thanks: 597
Thanked 257 Times in 174 Posts
Mentioned: 6 Post(s)
Tagged: 0 Thread(s)
|
After assembling the diff and checking the mesh, it was pretty apparent that there was practically no backlash and a pretty heavy toe contact. Going to go buy a bearing puller to get the bearing off the pinion and swap the shim (The OEM shim from the original setup was too thick).
I think I have just enough left over shims from preloading the pinion bearings for this to work. |
|
|
|
|
08-22-2014, 07:25 PM
|
#76 |
|
Senior Member
Join Date: Jan 2013
Drives: Scion FR-S
Location: Los Angeles
Posts: 686
Thanks: 597
Thanked 257 Times in 174 Posts
Mentioned: 6 Post(s)
Tagged: 0 Thread(s)
|
Alright, I bought a puller from harbor freight and swapped the pinion shims. Instantly noticed a much better mesh and was no longer getting a sticking at the toe of the gear.
Here is my bearing puller setup:  Here is the gear mesh after swap. Notice that there is still a slight toe contact. I could have removed either .002 or .007 from the shims between the bearing/pinion, but decided it was good enough for my purposes. Mostly out of not wanting to spend 2 hours pulling the pinion bearing and re-installing it for marginal change. Note that I have no basis for knowing this mesh pattern to be ok, so follow my lead at your own risk.  As for installing the diff, by far the most tiresome/difficult part was removing and installing the axles. To remove the axles, I used the following setup, which was the same bearing puller from harbor freight. Was pretty easy to remove the axles in this way, the hard part was positioning the diff/wheels to have the movement necessary to remove the axles completely from the housing.  Going to be breaking it in tomorrow. Last edited by kodyo; 08-25-2014 at 03:57 PM. |
|
|
|
|
08-25-2014, 01:27 AM
|
#77 |
|
Senior Member
Join Date: Jan 2013
Drives: Scion FR-S
Location: Los Angeles
Posts: 686
Thanks: 597
Thanked 257 Times in 174 Posts
Mentioned: 6 Post(s)
Tagged: 0 Thread(s)
|
After running the setup for the weekend, I do notice a slight whine under deceleration (engine braking) from higher speeds.
Probably going to pull the whole thing apart this weekend and attempt to reshim the pinion gear and check backlash more thoroughly. |
|
|
|
|
08-30-2014, 02:08 PM
|
#78 |
|
Senior Member
Join Date: Jan 2013
Drives: Scion FR-S
Location: Los Angeles
Posts: 686
Thanks: 597
Thanked 257 Times in 174 Posts
Mentioned: 6 Post(s)
Tagged: 0 Thread(s)
|
Just finished setting up the gears again and it took forever. Pulled the pinion bearing off no less than 7 times to try and adjust the contact patch and backlash. Decreased the shim between the pinion by a little over .007 and whine appears to be a lot less and the contact path appears to be more reasonable.
I still couldn't get the backlash figured out. I'd measure the backlash with my dial indicator and it would be .003-.005 (.008-.010 being the target value for the weir gears), but then the contact patch would be a bit toward the edge of the tooth (indicating backlash could be even smaller). So I ended up just trying to find the position where backlash was maximized and still maintain a reasonable contact patch and calling it a day. See the new contact patches below as an example of the front and back contacts:   If I was to redo the whole setup, I would have taken a little more time setting up the shim between the pinion and gears to begin with. I think I wore the gears in too much before deciding to redo the setup, so I wouldn't be surprised if that affected the contact patches I was seeing after the reset. Overall, the 4.56 is a pretty noticeable performance mod. I also routinely drive highway (~75 mph) and the increase in RPM is not too bad (Basically 10% higher than before). I have a fairly quiet exhaust setup (catted ft86 SF header, catted motiv front/over pipe, greddy SP elite axleback), and drone/exhaust noise is tolerable, but noticeable. If the setup was a little more aggressive, I can see how it would be incredibly frustrating. Last edited by kodyo; 08-30-2014 at 02:25 PM. |
|
|
|
| The Following User Says Thank You to kodyo For This Useful Post: | civicdrivr (08-30-2014) |
|
09-06-2014, 07:32 PM
|
#79 |
|
Senior Member
Join Date: Jan 2013
Drives: Scion FR-S
Location: Los Angeles
Posts: 686
Thanks: 597
Thanked 257 Times in 174 Posts
Mentioned: 6 Post(s)
Tagged: 0 Thread(s)
|
I was still getting some whine from the gears, so I took it apart one last time (hopefully).
Before doing anything, I re-blueprinted the gears to check my contact after some wear. It was still a little too much toe contact, so I removed .0025 shim between bearing and pinion. Old blueprint is below: Note on this one that the contact on the back face of the gear is toward the heel. This tells me that it needs to be adjusted (remove shims)  Contact on the front face is very well centered, so its hard to read this contact to get an adjustment.  As you may remember last time, the measured backlash was .003, which I believe is causing the whine. Since I didn't want to buy a bunch of differential shims, I came up with the following calculation to increase backlash based on the tooth geometry. The formula is as follows: (Delta Shim)=(Desired Backlash - Current Backlash)/(tan(10deg)+tan(30deg)) e.g. (Delta Shim)=(.008-.003)/(tan(10)+tan(30))=.0066~.007 The previous diff shims were .114 on the left and .115 on the right. So I bought shims to increase my backlash: .121 on the left, .108 on the right. After getting the shims installed, I measured the backlash to be .008 (see picture below). USE THIS FORMULA AT YOUR OWN RISK. It's just something I noticed and worked for my gears.  I then rechecked the gear mesh. I think it is still borderline toe contact, but I'm pretty pleased with this contact, so I kept it as is. I will post back to inform about affect of changes.   Just a general FYI, the Toyota manual says to replace the circlips on the axle, as well as apply a multi purpose grease to all of the seals (including pinion seal). So part of the motivation of taking it all apart was to do this. I will note that replacing the circlips may not be necessary as the new ones look pretty much the same as the old ones after removing the axles. |
|
|
|
|
09-13-2014, 02:18 PM
|
#80 |
|
Senior Member
Join Date: Jan 2013
Drives: Scion FR-S
Location: Los Angeles
Posts: 686
Thanks: 597
Thanked 257 Times in 174 Posts
Mentioned: 6 Post(s)
Tagged: 0 Thread(s)
|
Still getting some gear whine while decelerating after the diff warms up. Plan is to use some Redline Heavy Shockproof in the diff to see if it quiets down (it's already not very loud, so I'm hopeful). If it persists, I may be buying another set of gears to set it up all correctly the first time to see if that fixes the issue. I suspect that I screwed up the first set of gears by rushing the job and running them misaligned. The noise really isn't so much the issue as the oil quality after just a few hundred miles as it comes out pretty dark. Hopefully my example will be a good warning to anyone who plans on doing this to be patient.
|
|
|
|
|
09-15-2014, 09:38 AM
|
#81 | |
|
The Mechanic

Join Date: Mar 2012
Drives: Civic Turbo,FR-S
Location: NJ
Posts: 928
Thanks: 130
Thanked 171 Times in 119 Posts
Mentioned: 2 Post(s)
Tagged: 1 Thread(s)
|
Quote:

__________________
|
|
|
|
|
|
09-15-2014, 11:18 AM
|
#82 | |
|
Senior Member
Join Date: Jan 2013
Drives: Scion FR-S
Location: Los Angeles
Posts: 686
Thanks: 597
Thanked 257 Times in 174 Posts
Mentioned: 6 Post(s)
Tagged: 0 Thread(s)
|
Quote:
Supposed to get the heavy shockproof in today and will be driving another 150 miles after putting it in, so I'll report back in the next few days the outcome. I unfortunately don't have the time to rip it all apart for another few months, so I'll probably buy another set at that point and just redo the whole setup (minus bearings). My downfall was not getting backlash correct the first time. Are you sure it was measured correctly and pattern on front and back of tooth was correct? |
|
|
|
|
|
09-16-2014, 09:30 AM
|
#83 | |
|
The Mechanic
Join Date: Mar 2012
Drives: Civic Turbo,FR-S
Location: NJ
Posts: 928
Thanks: 130
Thanked 171 Times in 119 Posts
Mentioned: 2 Post(s)
Tagged: 1 Thread(s)
|
Quote:
__________________
|
|
|
|
|
|
09-16-2014, 11:16 PM
|
#84 | |
|
Senior Member
Join Date: Jan 2013
Drives: Scion FR-S
Location: Los Angeles
Posts: 686
Thanks: 597
Thanked 257 Times in 174 Posts
Mentioned: 6 Post(s)
Tagged: 0 Thread(s)
|
Quote:
For what it's worth, the heavy shockproof didn't have much of an affect. |
|
|
|
|
|
|
|
|
|
|
 Similar Threads
|
||||
| Thread | Thread Starter | Forum | Replies | Last Post |
| Mfactory Final Drive Ring and Pinion | Crossover Auto | Engine, Exhaust, Transmission | 87 | 05-26-2017 02:21 AM |
| Considering going to 3.727 gear/pinion in 6MT | HotLavaMann | Engine, Exhaust, Transmission | 83 | 01-10-2015 10:34 AM |
| 3.9 final gear - ring and pinion | PantsDants | Engine, Exhaust, Bolt-Ons | 5 | 11-08-2013 03:06 AM |
| MFactory Ring and Pinion Sets | JMPoole | Engine, Exhaust, Bolt-Ons | 14 | 07-31-2013 12:09 PM |
| Differential and Transmission Fluid Swap with Red Line Oil - 2013 Subaru BRZ | JPxM0Dz | Mechanical Maintenance (Oil, Fluids, Break-In, Servicing) | 1 | 05-05-2013 05:12 PM |


