


|
||||||
| Cosmetic Modification (Interior/Exterior/Lighting) Discussions about cosmetic mods. |
 |
|
|
Thread Tools | Search this Thread |
 04-21-2013, 09:45 PM
|
#43 | |
|
Senior Member

Join Date: Dec 2012
Drives: 2013 BRZ Limited - WRB, MT
Location: Long Island, NY
Posts: 1,177
Thanks: 58
Thanked 176 Times in 139 Posts
Mentioned: 15 Post(s)
Tagged: 0 Thread(s)
|
Quote:
|
|

|

|
|
04-22-2013, 04:14 AM
|
#44 |
|
Senior Member

Join Date: Nov 2012
Drives: BMW M3
Location: Wilmington, DE
Posts: 132
Thanks: 4
Thanked 34 Times in 27 Posts
Mentioned: 8 Post(s)
Tagged: 0 Thread(s)
|
jpit, abutterman, and anybody interested:
We are now working to resolve all the dash trim issues raised here. We do stand behind our products and we will do what we can to resolve it to your full satisfaction. A few words of explanation in regards to radio bezel cover it is not the matter of different radio in European Toyota GT86 / Subaru BRZ as we did the prototyping on the part that was shipped to us for measurements by a customer from the US. We only do not have any installation instructions published on the website yet. The customer who sent us the parts for prototyping was supposed make an installation manual for us to publish on the website but so far we havent received anything from him :-( Same thing refers to embroidery alignment on the other trim part - as the bottom shape of the plastic dash trim is not a straight line it is not easy to align the embroidery properly without a proper installation feedback. And again, we haven't received any feedback from the first customer :-( I sincerely hope we can get you a product you'll be happy with :-) We are going to need some assistance from you... jpit: You've just received an email with some detailed explanations and suggestions how we can get this all solved :-) regards Jack RedlineGoods Team |
|
|
|
|
04-25-2013, 04:25 AM
|
#45 |
|
Senior Member
Join Date: Nov 2012
Drives: BMW M3
Location: Wilmington, DE
Posts: 132
Thanks: 4
Thanked 34 Times in 27 Posts
Mentioned: 8 Post(s)
Tagged: 0 Thread(s)
|
In the meantime guys, please see this install:
 What do you think? I hope to have a thorough install write-up for you soon. And some new things maybe :-) Anyone interested in lending us the following parts for prototyping (in exchavge for free covers upon good install write-up)? - door speaker bezels - door armrest - door window sill - knee pads - AUTO shift boot Let me know Take care Jack RedlineGoods Team |
|
|
|
|
04-25-2013, 08:34 PM
|
#46 |
|
Senior Member
Join Date: Dec 2012
Drives: 2013 BRZ Limited - WRB, MT
Location: Long Island, NY
Posts: 1,177
Thanks: 58
Thanked 176 Times in 139 Posts
Mentioned: 15 Post(s)
Tagged: 0 Thread(s)
|
My dash pieces came in today. I guess some parts of the world have a realllly small radio lol mine's not cut at all but it should be easy enough to cut it out. Looks like i should be able to get the stitching lined up so it should come out nice. I'll give it a shot this weekend
|
|
|
|
|
04-26-2013, 03:27 AM
|
#47 |
|
Senior Member
Join Date: Nov 2012
Drives: BMW M3
Location: Wilmington, DE
Posts: 132
Thanks: 4
Thanked 34 Times in 27 Posts
Mentioned: 8 Post(s)
Tagged: 0 Thread(s)
|
Guys,
It is not the matter of radio size really :-) It's just the matter of leather being a flexible fabric thus quite easy to play with. Therefore it is really easy to cut the leather to the void in the plastic trim when you first align tle leather and stitching properly to the shape of the plastic part. If the leather was pre-cut precisely it could happen that if you fail to align it perfectly in one place, you may have too little leather in another... Please see these installation manuals for guidance on how to do it:
In case you have any more questions, feel free to ask, I'm here to help :-) PS: @abutterman, as we are still missing a proper instalaltion manual for dash trims, i will gladly offer a 50% refund upon good installation write-up with photos, including the process of glueing the leather onto plastic trims, what do you think? :-) Take care Jack RedlineGoods Team |
|
|
|
|
04-26-2013, 09:36 AM
|
#48 | |
|
Ridge Racerrrrrrrrr

Join Date: Jul 2012
Drives: 2013 Scion FR-S, 2004 Toyota Coroll
Location: Regina, Sk
Posts: 3,516
Thanks: 5,786
Thanked 1,363 Times in 954 Posts
Mentioned: 37 Post(s)
Tagged: 1 Thread(s)
|
Quote:
I am Canadian too, so I could be your Canadian car rep  waaait dang I am unable to take my parts off to send away. Sorry guys!
__________________
|
|
|
|
|
|
04-26-2013, 09:41 AM
|
#49 |
|
Senior Member
Join Date: Dec 2012
Drives: 2013 BRZ Limited - WRB, MT
Location: Long Island, NY
Posts: 1,177
Thanks: 58
Thanked 176 Times in 139 Posts
Mentioned: 15 Post(s)
Tagged: 0 Thread(s)
|
i actually have a spare set of plain black knee pads. i'll have to see how much shipping is to poland
|
|
|
|
|
04-26-2013, 01:59 PM
|
#50 |
|
Senior Member
Join Date: Dec 2012
Drives: 2013 BRZ Limited - WRB, MT
Location: Long Island, NY
Posts: 1,177
Thanks: 58
Thanked 176 Times in 139 Posts
Mentioned: 15 Post(s)
Tagged: 0 Thread(s)
|
doesn't look like i'll be able to install the leather parts. If i wrap the leather around the edges where the 2 pieces meet, i can't get them to clip back into the dash. I tried trimming it down but it just looks aweful. Also ended up with scratches on my trim from trying to trim the leather while it was held in place so i don't think this piece is going to work out. The alcantara pieces seem to be much easier as the material is a lot thinner than real leather. If you're going to order the dash pieces, definitely go alcantara. The leather is awesome for the shift boot though and juuuust makes it way back into place with the ebrake boot.
|
|
|
|
|
04-26-2013, 04:53 PM
|
#51 |
|
Senior Member
Join Date: Nov 2012
Drives: BMW M3
Location: Wilmington, DE
Posts: 132
Thanks: 4
Thanked 34 Times in 27 Posts
Mentioned: 8 Post(s)
Tagged: 0 Thread(s)
|
This is also somehing we were afraid of - as Alcantara is much thinner than leather it seems the only way to install leather covered dash trims will be to trim the plastic trims themselves along the egde where they meet each other. Is this something you'd take the risk of doing, Andrew?
Otherwise, we'll look for some plastic trims at the dealership / junkyard to make the trials and find the solution. Be assured we won't leave it this way and do our best to resolve this issue to your full satisfaction. regards Jack |
|
|
|
|
04-26-2013, 07:01 PM
|
#52 |
|
Senior Member
Join Date: Jun 2012
Drives: Subaru BRZ
Location: Port Angeles, WA
Posts: 338
Thanks: 24
Thanked 234 Times in 86 Posts
Mentioned: 22 Post(s)
Tagged: 1 Thread(s)
|
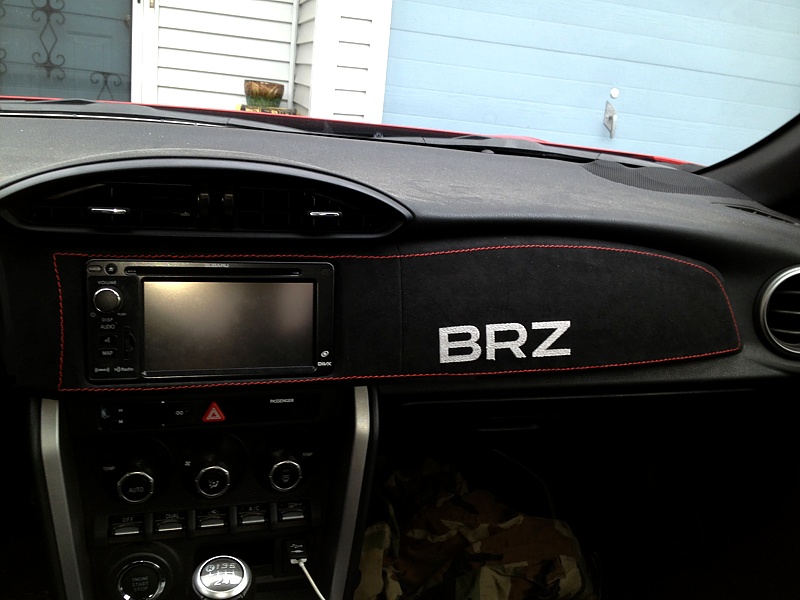
Just finished installing the two piece leather dash cover. Took a couple of hours and it looks fine (except the slanted BRZ). I did not use any glue but a 3M window ribbon sealer #08612 (a flexible, sticky - putty like substance). This will hold down the edges firmly and you can make adjustments and if you choose go back to stock.
The leather is beautiful and the stitching is straight but this does require some work to install. Last edited by jpit; 04-26-2013 at 07:27 PM. |
|
|
|
| The Following User Says Thank You to jpit For This Useful Post: | Panman (04-26-2013) |
|
04-26-2013, 07:27 PM
|
#53 | |
|
When In Doubt...

Join Date: May 2011
Drives: Slowww
Location: PA215
Posts: 1,844
Thanks: 1,023
Thanked 752 Times in 412 Posts
Mentioned: 20 Post(s)
Tagged: 0 Thread(s)
|
Quote:
This looks awful. The lines are not remotely straight. If you look at the stitching above the headunit, it's very close to the headunit on the left side but then on the right it moves away about 5mm. Also, the style of stitching is no good. See if you can do something that more closely resembles the stock stitching on the seats. You guys have a bit of a way to go if you want to actually develop a real demand for these. Your price is extremely competitive and I respect and appreciate that people still want to offer a good deal but honestly, the JPM piece even if it's 3-4x the price, seems like a better deal to me. I think your company would benefit from increasing the price and outsourcing this upholstery work elsewhere because right now it looks like you have a gang of school children sitting in a basement somewhere trying to sew these with the lights off.
__________________
Join the Galaxy Blue Silica BRZ registry below: https://docs.google.com/spreadsheet/...2c&usp=sharing |
|
|
|
|
|
04-26-2013, 09:55 PM
|
#54 | |
|
Senior Member
Join Date: Dec 2012
Drives: 2013 BRZ Limited - WRB, MT
Location: Long Island, NY
Posts: 1,177
Thanks: 58
Thanked 176 Times in 139 Posts
Mentioned: 15 Post(s)
Tagged: 0 Thread(s)
|
Quote:
|
|
|
|
|
|
04-26-2013, 10:20 PM
|
#55 | |
|
Senior Member
Join Date: Jun 2012
Drives: Subaru BRZ
Location: Port Angeles, WA
Posts: 338
Thanks: 24
Thanked 234 Times in 86 Posts
Mentioned: 22 Post(s)
Tagged: 1 Thread(s)
|
Quote:
Laika is being a little too critical of Redline. The leather they use is first rate and the stitching is almost identical to JPM (I have a couple of their products). You save money by having to install the leather yourself and also not having to buy the replacement part. If you take your time and do a careful installation you should be alright. |
|
|
|
|
|
04-26-2013, 11:04 PM
|
#56 | |
|
When In Doubt...
Join Date: May 2011
Drives: Slowww
Location: PA215
Posts: 1,844
Thanks: 1,023
Thanked 752 Times in 412 Posts
Mentioned: 20 Post(s)
Tagged: 0 Thread(s)
|
Quote:
Jpit it looks like the material is kind of bunched up to the left of the headunit in your picture. Is this just a fitment thing or do you think it would be fixed if you removed the panel and stretched that part then secured it with a proper glue gun or equivalent? I think redline is on the right track and a few pointers (from someone qualified, not me) away from making a great looking cover. I'd be extremely eager to get the pieces for the low price that redlinegoods is offering but I'm going to wait and see if they figure out how to make it more aesthetically pleasing.
__________________
Join the Galaxy Blue Silica BRZ registry below: https://docs.google.com/spreadsheet/...2c&usp=sharing |
|
|
|
|
|
|
|
|
|
|
 Similar Threads
|
||||
| Thread | Thread Starter | Forum | Replies | Last Post |
| Crown Royal Shift Boot | Derik210 | Cosmetic Modification (Interior/Exterior/Lighting) | 30 | 09-04-2015 05:06 PM |
| How-to: Install JPM Coachworks 6MT Alcantara or Leather Shift Boot | JPM Coachworks | DIY (Do-It-Yourself) Guides | 22 | 06-26-2014 11:46 PM |
| WTB: Red stitched ebrake boot | AG3NT_5CARFAC3 | Interior Parts (Incl. Lighting) | 1 | 02-28-2013 12:04 AM |
| WTT: My red stitched ebrake boot | Laika | Interior Parts (Incl. Lighting) | 10 | 02-09-2013 01:26 AM |
| Need Subaru BRZ shift Boot | djliquidsteele | Cosmetic Modification (Interior/Exterior/Lighting) | 0 | 10-21-2012 04:18 PM |


