


 06-17-2017, 05:34 AM
|
#29 |
|
Senior Member

Join Date: Jul 2016
Drives: BRZ, WRX
Location: Sydney, Australia
Posts: 291
Thanks: 105
Thanked 962 Times in 233 Posts
Mentioned: 2 Post(s)
Tagged: 0 Thread(s)
|
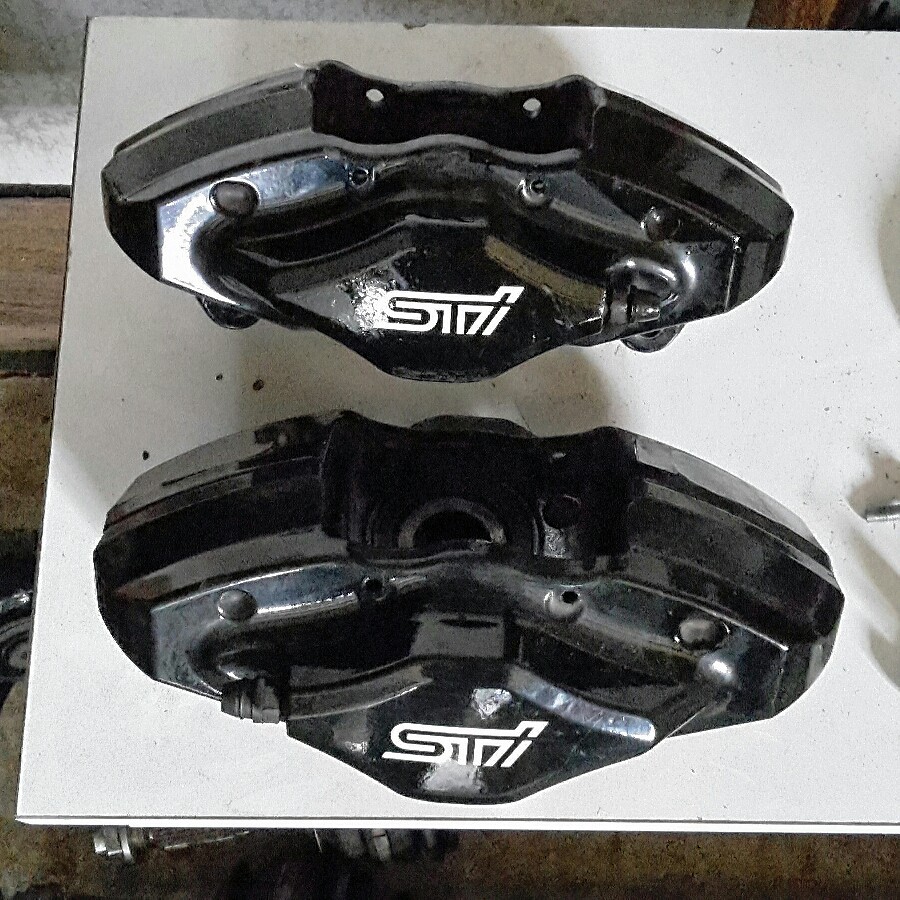
Oh and I also picked up some rear brakes, they were too cheap not to buy
Last edited by DIY; 07-01-2017 at 07:40 AM. |

|

|
|
06-21-2017, 09:36 PM
|
#30 | |
|
Member
Join Date: Apr 2015
Drives: 2013 Scion FR-S
Location: Yarmouth
Posts: 12
Thanks: 0
Thanked 2 Times in 2 Posts
Mentioned: 0 Post(s)
Tagged: 0 Thread(s)
|
Quote:
Sent from my iPhone using Tapatalk |
|
|
|
|
|
06-21-2017, 09:36 PM
|
#31 | |
|
Member
Join Date: Apr 2015
Drives: 2013 Scion FR-S
Location: Yarmouth
Posts: 12
Thanks: 0
Thanked 2 Times in 2 Posts
Mentioned: 0 Post(s)
Tagged: 0 Thread(s)
|
Quote:
Too awesome for words! Love this entire thread! Sent from my iPhone using Tapatalk |
|
|
|
|
| The Following User Says Thank You to JayzFRS For This Useful Post: | DIY (06-22-2017) |
|
06-21-2017, 09:43 PM
|
#32 | |
|
Senior Member

Join Date: Jun 2017
Drives: 2013 Black FR-S 6A
Location: Calgary
Posts: 134
Thanks: 37
Thanked 52 Times in 39 Posts
Mentioned: 0 Post(s)
Tagged: 0 Thread(s)
|
Subscribe ... and now I must wait LOL this is awesome though keep up the good work !
Sent from my iPhone using Tapatalk
__________________
Quote:
  |
|
|
|
|
| The Following User Says Thank You to Syche For This Useful Post: | DIY (06-22-2017) |
|
06-22-2017, 11:43 AM
|
#33 |
|
BoostedBRZ
Join Date: Mar 2014
Drives: Turbo BRZ
Location: IL
Posts: 689
Thanks: 171
Thanked 259 Times in 191 Posts
Mentioned: 3 Post(s)
Tagged: 0 Thread(s)
|
build looks great, can't wait to see the finished product!
__________________
|
|
|
|
| The Following User Says Thank You to pgranberg11 For This Useful Post: | DIY (06-22-2017) |
|
06-30-2017, 10:55 AM
|
#34 |
|
Senior Member

Join Date: Apr 2014
Drives: 2013 Ultramarine FR-S
Location: Springfield, MO
Posts: 1,950
Thanks: 2,539
Thanked 1,421 Times in 805 Posts
Mentioned: 31 Post(s)
Tagged: 3 Thread(s)
|
Photos are down

__________________
 |
|
|
|
|
06-30-2017, 11:35 AM
|
#35 | |
|
sleep, drive, eat, repeat

Join Date: Mar 2012
Drives: '13 BRZ, '12 Outback
Location: Sack of Potatoes
Posts: 4,431
Thanks: 2,630
Thanked 3,797 Times in 1,981 Posts
Mentioned: 188 Post(s)
Tagged: 4 Thread(s)
|
Quote:

|
|
|
|
|
| The Following User Says Thank You to BigFatFlip For This Useful Post: | Lynxis (06-30-2017) |
|
06-30-2017, 07:18 PM
|
#36 |
|
Senior Member
Join Date: Jul 2016
Drives: BRZ, WRX
Location: Sydney, Australia
Posts: 291
Thanks: 105
Thanked 962 Times in 233 Posts
Mentioned: 2 Post(s)
Tagged: 0 Thread(s)
|
I hope photobucket change their mind on this because I'm not going to pay $40 per month or whatever it was. They are basically holding people who have been using their service to ransom. I have over 2000 photos shared going back to 2007 and there is no way of fixing all those links if I change to a new host.
An update on the car: I have just been practicing joining tube the last couple of weeks, cutting the fish mouth pattern and welding some joins together at different angle. I have done them with TIG and MIG and have decided to use TIG on all the joins in the car as I really struggled to get something I was happy with using the MIG welder. Yesterday I went and purchased a pro-tools hole saw style tube notcher and enough steel tube to do the entire roll cage, crossmembers etc. it should be delivered some time next week. Sorry no photos today. |
|
|
|
|
07-01-2017, 08:08 AM
|
#37 |
|
Senior Member
Join Date: Jul 2016
Drives: BRZ, WRX
Location: Sydney, Australia
Posts: 291
Thanks: 105
Thanked 962 Times in 233 Posts
Mentioned: 2 Post(s)
Tagged: 0 Thread(s)
|
I have downloaded all my photos from photobucket and created a new Flickr account and spent a fair amount of time editing all my posts in this thread so we can see the photos again.
So now I have photo hosting again I will share some photos of the latest progress. I am a little reluctant to post photos of my welding because I know how critical welders can be with other peoples work but anyway just bear in mind when you look at photos of my welding that I only started TIG welding in November last year and MIG welding in March this year. As mentioned I bought myself a tube notcher after using the angle grinder method and also the method where you print out a template to wrap around the tube. Both methods gave me good results but not super consistent and a little time consuming. So this is the notcher. We don't have a lot to choose from here in Aus at reasonable prices but this pro-tools industrial notcher was good value.  It takes about a minute to drill through this 2.6mm wall DOM tube 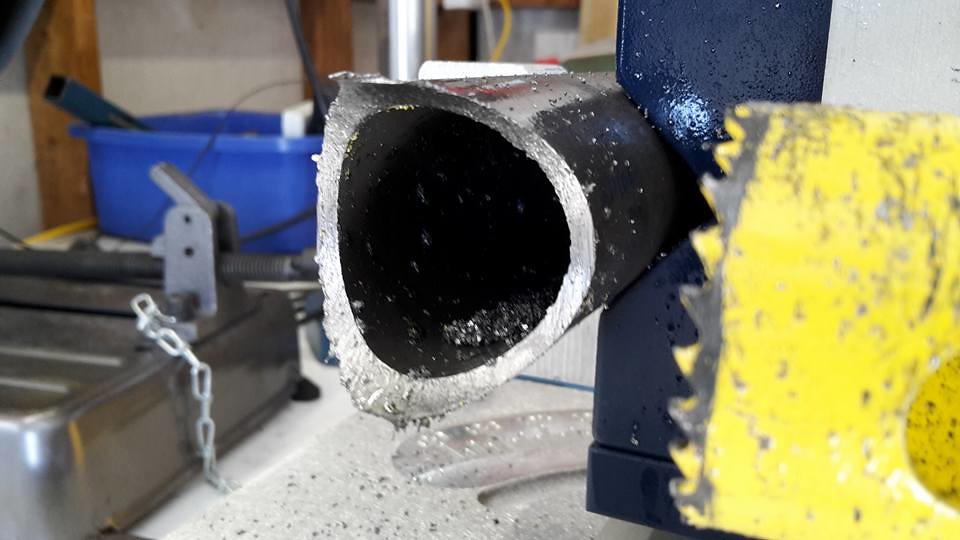 Straight off the notcher without any clean up at all you get perfect fitment which makes welding a lot easier and stronger joints. 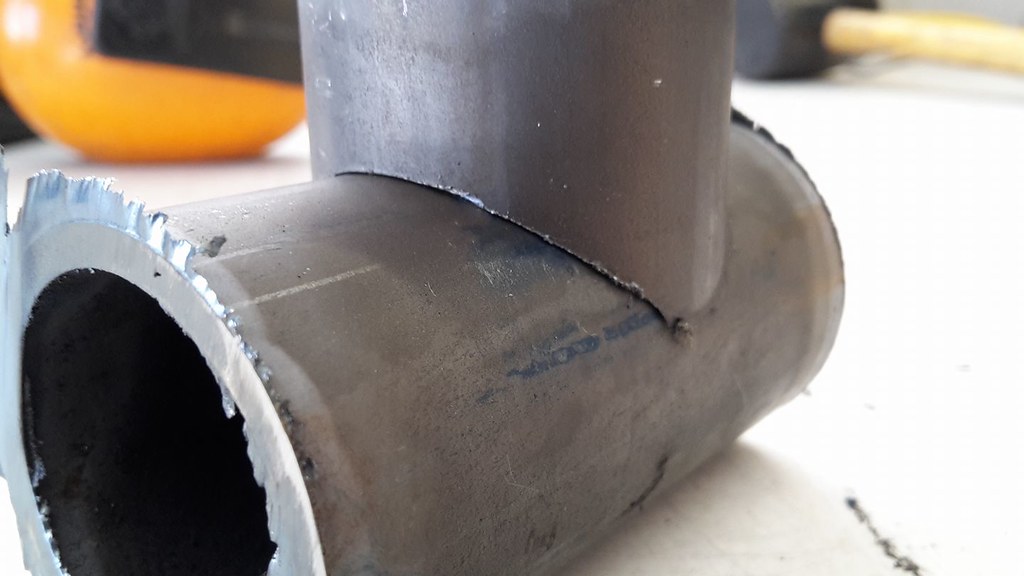 De-burred 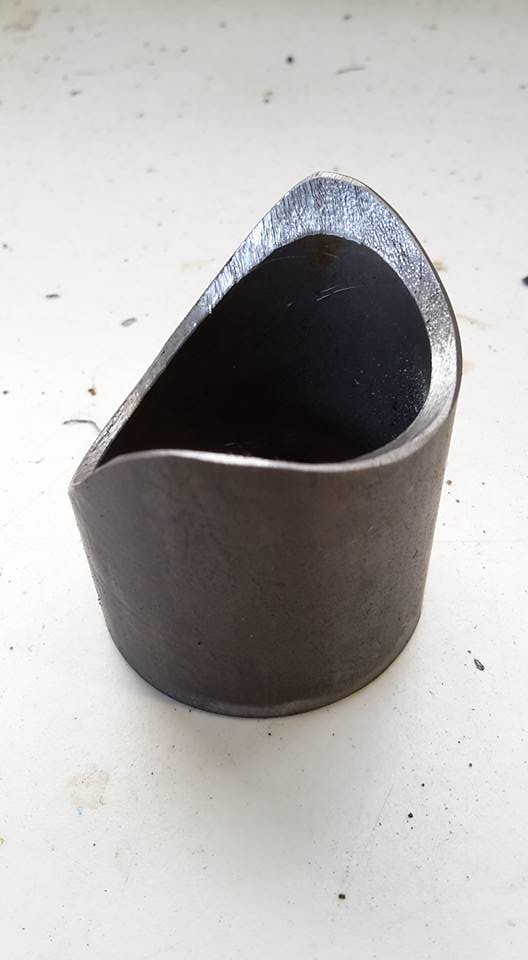 Fully cleaned up to shiny bright metal and washed in acetone ready for welding. 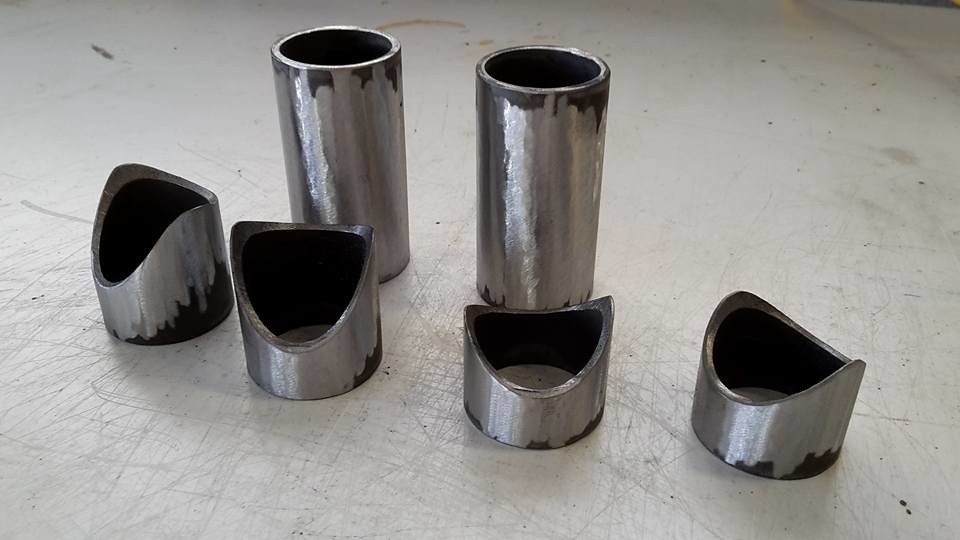 These are just practice weld pieces I am making here, the tube is the actual stuff I am building the rear suspension and roll cage with and this allows me to dial in the settings on my welder and basically get used to cutting, preparing and welding tube. 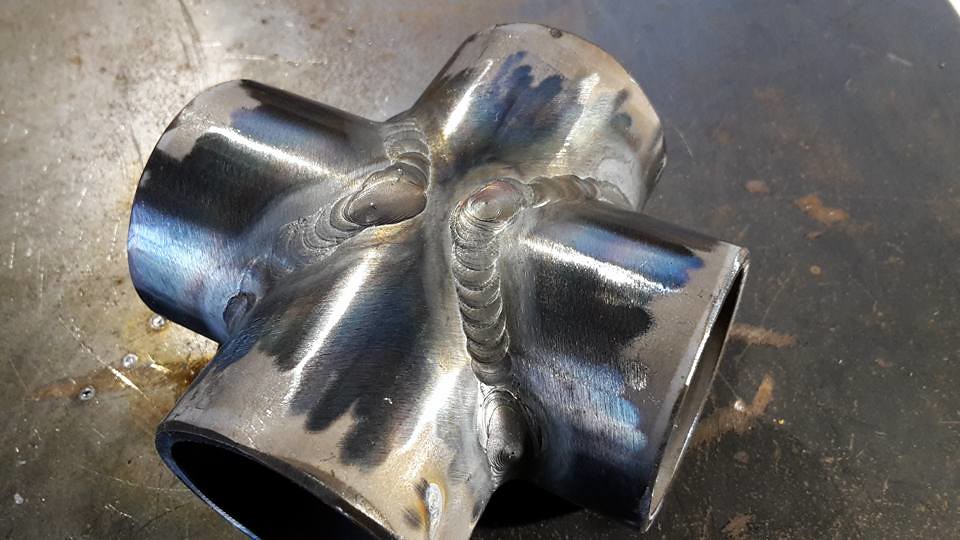 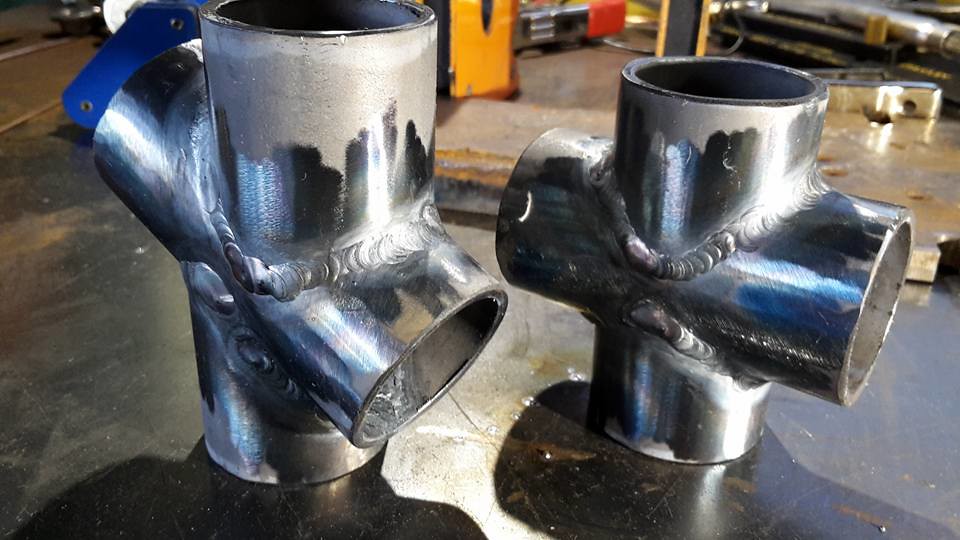 Finally a photo of the inside of the tube after welding so you can see the penetration is good.  Joel. |
|
|
|
| The Following 2 Users Say Thank You to DIY For This Useful Post: | Ash_89 (03-01-2021), BigFatFlip (07-03-2017) |
|
07-02-2017, 05:13 AM
|
#38 |
|
Senior Member
Join Date: Jul 2016
Drives: BRZ, WRX
Location: Sydney, Australia
Posts: 291
Thanks: 105
Thanked 962 Times in 233 Posts
Mentioned: 2 Post(s)
Tagged: 0 Thread(s)
|
Today I tested myself by welding a practice structure "out of position". Its all well and good to be able to weld something on the bench but that won't help me when it comes to the parts of the tube structure and roll cage that have to be welded inside the car in awkward positions.
So this is just some 90 and 25 degree notches with a little base plate on the bottom of the main length of tube. 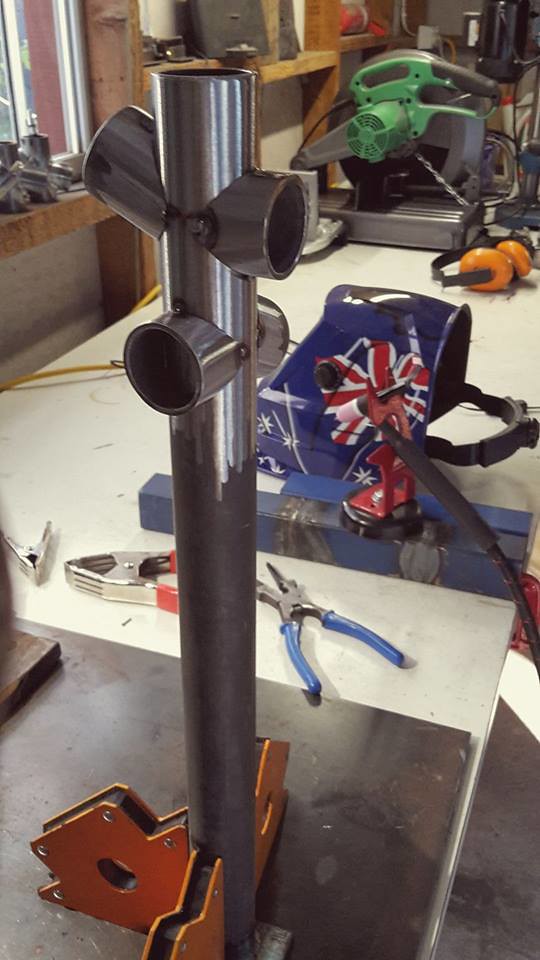 I did not re-position it at all for the whole exercise to keep things difficult and I even had to weld some of it left-handed which was a first for me. 
|
|
|
|
| The Following 3 Users Say Thank You to DIY For This Useful Post: |
|
07-06-2017, 06:50 PM
|
#39 |
|
Senior Member
Join Date: Jul 2016
Drives: BRZ, WRX
Location: Sydney, Australia
Posts: 291
Thanks: 105
Thanked 962 Times in 233 Posts
Mentioned: 2 Post(s)
Tagged: 0 Thread(s)
|
Hey guys, a small update today.
All the tube to build the roll cage and rear suspension was delivered to my house this week. 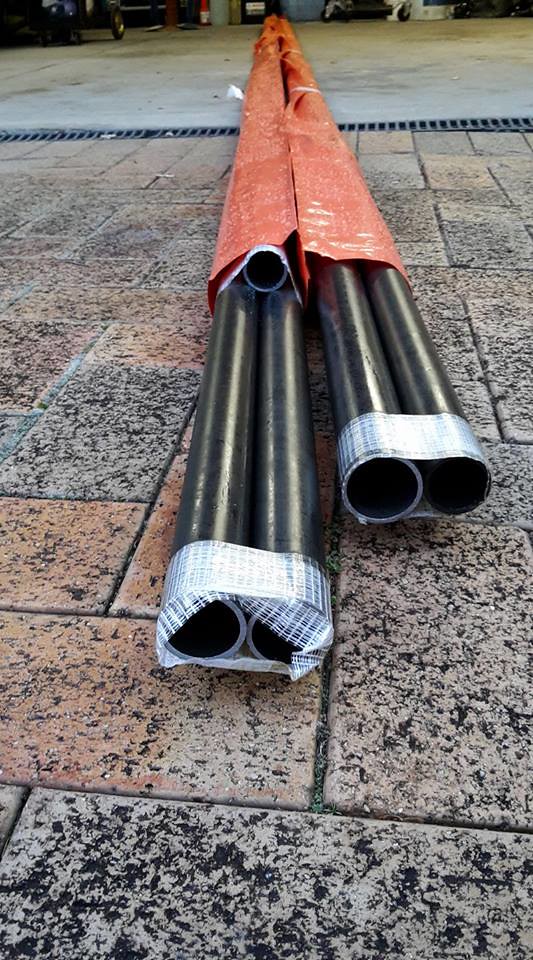 The tube size for the cage is as per the rules, that is 1.75" for the main hoop and everything else is 1.5", all 2.6mm wall DOM. My tube bender is about the least expensive you can buy especially here in Aus as we get stung hard when importing from the USA. Last night I used it for the first time and found it to work very well considering the price. The only real downside to this bender is the CLR of the dies, that is the radius of which the die bends the tube around is on the larger side. This means you will not be able to tuck things into corners as well as you could with a smaller die radius. 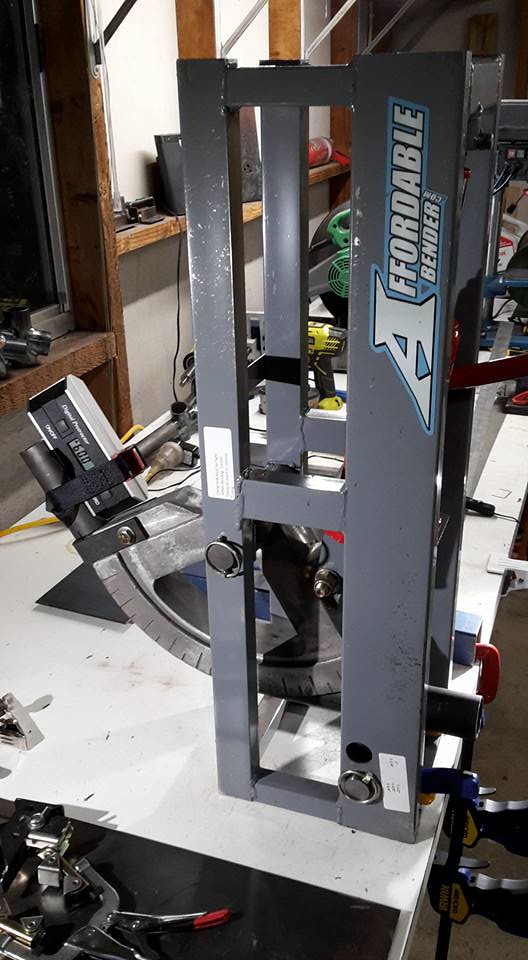 I ordered the bender with the two die sizes I needed to complete the roll cage. 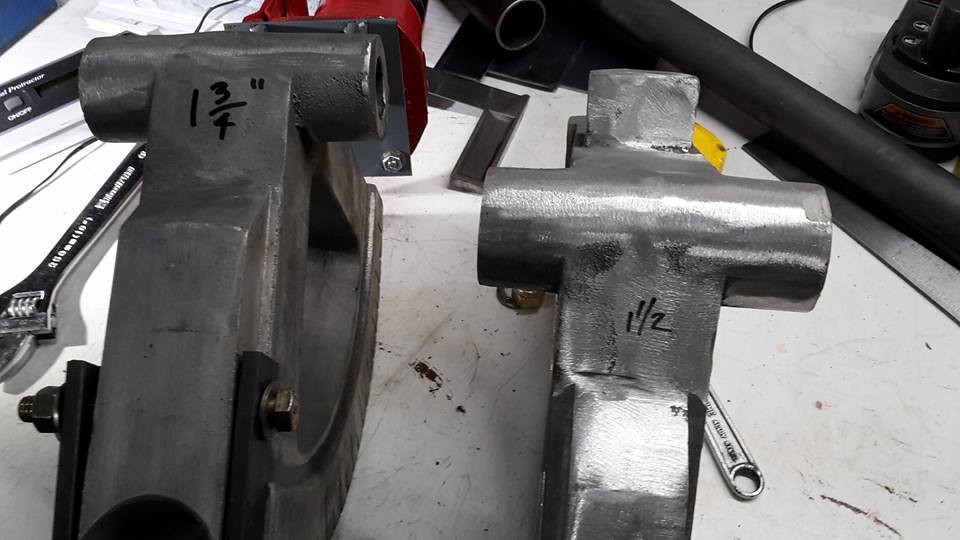 I made 2 bends last night, both about 90 degrees, one for each tube size I am using. Before making the bends I have marked the position of the start of the die and then further marks along the tube every 20mm. So these two tube will be my reference bends that I can hold up inside the car when measuring everything, having the distance along the bend helps me quickly work out how long the tube needs to be.  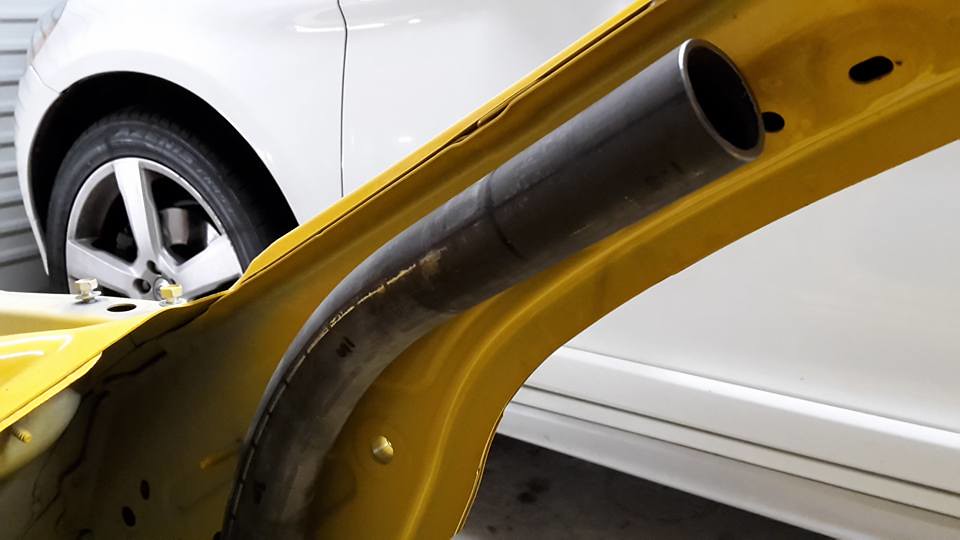 Hopefully this weekend I can get started on the roll cage. |
|
|
|
| The Following 4 Users Say Thank You to DIY For This Useful Post: |
|
07-08-2017, 08:03 AM
|
#40 |
|
Senior Member
Join Date: Jul 2016
Drives: BRZ, WRX
Location: Sydney, Australia
Posts: 291
Thanks: 105
Thanked 962 Times in 233 Posts
Mentioned: 2 Post(s)
Tagged: 0 Thread(s)
|
I did not get as much done as I would have liked today but any progress is good when you have 2 children under 3 years old.
I wanted to drill out any captive nuts which are no longer required and also remove any unnecessary brackets before I start installing the roll cage as it would be hard to get the drill in there once full of tubes. I start by marking all the captive nuts and brackets that need removal. 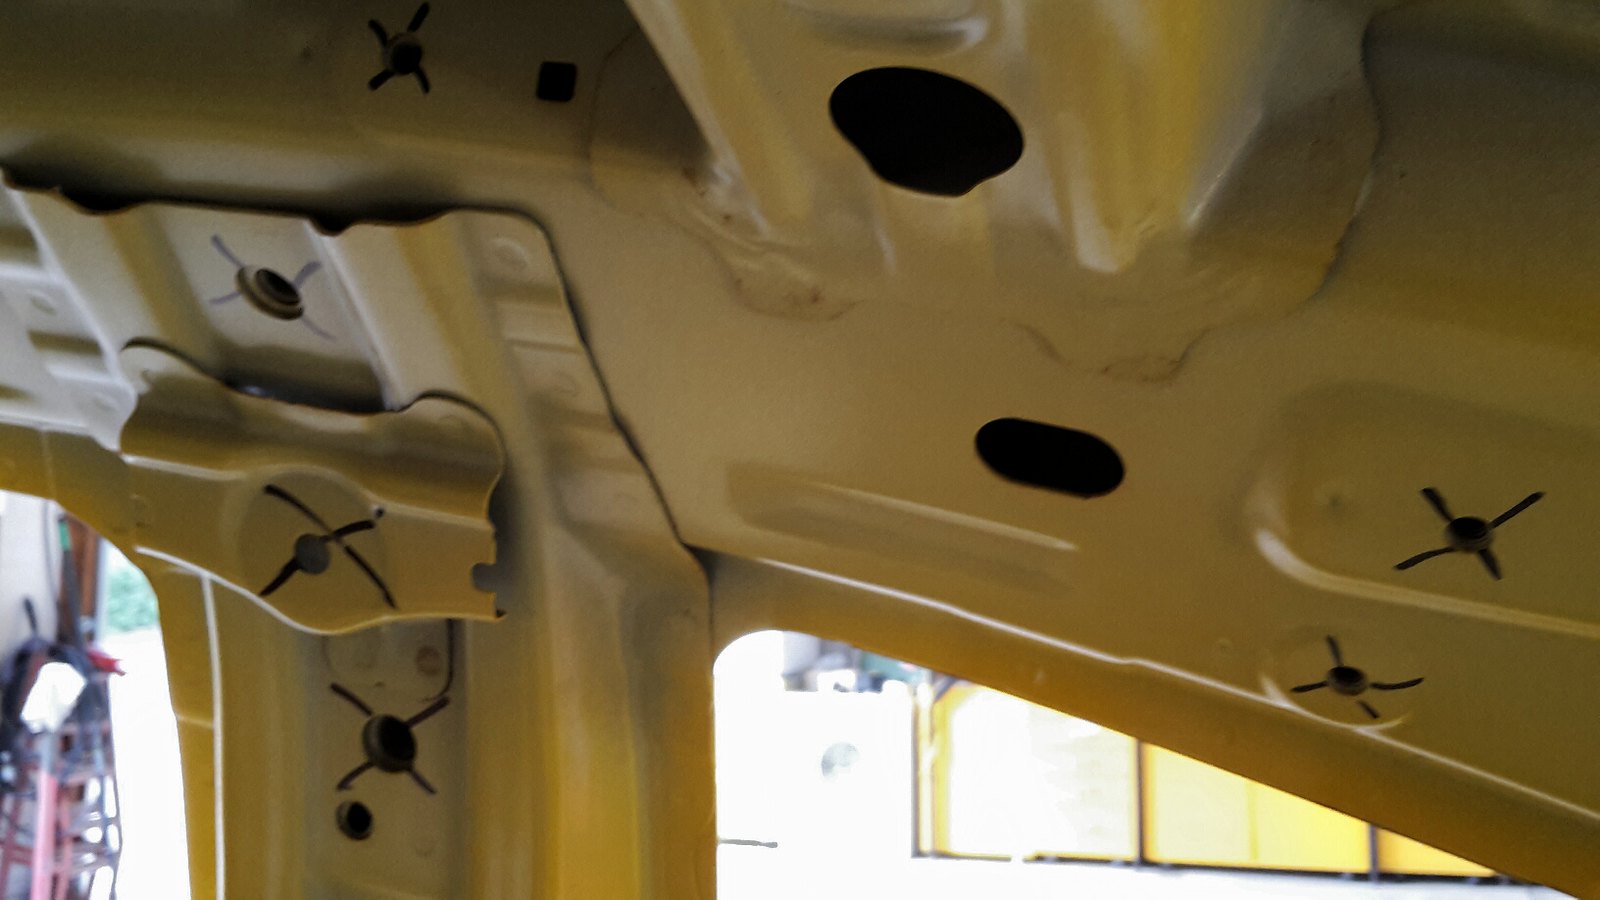 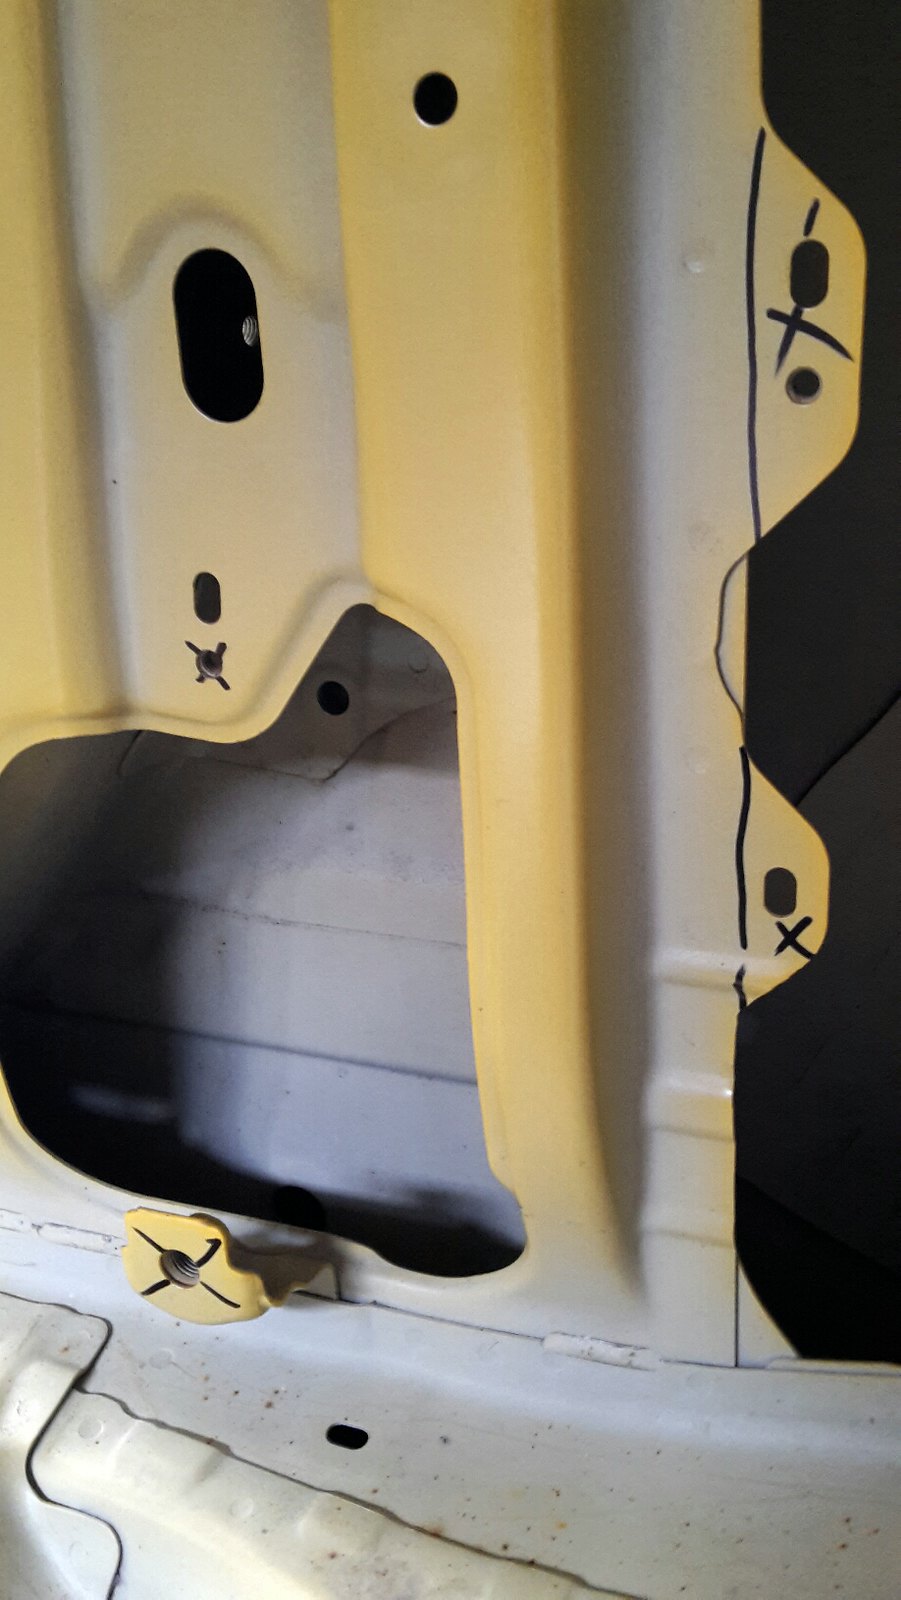 I have not done all of them yet, just the ones that will be covered by tubes, about half a kilo came out just around the main hoop. I have also de-burred the holes and put a little primer on them. 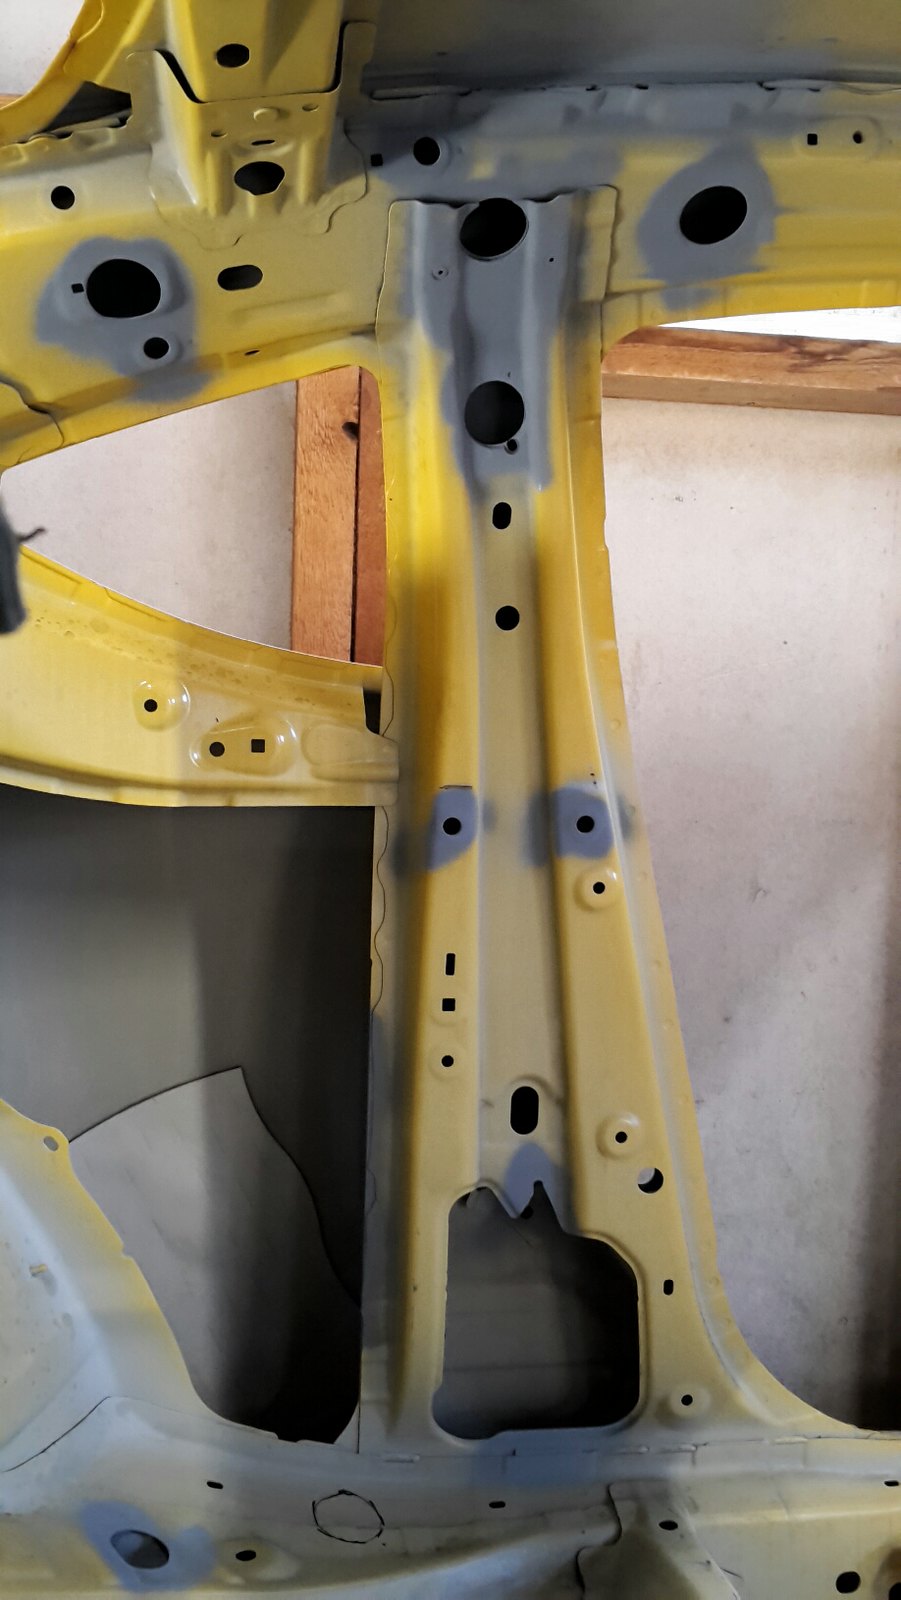 I have also removed the central support bar from the roof as its not longer required with a roll cage. That support bar was 1.75kg on its own. 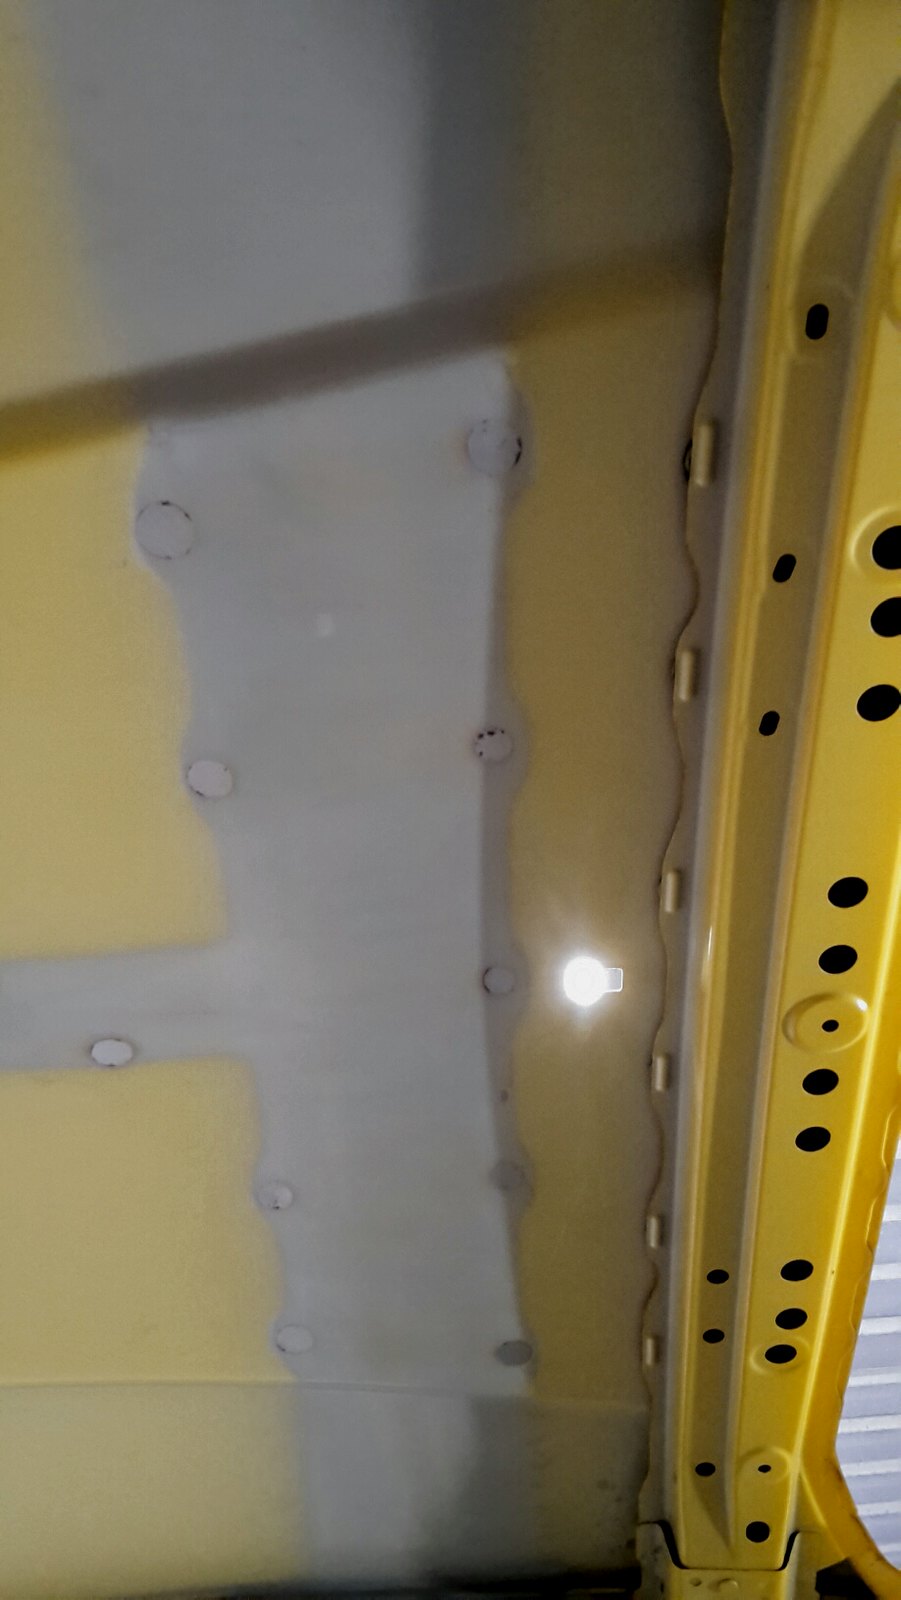 I stopped there as my spot weld removal tool died and I'll need to buy another one before I can proceed. I spent the afternoon measuring everything up for the main hoop to be bent and fitted, hopefully I can find some more time tomorrow to get that done. |
|
|
|
| The Following 2 Users Say Thank You to DIY For This Useful Post: | Ash_89 (03-01-2021), BigFatFlip (07-10-2017) |
|
07-09-2017, 03:49 AM
|
#41 |
|
Senior Member
Join Date: Jul 2016
Drives: BRZ, WRX
Location: Sydney, Australia
Posts: 291
Thanks: 105
Thanked 962 Times in 233 Posts
Mentioned: 2 Post(s)
Tagged: 0 Thread(s)
|
I spent the afternoon bending the main hoop for the roll cage and let me say that it was not a pleasant experience working on the ground wrestling with the bender!
I got it finished but I am not 100% happy with it. I am seriously considering making another one as I have enough spare tube. The first two bends came out fine but then I found the next two bends ended up needing to start part way into the tail end of the first bends making it very difficult to estimate where the bend should start to keep the hoop within my boundary. Looking back I should have done the first bends at a shallower angle and further inward to give myself more space for the second bends. Anyway I'll need a break from it now, my back is aching. 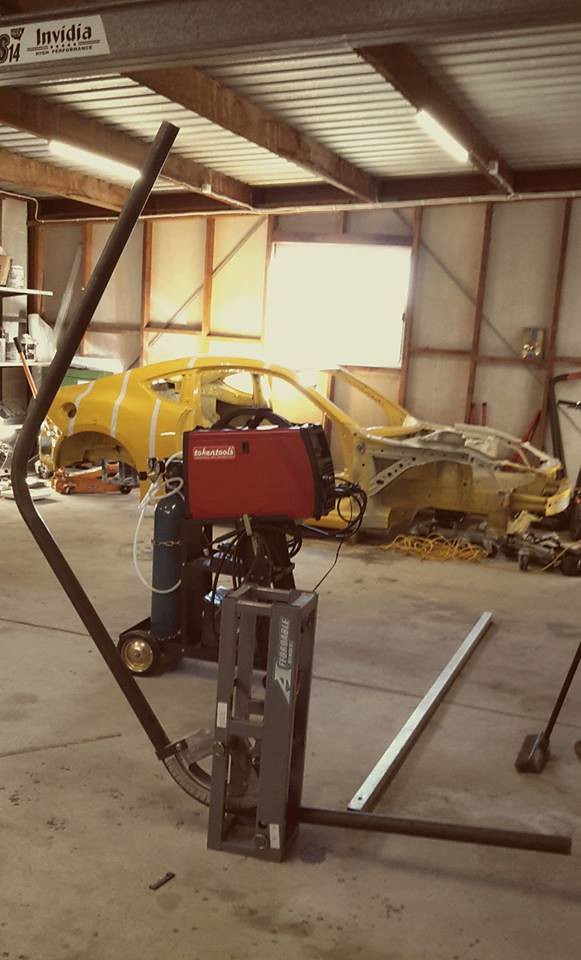
|
|
|
|
|
07-09-2017, 07:46 AM
|
#42 |
|
Member

Join Date: Jun 2013
Drives: Toyota GT86
Location: Western Australia
Posts: 63
Thanks: 36
Thanked 61 Times in 36 Posts
Mentioned: 0 Post(s)
Tagged: 0 Thread(s)
|
mate great to see another great build from Australia, love your DIY approach. Will be following this! keep it up mate
__________________
|
|
|
|
| The Following User Says Thank You to wnt3d For This Useful Post: | DIY (07-09-2017) |
|
|
|
|
 |
|
|


