


 04-14-2013, 08:11 AM
|
#267 |
|
My FR-S has 5 gears

Join Date: Aug 2012
Drives: FRS/280z/Tundra
Location: St. Louis
Posts: 1,994
Thanks: 626
Thanked 1,065 Times in 572 Posts
Mentioned: 49 Post(s)
Tagged: 3 Thread(s)
|
So basically someone could start making and selling pre built harness that plugs into the side maker connector and jumps to the foglight h11? Shit I wish I was I'm America
__________________
Omar GC
2JZ - 6870 - stock block - 1000whp? Instagram: 2jzus |

|

|
|
04-16-2013, 07:24 PM
|
#268 | |
|
Senior Member
Join Date: May 2012
Drives: Scion FR-S Asphalt AT & XB
Location: Virginia Beach,VA
Posts: 123
Thanks: 15
Thanked 30 Times in 21 Posts
Mentioned: 3 Post(s)
Tagged: 2 Thread(s)
|
Quote:
|
|
|
|
|
|
04-16-2013, 07:49 PM
|
#269 | |
|
Senior Member

Join Date: Jan 2013
Drives: Awesome
Location: Vancouver, BC
Posts: 295
Thanks: 167
Thanked 78 Times in 61 Posts
Mentioned: 0 Post(s)
Tagged: 0 Thread(s)
|
Quote:
__________________
 |
|
|
|
|
| The Following User Says Thank You to Retro86 For This Useful Post: | Willsonk (04-17-2013) |
|
04-18-2013, 08:48 AM
|
#270 |
|
give us this day

Join Date: Jul 2012
Drives: AE86 - FRS
Location: Three Stars & A Sun
Posts: 404
Thanks: 138
Thanked 161 Times in 37 Posts
Mentioned: 1 Post(s)
Tagged: 0 Thread(s)
|
http://www.ft86club.com/forums/showthread.php?t=34078
full fog light kit put my own kit together for 150 ..
__________________
 |
|
|
|
| The Following User Says Thank You to imravenit For This Useful Post: | Sco2355 (04-18-2013) |
|
04-18-2013, 01:39 PM
|
#271 | |
|
Senior Member
Join Date: Sep 2010
Drives: FR-S
Location: New Orleans, LA
Posts: 423
Thanks: 87
Thanked 107 Times in 68 Posts
Mentioned: 5 Post(s)
Tagged: 0 Thread(s)
|
Quote:
|
|
|
|
|
| The Following User Says Thank You to Sco2355 For This Useful Post: | Retro86 (04-18-2013) |
|
04-18-2013, 11:15 PM
|
#272 |
|
Senior Member
Join Date: Sep 2012
Drives: 2003 Camry Blue | 2013 FR-S White
Location: Bay Area - South Bay
Posts: 1,144
Thanks: 804
Thanked 288 Times in 221 Posts
Mentioned: 8 Post(s)
Tagged: 0 Thread(s)
|
If anyone wants to make harnesses just to sell here's a picture of the harness for reference:
Mj!BRKb9b(U!!~~60_57.JPG)
|
|
|
|
| The Following User Says Thank You to CamryDS For This Useful Post: | PANDA86 (04-19-2013) |
|
04-18-2013, 11:35 PM
|
#273 |
|
Old School Status
Join Date: Dec 2012
Drives: .
Location: .
Posts: 255
Thanks: 150
Thanked 407 Times in 197 Posts
Mentioned: 13 Post(s)
Tagged: 0 Thread(s)
|
is there a complete listing of parts list? i.e. stalk, light harness part/model# etc? TIA.
__________________
|
|
|
|
|
04-18-2013, 11:41 PM
|
#274 | |
|
Senior Member
Join Date: Sep 2012
Drives: 2003 Camry Blue | 2013 FR-S White
Location: Bay Area - South Bay
Posts: 1,144
Thanks: 804
Thanked 288 Times in 221 Posts
Mentioned: 8 Post(s)
Tagged: 0 Thread(s)
|
Quote:
|
|
|
|
|
|
04-19-2013, 04:16 AM
|
#275 | ||||||
|
give us this day
Join Date: Jul 2012
Drives: AE86 - FRS
Location: Three Stars & A Sun
Posts: 404
Thanks: 138
Thanked 161 Times in 37 Posts
Mentioned: 1 Post(s)
Tagged: 0 Thread(s)
|
Heres everything you need to know how to install a fog light on your frs..
Here's all the references I used.. FRS Fogs using BRZ Stalk http://www.ft86club.com/forums/showthread.php?t=29263 Fog Light Powered with Factory Stalk and BCM http://www.ft86club.com/forums/showthread.php?t=33025 Scion Frs Fog Lights http://www.ft86club.com/forums/showthread.php?t=27581 for more information and guide please visit these threads above.. 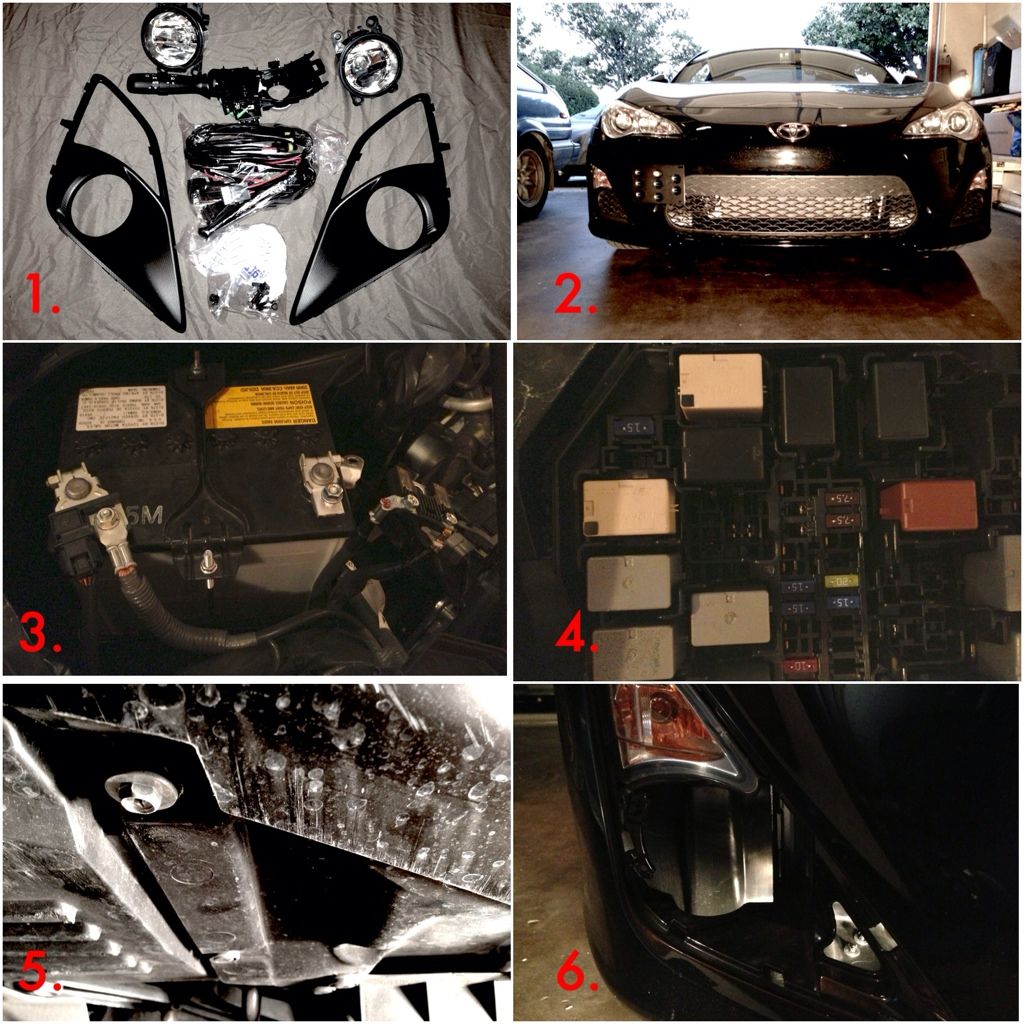 Parts Needed: 1. L&R Fog Lights $84 Quote:
Quote:
Item#: 83115FJ070 http://subarupartsforyou.com/cp_part...p?partid=23294 H11 Harness $15-25 Any h11 harness you prefer, wether you buy one from amazon.com or get Nigel fog light harness kit. Mounting Hardwares $5 You need 4x m5 or m6 Allen bolts, 4x m5 or m6 washer, 4x nylon m5 or m6 nuts. Extra Harness Pins, to make a new harness with your h11 connectors, to connect to the signal lights connectors.  http://www.ft86club.com/forums/showt...=29263&page=12 Or get the full kit at Ishii Motors http://www.ft86club.com/forums/showthread.php?t=34078 for $385 2. Start by disconnecting the battery 3. Positive Terminal disconnected 4. 3x fuses for the Horn were taken off. Heres a reference http://www.ft86club.com/forums/showthread.php?t=12257 5. Now take off plastic splash guard underneath the bumper, both passenger and driver sides, there 1x 10mm nut you need to take off and 2 pop offs on each side.. 6. take off the plastic cover on passenger side, be patient, you can actually pull it off once you get a corner off. 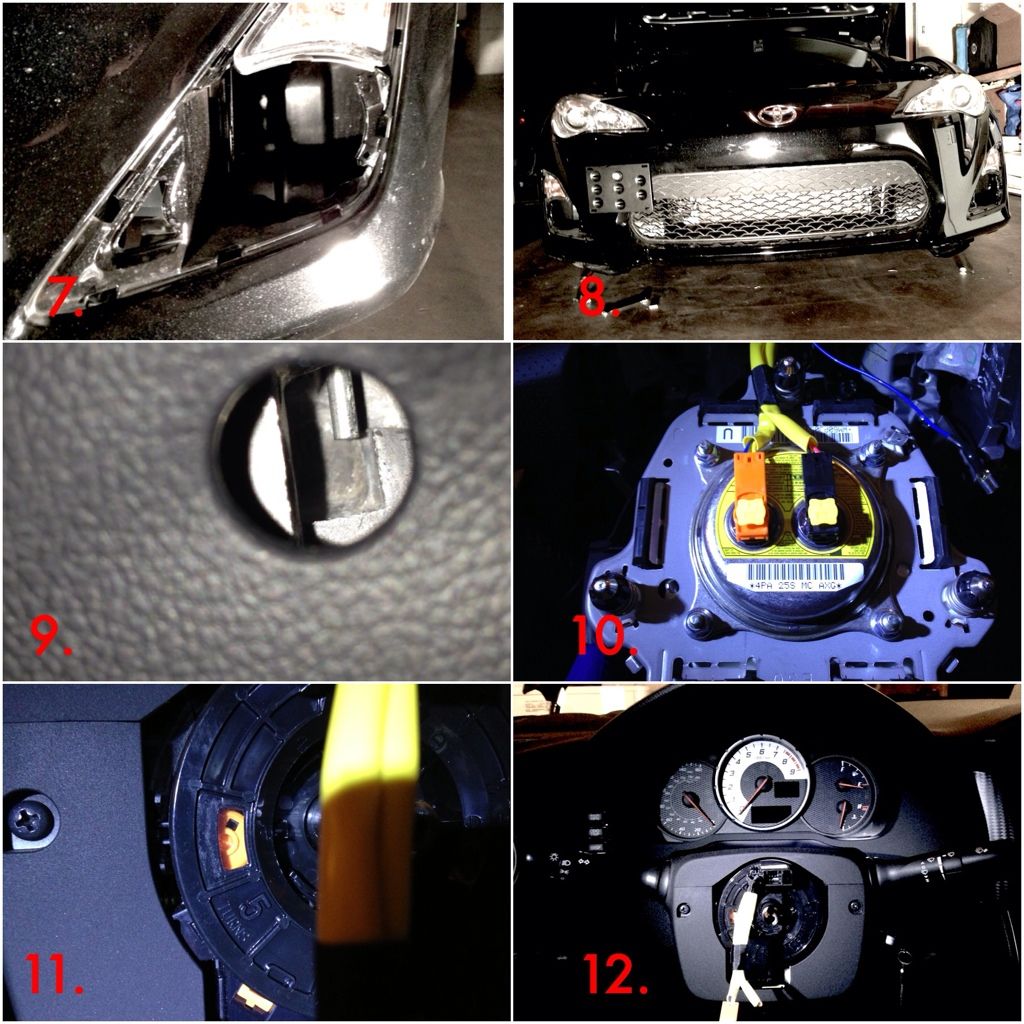 7. Now same for the driver side just carefully take off driver side plastic cover 8. Here both driver and passenger side plastic covers are taken off 9. Now its time to take the steering wheel off, first you need to take the airbag off. once again dont forget to disconnect battery off. now go to the cabin and push the pin forward the center of the steering wheel on all three holes. while pulling the airbag itself towards you. Reference http://www.ft86club.com/forums/showt...ghlight=Airbag 10. remove the orange, black harness and ground for the horn off the airbag. remove the nut that's holding the steering wheel, then gently pull the steering wheel towards you. 11. make sure to tape the steering angle sensor so it does not move I used a tape to make sure it does not move, basically you want the orange to be visible in the window just like the picture. 12. remove two bolts to take upper and lower plastic steering cover. Quote:
 13. now remove the white connector on the steering angle sensor 14. remove all off the sensors underneath, the yellow one is a tricky one you actually need to push it from the end. Quote:
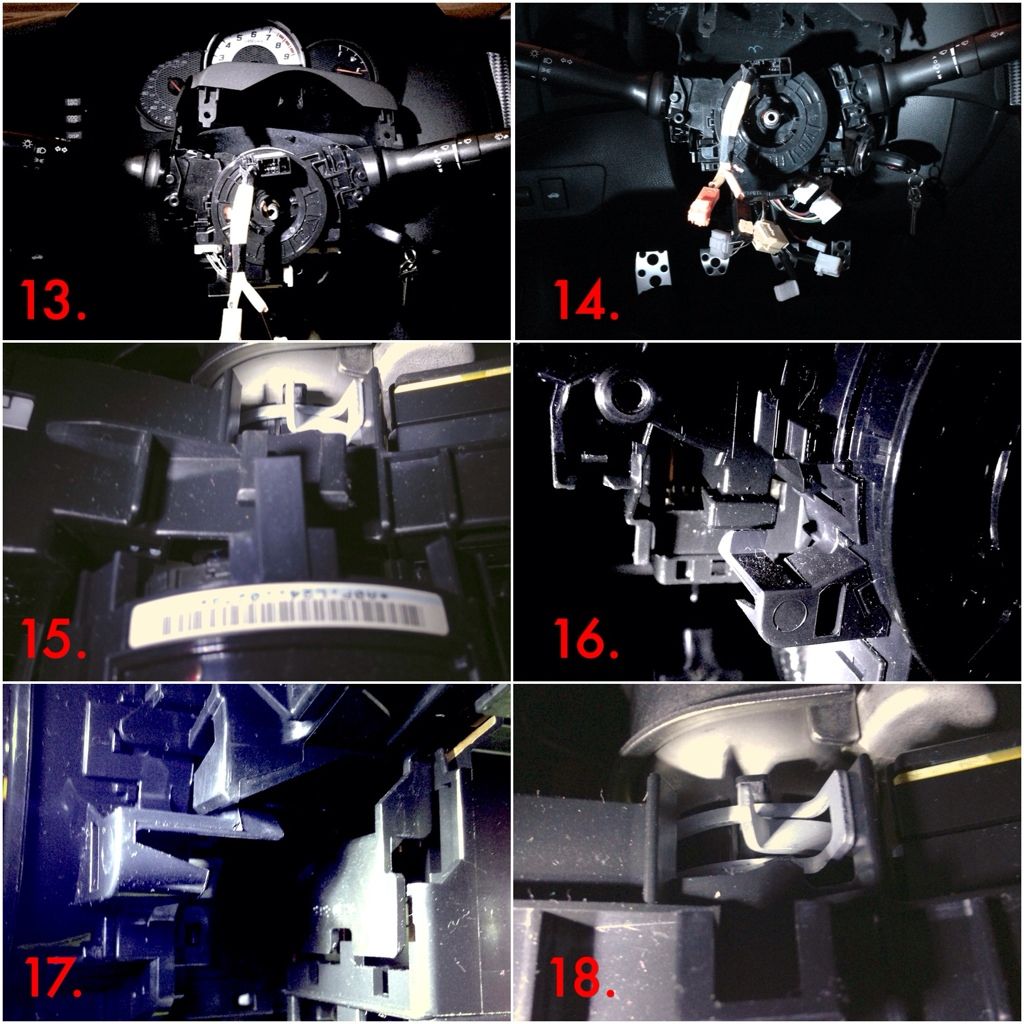
16. Then unclip the clip on the 9 oclock position to remove the steering angle sensor 17. Finally, unclip the clip on the 3 oclock position to remove the steering anlge sensor 19. You need to remove the wiper switch first before you take the light switch stalk.  18. After removing the sensor, locate the clamp thats holding the switch, the clamp is at the back at your 12 oclock, just squeeze the clamp thats holding the original stalk switch at the back and wiggle the stalk out towards you.. It might take some time but be patient and wiggle it in and out towards you. The idea is to push it away first to get it off the notch that's holding it then quickly pulling it towards you. 20. you should see this when you take the original stalk switch while depressing the clamp and pulling it towards you. Quote:
22-23. take off the original turn signal lights driver and passenger side harness, and make a new one by putting a new pin on the fourth slot. and tappping into the black wire for ground. Refer to.. Quote:
24-25. install fog lights. your choice of hardwares. Just so you know the top is larger than the bottom. So you might wanna buy two different sizes of bolts. Also an Allen stylel bolts works best for me. 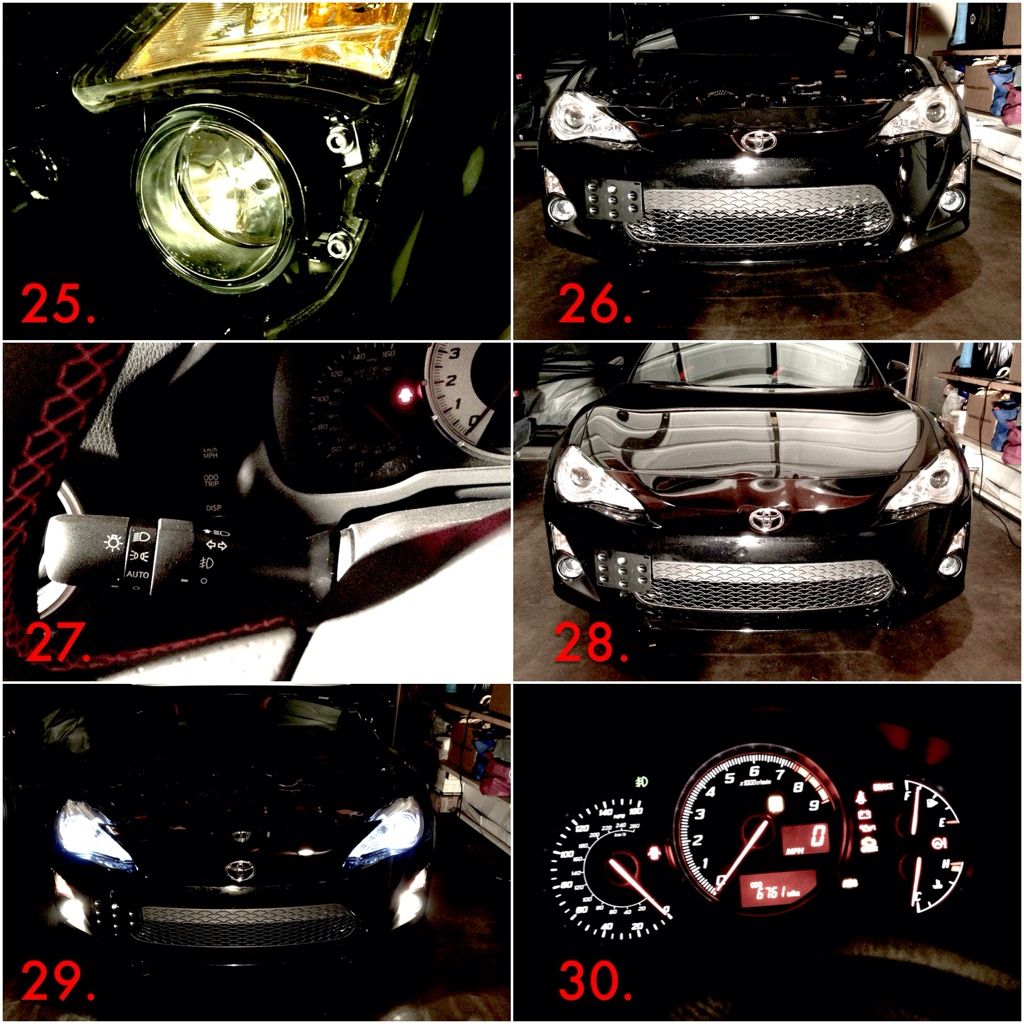 26. you should now end up with this  27. turn fog light switch on 28-29. enjoy! 30. Also ere is a fog light indicator inside the cabin! For more higher resolution pictures please click the link below: http://s1353.photobucket.com/user/im...%20Light%20FRS If youre having s hard time following you need to read the first three references for you to fully understand what is going on.. Please take the time to do some research... as I did as well.. But I hope these pictures will guide you.. If you have any questions feel free to send me a message!! Have a good one! To the op's , if you guys have any suggestion on the write up I can make some changes. As I was rushing typing this down..
__________________
Last edited by imravenit; 04-19-2013 at 07:01 PM. |
||||||
|
|
|
| The Following 5 Users Say Thank You to imravenit For This Useful Post: | BabaYaga (02-23-2015), charged86 (09-18-2013), civicdrivr (04-19-2013), nigel-jdmparts (04-30-2013), PANDA86 (04-19-2013) |
|
04-19-2013, 05:07 PM
|
#276 |
|
Member

Join Date: Oct 2012
Drives: ZN6, DC2
Location: Toronto, Canada
Posts: 31
Thanks: 44
Thanked 4 Times in 4 Posts
Mentioned: 0 Post(s)
Tagged: 2 Thread(s)
|
^ Thanks @imravenit
Seems like no one is able to get the part number for the EURO GT86 Stalk to enable the rear fogs though. 
|
|
|
|
|
04-19-2013, 05:45 PM
|
#277 | |
|
Senior Member
Join Date: Jan 2013
Drives: Awesome
Location: Vancouver, BC
Posts: 295
Thanks: 167
Thanked 78 Times in 61 Posts
Mentioned: 0 Post(s)
Tagged: 0 Thread(s)
|
Quote:
__________________
|
|
|
|
|
|
04-19-2013, 05:53 PM
|
#278 | |
|
First 86 Driver Baby!

Join Date: Jan 2012
Drives: FR-S, Flex
Location: Williamsburg, VA
Posts: 1,752
Thanks: 509
Thanked 513 Times in 349 Posts
Mentioned: 32 Post(s)
Tagged: 3 Thread(s)
|
Quote:
|
|
|
|
|
| The Following 3 Users Say Thank You to kmbkk For This Useful Post: |
|
04-28-2013, 03:56 AM
|
#279 |
|
give us this day
Join Date: Jul 2012
Drives: AE86 - FRS
Location: Three Stars & A Sun
Posts: 404
Thanks: 138
Thanked 161 Times in 37 Posts
Mentioned: 1 Post(s)
Tagged: 0 Thread(s)
|
btw how come the fog lights does not fit the legacy socket?
__________________
|
|
|
|
|
|
|
|
 |
|
|
 Similar Threads
|
||||
| Thread | Thread Starter | Forum | Replies | Last Post |
| Who here has LEDs in their fogs/DRLs in their GT? | RZ86 | Cosmetic Modification (Interior/Exterior/Lighting) | 10 | 03-30-2013 10:54 PM |
| Fogs wiring; Will this work? | Khánh | Cosmetic Modification (Interior/Exterior/Lighting) | 12 | 02-16-2013 12:44 PM |
| BRZ HID Bulb + HID Fogs | delusional | DIY (Do-It-Yourself) Guides | 4 | 02-05-2013 05:09 AM |
| new Camry fogs fit the frs?? | hislargeness | Cosmetic Modification (Interior/Exterior/Lighting) | 3 | 09-26-2012 03:20 AM |
| for everyone thinking of using rear fogs | xpicer | Cosmetic Modification (Interior/Exterior/Lighting) | 4 | 07-04-2012 12:53 AM |


 2013 Scion FR-S
 Nozomi \ Noz