


|
||||||
| DIY (Do-It-Yourself) Guides For all DIYs. |
 |
|
|
Thread Tools | Search this Thread |
 11-12-2012, 12:51 AM
|
#1 |
|
Photo Specialist

Join Date: Feb 2012
Drives: 2013 Toyota 86 DGM 6MT
Location: Texas
Posts: 1,152
Thanks: 587
Thanked 1,803 Times in 420 Posts
Mentioned: 94 Post(s)
Tagged: 0 Thread(s)
|
DIY - Rear Swaybar and Endlinks - Perrin
Houston86.com back with another DIY guide. Today we are covering the install of @PERRIN's 16mm Rear Swaybar and Endlink. Although it is Perrin centric, this applies to most vendor's products.
For comprehensive pictures of the items, theory, review, etc check out this thread http://www.ft86club.com/forums/showthread.php?t=22020 This install was pretty easy. You don't need expensive niche items. Just basic hand tools, jack stands, and a floor jack. Definitely feel more confident that the car will be able to handle more power when those options come out. Please use this guide in addition to the service manual and the vendor's official instructions. As always I am not responsible for damage done to yourself or your vehicle. Always remember to be safe. 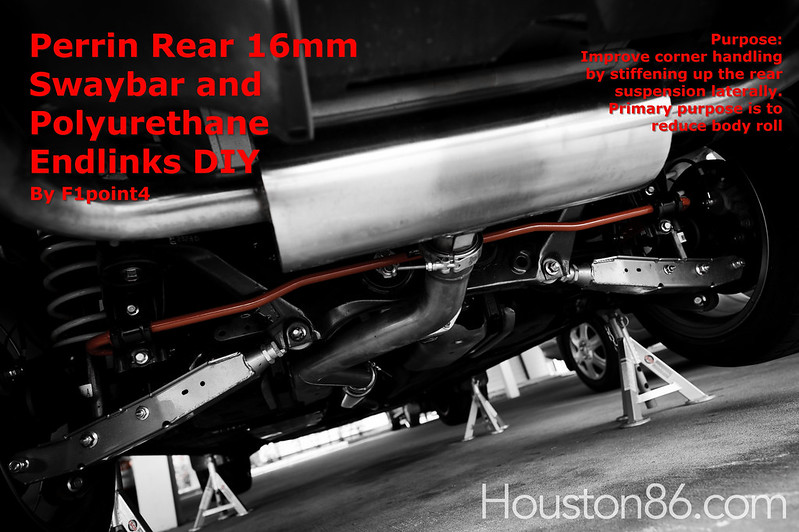 20121111-Perrin_RearSwaybar_Endlink_DIY-01 by VictorN07, on Flickr 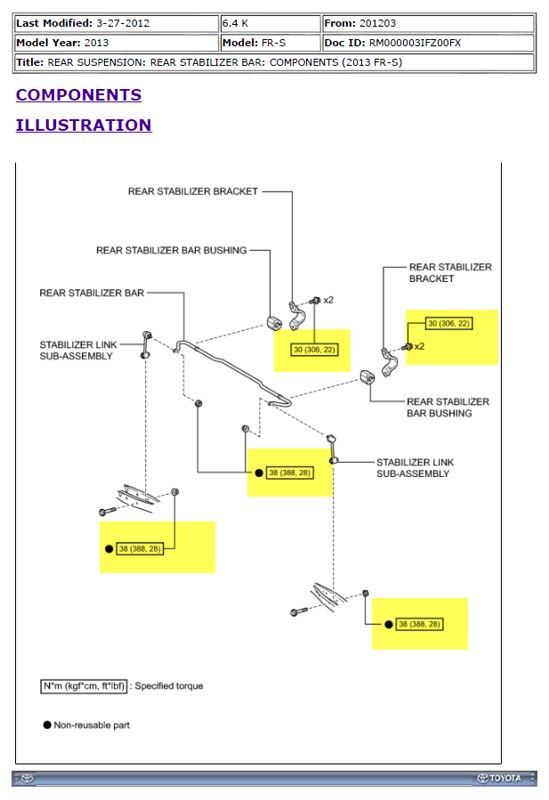 20121111-Perrin_RearSwaybar_Endlink_DIY-02 by VictorN07, on Flickr 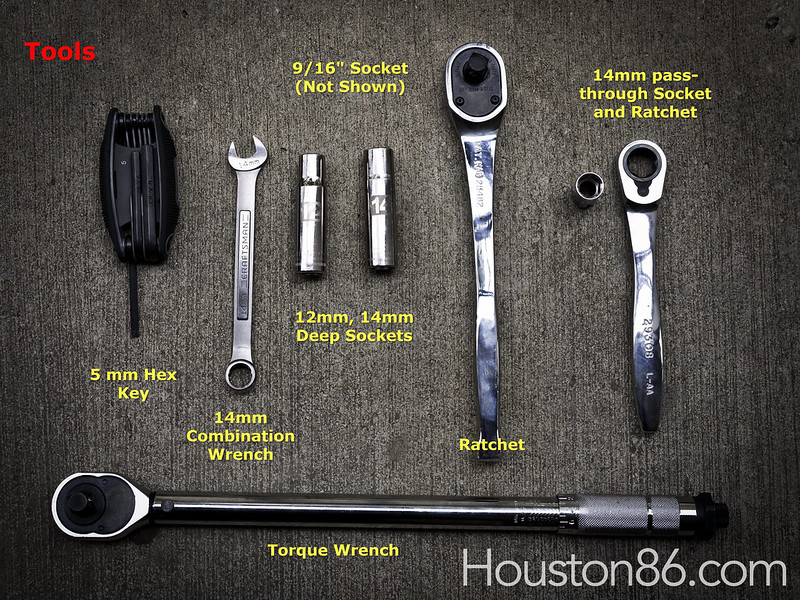 20121111-Perrin_RearSwaybar_Endlink_DIY-03 by VictorN07, on Flickr 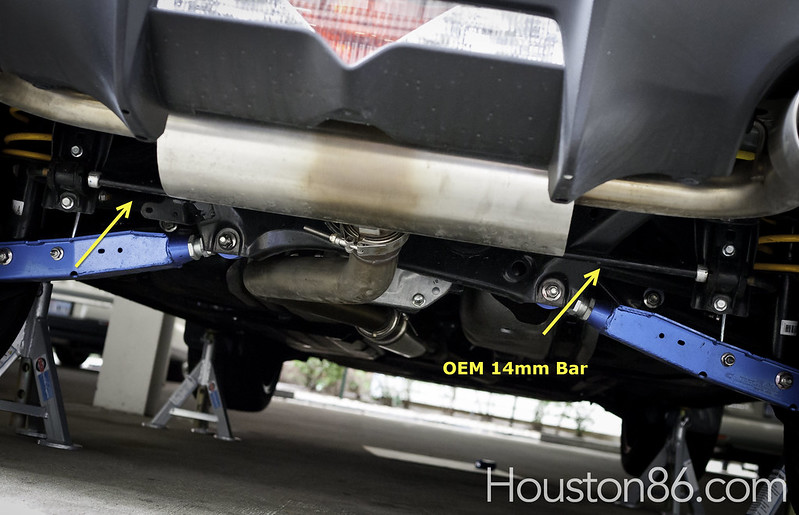 20121111-Perrin_RearSwaybar_Endlink_DIY-04 by VictorN07, on Flickr 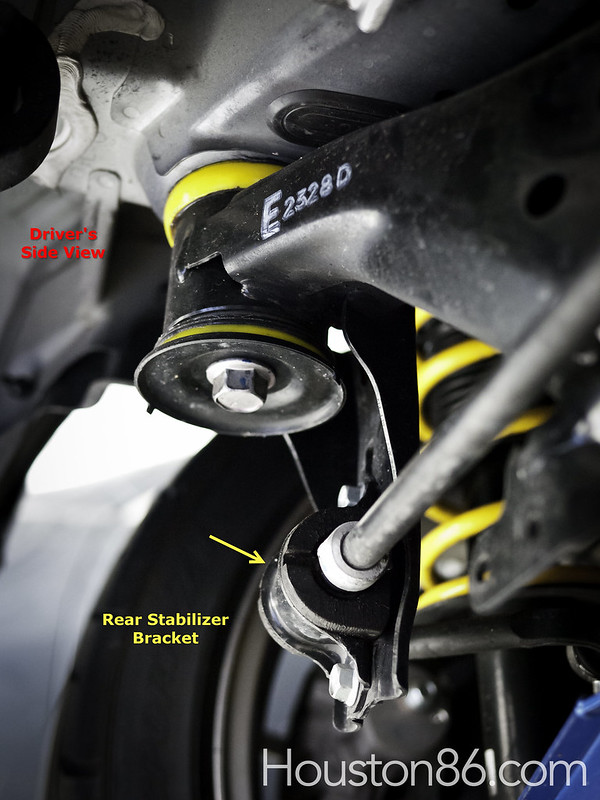 20121111-Perrin_RearSwaybar_Endlink_DIY-05 by VictorN07, on Flickr Backside of the Rear Stabilizer Bracket  20121111-Perrin_RearSwaybar_Endlink_DIY-06 by VictorN07, on Flickr  20121111-Perrin_RearSwaybar_Endlink_DIY-07 by VictorN07, on Flickr  20121111-Perrin_RearSwaybar_Endlink_DIY-08 by VictorN07, on Flickr You could raise your car on a lift. Kept it simple going with Jack stands; they give plenty of height to get in there. 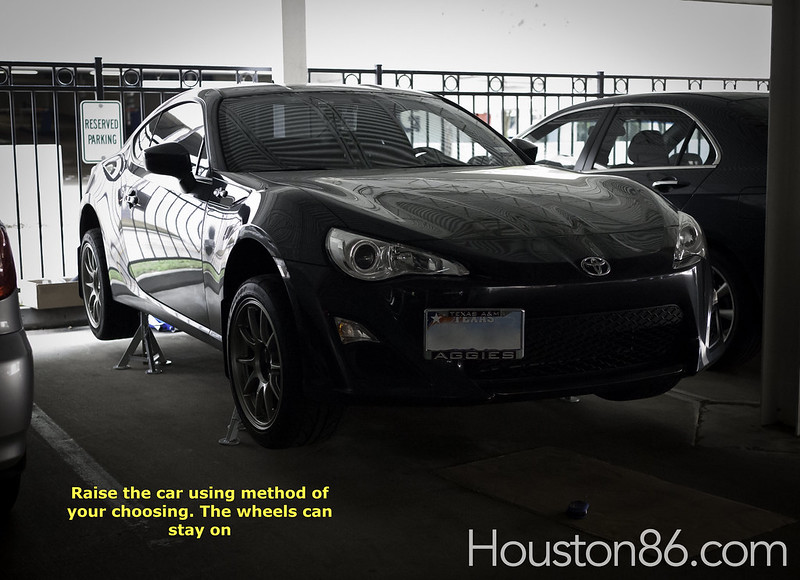 20121111-Perrin_RearSwaybar_Endlink_DIY-09 by VictorN07, on Flickr 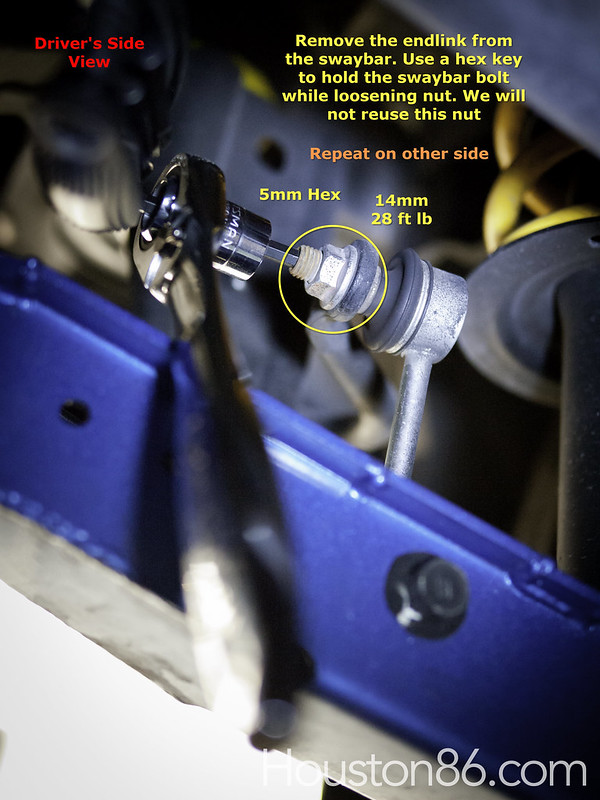 20121111-Perrin_RearSwaybar_Endlink_DIY-10 by VictorN07, on Flickr  20121111-Perrin_RearSwaybar_Endlink_DIY-11 by VictorN07, on Flickr Forgot to add the text to repeat on the other side 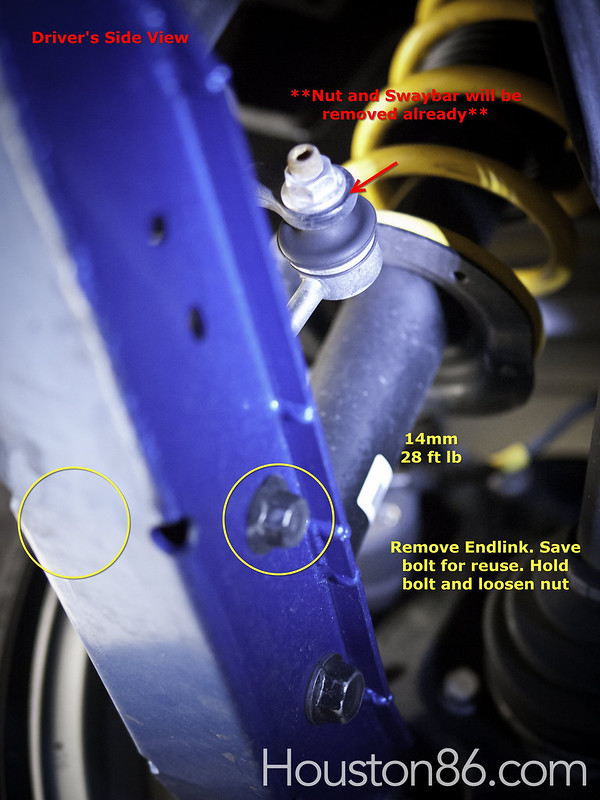 20121111-Perrin_RearSwaybar_Endlink_DIY-12 by VictorN07, on Flickr  20121111-Perrin_RearSwaybar_Endlink_DIY-13 by VictorN07, on Flickr 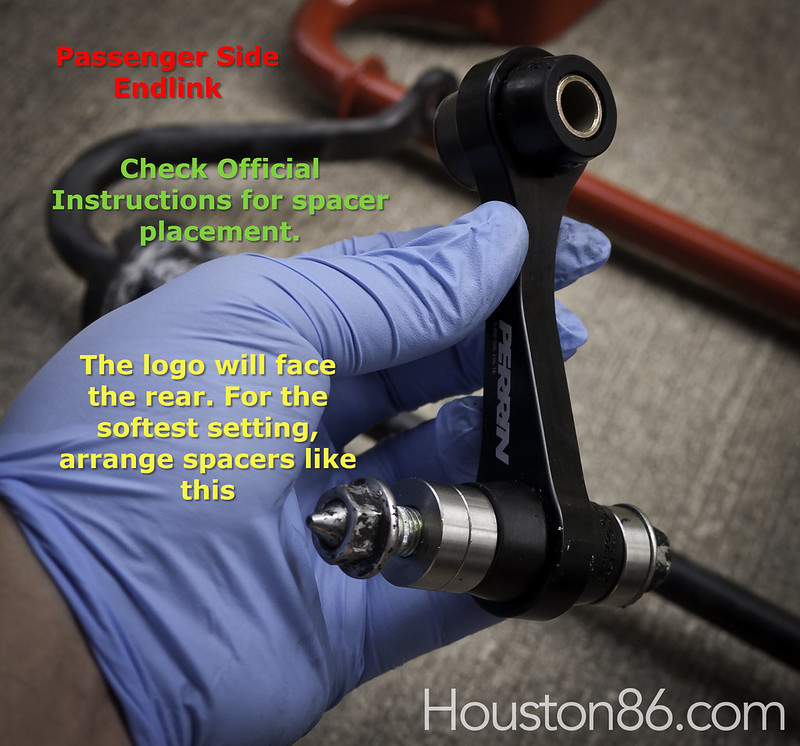 20121111-Perrin_RearSwaybar_Endlink_DIY-14 by VictorN07, on Flickr 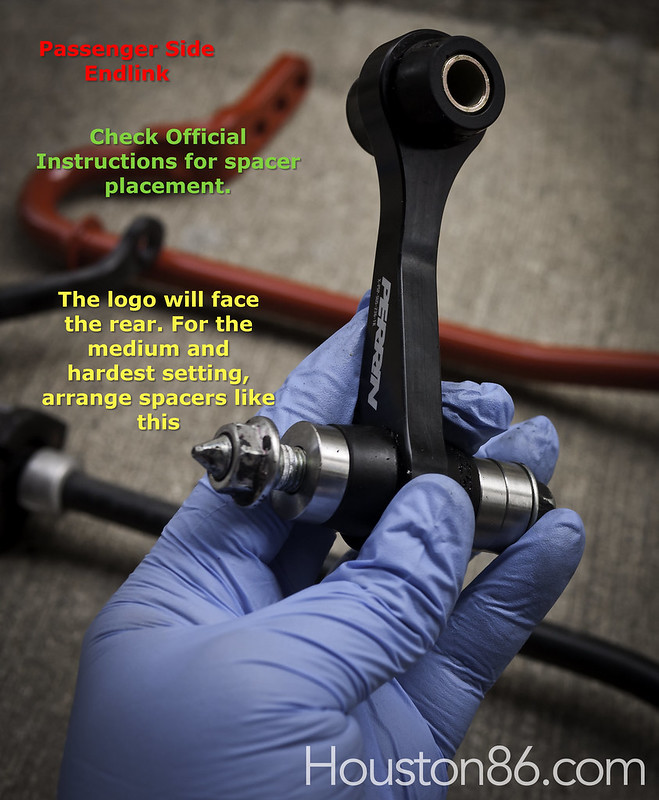 20121111-Perrin_RearSwaybar_Endlink_DIY-15 by VictorN07, on Flickr 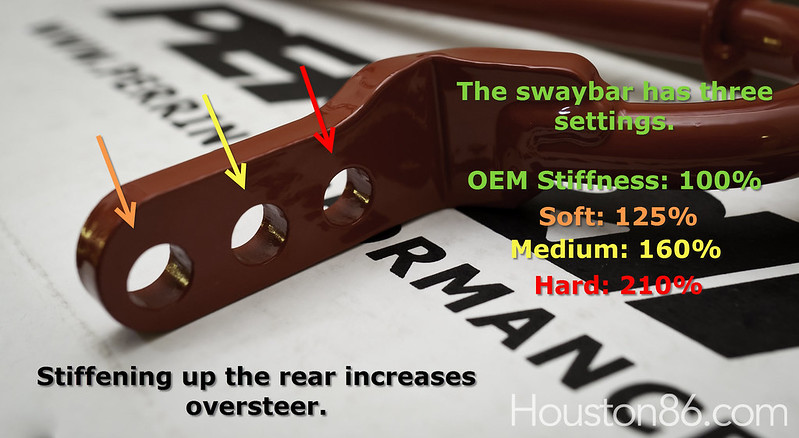 20121111-Perrin_RearSwaybar_Endlink_DIY-16 by VictorN07, on Flickr 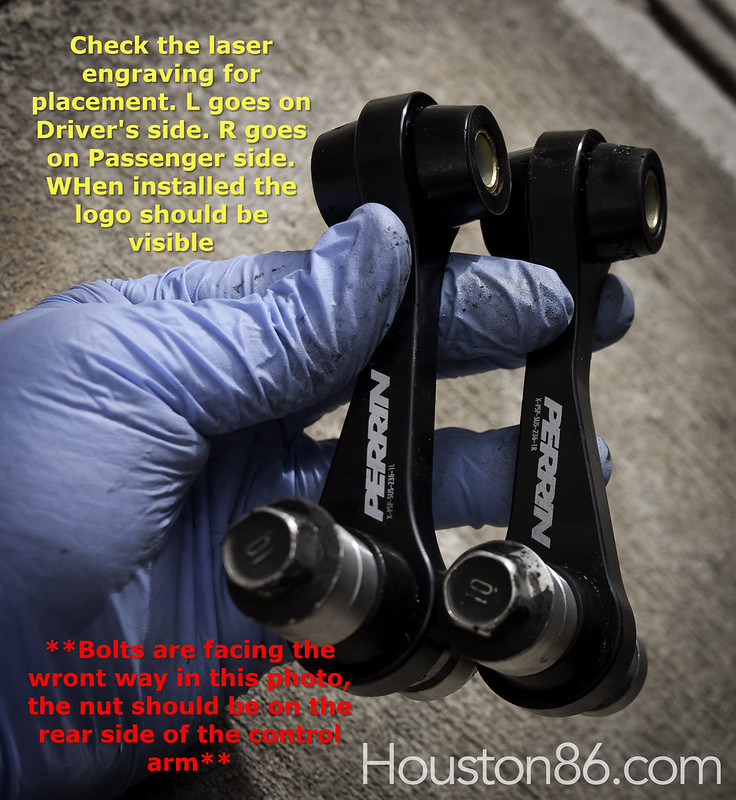 20121111-Perrin_RearSwaybar_Endlink_DIY-17 by VictorN07, on Flickr 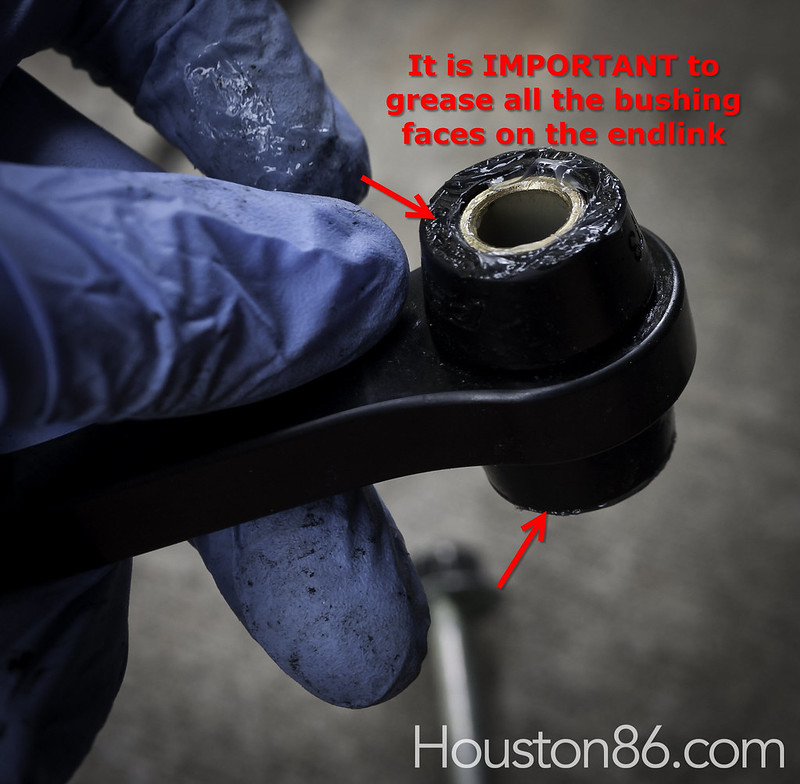 20121111-Perrin_RearSwaybar_Endlink_DIY-18 by VictorN07, on Flickr Perrin does not say to grease the faces of the spacers. I chose to do this because I think metal on metal contact will create noise. Like any urethane bushing, you will have to periodically check and regrease 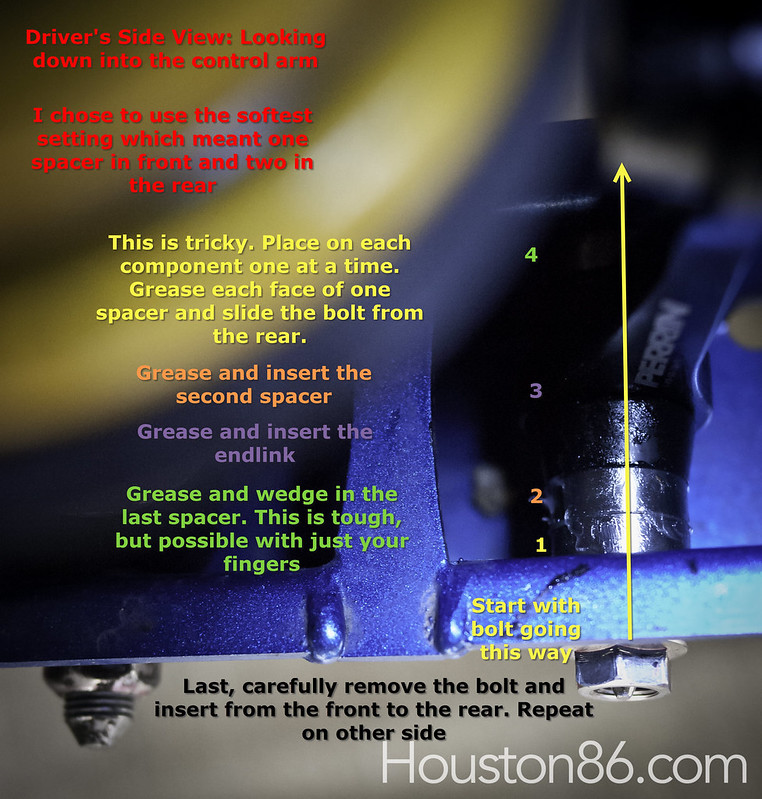 20121111-Perrin_RearSwaybar_Endlink_DIY-19 by VictorN07, on Flickr 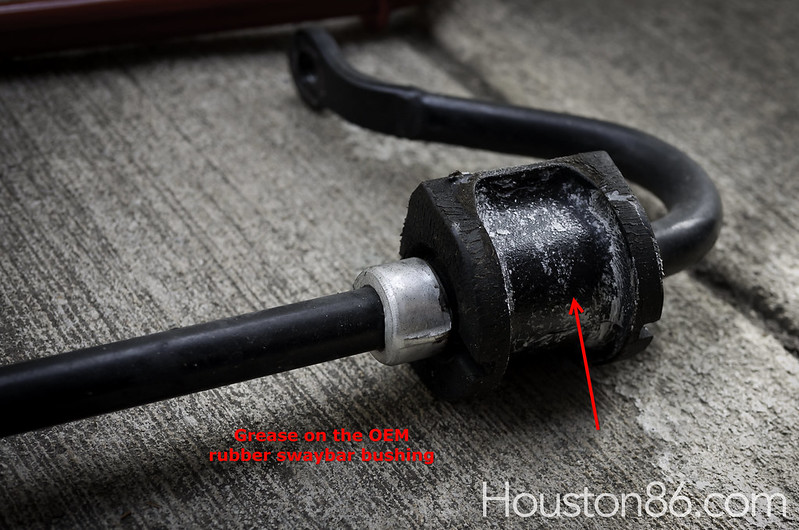 20121111-Perrin_RearSwaybar_Endlink_DIY-20 by VictorN07, on Flickr 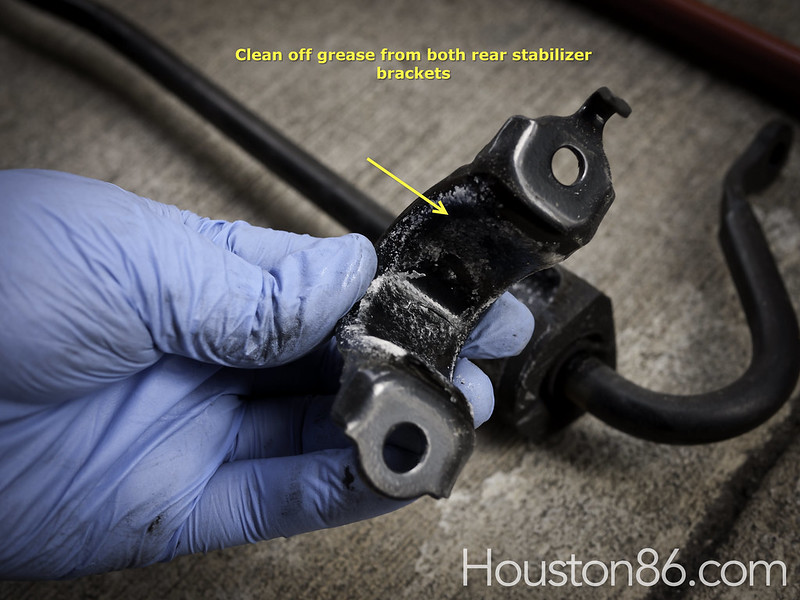 20121111-Perrin_RearSwaybar_Endlink_DIY-21 by VictorN07, on Flickr 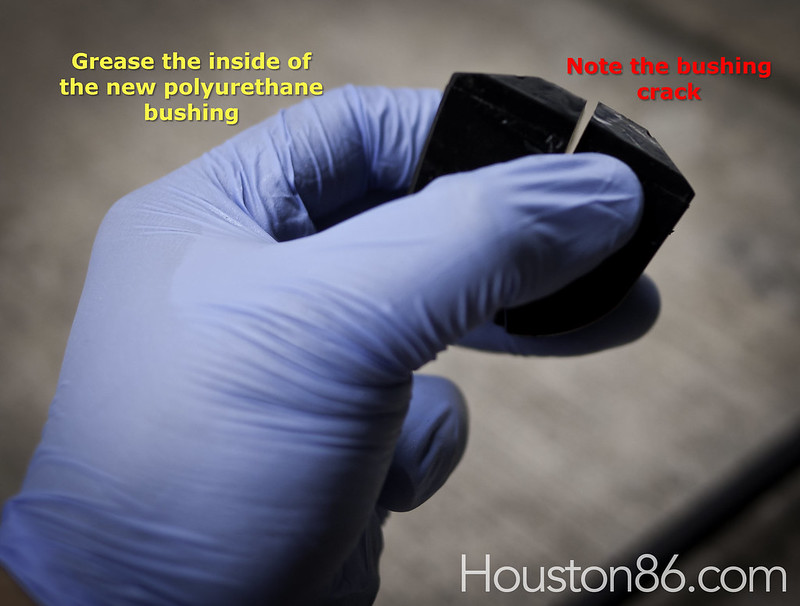 20121111-Perrin_RearSwaybar_Endlink_DIY-22 by VictorN07, on Flickr Perrin does not say to grease the outside of the swaybar bushing. I chose to do this because the OEM bushing was greased that way. Like any urethane bushing, you will have to periodically check and regrease  20121111-Perrin_RearSwaybar_Endlink_DIY-23 by VictorN07, on Flickr  20121111-Perrin_RearSwaybar_Endlink_DIY-24 by VictorN07, on Flickr I should add the hardware is supplied with the kit. As for torquing the bolts, I started with the Rear Swaybar, then the control arm, last the endlink/swaybar connection  20121111-Perrin_RearSwaybar_Endlink_DIY-25 by VictorN07, on Flickr 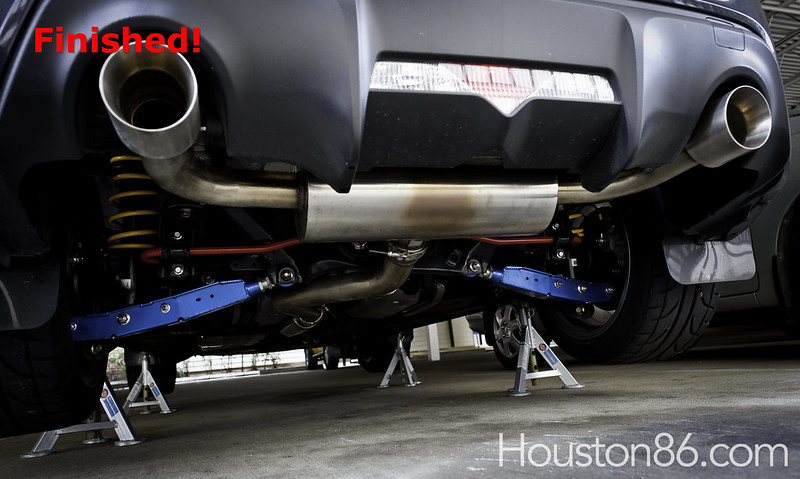 20121111-Perrin_RearSwaybar_Endlink_DIY-26 by VictorN07, on Flickr
__________________
Last edited by F1point4; 11-12-2012 at 10:13 AM. Reason: clarified instructions |

|

|
| The Following 11 Users Say Thank You to F1point4 For This Useful Post: | 20valvewynn83 (11-12-2012), andrewFT86 (06-22-2016), axelo (10-05-2015), BAOVAN (12-27-2016), Burn (11-12-2012), cobrabyte (11-12-2012), developer (11-12-2012), ft86Fan (11-12-2012), normancw (04-22-2013), nubbster927 (11-13-2012), Slartibartfast (11-12-2012) |
|
11-12-2012, 06:08 PM
|
#2 |
|
Senior Member

Join Date: Feb 2010
Drives: FR-S, Exige S, Miata
Location: Basking Ridge NJ
Posts: 798
Thanks: 327
Thanked 131 Times in 80 Posts
Mentioned: 2 Post(s)
Tagged: 0 Thread(s)
|
Great write up as usual. Will you be supercharging this car? Looking forward to that write up if so.
__________________
'13 Scion FR-S (Whiteout)
'07 Lotus Exige S (Aspen White) Touring, Traction, Starshield '95 Miata (Montego Blue) |
|
|
|
|
11-12-2012, 06:56 PM
|
#3 | |
|
Photo Specialist
Join Date: Feb 2012
Drives: 2013 Toyota 86 DGM 6MT
Location: Texas
Posts: 1,152
Thanks: 587
Thanked 1,803 Times in 420 Posts
Mentioned: 94 Post(s)
Tagged: 0 Thread(s)
|
Quote:
__________________
|
|
|
|
|
| The Following User Says Thank You to F1point4 For This Useful Post: | ft86Fan (11-12-2012) |
|
04-22-2013, 09:56 AM
|
#4 |
|
Engineer

Join Date: Jul 2012
Drives: WRB 2022 Subaru Brz
Location: Toronto/Michigan
Posts: 226
Thanks: 30
Thanked 55 Times in 32 Posts
Mentioned: 2 Post(s)
Tagged: 0 Thread(s)
|
Do your really need new end links when just replacing the sway bars. My car is not lowered, and none of its suspension components are changed. Wouldn't the stock end links be fine?
|
|
|
|
|
04-22-2013, 10:01 AM
|
#5 | |
|
Photo Specialist
Join Date: Feb 2012
Drives: 2013 Toyota 86 DGM 6MT
Location: Texas
Posts: 1,152
Thanks: 587
Thanked 1,803 Times in 420 Posts
Mentioned: 94 Post(s)
Tagged: 0 Thread(s)
|
Quote:
__________________
|
|
|
|
|
|
05-01-2013, 01:33 PM
|
#7 |
|
Junior Member
Join Date: May 2013
Drives: 2013 Subaru BRZ Limited
Location: United States
Posts: 4
Thanks: 0
Thanked 1 Time in 1 Post
Mentioned: 0 Post(s)
Tagged: 0 Thread(s)
|
Props to a VERY thorough/detailed write up!
|
|
|
|
|
09-30-2015, 03:20 AM
|
#8 |
|
Mountain Runner

Join Date: Jan 2014
Drives: 2013 Subaru BRZ Limited 6MT
Location: Boone, NC and Charlotte area NC
Posts: 714
Thanks: 489
Thanked 142 Times in 105 Posts
Mentioned: 8 Post(s)
Tagged: 2 Thread(s)
|
I know it's been like 2 years and change,but here goes nothing. If i only get the rear Perrin 16mm sway bar and only use the softest setting (only 130% the stiffness of the original sway bar) would i be fine using stock endlinks? I feel like the OEM end links wouldn't really have a huge problem with ony 30% more stiffness... I'm only interested in changing the rear sway bar right now, and I only want a tiny bit more stiffness in the rear to dial out some of the understeer that the car exhibits during short and tight autocrosses. Am I on the right track? (no pun intended) @F1point4
|
|
|
|
|
09-30-2015, 02:21 PM
|
#9 |
|
Senior Member
Join Date: Apr 2012
Drives: 2014 Subaru BRZ
Location: Hillsboro, Oregon
Posts: 770
Thanks: 450
Thanked 536 Times in 316 Posts
Mentioned: 137 Post(s)
Tagged: 2 Thread(s)
 |
I'd say using the stock endlinks will be OK to use with our 16mm bar. It'd still work better with upgraded endlinks though. If you're looking to pick up one of those bars, send me a PM, thanks!
|
|
|
|
|
06-02-2016, 10:42 PM
|
#10 |
|
Senior Member
Join Date: Aug 2014
Drives: 2013 White-Out FRS
Location: San Jose, CA
Posts: 697
Thanks: 243
Thanked 211 Times in 142 Posts
Mentioned: 9 Post(s)
Tagged: 0 Thread(s)
|
Sorry to revive an old thread, but will this install affect my camber? No need for alignment again after right?
__________________
I live my life one quarter-pounder at a time.
|
|
|
|
| The Following User Says Thank You to HachiRo For This Useful Post: | pumice (09-24-2018) |
|
06-03-2016, 08:14 AM
|
#11 | |
|
Senior Member

Join Date: May 2013
Drives: 2016 FR-S Oceanic Blue
Location: Southern NJ
Posts: 2,958
Thanks: 2,158
Thanked 1,601 Times in 923 Posts
Mentioned: 30 Post(s)
Tagged: 2 Thread(s)
|
Quote:
__________________
My 2016 Build thread TRD Exhaust with custom quad tips, TRD Lowering Springs,TRD Quick shifter,LED;DRL, Projectors, and turn signals. Re-badge, 86 Nanny, WinmaxW2 Pads, K&N Drop In, Antenna delete |
|
|
|
|
|
07-26-2018, 03:27 PM
|
#12 |
|
Senior Member

Join Date: Aug 2017
Drives: 2013 Scion FR-S
Location: Orange County
Posts: 225
Thanks: 75
Thanked 50 Times in 36 Posts
Mentioned: 2 Post(s)
Tagged: 0 Thread(s)
|
Necroing a useful thread. Has anyone use the Perrin endlink on the stock sway bar? If so, how did you setup the spacers in the rear LCA?
|
|
|
|
|
|
|
|
|
| Tags |
| diy, endlinks, perrin, polyurethane, rear swaybar |
|
|
 Similar Threads
|
||||
| Thread | Thread Starter | Forum | Replies | Last Post |
| Perrin Rear Shifter Bushing Install | F1point4 | DIY (Do-It-Yourself) Guides | 55 | 10-21-2021 02:39 PM |
| Perrin 16mm Rear Swaybar and Polyurethane Endlinks Review | F1point4 | Suspension | Chassis | Brakes -- Sponsored by 949 Racing | 17 | 07-26-2018 06:15 PM |
| FS: Perrin Rear Shifter Bushing | green_comet | Australia Classifieds | 2 | 11-07-2012 02:04 AM |
| Perrin Rear Sway Bars at Redline360 | Redline360 | Brakes, Suspension, Chassis | 0 | 06-28-2012 10:38 PM |


