


|
||||||
| DIY (Do-It-Yourself) Guides For all DIYs. |
 |
|
|
Thread Tools | Search this Thread |
 03-27-2021, 11:00 AM
|
#1 |
|
Member
Join Date: May 2020
Drives: 2013 Scion FR-S 10 Series
Location: Ventura, CA
Posts: 47
Thanks: 15
Thanked 8 Times in 8 Posts
Mentioned: 0 Post(s)
Tagged: 0 Thread(s)
|
How To Disassemble Valenti TRAD Tail Lights
Hello all! I was looking for for info on how to take these apart and the only repair guide involved cutting the housing. No thanks.
These are fairly simple butyl sealed tails. I pulled them apart in about 30 minutes using the oven method. I think 15 minutes at 250 may be a little too hot or too long, because I slightly warped a part of the housing, but I figure I can straighten it back out with a heat gun when I'm installing them. The LED assembly is behind the reflectors which are also glued in with butyl. It all pulled apart fairly easily out of the oven. I am currently attempting to contact Valenti Japan to see about getting replacement parts for these. They are fairly heavily water damaged. I picked these up used for $90. I think I overpaid, but mostly because I didn't notice the nasty chip missing on the damaged one. My end goal is to rebuild them and black out the chrome.  
|

|

|
|
03-27-2021, 01:49 PM
|
#2 |
|
ProCrastinationConsultant

Join Date: Sep 2013
Drives: '14 Ranger, '18 Tacoma 4Dr LB
Location: chicago-ish
Posts: 11,330
Thanks: 35,240
Thanked 13,673 Times in 6,781 Posts
Mentioned: 98 Post(s)
Tagged: 0 Thread(s)
|
can you get some better/larger pictures of the circuit board components?
i've got some ideas. valenti's not going to help with replacements, but it's really not a big deal, as most of that stuff is off-the-shelf anyways. as long as you know how to solder, it's not that hard.
__________________
"The time you enjoy wasting is not wasted time"
 |
|
|
|
|
03-27-2021, 02:28 PM
|
#3 | |
|
Member
Join Date: May 2020
Drives: 2013 Scion FR-S 10 Series
Location: Ventura, CA
Posts: 47
Thanks: 15
Thanked 8 Times in 8 Posts
Mentioned: 0 Post(s)
Tagged: 0 Thread(s)
|
Quote:
  
|
|
|
|
|
|
03-27-2021, 02:32 PM
|
#4 |
|
Member
Join Date: May 2020
Drives: 2013 Scion FR-S 10 Series
Location: Ventura, CA
Posts: 47
Thanks: 15
Thanked 8 Times in 8 Posts
Mentioned: 0 Post(s)
Tagged: 0 Thread(s)
|
I hadn't opened the controller yet. It looks salvageable.
 
|
|
|
|
| The Following User Says Thank You to JonnyObnoxious For This Useful Post: | Wally86 (03-29-2021) |
|
03-27-2021, 10:25 PM
|
#5 |
|
ProCrastinationConsultant
Join Date: Sep 2013
Drives: '14 Ranger, '18 Tacoma 4Dr LB
Location: chicago-ish
Posts: 11,330
Thanks: 35,240
Thanked 13,673 Times in 6,781 Posts
Mentioned: 98 Post(s)
Tagged: 0 Thread(s)
|
yeah, it looks like the controller board is good, which is great news!
the circuit boards all appear to be single layer boards, in really bad shape in a number of pads. while they likely could be repaired using adhesive-backed copper tape, i wouldn't trust it for a long term fix--the adhesives most copper tapes use aren't very thermally friendly, so i would expect the adhesive to pull apart just from the car repeatedly sitting in the sun. personally, i would cut/etch new boards using the originals for a template(i used to design and etch, last couple designs have been lazier, i just used a dremel to cut the copper away to create the traces. faster to finished product, just doesn't look as pretty). the overall components are nothing spectacular. the surface mount boards use plcc2 leds, i believe 3216 smd resistors (metric size designation of smd resistors is simply the length and width combined, so a 3216 resistor is 3.2mm x 1.6mm), and a few protection diodes. the other boards use 5mm leds on plastic standoff's, and what i believe are 6464 smd resistors. valenti's have had a number of issues using subpar components in the past, i would recommend upgrading the 5mm led's to superflux led's. led brands to look for are going to be liteon, cree, nichia, and osram. lumiled used to be the go-to brand, but they seem to no longer exist. in what seems like a past life, i has started some writeups on hidplanet.com in the led section that goes over all of that. life's gotten in the way since, and i've sort of dropped the projects i had going for a while.
__________________
"The time you enjoy wasting is not wasted time"
|
|
|
|
| The Following 2 Users Say Thank You to soundman98 For This Useful Post: | JonnyObnoxious (03-27-2021), Wally86 (03-29-2021) |
|
03-28-2021, 12:05 AM
|
#6 | |
|
Member
Join Date: May 2020
Drives: 2013 Scion FR-S 10 Series
Location: Ventura, CA
Posts: 47
Thanks: 15
Thanked 8 Times in 8 Posts
Mentioned: 0 Post(s)
Tagged: 0 Thread(s)
|
Quote:
I've never made a pcb before, but I looked it up, and I just so happen to own a laser printer. I'm guessing the real pain here will be cutting out the custom shaped boards for the olm light. I guess I'll use a Dremel for that. Most of these little ones are 331s, and there's a couple 271s on the brake led assembly. Then there are a couple diodes I think: GW 65 4007 and GW 6D 4007. I added pics, not sure if you can see them. So I guess I'll desolder/disassemble these and get to ordering the parts for the rebuild. And I'll get enough LEDs for both lamps. Then I'll be the belle of the ball with my custom Valenti tails. Next to look up a real fancy controller so I can make them do crazy things! Imma have to dig deeper in this LED stuff.  
|
|
|
|
|
|
03-28-2021, 01:40 AM
|
#7 | |||
|
ProCrastinationConsultant
Join Date: Sep 2013
Drives: '14 Ranger, '18 Tacoma 4Dr LB
Location: chicago-ish
Posts: 11,330
Thanks: 35,240
Thanked 13,673 Times in 6,781 Posts
Mentioned: 98 Post(s)
Tagged: 0 Thread(s)
|
Quote:
this was a 3rd brake light i made back in 2011. i just printed and taped the design file, drilled all the holes with a dremel drill press, and then used a dremel cutoff wheel to remove copper where i didn't need it. 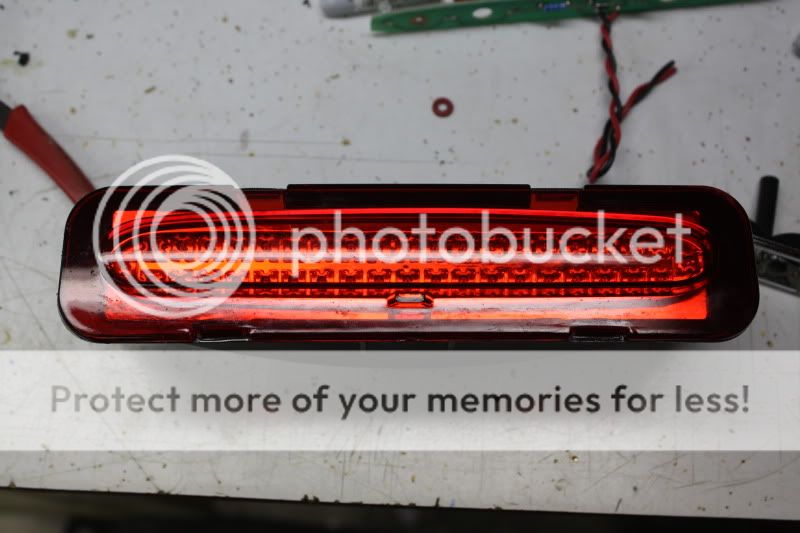  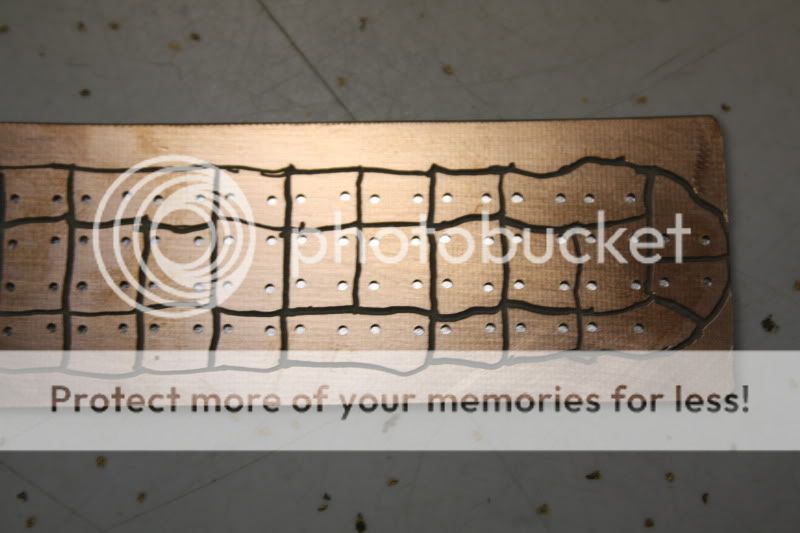 this was a different board that i went through the process of chemical etching. same design procedure though 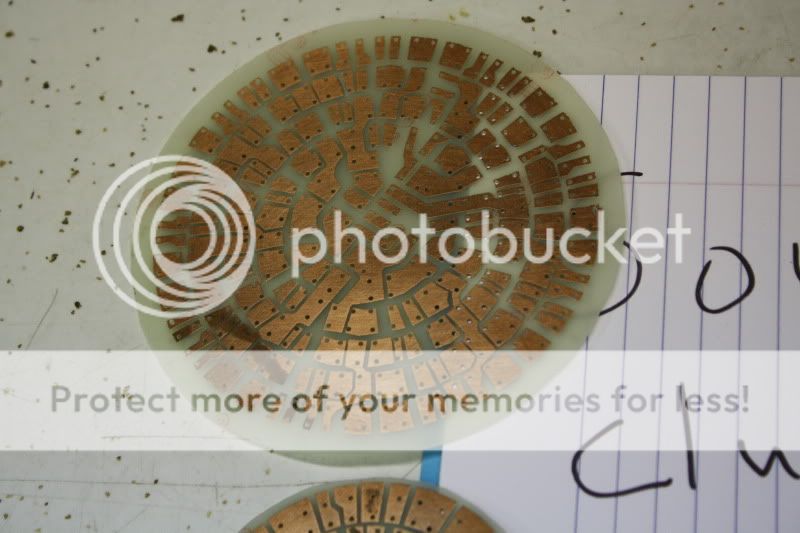 if you're interested in chemical etching, i highly recommend press-n-peel blue for the transfer method. it works quite well: https://www.techniks.com/index.htm Quote:
331 is 330 ohms. 271 is 270 ohms. but i wouldn't go specifically off those numbers for your new led's. i can't find that exact diode, but i believe it to be a typical 'general purpose 4007 diode: https://www.digikey.com/en/products/...AJjKUqVAOxMxQA Quote:
https://ghoztlighting.com/
__________________
"The time you enjoy wasting is not wasted time"
|
|||
|
|
|
| The Following User Says Thank You to soundman98 For This Useful Post: | JonnyObnoxious (03-28-2021) |
|
03-28-2021, 10:14 AM
|
#8 | |
|
Member
Join Date: May 2020
Drives: 2013 Scion FR-S 10 Series
Location: Ventura, CA
Posts: 47
Thanks: 15
Thanked 8 Times in 8 Posts
Mentioned: 0 Post(s)
Tagged: 0 Thread(s)
|
Quote:
I've been looking for good info on doing custom lights for a minute. Thanks tons. Now if you can point me to someone who successfully put a +17 cluster, steering wheel, back-up camera and other electronics in a 13-16 (with push start and dual climate) then I'd really be in business. I think I need to get in contact with https://www.geraldjustprojects.com/. |
|
|
|
|
|
03-28-2021, 10:35 AM
|
#9 |
|
ProCrastinationConsultant
Join Date: Sep 2013
Drives: '14 Ranger, '18 Tacoma 4Dr LB
Location: chicago-ish
Posts: 11,330
Thanks: 35,240
Thanked 13,673 Times in 6,781 Posts
Mentioned: 98 Post(s)
Tagged: 0 Thread(s)
|
for that, you're likely better off getting a 17+ unless you're married to your current car.. otherwise, the next best option is going to be sourcing a salvage 17+ with the features you want and pulling the main harnesses and computers for all of it. which is going to take re-building your current car from a nearly empty shell...
it would be a heck of a lot easier to add the 10 series light up badges to a 17+ than to add all the 17+ features to a 10 series... the lighted emblems can be had all over the place, or you can make your own even.. this guy has been doing it for a while, had some concepts to copy the same methodology he uses-- routed/frosted plexiglass backed up to the badge with led's embedded in it, just never got around to it. https://ampdemblems.com/
__________________
"The time you enjoy wasting is not wasted time"
|
|
|
|
|
03-28-2021, 11:01 AM
|
#10 | |||
|
Member
Join Date: May 2020
Drives: 2013 Scion FR-S 10 Series
Location: Ventura, CA
Posts: 47
Thanks: 15
Thanked 8 Times in 8 Posts
Mentioned: 0 Post(s)
Tagged: 0 Thread(s)
|
Quote:
Quote:
Quote:

Last edited by JonnyObnoxious; 03-28-2021 at 11:43 AM. |
|||
|
|
|
|
|
|
|
|
| Thread Tools | Search this Thread |
|
|
 Similar Threads
|
||||
| Thread | Thread Starter | Forum | Replies | Last Post |
| Wiring & Splicing Valenti Revo SB2 tail lights to Valenti fourth brake light | Ep140 | Cosmetic Modification (Interior/Exterior/Lighting) | 8 | 06-16-2020 05:05 PM |
| FS: OEM Tail lights and Valenti Clear Tail lights | x1UP | Exterior Parts (Aero, Lighting, Etc.) | 16 | 01-28-2017 12:19 PM |
| Valenti / Lexon / Tom Tail lights, Winjet Headlights, Front Bumper lights and Mirrors | Speed Element | Exterior Parts - Lighting | 224 | 12-06-2016 02:07 PM |
| NEW EXCLUSIVE Valenti Tail lights, Winjet Headlights, Front Bumper lights and Mirrors | Speed Element | Northern California | 34 | 01-14-2015 05:32 PM |


