|
||||||
| DIY (Do-It-Yourself) Guides For all DIYs. |
 |
|
|
Thread Tools | Search this Thread |
|
|
#1 |
|
Senior Member
Join Date: Nov 2012
Drives: Flight 86 is now boarding.
Location: CA
Posts: 1,759
Thanks: 1,842
Thanked 1,502 Times in 700 Posts
Mentioned: 230 Post(s)
Tagged: 1 Thread(s)
|
DIY: Tail Lights - Opening and Sealing So You Can Customize
** I release myself of any negative, unwanted result(s) that you may experience from following my DIY. Follow at your discretion. **
Hi and thanks for reading. This is my first DIY posting but not my first on manipulating cars. After much research offline and online, I found this tactic to suit the job and keep condensation out. Granted the tail lights have the clear lip on the edge where moisture/water may collect especially after a car wash, this method does not resolve that issue. Instead, after 3 layers of sealing and days of curing, your customized tail lights will look unique and condensation free. I have performed this mod on my tail lights as well another local member's tail lights and happy to report, our customized lights remain condensation free. This WILL NOT resolve the issue if you are already experiencing condensation, but merely a guide to open - paint - reseal your own tail lights. Enjoy, good luck, and be patient. Supplies: - Comfortable spot at your house. - Push pin remover or flat head screw driver. - 8mm wrench or 8mm deep socket - I used a wrench because it naturally removed the plastic zip ties that held the wires. - a Dremel Dremel Dremel --> and 3 styles of High Speed Cutters/Engraving bit #199-04, 125, and 7134 - 2 have been customized to minimize the 'incision' made. - Permatex Black Silicon Adhesive Sealant item # 81158. You may choose to use other stuff at your discretion. - syringe (hypodermic needle) - unsure of the gauge so google locally for a retailer - Exacto-knives / blades - Lint-free or detailing cloth (or anything cloth that won't scratch your lens). Save this cloth. - Disposable rag(s) - Disposable glove(s) - Space heater or something you can control the heat of. I use a small space heater, you will find out why. - Rotating table and/or a moist chamois. I sacrificed a rotating RC-car stand to receive a suction cup to hold the entire assembly via the lens while being Dremeled. - PAINT! Unlimited possibilities and color. Safety Supplies: - Full face plastic shield - it gets messing. - Hair net - it gets messing. - Safety glasses (optional) Cleaning Supplies: - anything really. I always have a bottle of Simple Green near by. But for this mod, definitely have alcohol prep swabs. Now, you are ready to cut. At lot of things are "not for the faint of heart", this is one of them. Obviously, practice makes perfect so if you are not too familiar with your Dremel, you may practice control and cutting lines on a spare junk plastic. Look around, you have something plastic that can be used and recycled after. Before:  After:  Step 1: Peel back the interior by removing the push pin(s) by carefully using a flat head screw driver or removing tool. Do these steps on both sides. 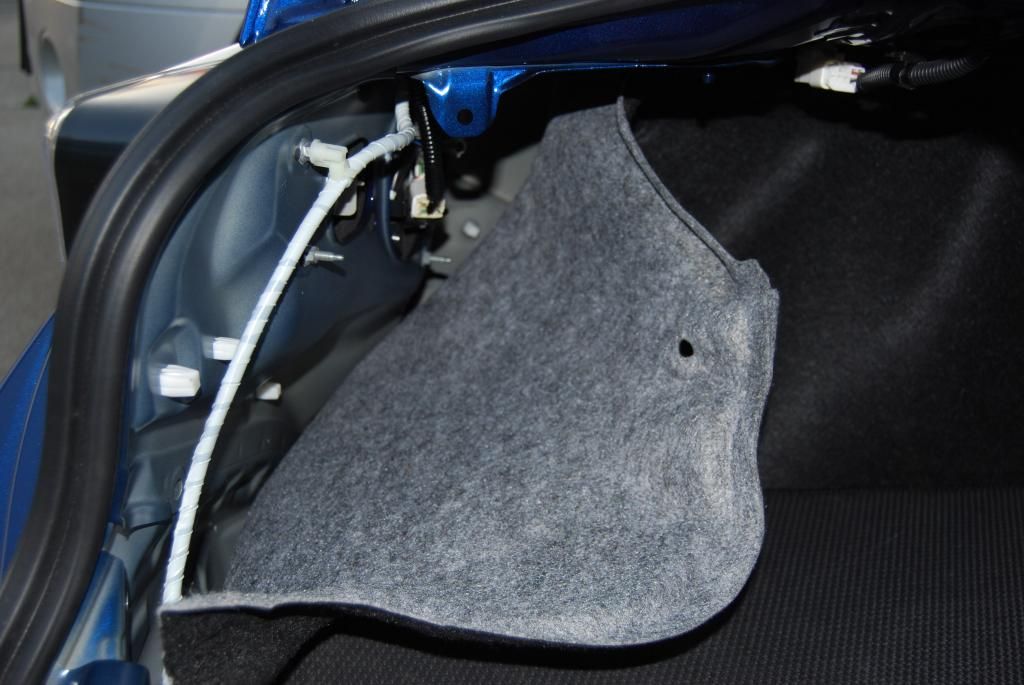 Step 2: Using a 8mm wrench, remove the 4 bolts securing the lights to the frame. The plastic zip ties get naturally pushed out as you begin removing the bolt. Unplug the white harness connected to the main brake light. 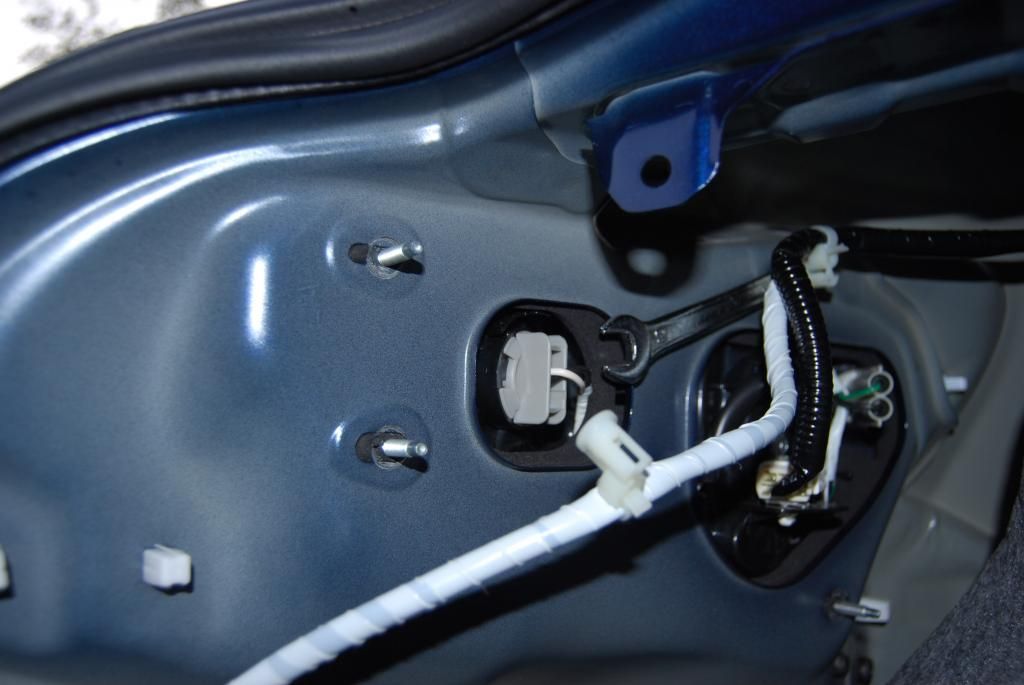 Step 3: Once the 4 bolts and harness are removed, use both hands on the exterior lens to loosely remove the entire assembly. Use a non-abrasive drop cloth (I used a $10 Yoga mat as pictured) for all my work. These yoga mats are cheap, cushioned, comes in a large roll, and very versatile.  Step 4 & 5: Pictured below. Observe the backing of the assembly. Look closely at the factory weld and observe the 'space' you have to cut. The area to cut is on the flat surface, just before the assembly goes vertical or wall. I tried to highlight the cutting area with the whiteout pen marker. You want to cut closer to the 'wall' rather than closer to the edge (closer to the edge/outside rim you go, the more clear plastic you will cut - not good). 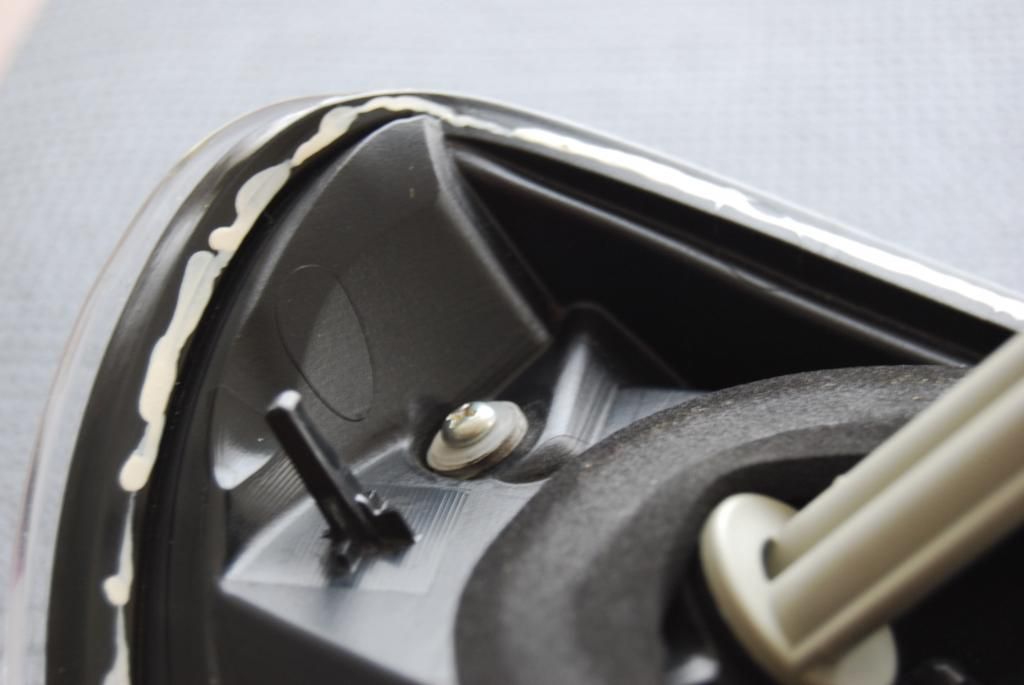 This picture illustrate the gap you will need to cut using the Dremel . I use a High Speed Cutter/Engraving tool #125 or #7134. With either of these attachments, I hold the Dremel vertically and carefully use the Dremel as a router. Use the plastic housing (garnish) as a guide for your hand and Dremel and steadily route-out (cut) this section. 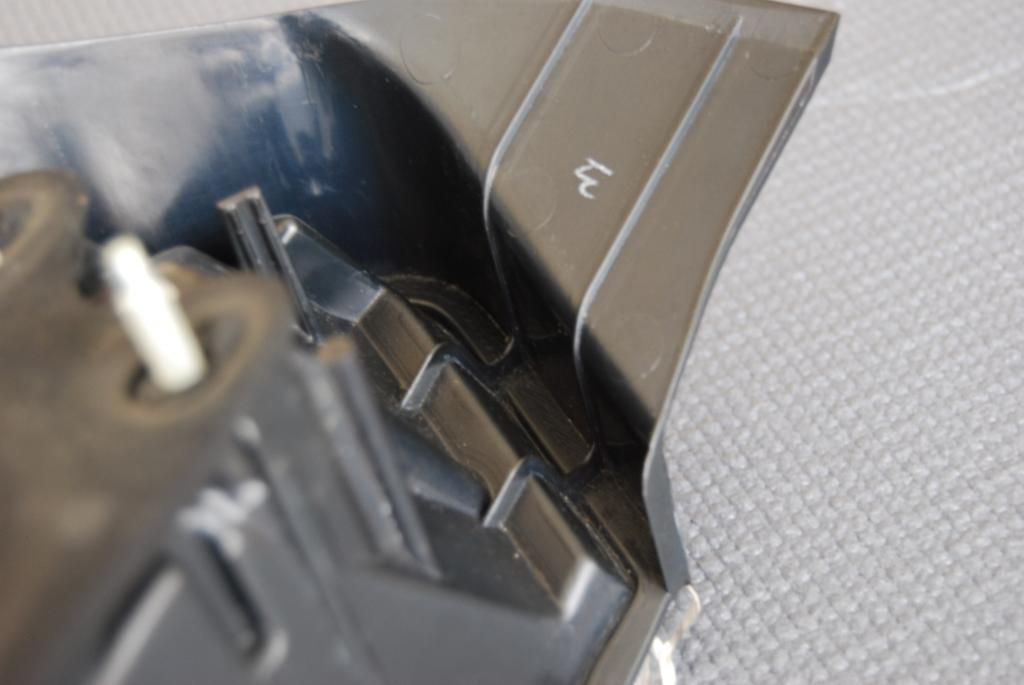 Step 6 - 8: After determining the cut line, assemble the Dremel and its drill bits as listed. Bit #199-04 is a "horizontal cutter". Bits #125 and #7134 are the "vertical cutters". Prepare your safety equipment. Use a non-abrasive material (rotating RC-car stand with a suction cup), rest the assemble on it. You will want to move the assembly freely rather than the Dremel (you may think otherwise), as you cut with the Dremel. Sample section using the Dremel bit #199-04 "horizontal cutter", cleaned using the blades.  Sample section using the Dremel bit #199-04 "horizontal cutter" uncleaned.  Sample section using the Dremel bit #125 and #7134 "vertical cutter". 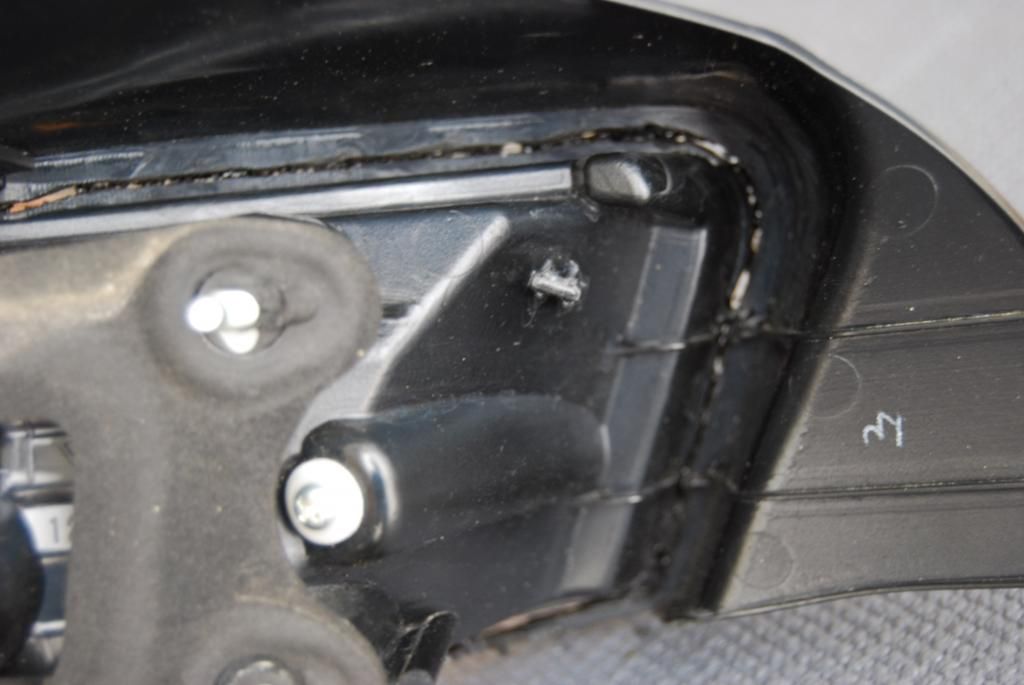 Step 9: Success! Carefully pry the two parts apart. Take extreme caution here as sections may still be bonded together. The cleaner cut line you produce, closer to the 'wall' rather than the edge, the less bonding you should have after completion of the cut. Do not use extreme force but use the Xacto-knives/blades to help cut away any bonded section. Or carefully, at a slower controlled speed, run the Dremel thru that section again. At this point, I use the exhaust of the shop-vac to blow off the debris in the lens and light housing (CAUTION: blow off from an arm's length as blowing too close may have the debris scratch the lens on its way out). Gently clean up the edges of both housings using your fingers - using the blades could cut away material that is needed. 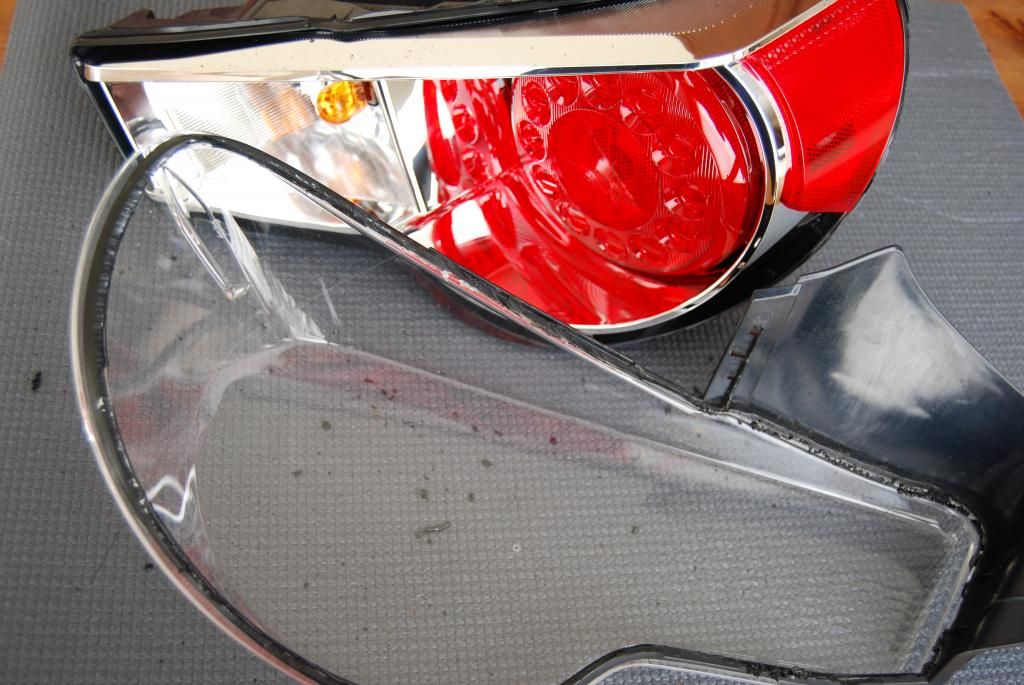 Step 10: Unscrew the assembly apart. Look at the back of the assemble, unscrew the screws. Set aside and relax. Take a break. Prepare your paints. Prepare and mask at your discretion. Imagine what you want the end result to be. This picture illustrates the storage, my trunk, so it can be left alone. It's not like the car can go anywhere without the tail lights anyways haha 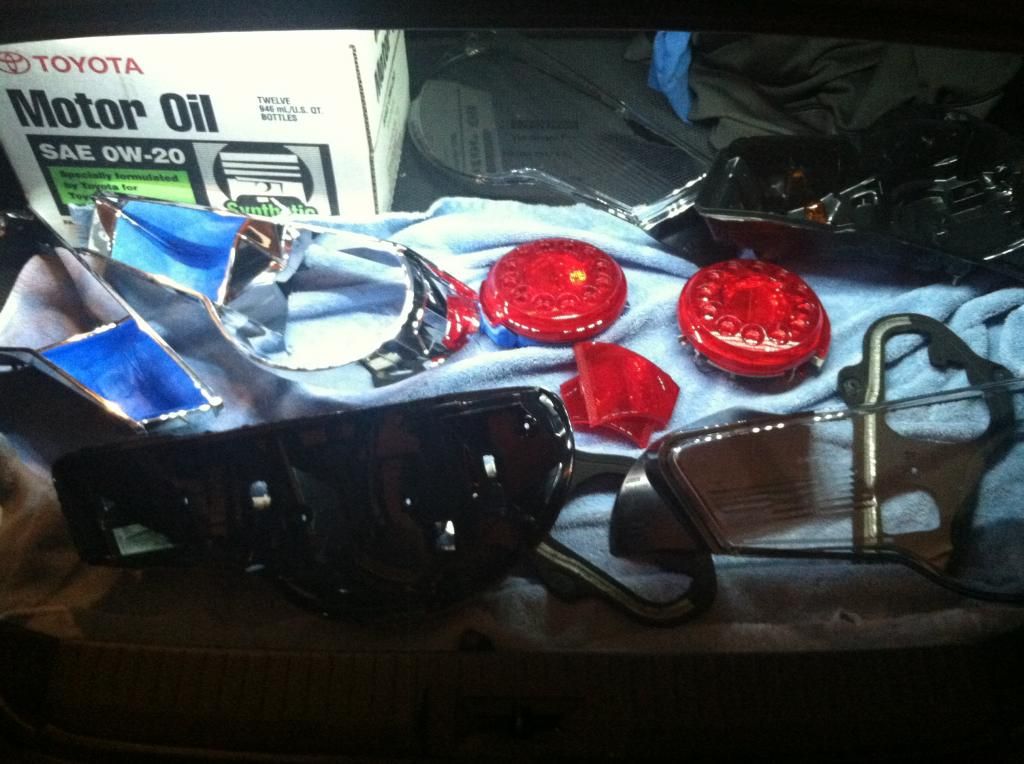 Step 11 & 12: Paint! These pair received the Krylon Matte black paint with 1 coat of Matte clear coat. The 'squared' on the turn signal is taped off. So is the corner lens (option to remove the corner lens but use clear sealant to cure and glue it back on).  Step 12: 3 coats of paint and 1 coat of clear later, the assemblies are painted. Follow the instructions on the paint can. I allowed ample time to allow each layer to dry. Masking tape removed and ready to be re-assembled. DO NOT TOUCH THE PAINTED SURFACE FROM HERE ON. There are plenty of holding spots in the rear of the assembly to avoid finger prints on the paint.  Glamour shot!  Glamour shot! 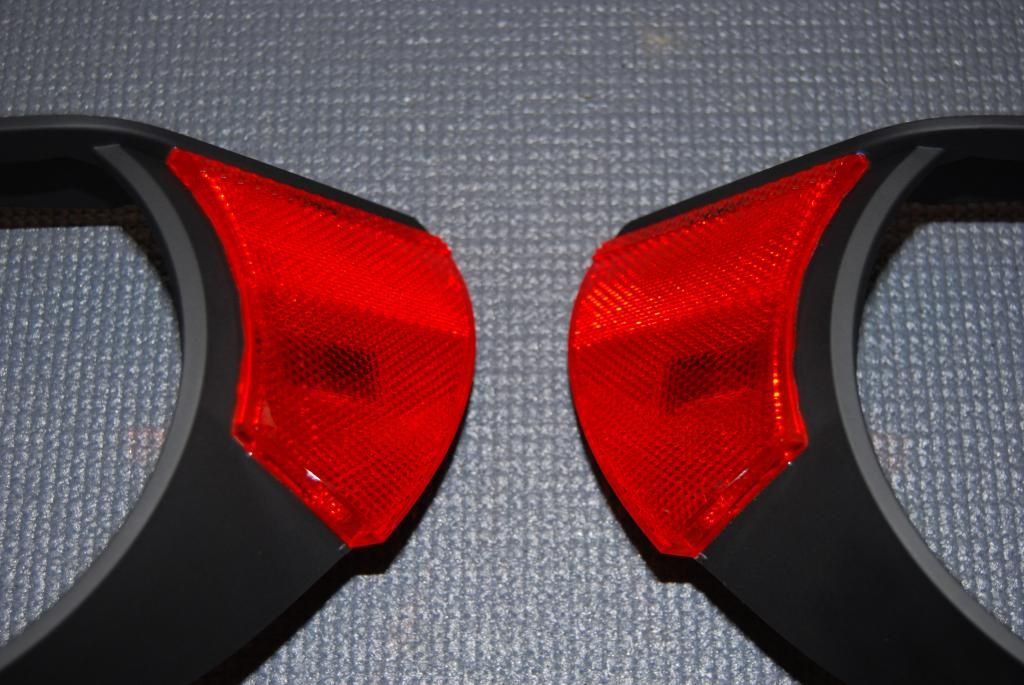 Step 13: Prepare for re-assembly: + Using the alcohol swabs carefully swab the interior of the lens. Carefully and lightly use a non-abrasive cloth to wipe up any residue left by the alcohol swabs. DO NOT TOUCH the interior lens at this point. + Carefully re-assemble the painted bezel to the back housing. Carefully, reinsert the brake light. Holding the assembly above your head and looking up, screw in the bezel screws. AVOID touching any part of painted bezel. + Once the rear assembly is done and the lens is cleaned, test fit the two together. Carefully pay attention to what and how you move the two together. Once you feel the fit is fine, prepare the silicone adhesive, syringe, and the space heater.  Step 13: At this point, your assembly's painted bezel and lights should be securely put together. Test fit and alignment is to your liking. + Prepare the black silicon tube (a new tube is preferred b/c you may find a cured, used tube more difficult to work with). I use one tube per pair, dispose the rest. + Prepare the space heater, turn it on to its 'low' setting (low b/c you will need to just keep the black silicon warm and not hot to the touch nor hot enough to burn anything else. I've tried warming a cup of water but running back and forth to the kitchen was uncalled for. + Prepare the syringe... --> Once the black silicon tube is warm to the touch, squeeze about 1/2 inch of it into the syringe tube. Working quickly with the warm silicon being forced out of the syringe is less tiresome so keep the silicon warm and on the space heater. --> Start injecting the black silicon into the incision. Moving very slowly in one direction after the silicon has filled the previous gap. I moved about 2-3mm per 4-5sec. Keep a steady pressure on the syringe. Keep the syringe inside the incision while the silicon is moving out. This step takes patience and time. Pictures below illustrates the beading of the injected silicon. If you need to rest or need to put the syringe down, place it on the space heater alongside the silicon tube (warm silicon is easier to work with than cold silicon). --> While you are injecting, make sure you check the previous injected gap for any space or holes. Injecting slowly and allowing the silicon to bead out helps fill the incision to prevent unwanted results. --> After completing this injecting phase, check for holes. I use a small flashlight in a completely dark room and run the light along the edge via the lens (careful not to scratch the lens with the flashlight). --> THIS IS PHASE 1 of sealing. After injection, allow a few hours to cure. I did not allow it to cure for more than a few hours because I want the silicon to remain 'moist' in preparation for PHASE 2 of sealing. ** Discretion; if you are satisfied with the injection phase, the remaining silicon in the syringe may be disposed of. Take caution of how you dispose of the syringe. **    Step 14: PHASE 2 of sealing. With the warm-to-the-touch silicon, brush some silicon on a cloth tip/corner. Brush some silicon on the beaded incision to make a layer of silicon bonding the two plastic edges and the previous silicon. Keeping the injected PHASE 1 moist or un-cured, allows you to spread and bond both silicon phases together. Spread the PHASE 2 silicon enough to generously cover the edges and incision. Allow PHASE 2 to cure as long as possible. 24+ hours recommended, the longer the cure the stronger the silicon will be. While curing, do not disturb or move around. Again, I used my trunk as storage. Sample section after PHASE 2 of sealing. 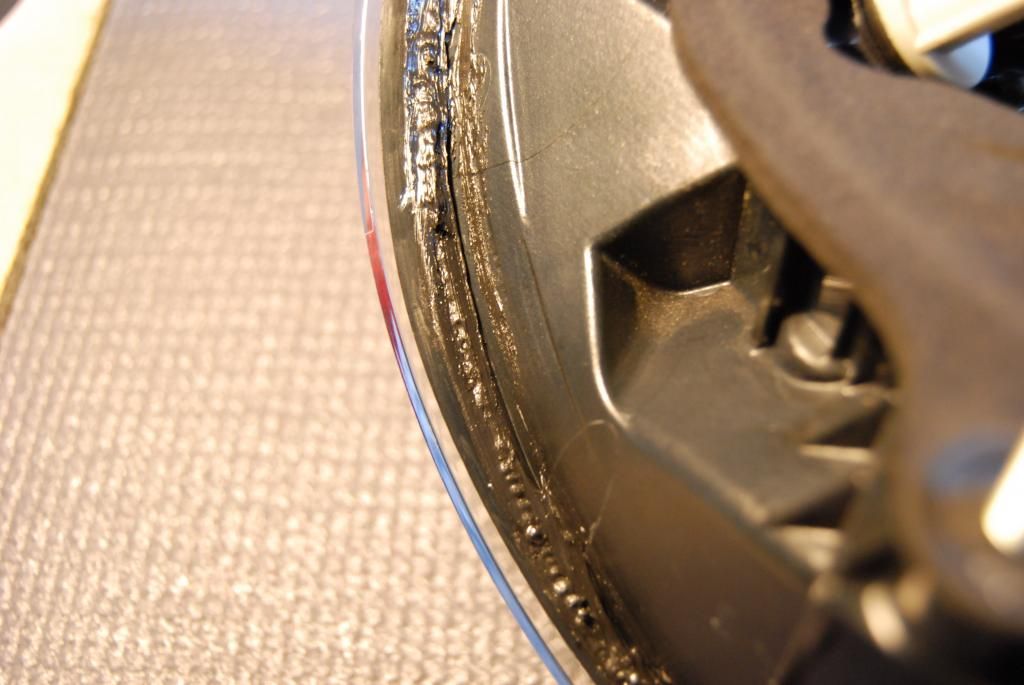 Step 15: PHASE 3, after PHASE 2 is hard to the touch, it's time for your last and final sealing. With the warm-to-the-touch silicon, generously dab the silicon via its factory-supplied tube (cut the tube's tip just enough to allow 2mm of silicon to ooze out) on the incision. Dabbing in a left-right motion to cover from the edge to the wall should make a nice seal. Dab slowly and overlap the previous dab. If the silicon begins to be difficult to squeeze out, re-warm it with the space heater. Allow 24+ hours to cure. Depending how generous you were on the last phase, the longer the cure time needed. Test the silicon by carefully touching a section to see if it's still moist or hard every few hours. Store and do not disturb again. I allowed 2+ days for the entire assemble to cure. Sample section of PHASE 3 of sealing.  Step 16: Sealed! Final inspection with small flashlight in the dark room - success.  Installed! Glamour shot!  Thanks to @SC David, a member and a local photographer for this great shot. He shoots our local meets   The possibilities are endless with an open pair of tail lights. Re-sealing them is the question and this method was in collaboration from a few local auto-body shops, auto-stores, and a couple trial and errors with other re-sealing methods and ingredients. This method used more time rather than 2 or 3 'sealing agents'. The supplies are locally purchased or acquired. Total start to finish of this job is 3 - 4 days, including cure time. Physical cutting, painting, and sealing <1 day. Thanks for reading.
__________________
 |
|
|

|
| The Following 22 Users Say Thank You to MyRx For This Useful Post: | BigFatFlip (06-03-2013), BlaineWasHere (06-01-2013), Chinadian (06-03-2013), continuecrushing (06-03-2013), DAEMANO (10-17-2014), FutureFT86 (03-20-2018), Guff (06-09-2013), Hawk77FT (08-06-2013), hmong337 (02-23-2014), JoeHK (10-10-2014), M-17 (09-03-2013), mitosis (10-02-2013), PMok (06-01-2013), RehabJeff86 (06-06-2013), SC David (06-03-2013), sinigang_guy (06-08-2013), sirus (01-09-2015), SkAsphalt (10-10-2014), SnyperSuicide (11-26-2013), Timmy_Jones (05-28-2015), Trashed675 (06-01-2013), zeal86 (06-10-2018) |
|
|
#2 |
|
Codename: Stitch
Join Date: Apr 2012
Drives: 91 MR2; 06 IS350; 16 BRZ; 18 CX-5
Location: Hayward/NorCal
Posts: 5,248
Thanks: 4,021
Thanked 5,436 Times in 2,307 Posts
Mentioned: 462 Post(s)
Tagged: 6 Thread(s)
|
damn, that's a lot of work and skill that I don't have. Looks awesome though.
 If I hadn't got my tails painted on the outside already, I would have you do mine. 
__________________
|
|
|

|
| The Following User Says Thank You to PMok For This Useful Post: | MyRx (06-01-2013) |
|
|
#3 |
|
Much title. Wow.
Join Date: Mar 2013
Drives: 2013 BRZ Sport-Tech
Location: Edmonton, AB
Posts: 716
Thanks: 118
Thanked 292 Times in 163 Posts
Mentioned: 8 Post(s)
Tagged: 0 Thread(s)
|
This is something I will be doing. The work is worth it.
|
|
|

|
| The Following User Says Thank You to Deadspool For This Useful Post: | MyRx (06-01-2013) |
|
|
#4 |
|
Grip>Drift
Join Date: Jun 2012
Drives: FRS
Location: NorCal
Posts: 3,472
Thanks: 782
Thanked 1,749 Times in 918 Posts
Mentioned: 53 Post(s)
Tagged: 2 Thread(s)
|
The black ones on the white car are mine that OP made. I'm reserving this spot for some more finished pics.
PICS ADDED!
__________________
Last edited by BlaineWasHere; 06-04-2013 at 02:23 AM. |
|
|

|
|
|
#5 | |
|
Senior Member
Join Date: Nov 2012
Drives: Flight 86 is now boarding.
Location: CA
Posts: 1,759
Thanks: 1,842
Thanked 1,502 Times in 700 Posts
Mentioned: 230 Post(s)
Tagged: 1 Thread(s)
|
Def worth it. Just be patient with the cutting and re-sealing.
Quote:

__________________
 |
|
|
|

|
|
|
#6 |
|
Join Date: Aug 2012
Drives: SWP BRZ
Location: NJ
Posts: 3,181
Thanks: 724
Thanked 667 Times in 507 Posts
Mentioned: 15 Post(s)
Tagged: 2 Thread(s)
 |
damm it looks great. i don't have balls to do that though
|
|
|

|
|
|
#7 |
|
Bloberator
Join Date: Dec 2012
Drives: 2013 Asphalt FR-S 6MT
Location: San Francisco, CA
Posts: 302
Thanks: 132
Thanked 302 Times in 119 Posts
Mentioned: 17 Post(s)
Tagged: 0 Thread(s)
|
Stellar work! The tinted overlays can look good, but painting the insides looks fantastic. Loved the way yours looked in person. Very subtle and tasteful upgrade.
__________________
|
|
|

|
| The Following User Says Thank You to SC David For This Useful Post: | MyRx (06-03-2013) |
|
|
#8 |
|
sleep, drive, eat, repeat
Join Date: Mar 2012
Drives: '13 BRZ, '12 Outback
Location: Sack of Potatoes
Posts: 4,431
Thanks: 2,630
Thanked 3,797 Times in 1,981 Posts
Mentioned: 188 Post(s)
Tagged: 4 Thread(s)
|
Awesome write up J, not that I'm gonna do it lol, not ballsy like you!
|
|
|

|
| The Following User Says Thank You to BigFatFlip For This Useful Post: | MyRx (06-03-2013) |
|
|
#9 |
|
Grip>Drift
Join Date: Jun 2012
Drives: FRS
Location: NorCal
Posts: 3,472
Thanks: 782
Thanked 1,749 Times in 918 Posts
Mentioned: 53 Post(s)
Tagged: 2 Thread(s)
|
I added pics to my first post.
__________________
|
|
|

|
| The Following User Says Thank You to BlaineWasHere For This Useful Post: | MyRx (06-04-2013) |
|
|
#11 |
|
Grip>Drift
Join Date: Jun 2012
Drives: FRS
Location: NorCal
Posts: 3,472
Thanks: 782
Thanked 1,749 Times in 918 Posts
Mentioned: 53 Post(s)
Tagged: 2 Thread(s)
|
There is no way. That's why this thread exists.
__________________
|
|
|

|
| The Following 2 Users Say Thank You to BlaineWasHere For This Useful Post: | beaver_scott (09-04-2013), MyRx (09-06-2013) |
|
|
#12 |
|
Senior Member
Join Date: May 2013
Drives: Scion FR-S Whiteout
Location: Hollywood, CA
Posts: 962
Thanks: 297
Thanked 241 Times in 137 Posts
Mentioned: 22 Post(s)
Tagged: 0 Thread(s)
|
Awesome writeup!
Btw, if anyone wants a driver side tail light in good condition for cheap, for practice of trying to open, PM me.
__________________
2013 Scion FR-S
|
|
|

|
| The Following User Says Thank You to retrosmiths For This Useful Post: | MyRx (09-06-2013) |
|
|
#13 |
|
Ridge Racerrrrrrrrr
Join Date: Jul 2012
Drives: 2013 Scion FR-S, 2004 Toyota Coroll
Location: Regina, Sk
Posts: 3,516
Thanks: 5,786
Thanked 1,363 Times in 954 Posts
Mentioned: 37 Post(s)
Tagged: 1 Thread(s)
|
Awesome awesome write up! Mmmm maybe over the winter I will buy a second pair of tail lights and try this!
__________________
|
|
|

|
|
|
#14 | |
|
Senior Member
Join Date: Nov 2012
Drives: Flight 86 is now boarding.
Location: CA
Posts: 1,759
Thanks: 1,842
Thanked 1,502 Times in 700 Posts
Mentioned: 230 Post(s)
Tagged: 1 Thread(s)
|
Quote:
Just be careful on the amount of moisture in the air during curing because pinholes can allow moisture to collect inside the lens. One time, I stored a pair in a box lined with kitty liter to help with the moisture because it had rained a few days during. (I don't have cats but kitty liter served the same purpose, and definitely cheaper).
__________________
 |
|
|
|

|
| The Following User Says Thank You to MyRx For This Useful Post: | mitosis (10-02-2013) |
|
|
|
|
|
|
 Similar Threads
|
||||
| Thread | Thread Starter | Forum | Replies | Last Post |
| LED Tail Lights | Ryan86 | AFRICA | 13 | 11-20-2017 06:43 AM |
| FR-S smoked tail lights and reverse lights | jjdrivesajazz | Cosmetic Modification (Interior/Exterior/Lighting) | 43 | 02-21-2013 09:38 PM |
| Tail lights for the 86 | Minovsky | Cosmetic Modification (Interior/Exterior/Lighting) | 29 | 02-06-2013 12:56 PM |
| WTB FRS Tail lights | FRStance | Exterior Parts (Aero, Lighting, Etc.) | 5 | 01-12-2013 08:40 PM |
| opening tail lights? | JollyJON | Cosmetic Modification (Interior/Exterior/Lighting) | 34 | 07-23-2012 05:35 PM |