


|
||||||
| DIY (Do-It-Yourself) Guides For all DIYs. |
 |
|
|
Thread Tools | Search this Thread |
 01-14-2013, 09:49 PM
|
#1 |
|
Senior Member

Join Date: Jun 2012
Drives: 2013 FS FR-S
Location: Richmond, IN
Posts: 195
Thanks: 0
Thanked 111 Times in 33 Posts
Mentioned: 4 Post(s)
Tagged: 0 Thread(s)
|
DIY__twincamRob's 5min Whiteline Positive Shift bushing install
Went to install this bushing tonight and got to looking at it and thought to myself, there's got to be an easier way. Sure enough, there is. All you need to remove is one 10mm bolt and one 19mm bolt. Here's some pics of how I did it...
example pic borrowed from Whiteline     **Disclaimer: Do at your own risk. I hold no responsibility for injury, damage or spontaneous combustion.**
__________________
Robbie S.
-13 FR-S -12 H-D 48 Instagram: @twincamrob  Last edited by twincamRob; 01-15-2013 at 06:09 AM. |

|

|
| The Following 19 Users Say Thank You to twincamRob For This Useful Post: | axelo (09-25-2015), Cross (05-04-2015), danthedirt (07-09-2013), funbeatsfast (02-07-2013), I<3Twisties (01-19-2013), jvincent (07-02-2014), Kayshart (01-25-2015), Koa (01-20-2015), Lord09 (09-26-2015), Mikepage (03-16-2014), normancw (07-11-2013), Pat (11-03-2014), Phaedrus29 (09-23-2015), ProjectD (01-15-2013), RallySport Direct (07-22-2013), SkAsphalt (01-16-2013), SPCorBUST (05-06-2014), yomny (02-28-2015), zoth (08-12-2014) |
|
01-19-2013, 02:36 AM
|
#2 |
|
Member

Join Date: Nov 2012
Drives: SUBARWD
Location: San Jose
Posts: 65
Thanks: 29
Thanked 43 Times in 11 Posts
Mentioned: 2 Post(s)
Tagged: 0 Thread(s)
|
awesome write up! i really wanted to install it but didn't think i can do it myself.
|
|
|
|
|
02-07-2013, 02:23 PM
|
#3 |
|
Senior Member

Join Date: Jan 2012
Drives: '13 FR-S
Location: Ohio
Posts: 115
Thanks: 13
Thanked 21 Times in 15 Posts
Mentioned: 0 Post(s)
Tagged: 0 Thread(s)
|
So simple...
After reading other DIY's I was prepared to spend a whole day on the install. This way literally takes 5 minutes. Maybe less, since the car was already on jack stands. Well done write up, twincamRob. Please continue to simplify my life. Last edited by funbeatsfast; 02-15-2013 at 04:07 PM. |
|
|
|
|
02-07-2013, 02:33 PM
|
#4 |
|
Professional Smartass

Join Date: Jul 2012
Drives: White Out FRS
Location: Houston TX
Posts: 1,126
Thanks: 114
Thanked 610 Times in 308 Posts
Mentioned: 51 Post(s)
Tagged: 0 Thread(s)
|
Sorry but I find this install method a bit dangerous. You're putting a lot of pressure on the transmission to push it up enough to clear the bushing. But to each their own. Also you forgot the torque values but now I'm just being a jerk.

|
|
|
|
|
02-07-2013, 03:00 PM
|
#5 |
|
Photo Specialist

Join Date: Feb 2012
Drives: 2013 Toyota 86 DGM 6MT
Location: Texas
Posts: 1,152
Thanks: 587
Thanked 1,804 Times in 420 Posts
Mentioned: 94 Post(s)
Tagged: 0 Thread(s)
|
I feel there is great risk jacking up and supporting the gearbox soley using the exhaust hanger bracket. It is interesting there are alternative ways to install the piece.
__________________
|
|
|
|
|
02-08-2013, 06:18 AM
|
#6 | ||
|
Senior Member
Join Date: Jun 2012
Drives: 2013 FS FR-S
Location: Richmond, IN
Posts: 195
Thanks: 0
Thanked 111 Times in 33 Posts
Mentioned: 4 Post(s)
Tagged: 0 Thread(s)
|
Quote:
 Quote:
__________________
Robbie S.
-13 FR-S -12 H-D 48 Instagram: @twincamrob |
||
|
|
|
| The Following User Says Thank You to twincamRob For This Useful Post: | sosick (03-14-2014) |
|
07-05-2013, 09:43 PM
|
#7 |

Join Date: Aug 2012
Drives: SWP BRZ
Location: NJ
Posts: 3,181
Thanks: 724
Thanked 667 Times in 507 Posts
Mentioned: 15 Post(s)
Tagged: 2 Thread(s)
 |
I need to install mine soon and have question.
i copied F1Piont4's picture 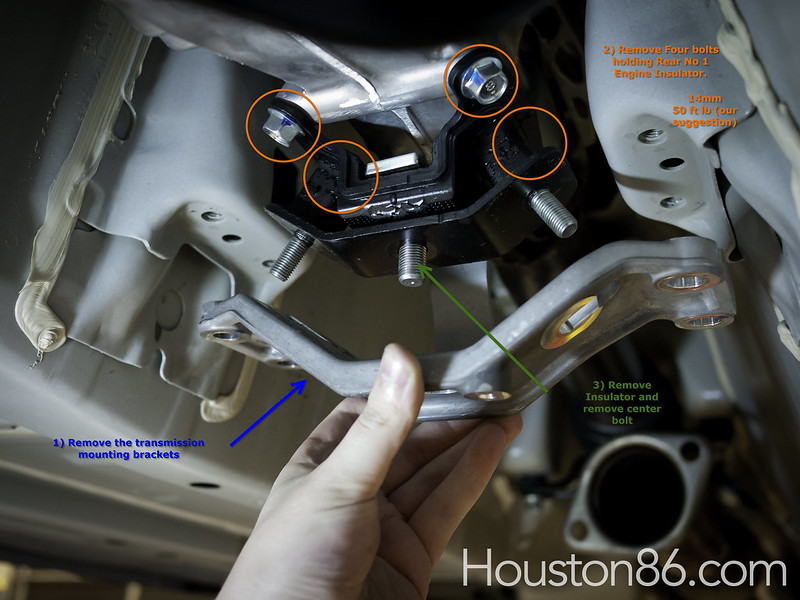 don't i need to remove 1 center T bolt nut and 2 side nuts to raise transmission? because brackets are holding by 3 nuts to that Insulator. you said you only removed 1 center T bolt nut. |
|
|
|
|
07-07-2013, 04:16 PM
|
#8 |
|
Join Date: Aug 2012
Drives: SWP BRZ
Location: NJ
Posts: 3,181
Thanks: 724
Thanked 667 Times in 507 Posts
Mentioned: 15 Post(s)
Tagged: 2 Thread(s)
|
I just installed mine and this method worked great! it wasnt danagerous at all!
BTW, center nut is 17mm not 19mm  I put bushing word "Whiteline" facing front. does it really matter? if it is, i am just going to change it again when i do my oil change. too tired to fix it now since i installed front pipe with it. |
|
|
|
|
07-09-2013, 02:43 PM
|
#9 |
|
Senior Member
Join Date: Oct 2012
Drives: FRS
Location: Gainesville FL
Posts: 444
Thanks: 154
Thanked 283 Times in 154 Posts
Mentioned: 6 Post(s)
Tagged: 2 Thread(s)
|
Whiteline should be visible from the rear
|
|
|
|
|
07-09-2013, 03:24 PM
|
#10 | |
|
Join Date: Aug 2012
Drives: SWP BRZ
Location: NJ
Posts: 3,181
Thanks: 724
Thanked 667 Times in 507 Posts
Mentioned: 15 Post(s)
Tagged: 2 Thread(s)
|
Quote:
i went to whiteline homepage and their installed picture is what i have. http://www.whiteline.com.au/product_detail4.php?part_number=KDT926 I guess it doesnt really matter where word goes to either front or rear. I also sent an e-mail to whiteline to confirm it whether it should matter or not but havent received e-mail back. |
|
|
|
|
|
07-09-2013, 05:13 PM
|
#11 |
|
Senior Member
Join Date: Oct 2012
Drives: FRS
Location: Gainesville FL
Posts: 444
Thanks: 154
Thanked 283 Times in 154 Posts
Mentioned: 6 Post(s)
Tagged: 2 Thread(s)
|
http://www.ft86club.com/forums/showthread.php?t=19782
Check out this one. If you look at the bushing piece there is a ledge on the side that says whiteline, different from other side of it as if to act as a brace. |
|
|
|
|
07-09-2013, 05:34 PM
|
#12 | |
|
Join Date: Aug 2012
Drives: SWP BRZ
Location: NJ
Posts: 3,181
Thanks: 724
Thanked 667 Times in 507 Posts
Mentioned: 15 Post(s)
Tagged: 2 Thread(s)
|
Quote:
more confusing is, when i read Whiteline's instruction, there is no mentioning about insert from front or rear either. also Whiteline's website has installed picture as well (Whiteline word is visible from front) I still did not received e-mail back from whiteline yet. It's no big deal that i can re-install but it seems it doesn't really matter. ( correct me if i am wrong) if Whiteline said it doesnt matter, i don't have to waste my time re-installing this. hope someone can hop in and explain more detailed info if experienced with this. also found video of whiteline's [ame="http://www.youtube.com/watch?v=dLzMO6_ZNHk"]BRZ / 86 / FR-S Whiteline Positive Shift Kit - YouTube[/ame] Last edited by zc06_kisstherain; 07-09-2013 at 10:01 PM. |
|
|
|
|
|
|
|
|
|
|
 Similar Threads
|
||||
| Thread | Thread Starter | Forum | Replies | Last Post |
| Whiteline Positive Shift Kit DIY | F1point4 | DIY (Do-It-Yourself) Guides | 95 | 04-26-2021 02:05 PM |
| Perrin Transmission Support & Whiteline Gearbox Positive Shift Kit | jehu | Suspension | Chassis | Brakes -- Sponsored by 949 Racing | 66 | 12-14-2017 04:12 PM |
| Whiteline Positive Shift Bushing? | wootwoot | Engine, Exhaust, Transmission | 20 | 11-05-2012 08:45 PM |
| FS [WA] Whiteline KDT926(Positive Shift Kit) | stevo_12v | Australia Classifieds | 5 | 11-04-2012 06:16 AM |
| IN STOCK!!! Whiteline FR-S/BRZ Positive Traction and Shift Kits! | 10k Redline | Brakes, Suspension, Chassis | 6 | 10-16-2012 06:32 PM |


 Betty
Betty

