


|
||||||
| Member's Car Journals Car journals by our members. |
 |
|
|
Thread Tools | Search this Thread |
 12-23-2015, 01:59 AM
|
#1 |
|
Senior Member

Join Date: Aug 2012
Drives: @redline, '14 BRZ, '98 Forester
Location: Austin, TX
Posts: 240
Thanks: 126
Thanked 117 Times in 56 Posts
Mentioned: 1 Post(s)
Tagged: 0 Thread(s)
|
Xanatos' Budget Rebuild
WARNING: IMAGE HEAVY
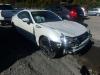
Welcome to my budget rebuild. With my limited funds I will try to get everything I can done myself. This is my first project car but I'm not afraid of putting in some wrench time. I'd like to give a shout out to B is for Build for inspiring me to finally get this project started. His videos are pretty educational and I'd like to do the same with my build journal. Link to the whole picture folder. Before:  I got this SWP BRZ Limited automatic for ~7500 after fees on an online auction and $800 to ship to Austin. For now I just want to get it up and running then make it look pretty when it becomes my daily driver. I was hoping to get the front bumper in the trunk but all I got were some socks, womens clothing magazines, an empty jar of dill pickles  and the floormats. and the floormats. Damaged: Missing BRZ bumper broken headlights both front fenders hood front crash beam radiator + radiator support condenser airbox bent support brackets frame (it shouldnt impact the alignment but I will still try to get it straightened) Parts Prices Current state: Day 2  Lets get started! Day 0 - 2 - FRS Bumper + LH Fender
__________________
[||]=(Flat 4 Life)=[||]
Xanatos' Budget Rebuild DIY - Rewiring FRS Headlights + Turn Signals for BRZ Limited Last edited by Xanatos; 12-23-2015 at 03:17 PM. |

|

|
|
12-23-2015, 01:59 AM
|
#2 |
|
Senior Member
Join Date: Aug 2012
Drives: @redline, '14 BRZ, '98 Forester
Location: Austin, TX
Posts: 240
Thanks: 126
Thanked 117 Times in 56 Posts
Mentioned: 1 Post(s)
Tagged: 0 Thread(s)
|
[Reserved]
__________________
[||]=(Flat 4 Life)=[||]
Xanatos' Budget Rebuild DIY - Rewiring FRS Headlights + Turn Signals for BRZ Limited |
|
|
|
|
12-23-2015, 03:15 AM
|
#3 |
|
Senior Member
Join Date: Aug 2012
Drives: @redline, '14 BRZ, '98 Forester
Location: Austin, TX
Posts: 240
Thanks: 126
Thanked 117 Times in 56 Posts
Mentioned: 1 Post(s)
Tagged: 0 Thread(s)
|
Day 0 - 2
Day 0:
Car got dropped off by the trucking company: Raber's Auto Transport, the guy's (Leo Raber) attitude wasn't great and hes got questionable reviews all over the internet but I didn't know about it until after I already paid the deposit and things were rolling.  He called me to tell me his differential broke down and it would be delayed 3 days. Then he called again to delay another day. Took two weeks to get from NY to Texas. He called me to tell me his differential broke down and it would be delayed 3 days. Then he called again to delay another day. Took two weeks to get from NY to Texas.The car was shipped to a local shopping center with better parking for a truck. This shopping center also has a Harbor Freight so I picked up a rope to tie down the hood while I drove it back. On the way back the battery gave out so I had to get a new one from Sears. Size 35 which is conveniently on sale right now. Got the battery installed and drove it limping back. The fender liners were torn and rubbing against the tires the whole way so I cut them off. The driver side airbag was deployed and in the way and I kept honking when turning so I also cut it out along with the Subaru logo piece. After looking under the hood I decided I should not be driving it until I get more parts. After it went dark I began searching for what I may need. Craigslist came up with a cheap FRS bumper in Dallas. Day 1: Took a 6 hour roadtrip to Dallas in my DD Forester (in the background of some pictures). The view isn't all the spectacular and the traffic was pretty bad due to construction most of the way. Google maps and Waze both failed to work properly in the construction zones. Got home with the new bumper and gave it a shower:  Theres some slight damage to it but I'll get it looking fancy later:  I'm going to try some cheap acrylic paint from Walmart for the bottom as a test bed. If it looks ok I will try with the rest of it:  Day 2: Fender Work Part 1: Pulling the fender took about 10 minutes because I don't have all the right tools yet so I had to improvise. Also the dents up front made it a little harder. The bottom of the fender attaches to the pinch welds where you should jack and that part had an immense amount of paint around the 2x 10mm bolts. Before:  After:  Took about 4 hours of work to get it to where its at. Some paint chipped but thats to be expected around the rusty crinks. I dont know how the bumper attachment piece is supposed to look so I will have to do some more research before I can get it to look and fit right. Using a soft cloth (to keep the paint intact) I started to work bending back the edge of the wheel well. As you see here the cloth is double layered for added protection. It gives less tactile feedback through the pliers but provide less harsh bends. Also note the bent part up top (has Subaru printed on it):  As you bend it with flat pliers(see below) try not to bend too much at one time or the paint will crack. Rule of thumb for me is move about half the tool width with each bend and only about 5-10 degrees of bend each time. I probably went back and forth through the whole edge 6 times to get it back to 90deg.  Note the chipped paint on the bottom edge. When going over this area try to keep the cloth away as it will catch paint and rip it off in chunks.  Looks about done. I also worked out the crink with the Subaru logo.  This is a ratchet that I used to bend out the large dent in the fender. I would have prefered something about baseball to grapefruit sized solid ball to work with but thats all I had with a 3D curve. Use a cloth around your tool of choice and a rubber band to keep it in place.  Gonna leave it like this for now. It can still be worked on but time vs reward didn't seem worth it with my tools. As you bend that piece make sure you have something soft below it so you don't scratch. It would be easier if you had someone hold the fender at an angle while you bend away but this was not the case for me. As I put force down on this end the other end would fly up. Make sure when you make bends apply a light force at first to test if it bends and progressively increase your force so you don't want to have a bulge that will also crack paint.  Still has some scratches on the paint. But I'm gonna leave it like that for now.  I also removed the broken airbox, hood gasket on the radiator support, and had a better look under the car at the damage.
__________________
[||]=(Flat 4 Life)=[||]
Xanatos' Budget Rebuild DIY - Rewiring FRS Headlights + Turn Signals for BRZ Limited |
|
|
|
|
12-23-2015, 04:22 AM
|
#4 |
|
/dev/null

Join Date: Jan 2013
Drives: Uphill
Location: Metric North
Posts: 2,221
Thanks: 3,489
Thanked 2,926 Times in 1,420 Posts
Mentioned: 18 Post(s)
Tagged: 14 Thread(s)
|
It looks like a good project car, I hope you don't find too many surprises!
I'd offer to lend a hand if I lived anywhere near you :-) Good luck, and post updates! |
|
|
|
| The Following User Says Thank You to Sarlacc For This Useful Post: | Xanatos (12-23-2015) |
|
05-11-2016, 05:57 AM
|
#5 |
|
Senior Member
Join Date: Aug 2012
Drives: @redline, '14 BRZ, '98 Forester
Location: Austin, TX
Posts: 240
Thanks: 126
Thanked 117 Times in 56 Posts
Mentioned: 1 Post(s)
Tagged: 0 Thread(s)
|
I haven't had much time to work on my BRZ but more updates will be coming soon when my parts start coming in!
In the meantime I have created a DIY tutorial for anyone who wants to put FRS headlights + turn signals on their BRZ Limited.
__________________
[||]=(Flat 4 Life)=[||]
Xanatos' Budget Rebuild DIY - Rewiring FRS Headlights + Turn Signals for BRZ Limited |
|
|
|
|
01-13-2017, 12:06 AM
|
#6 | |
|
Junior Member
Join Date: Dec 2016
Drives: 2015 CWP BRZ 6MT
Location: ATX
Posts: 4
Thanks: 0
Thanked 3 Times in 1 Post
Mentioned: 0 Post(s)
Tagged: 0 Thread(s)
|
Quote:
|
|
|
|
|
|
06-18-2017, 04:11 PM
|
#7 |
|
Member
Join Date: Mar 2017
Drives: Toyota Avensis III
Location: Romania
Posts: 14
Thanks: 0
Thanked 4 Times in 3 Posts
Mentioned: 0 Post(s)
Tagged: 0 Thread(s)
|
My damaged car was bought from salvage cars.
Very hard to be restored...
__________________
If there is passion and motivation accomplishment is at hand.
|
|
|
|
|
06-25-2017, 12:51 AM
|
#8 |
|
Member
Join Date: Sep 2016
Drives: 2016 FR-S
Location: Toronto
Posts: 42
Thanks: 4
Thanked 27 Times in 20 Posts
Mentioned: 0 Post(s)
Tagged: 0 Thread(s)
|
goodluck with the rebuild. i rebuilt my frs from auction too. any questions let me know, i work in collision.
|
|
|
|
|
|
|
|
|
|
|
 Similar Threads
|
||||
| Thread | Thread Starter | Forum | Replies | Last Post |
| '13 Subaru BRZ rebuild | P3tras | Member's Car Journals | 96 | 01-03-2016 07:05 PM |
| 2jz or fa20 rebuild? | 2015FRShalo | Northern California | 24 | 12-17-2015 02:07 AM |
| BRZ Rebuild (Mulekr1) | mulekr1 | Member's Car Journals | 3 | 11-15-2015 11:53 AM |
| Looking to rebuild a Scion FRS | miller.4311 | FR-S & 86 Photos, Videos, Wallpapers, Gallery Forum | 4 | 06-24-2015 07:47 PM |
| rebuild FR-S Raven | FR-S_AV | Member's Car Journals | 9 | 06-20-2015 02:44 AM |


 BRZ Lmtd
 Darth 86
