Hi at all,
I want to give a short overview of my current swap project on a 2013 Toyota 86. I decided to design/develop the mechanical swap components myself. I want to develop a "as complete as possible" HowTo once the project is finished. As well I develop all custom parts using free CAD software. When all components are tested, I´m planing to upload the data to a public CAD sharing platform, giving companys and individuals the option to reproduce, modify and improve my kit. (work in progress)
A short introduction of myself: I´m a 35 year old projectmanager and former mechanical engineer living in east Germany. I´m into cars since I was 18 and did nearly everything, from hifi build over turbo kits, paintjobs and engine swaps on my own. For sure with changing quality of the result.

The Kit shall include engine and trans mounts, AC line adapters, acessory idler pulley bracket, ignition coil relocation brackets + valve cover liners, air filter connector with MAF flange, air filter box and cold air intake. On side of the electronics the AGT engeineering CAN Translator will be used. This translator is made by @
toddy101 , who is also active in this forum with a engine swap thread.
Credits also goes to @
spitsnaugle , who gave me some great ideas for my build with his documented LS swap-thread.
Currently the first version of all basic parts is under production. Not yet under manufacturing is the airbox, which is already prepared in CAD. Some parts of the CAI, which will be located under the bumper, still needs to be modeled.
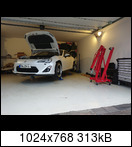
The car before the swap (even if this will not really influence the body):


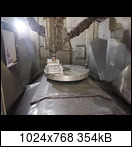
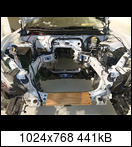
Everythings takes place in my private garage without lifter/ramp:
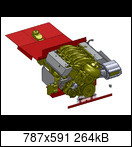
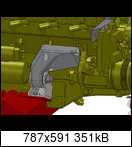
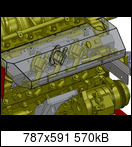
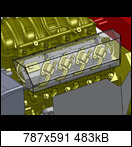
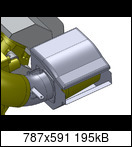
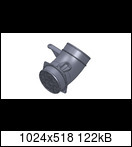
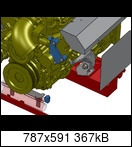
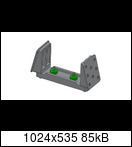
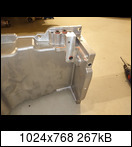
Current status of CAD-development:

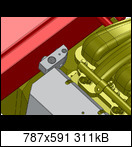
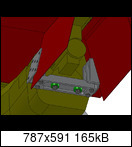
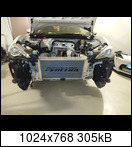
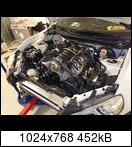
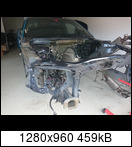
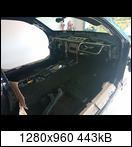
After those pics of the status of non-physical swap parts, here are some impressions of the current "real" progress:
The layout of the transmission and axle:
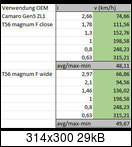
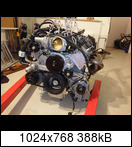
I decided to buy a slightly crashed 2013 Camaro SS to get the engine and some other parts. Initialy it was my intension to use also the Camaro TR6060 trans for the swap. Since I learned that this would mean essential metalwork on the tunnel due too the wide forward receptecle of the remote shifter, OR a significant mod of the trans endhousing, I changed plans and will use a T56 Magnum F for my swap. This also makes things easier for the driveshaft.
Nevertheless, since the prices for LS Engines and all the other US car parts are very high here in europe, the decission was still OK. Overall I will have the engine, harness and ECU as well as some other stuff for zero cost after seeling all other parts of the camaro as well as the no longer needed parts of the 86. Only thing missing is the transmission. Ofcourse all components which are not OEM will be additional costs. Overall this swap is pretty much 25% higher in costs compared to any swap made in the US due to import/customs and the fact, the 90% of the necessary parts need to be shipped. This being said, even with shipment and customs added, many parts are cheeper when I ship them compared to the price I get at local store/seller.
For sure its also possible to use a GM crate engine with the swap kit components. But I also hope to gain some advantages by using an engine out of car with all official documents in matter of the legal approval (especially in matter of environmetal safety topics) we have to gain here to be allowed to bring such a modified car onto public roads.
Just for fun, here are some pics of the Camaro:


The HowTo will be finished once I´m close to the end of the project. I have a prallel thread in the german 86 forum where also some more development steps are descriped more detailed. Since I dont have the time to tranlate everything, I will only update this thread in longer time steps.
For now, here is the parts list I used for my swap, acessory setup and so on:
EDIT - 05/05/2020: Update of the parts list, still not complete but getting close. Most custom parts not included yet. Some listed items are sourced at German companys, but should be easy to find in US/North America/Australia.
Engine:
LS3 from Camaro SS 2010-2013, E38 ECU (alternatively GM crate engine 430HP version, some parts for belt drive may already be included when using crate engine)
TREMEC:
Gearbox - TUET16362
Clutch bell - 1386-212-005
Slip Yoke - SDH-2-3-6041X
Clutch Bell Screws - ICB-551684
Radiator:
I have to correct myself concerning what I stated here before. I had to learn that the 86 chassis has simply to small space for a radiator with integrated water to oil cooler and dramatically lacks of airflow through the engine compartment with a big LS block fitted in it. The additional heat load of the oil system exceeds the already poor cooling capacity of the relatively small radiator.
As well, the radiator desgin of the skunk2ultra I used is very poor. The fins are much to big and therefore the row count is very low what means an overall small surface for heat exchange, even while beeing hell of a big beast to fit in the available space.
Another thing I learned: DO NOT BUY A MISHIMOTO FAN SHROUD!!! The shroud itself isnt bad, but the fans used are the biggest crap you can get. The only thing they are able to is creating enormous noise, but the airflow is way below the factory fan set. I disassembled one of them partly and found out that they are very cheap noname chinese fans. They can be ordered on aliexpress for below 10 bucks. That also reflects the performamce you can expect.
I finally went with a Koyorad aluminium radiator and the factory fan shroud. The result was far better as with the setup of the skunk2ultra and the Mishimoto. Better air flow, more space for the air to escape between radiator and engine, better overall fitment, less noise and lower coolant temps.
To take care of the oil temps I additionaly installed a Setrap Slimline oil cooler and an inline thermostat. The thermostat is underneath the air box, the cooler itself is installed under the front crash bar.
For reliable coolant temps under all conditions still a vented hood will be needed. Otherwise overheating might still be an issue if ideling or stop&go traffic with AC switched on at high ambient temps.
A further improvement might be the verus radiator and as well a radiator scoop to prevent any hot air beeing pushed back out of the engine compartment and infront of the radiator. Thats also important for Installation of any aftermarket radiator and Fan shroud: Make sure to seal the radiator to the vehicles frame as good as possible so that no hot air can flow back from the engine compartment (pressurised by the fans) and infront of the radiator!
GM:
Alternator bracket ZL1 Camaro - 12578550
Air conditioning compressor bracket ZL1 Camaro - 12622243 (must be reworked for oil dipstick)
Air conditioning compressor ZL1 - 22785352
Poly V belt A/C compressor ZL1 - 12622244
Alternator ZL1 Camaro - 23482914
Crankshaft damper / harmonic balancer Corvette C6 - 12560115 12674582
Water pump Corvette C6 - 89018052 (alternative: 12681186)
Belt tensioner Corvette C6 - 12569301
Plug for cooling water port LS3 block - 12561663
Exhaust manifold gasket LSx (2x) - 12617944
Crankshaft damper screw LSx wet sump - 12557840
Water pump gasket LSx (2x) - 12630223
Gasket engine front cover - 12633904
Oil filter - 6437462
Thermostat kit - 89018168
Thermostat seal - 12587397 (Attention: A 1mm NBR seal is also required!)
Thermostat housing - ????????
GTO - Shifter Cup - 92147292
GTO - Shifter - 92177175
Clutch actuator / slave cylinder - 24264182
Pilot bearing - 14061685
Clutch master cylinder - 92199594
Melling:
High Pressure oil pump 10295
Improved Racing:
Note: It is fully intentioned that I the actually wrong oil pan (or oil pan kit) is given here. The oil pan mentioned has a housing contained in the casting of the pan, which houses the pressure relief valve for the oil supply for VVT/DOD. This valve and housing is not required and must also be removed as it would collide with the steering rack. Also if the actually "correct" variant of the oil pan, without the housing, is ordered, the identical pan with the housing will be supplied because GM only produces the version with the additional housing for cost reasons. The said valve is only screwed into the pan anyway. On the version for vehicles without the relief valve, a blind plug is simply installed in its place. Since both versions have to be reworked anyway in order to not collide with the steering rack, the additional housing to be removed is hardly significant. Everything needed is an additional standard screw plug. The use of the pan with the pressure relief valve is recommended, since it only costs about half (!!!) of the pan without the valve, which is in fact identical due to the change in production.
Front Sump LS1, LS2 GTO / Commodore Oil Cooler Adapter EGM-107
Baffeled oil pan kit, EGM-403, including:
Oil pan GTO LS2 12599397 (GM)
Baffle for oil pan EGM-204
Pickup tube GTO LS2 - 12572654 (GM)
Dipstick GTO LS2 92067147 (GM)
Dipstick tube GTO LS2 92066941 (GM)
Gasket and small parts for assembly
JustDifferentials:
Pinion and crown gear set i = 3.58 - TV6-358-29-NG
Bearing and sealing kit for pinion - PKTV6-B (contains bearings and shims for pinion shaft but not for differential cage, bearings for differential cage can be reused if only the ratio is changed, as shims for the differential cage DIN988 in the appropriate size can be used as a cost-effective alternative to Toyota OEM -shims)
29-tooth differential flange - YOKT35100-MULTI
AGT-Engineering:
Plug&Play GM to BRZ/86 CAN-Bus Translator
Continental:
Poly V belt - 6PK1880
Note: The poly belt for the ancillaries is meant to be used with the custom-made pulley bracket. (ZN6-020-000-05c) This bracket is also part of the A/C system and carries the A/C line with the high pressure service port for R1234yf. This HD service port is taken over with the OEM A/C line fitting of the GT86.
A/C lines:
Below are the individual parts of the A/C lines. For better allocation, each with start/end point of the respective line. The components are listed in the order in which they are installed from the specified start to end point. Parts of the lines, which are taken from the original lines or which are self-made, are shown in green letters to illustrate the complete line construction.
Cold Hose/custom manufactured: Hose 1 - Expansion valve to A/C compressor:
Adapter expansion valve ZN6-020-000-02b
# 10 90 Degree O-ring Fitting - BL1323
# 10 (1/2") Standard Barrier A/C Hose XXX ft - BH10
# 10 (1/2") Inline Splicer 7/16" R-12 or Switch Port - BL6103-1 (Adapter for R1234yf needed!)
# 10 (1/2") Standard Barrier A/C Hose XXX ft - BH10
# 10 45 Degree O-ring Fitting BL1313
Connection to A/C compressor ZN6-020-000-???
Hose 2 - A/C compressor to bracket for pulley (ZN6-020-000-05c):
#8 90 Degree O-ring Fitting - BL1322
# 8 (13/32") Barrier A/C Hose XXX ft - BH8
# 8 Straight O-ring Fitting - BL1302
Hose 3 - holder for pulley (ZN6-020-000-05c) to air conditioner:
OEM Toyota fitting with high pressure service port, removed from OEM line by cutting the ferrule/press sleeve
# 8 Ferrule/press sleeve for Standard Barrier Hose - ATC3008L
# 8 (13/32") Standard Barrier A/C Hose XXX ft - BH8
#8 90 Degree O-ring Fitting - BL1322
Adapter upper connection to kondenser ZN6-020-000-01b
eBay:
Retrofit adapter R1234yf low pressure service port to 1/4" SAE thread female
Vacuum connection brake booster: ebay:
Board outlet 1/4" for 10 mm hose AISI 316 stainless steel Board outlet 8688 - Connection for brake booster to intake manifold. To do this, drill a hole in the rear of the intake manifold, to the left of the original connection. The original connection must be removed to connect the heating heat exchanger.
V2A pipe 10mm, approx. 30cm
Turbozentrum:
2x silicone elbow 90°, 10mm, black
Fuel lines: Pneumatikshop:
Distributor block, PN 16, aluminium, 2xG1/8, 2xG1/4
Threaded nozzle with cylindrical thread, with NBR O-ring, nozzle, up to PN 30, Dm 8mm, G1/8
Screw plug with elastomer seal (G thread) 400 bar Plug galv., G1/4
Elbow screw-in fitting for fabric hose TX, up to 10 bar aluminum, Dm9, G1/4
AN-Fittings:
AN6/Dash6 Fitting straight
GM Quick disconnect adapter 9,5mm AN6
Turbozentrum:
06 AN / Dash 6 Viton hydraulic hose nylon - E85 capable - 60cm
Oil lines: AN-Fittings:
2xORB to AN8
3x 90° AN8 fitting
1x 180° AN8 fitting
Miscellaneous:
AN8 nylon braided hydraulic hose, 2m
Cooling water lines:
I recommend using Heat Shrink Clamps for all connections between the individual components of the cooling water lines. These do not have a larger diameter than the hose itself at any point, which is a great advantage given the sometimes very tight space conditions. Only at the "ends" of the lines, e.g. at the connections of the water pump and radiator, I recommend to use conventional spring or bolt clamps, in order to be able to loosen and reinstall the hose if necessary without damage. An exception is the connection of the hoses to the heater core. In this case the Heat Shrink Clamps must be used due to space reasons. The connections of the heat exchanger protruding from the fire wall must be shortened by about 2 cm before installation.
Cooling water lines to heater core and steamport:
The hose on the right-hand side in the direction of travel must be extended by using an aluminum hose connector. Turn the reattached section by 180°. The left-hand hose in the direction of travel must be disconnected before the first bend on the fire wall and then reconnected after rotating it by 180°. The OEM bleeder valve of the Toyota 86 must be installed in this hose after the 90° hose elbow attached to the heater core in order to be able to bleed at the highest point of the system.
Mackay:
RUBBER HEATER HOSE KIT COMMODORE VE L76 L98 6.0L V8 06-10 CH4201/CH4227
Alternative to Mackay the following OEM GM parts can be used if available:
Hose heater core (engine side) 92281853 (92233978; 92233977)
Hose heater core (heater core side) 92266388 (92233974; 92184038)
Turbozentrum:
3x silicone elbow 90°, 16mm, black
Schlauchland:
Pipe connector aluminium Dm=16mm l=80mm - AR_V500_8cm_16mm
Miscellaneous:
18mm water temperature display adapter tube / cooler sensor adapter GT
hose connection 6mm 1/8" NPT black
Cooling water lines -> water pump to radiator (lower line, described as A/C lines):
Schlauchland/Turbozentrum:
Silicone elbow 90°, 38mm, black
Aluminum elbow 90°, Dm=38mm - AB90_V100_38mm_Elox-black
Silicone elbow 90°, 38mm, black
Tube connector aluminum Dm=38mm l=600mm - AR_V500_60cm_38mm_Elox-black
Silicone elbow 90°, 38mm, black
Tube connector aluminum Dm=38mm l=80mm - AR_V500_8cm_38mm
Silicone elbow 90°, 38mm, black
Cooling water lines -> filler neck to water pump (upper line, described as A/C lines):
Schlauchland/Turbozentrum:
Silicone elbow 135°, 38mm, black
Tube connector aluminum Dm=38mm l=80mm - AR_V500_8cm_38mm
Silicone elbow 45°, 38mm black
Tube connector aluminum Dm=38mm l=80mm - AR_V500_8cm_38mm
Silicone reduction elbow 90°, 38 - 35mm, black
Air filter: Turbozentrum:
Silicone elbow 90°, 102mm, black
2x HD hose clamp, black, 87-112mm
AEM:
DryFlow Air Filter 21-2058DK
Clutch-system: Earls:
Clutch adapter 4AN late version - EAR-652504ERL
Clutch adapter 4AN early version - LS641001ERL
Tilton:
Cover- TIL-74-207
Clamp TIL-74-208
Mount TIL-74-212
Reservoir TIL-74-202
Filter TIL-74-210
SpeedwayMotors:
Braided Stainless AN 4, 12 Inch Brake Line - 91031842-4
GM T56 Release Bearing Remote Bleeder Kit, 12 Line, LS1/Corvette/GTO - 5151399-12
Speedway Removable Brake Line Hose Retaining Tabs - 91031309
Spark plug wire: Scott Performance:
Scott Spark Plug Wire Kit w/Sleeve - LS Coil Pack (Plug Boot Angle: 45°, Color: Black) - CH-K03
Schlauchland:
Heat protection hose 2m, Dm=15mm - HSS-FITEX_V100_15mm
Miscellaneous:
Self-adhesive heat protection mat 100x100cm - HSM-AlFi-sk_V100_1.0x1.0m (for installation in transmission tunnel)