Hey guys, GJP Designs, who created the TracBox and IPS Gauge for the 1st gen is working on a 2nd gen IPS Gauge and I have the honor of helping him with pre-production testing(alongside a handful of others)
First off I want to say that this product was given to me at no cost and in return I will helping GJP Designs with troubleshooting/testing. Regardless, I will be giving my 100% unbiased and honest review of this smart gauge
I have some experience with the P3 gauge on other platforms(vw, bmw) but I dont have experience with the P3 Gauge on the twin platform
Its fairly safe to assume its very similar to how it works with the VW and BMW platforms ive used it with, so that will be my main point of comparison.
To start off, this gauge costs a faction of what the P3 Gauge costs yet feels very similar in how it functions/operates. The IPS Gauge has a 3D Printed housing that is pressure fit into the OEM driver side vent. This allows for minor adjustment to ensure the screen and angle are optimal for the driver. It also essentially eliminates the possibility of any vibrations.
The IPS Gauge comes with its own wiring harness that goes directly into your OBD2 port. At the time of this review, it does not support aftermarket sensors for boost and oil pressure. Those features are in the works, but as with everything, it requires time. This gauges firmware can also be updated via a Micro USB (old android connector).
It has all your common menu options that you should expect. It also has BRZ/GR86 specific options such as turning on/off the Active Sound.
As of right now, pretty much every option works as intended. My Active Sound feature shows an error because the module was unplugged (more on this later).
Link to product and more info regarding it's features and functions:
https://www.geraldjustprojects.com/p...gr86-brz-2022/
Lets get into this DIY:
Difficulty 2.5/10
Total Time required:
Newbie(never done anything past check your own fluids): 1 hour
Hobbyist(performs common automotive tasks and modifications): 30 mins
Professional(lives the auto industry hell on a daily basis): 12 mins
Tools required:
Trim removal tool (Flathead and a microfiber works too)
#2 Phillips
Straight long pick or a very small flathead(maybe even a toothpick? lol)
Zip Ties
Step 1: Open your box and look at your IPS Gauge. You should have the Gauge itself, the OBD2 connector, and an adapter to go from the OBD2 to the gauge itself

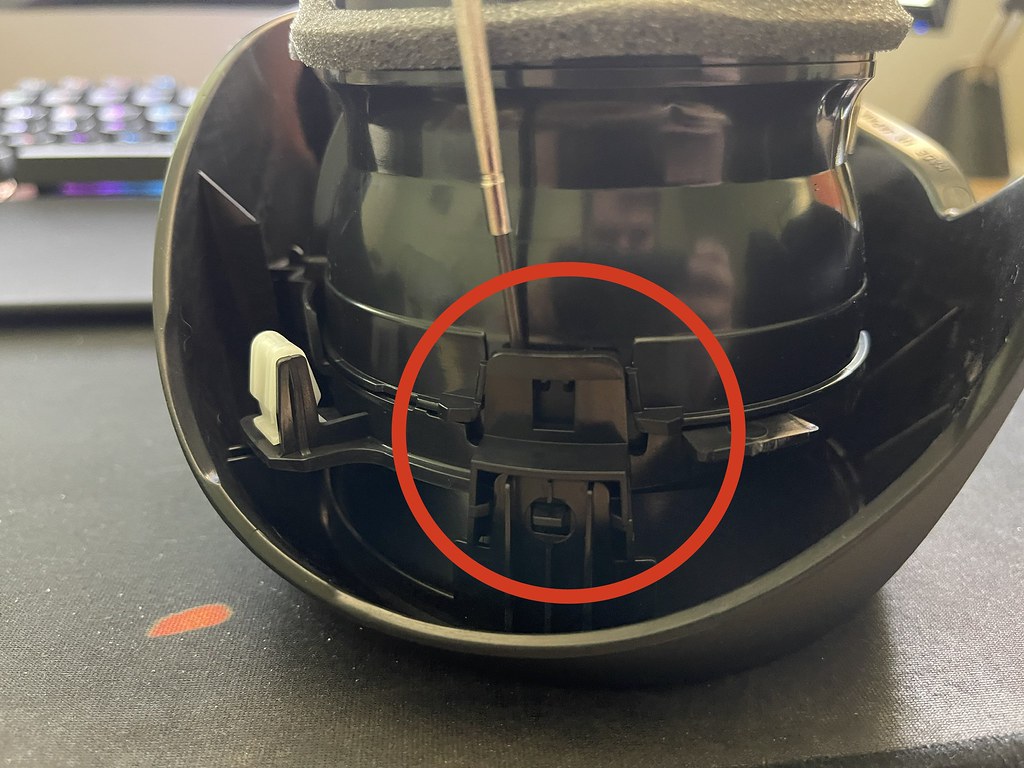
Step 2: Go to your car, open the driver side door and pull the side panel off with your trim removal tool. Put the tool where the arrow is pointed and it should pop one clip off and give you enough space to get your fingers behind the cover and pop it out. Ive included a picture of the back of the cover, to show you where every clip is. The panel pops out very easily


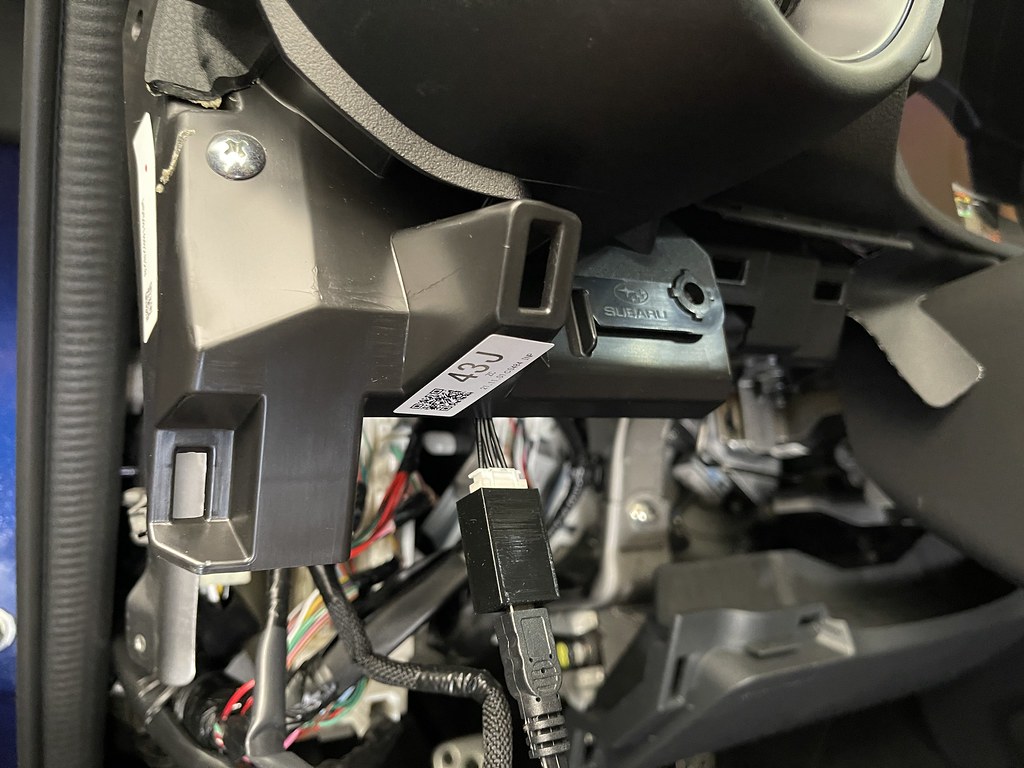
Step 3: Take your Phillips screwdriver and remove the screw under that panel, circled in red. Once that screw is removed, take grab the entire lower section from the front and pull it toward the back of the car and slightly downward. Give it a decent yank and itll pop most of the clips off. Work the rest out and you can either let the panel hang down to undo the 2 connectors and put the panel aside. Ive included a picture of the back of that panel, where all the clips on, so you have an idea of what to look for when pulled it off.


Step 4: Take your Phillips screwdriver and remove the screw under the vent, circled in red. Once that screw is removed, you can pull the whole vent assembly toward the back of the car from underneath/left section that is clearly exposed. It pops off fairly easily. Ive included a picture of the back of the vent assembly so you can see which clips you are fighting.

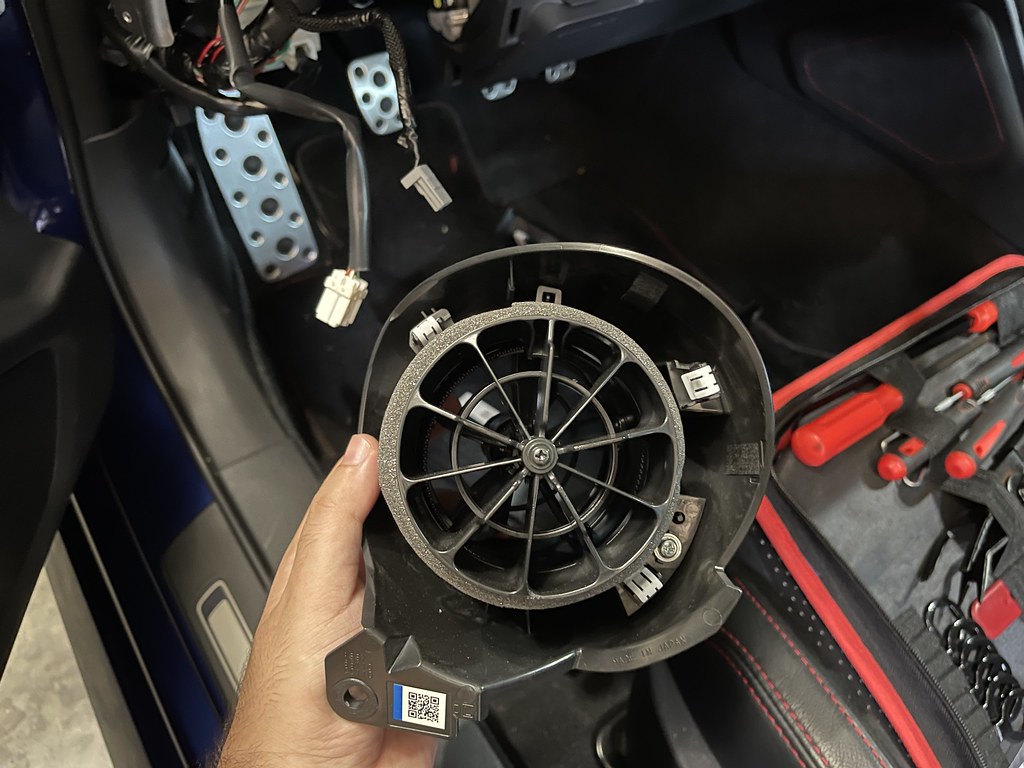
Step 5: Take your vent assembly, flip it over and you will see 3 tabs holding the vent itself to the housing. You will get your pick or a very thin flathead and undo each tab/clip one by one. As soon as you do the first one, the vent itself should move up enough to keep that tab unclipped while you do the others.
Ive circled all 3 tabs you have to undo. The vent itself will come out of the whole housing.


Step 6: Remove the Phillips screw holding the front portion of the vent to the rear portion. Once this screw is removed, the front portion will separate from the rear portion. You will not need this section anymore and can store it away safely.

Step 7: Get your adapter cable and run in into the vent housing from behind at the lowest portion, then plug it into your IPS Gauge.

Step 8: Push the IPS Gauge into the rear section of your vent. The section of the back of the Gauge where the plugs are is the
BOTTOM of the Gauge. The housing has a rectangle guide; that is the
TOP of the vent. One it is pressure fit into the rear portion of your vent, snap it back into the main housing. This is basically the only step that you may have to repeat if you install the gauge upside-down.

Step 9: Install the Vent assembly back into the car and push the hanging wire downward though an opening between the dash and the vent. You dont need to make any holes or do anything for the wire. The Vent tube is EXTREMELY flexible and wont damage or cut any wires. If you want to, you can trim a little bit of the vent tube to give the wire space, but its soft enough where it barely puts any pressure on the wire itself. Dont forget to put the Phillips screw back where it belongs!

Step 10: Plug in your OBD2 connector to the Gauge and to your port on the car. Wrap the excess wire and zip tie it out of the way.
This is when you should turn the ignition on and make sure the Gauge is facing the correct orientation!

Step 11: Install the two other panels in reverse order of removal. Dont forget the Phillips screw on the side!
Step 12: Before you turn on your car, hold down both buttons on the gauge for 8 seconds to open the main menu. Everything on this gauge requires holding the button for extended periods of time. Hold the left button for 2seconds to enter that specific menu and change the option. Hold the right button for 2 seconds to move to the next menu. Go through every menu option and ensure it all seems correct and to your liking. When you are done, hold both buttons down for 8 seconds and it will turn off the Gauge.
Step 13: Turn on your car. It should default to Readout #1. Holding the left button for 2 seconds will move to the previous readout/page. Holding the right button for 2 seconds will move to the next readout/page. Holding both buttons down for 8 seconds will allow you change what that specific readout/page shows. You scroll through the menu by holding either left or right button for 2 seconds. When you are at the readout you want to display for that page, you hold both buttons down and it will set it to that page. If the readout/page has a MAX value, dictating the highest value it has seen during that specific drive cycle, you can reset that MAX value by holding both buttons for 3 seconds. You will see the MAX value turn red and you can let go to reset it.
This all sounds a bit confusing, but trust me, when you use it, its A LOT simpler and easier to understand.
Step 14: Enjoy your gauge! If you have any issues, it is likely an isolated issue that GJP Designs can resolve via a firmware update. Please get into contact with him via his website with any issues.
Remember the Active Sound Error I mentioned? Well mine showed that even after I plugged in the sound module. At the time of me typing this, GJP Designs actually sent me an updated firmware to fix it and make some minor scaling changes that I found issues with!
Heres a few random screen menus.
Personal favorite is the TPMS readout, as it also shows temp! Its not like having a pyrometer, but it is a nice touch to keep track of tire temps on track!


Overall thoughts:
I like it.. a lot. I prefer it over the P3 gauges ive had in the past. Programming is specific to the vehicle instead of being generic. The menu is more modern, it matches the rest of the car in terms of design and once it has the ability to run aftermarket sensors for oil pressure and boost, it will be game changing.
Also note: The 3D printed housing is for testing purposes only, the final product will have an OEM-like finish.
one important aspect:
If you disconnect the obd2 port, it will reset all your "presets" for the pages. This gauge does not hold enough memory to keep the menu locations. It's really not a big deal to me, as it's not meant to be unplugged unless you need to access the OBD2 port
Ill update this post with an update review once I get some more use out of the gauge.