 02-27-2016, 12:05 AM
|
#8
|
|
Radio wiring harness guru
Join Date: Jun 2012
Drives: 1996 SVX L AWD
Location: Atlanta
Posts: 156
Thanks: 59
Thanked 98 Times in 47 Posts
Mentioned: 23 Post(s)
Tagged: 0 Thread(s)
|
For anyone else who needs to do this, here's the extraction procedure:
Quote:
In that style of connector, each of the metal terminals has a spring clip that locks it into the white plastic housing. You must push the spring flat so you can then pull the wire out the rear of the housing.
You need to fabricate an extraction tool (or find something that already is the correct size).
Here is a picture of a female terminal with a drawing showing how you'll need to orient the extraction tool: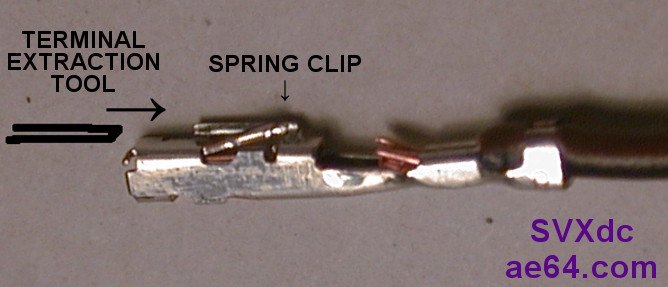
Picture of the exact same male terminal that you'll find in the white plastic connector being discussed: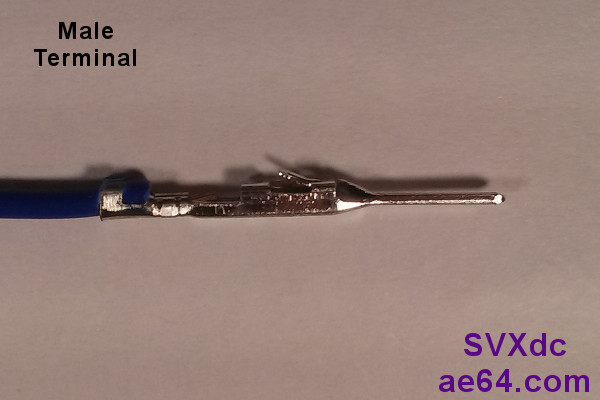
Picture looking at the front of the same type of 28-pin harness shell as on the Metra AX-TOY28SWC harness. The pin holes are the smaller squares, and the extraction hole is the wider rectangle above each pin's hole: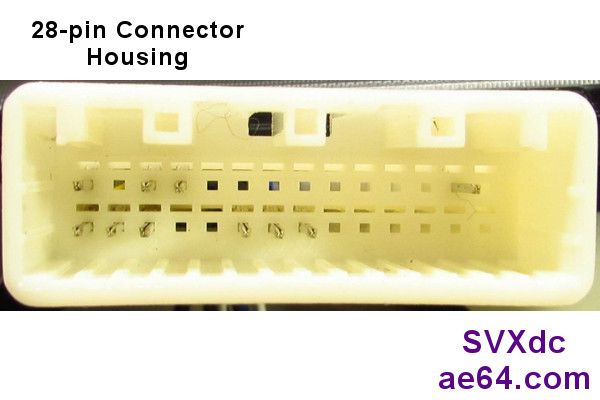
Note that the car's factory harness connectors have different styles of terminals, and require extra and/or different steps to extract (for example, on most factory harnesses, there is also a secondary plastic retention latch on the top or bottom that you must pop open). Harness connectors from other manufacturers may also have different terminals. There are many, many different types.
Fabricating an extraction tool:
For the type of shell pictured above, I fashioned an extraction tool by taking a straightened paper clip and then flattening the tip of one end with a smooth-faced hammer on an anvil. Many bench vices have a flat anvil area on the end opposite from the vice.
File the last 7mm of the tip so that it's no wider or taller than the extraction hole (the rectangular opening above a pin on the front -- pins side -- of the plastic housing). Also dull and de-burr the end. You don't want something so sharp that it pierces into the plastic housing itself.
Curl the back end of the paper clip, so you have a handle to push against without impaling your finger.
If you have an existing tool or piece of metal with a tip that's already the correct height, width, and length to fit about 7 mm deep into the rectangular extraction holes, you can use that. The cross-section needs to be just slightly smaller than the size of the extraction hole.
Extract a terminal and wire:
You'll use the tool to push down the metal spring clip.
First, push the wire into the rear of the housing (to release tension on the spring).
Then insert the extraction tool in the front about 6 to 7 mm deep into the extraction hole.
Once you've pushed down the spring flat enough with the tool, you'll be able to tug the wire out the rear of the housing fairly easily.
If the wire does not pull out easily, you haven't flattened the spring sufficiently. Pull out your extraction tool and try again.
Fix the spring clip:
If you plan to re-pin the wire into a different slot, use a tiny flat blade screwdriver to lift the spring back up (un-flatten it) like in my 2nd picture, above.
Insert the wire in the 28-pin shell:
The top of the 28-pin shell is the side that corresponds to the thumb latch on the car's plug (the lever that locks the two plastic connectors together). Hold the shell with the top row on top.
Orient the terminal that you're inserting with its spring clip on top (pointed up). As a check, you should see that the spring will slide in behind the extraction hole as the tip of the terminal goes towards the square pin hole.
Double-check that you have the correct slot (pin # position) before you insert the terminal! Although it's possible to extract a terminal, it's better to get it right the first time.
Begin pushing the terminal into the rear of the 28-pin shell.
Check the front of the shell to make sure the tip starts to emerge through the smaller square hole (it's easy to accidentally angle the terminal and have the tip emerge through the larger extraction hole).
You'll have to grasp the wire very close to the terminal, and push it in 1-2 mm at a time (if you try to grab the wire too far back, the wire will just fold over).
Push the wire in until the terminal snaps in (you will hear and feel a faint "click"). Approximately 5 mm of wire will follow the terminal into the hole before it ultimately clicks in.
Finally, tug on the wire to verify it's locked in.
|
|

|

|