AEM Wideband Failsafe (AFR/Boost)
I already alluded to my desire to add a gauge. I as all on the boost gauge bandwagon but @
Chris@Phastek and @
Do Boy convinced me to install a wideband AFR sensor.
I also did not want gauges on my steering column and A-Pillar. I am a big fan of using the ATI vent pod mount because it keeps everything discrete from wandering eyes.
I still did want to have boost so I had to look for combo gauges. I decided to buy like one out of the two combo AFR/Boost gauges on the market: AEM Wideband Failsafe
With this lack of choice, I did feel good that AEM is a reputable company, it was a mechanical boost gauge (i prefer this), comes with the bosch Wideband UEGO sensor, and has a datalogger. Even has a failsafe signal that can kill the engine in case your car leans out..
My only concerns were how to wire this to the car. Being a universal gauge we are on our own. A good thread below inspired confidence in me.
http://www.ft86club.com/forums/showp...5&postcount=77
I didn't have too much time to install and take pictures of everything. Here are some quick thoughts and photos I did take.
Quick feedback:
+ The ATI vent pod is a 60mm pod. This gauge is 52mm in size which I believe is common. Lucky for me ATI makes a 60 to 52mm pod adapter!
+ I didn't connect the dimmer wire. The gauge is easily read in all conditions so I don't plan to connect the wires.
+ the screen is OLED and has a fast refresh rate.
+ I ended up drilling three holes in my AC vent to run all the wiring to the gauge (I don't have a picture of this yet)
+ The 7/64" ID vacuum hose supplied is too short to run to the engine bay. I had to buy hose from O'Reilly's auto parts.
+ the data logging feature does work without the RPM signal wire connected to the car. I'm going to connect it later.
+ You can configure the gauge using only USB power. No need to hook the gauge to the car's power, or turn on the ignition to use the USB configuration function.
+ you can show boost in several units of meaures, show AFR, lamda, etc. Pretty much whatever to your choosing. THey provide face plates for the different modes.
+ Data output is very quick. Torque was mostly consistent with the gauge except it was slightly slower even though I had the Scantool OBDLink MX. One glaring difference was that the reading is different when the car cuts fuel because the drivetrain is spinning the crank under momentun. Torque read 14.7 AFR and this read 18. I think the UEGO sensor wins here.
+ Air can still go out around the pod. You cannot freely rotate the pod like you could the OEM vents. You cannot aim the airflow out this vent anymore nor close the airflow. It is more noisier when you have the fan on 2 or higher.
I hope you guys like pictures. Let's have at it
Here is the entire AEM kit laid out. I don't show the ATI vent pod or the adapter. Comes with everything you need. I'll go through stuff in more detail.
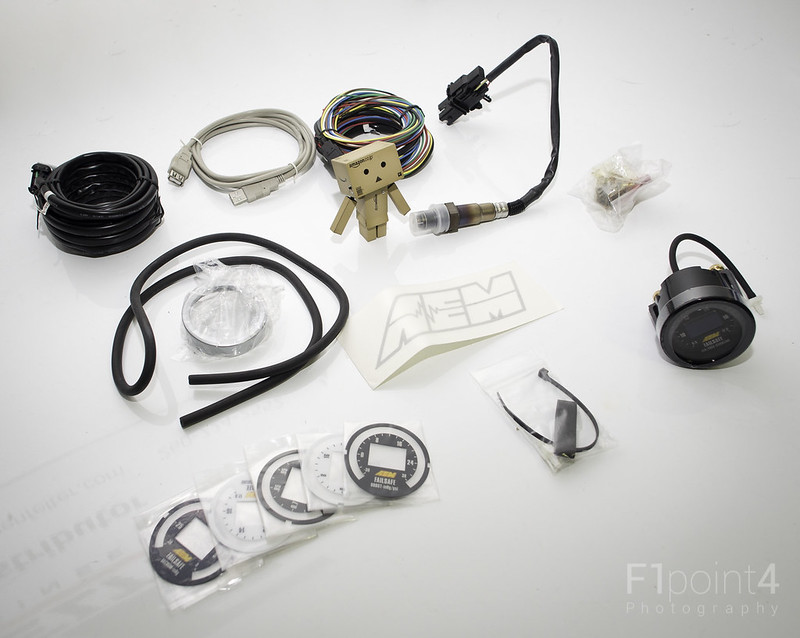 20130615-AEMWidebandGaugePics-017
 by
VictorN07, on Flickr
Danbo showing off the gauge. The gauge has a center display and a digital meter along its perimeter.
 20130615-AEMWidebandGaugePics-013
 by
VictorN07, on Flickr
The Bosch Wideband LSU4.2 UEGO sensor
 20130615-AEMWidebandGaugePics-015
 by
VictorN07, on Flickr
The UEGO sensor harness, USB extension cord, and gauge harness
 20130615-AEMWidebandGaugePics-022
 by
VictorN07, on Flickr
O2 Sensor bung. I did not use this as one was provided by my welder in my previous post
 20130615-AEMWidebandGaugePics-027
 by
VictorN07, on Flickr
This is the gauge harness separated and wrapped in loom. I split out the
harness into three sections
+USB,
+Ignition power and ground,
+Sensor wires (pretty much the rest
I got all of that through one grommet
 20130615-AEMWidebandGaugePics-038
 by
VictorN07, on Flickr
 20130615-AEMWidebandGaugePics-037
 by
VictorN07, on Flickr
You can see me start to drill holes in the AC duct work. I ended up drilling three holes.
+ For the harness above
+ The UEGO Harness
+ and the vacuum hose
 20130615-AEMWidebandGaugePics-040
 by
VictorN07, on Flickr
For the boost portion I had to tap into a vacuum source. The brake booster line was perfect. I already tapped into it once, and didn't want to do it again....so I decided to copy what @
Do Boy did and install a vacuum manifold into my engine bay. I can drive many vacuum accessories off of this block, but I am only using it to drive the boost gauge and Vortech Bypass valve.
 20130616-AEMWidebandGaugePics-057
 by
VictorN07, on Flickr
The finished engine bay
 20130616-AEMWidebandGaugePics-068
 by
VictorN07, on Flickr
I have some plans for a diagonal brace and strut tower bar. Since I knew I was changing them out I temporary mounted my vacuum manifold on top of an extra set of the vibration dampeners from the u-bolts i had for the catch cans. (see previous post).
The side of the manifold is my input from the brake booster line.
 20130616-AEMWidebandGaugePics-073
 by
VictorN07, on Flickr
To the bottom right of the catch can you can see the plug for the UEGO sensor. It's zipped tied there for easy access. This is another clear view of the vibration dampened U bolts used on the catch can.
 20130616-AEMWidebandGaugePics-077
 by
VictorN07, on Flickr
A clear shot from above of the UEGO sensor in the newly welded bung
 20130616-AEMWidebandGaugePics-081
 by
VictorN07, on Flickr
Finished! You can clearly see the ATI 60mm vend pod, and the 60 to 52mm adapter (rubber ring). I did have to cut the gauge plastic securing brace down so it would fit properly to the 60 to 52mm adapter.
 20130616-AEMWidebandFailsafeFinished-007
 by
VictorN07, on Flickr
 20130616-AEMWidebandFailsafeFinished-019
 by
VictorN07, on Flickr
 20130615-AEMWidebandGaugePics-055
 by
VictorN07, on Flickr
I'll take some more clear pictures of how i wired up the RPM sensor and what the fully drilled out AC ducting looks like soon.