


|
||||||
| DIY (Do-It-Yourself) Guides For all DIYs. |
 |
|
|
Thread Tools | Search this Thread |
 02-04-2013, 09:34 PM
|
#1 |
|
Senior Member

Join Date: Sep 2012
Drives: GBS Premium
Location: Denver
Posts: 154
Thanks: 41
Thanked 59 Times in 38 Posts
Mentioned: 3 Post(s)
Tagged: 0 Thread(s)
|
DIY - Caliper removal and paint
Items needed:
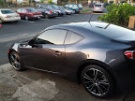
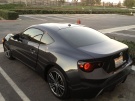
1) Use pinch clamp to pinch brake line, I clamped about 3in from the caliper. Tighten until it stops.  2) Place a paper towel and bucket under the first caliper you are going to remove the brake line from.  3) Remove brake line by removing the bolt that connects the line to the caliper (12mm). There will be 2 washers, make sure you don't loose them. I placed the end of the brake line and washers in a sandwich bag and taped it shut.  4) Remove the 2 bolts that connect the caliper to the car (17mm front/14mm rear). These should be really hard to break loose. 5) Pour brake fluid out of caliper, you can partially stop the hole with a paper towel or tape over it. Just be aware that fluid could spill out even after you drain it. Repeat for each caliper. It's the same process for front or rear. 6) Each caliper has 2 pieces. Split the caliper by removing the 2 bolts (14mm) connecting them.  7) Remove the pads and metal clips on either end. (Only one is shown but there is 1 at top and bottom. The front calipers have clips that are different on the top.) 8) Cleaning. Use the wire brush and spray to vigorously clean the calipers. This will take a lot of time. Be careful not puncture or damage the rubber gaskets or seals. 9) (Optional) On the front caliper (with the pots) use a dremel or sand paper to sand down the front facing ridge. You can remove other casting marks this way (I think they are cast). The rear pots do not need this as they are fairly smooth.  10) Clean again. 11) Mask the rubber and any smooth parts metallic parts (such as screw holes and the brake line hole)  12) If I could do this again I would prime the surface white. 13) Mix activator and epoxy, wait 5 minutes. 14) Apply even coats, try not to put really thick coats on as it will run and drip. If it does drip and dries you can shave it off with a razor. I applied 6 coats on the most visible areas and 3 on the not so visible area. I also used 2 G2 kits. I think if I would have primed only one would have been needed. Note: Masking and Painting took by far the most time. 15) Let dry for at least a day (You could probably bake them @200 for a half hour as well without damaging the rubber). 16) Remove masking 17) Reassemble caliper including pads. On the front calipers there is a metal clip that has "wings"--this will go in the upward facing direction. There is a tab on the pad that will rub on this and act like a spring (sort of). Up is always the direction of the bleeder valve. Make sure you cleaned these as well. 18) Place caliper back on the rotor and bolt back on.  19) Reattach brake line (12mm) -- leave pinch clamp on until you are ready to bleed the brakes. 20) Bleed the brakes one at a time. I used 1/2 in vinyl tubing to attach to the bleeder valve and ATE Super Blue Brake fluid. From tight, loosen the valve 1/2-1 turn. I flushed the brakes completely and pumped until the fluid turned blue (and there are no air bubbles).  21) I have decals on order, they may look like crap but I'll post pics if they look good. Feel free to let me know if something is incorrect, needs further explanation, or could be done a better way. Final Pics:    
Last edited by olorin; 02-05-2013 at 03:06 PM. |

|

|
| The Following 5 Users Say Thank You to olorin For This Useful Post: | Choco (01-21-2015), Draco_PR23 (02-08-2013), Drebin252 (04-12-2014), kludger (02-06-2013), SkAsphalt (04-07-2013) |
|
02-08-2013, 05:45 PM
|
#2 |
|
Shipping to Hawaii?...
Join Date: May 2012
Drives: '13 Asphalt FR-S
Location: Honolulu. Hawaii
Posts: 507
Thanks: 33
Thanked 77 Times in 62 Posts
Mentioned: 6 Post(s)
Tagged: 0 Thread(s)
|
Nice I was going to do this with high heat spray paint minus the epoxy brush painting, because brushes and I do not get along...when paint is involved. =P
Great color for your aquamarine!
__________________
~Matt
Efimia (asphalt FRS) |
|
|
|
|
02-08-2013, 07:08 PM
|
#3 |
|
Senior Member
Join Date: May 2012
Drives: 2013 asphalt fr-s
Location: Los angeles
Posts: 488
Thanks: 109
Thanked 125 Times in 88 Posts
Mentioned: 3 Post(s)
Tagged: 0 Thread(s)
|
I had just told my gf that painted calipers look tacky, unless done right. Gotta admit yours look awesome, didn't think they would look this good.
|
|
|
|
| The Following User Says Thank You to Asphaltfrs1 For This Useful Post: | olorin (02-09-2013) |
|
02-09-2013, 02:10 PM
|
#4 | |
|
Senior Member
Join Date: Sep 2012
Drives: GBS Premium
Location: Denver
Posts: 154
Thanks: 41
Thanked 59 Times in 38 Posts
Mentioned: 3 Post(s)
Tagged: 0 Thread(s)
|
Quote:
Galaxy Blue Silica - Its a Subaru  I had my doubts about painting, I saw a lot of crappy pictures; but the epoxy paint it is fairly thick, levels during drying, and is really glossy. After applying a few coats I tried to use a Preval spray kit but it was too thick. It may have worked if I thinned it with lacquer thiner, but I didn't try this as I was on a time crunch. I would definitely apply a high temp primer before applying the epoxy if I had to do it again. |
|
|
|
|
|
02-10-2013, 04:31 AM
|
#5 |
|
Member

Join Date: Jan 2013
Drives: Ultramarine Scion FR-S
Location: San Diego
Posts: 76
Thanks: 79
Thanked 12 Times in 11 Posts
Mentioned: 0 Post(s)
Tagged: 0 Thread(s)
|
First thought: Go Chargers!
|
|
|
|
|
02-10-2013, 10:41 PM
|
#6 | |
|
Shipping to Hawaii?...
Join Date: May 2012
Drives: '13 Asphalt FR-S
Location: Honolulu. Hawaii
Posts: 507
Thanks: 33
Thanked 77 Times in 62 Posts
Mentioned: 6 Post(s)
Tagged: 0 Thread(s)
|
Quote:
__________________
~Matt
Efimia (asphalt FRS) |
|
|
|
|
|
02-11-2013, 01:09 PM
|
#7 |
|
Banned
Join Date: Aug 2012
Drives: FR-S
Location: Seattle, WA
Posts: 459
Thanks: 42
Thanked 122 Times in 95 Posts
Mentioned: 6 Post(s)
Tagged: 0 Thread(s)
|
Surprisingly good looking. Shoulda done gold though IMO.
|
|
|
|
| The Following User Says Thank You to NemeGuero For This Useful Post: | olorin (02-11-2013) |
|
03-30-2014, 10:34 PM
|
#8 | |
|
Member
Join Date: Mar 2014
Drives: 2014 BRZ Limited SSM
Location: Houston, TX
Posts: 15
Thanks: 2
Thanked 8 Times in 6 Posts
Mentioned: 0 Post(s)
Tagged: 0 Thread(s)
|
Quote:
|
|
|
|
|
| The Following User Says Thank You to 2014BRZ_kcrow For This Useful Post: | olorin (03-31-2014) |
|
03-31-2014, 02:59 PM
|
#9 | |
|
Senior Member
Join Date: Sep 2012
Drives: GBS Premium
Location: Denver
Posts: 154
Thanks: 41
Thanked 59 Times in 38 Posts
Mentioned: 3 Post(s)
Tagged: 0 Thread(s)
|
Quote:
__________________
|
|
|
|
|
| The Following User Says Thank You to olorin For This Useful Post: | 2014BRZ_kcrow (04-04-2014) |
|
04-04-2014, 10:12 AM
|
#10 | |
|
Member
Join Date: Mar 2014
Drives: 2014 BRZ Limited SSM
Location: Houston, TX
Posts: 15
Thanks: 2
Thanked 8 Times in 6 Posts
Mentioned: 0 Post(s)
Tagged: 0 Thread(s)
|
Quote:
|
|
|
|
|
|
|
|
|
|
|
|
 Similar Threads
|
||||
| Thread | Thread Starter | Forum | Replies | Last Post |
| Brake caliper paint | WRB-DZA-BRZ | Cosmetic Modification (Interior/Exterior/Lighting) | 45 | 10-05-2016 01:02 PM |
| Adhesive Removal on Paint Safely? | Mac1235 | Cosmetic Maintenance (Wash, Wax, Detailing, Body Repairs) | 9 | 01-10-2013 03:39 PM |
| Paint Correction, Opti-Coating, Car Wraps, Paint Protection & Tinting - LI Detailers | LI Detailers | Cleaning and Detailing | 1 | 12-27-2012 04:12 PM |
| Caliper Paint w/emblem Customization | Kimsey47 | Cosmetic Modification (Interior/Exterior/Lighting) | 24 | 10-06-2012 02:08 PM |
| RED G2 BRAKE CALIPER PAINT?? | Mo707 | Suspension | Chassis | Brakes -- Sponsored by 949 Racing | 14 | 07-03-2012 01:38 AM |


