


|
||||||
| Suspension | Chassis | Brakes -- Sponsored by 949 Racing Relating to suspension, chassis, and brakes. Sponsored by 949 Racing. |
 |
|
|
Thread Tools | Search this Thread |
 01-15-2013, 08:42 AM
|
#15 | |
|
Red is Fastest
Join Date: Dec 2012
Drives: 13 FRS 6MT Firestorm
Location: Central Kentucky
Posts: 439
Thanks: 85
Thanked 242 Times in 120 Posts
Mentioned: 11 Post(s)
Tagged: 0 Thread(s)
|
Quote:
I've also considered, as you mention, taking it to a shop but I live in small town KY and reputable shops are hard to come by. As you also mentioned I to believe a body shop would probably be the best choice for this. Something I'm sure they've see before. Anyway here is my plan. I have 2 new bolts on the way. Ordered from Toyota dealer. $7.56 ea. Once I have the bolts, determine the size and thread pitch to get a tap. I'm not pulling one out to find out now. Once I have these I am going to attempt to get the bolt out. As I've mentioned it is seized. I can turn it in and out about 4 turns before it locks. I didn't put more muscle to it as I didn't want to break it. I've already applied PB blaster. This was Sunday evening and I had to work next day and I didn't have a large enough tap to try that if I got the bolt out. If I get the bolt out without breaking it I will then attempt to tap the threads in the hidden nut. If it breaks I have no choice but to then cut access, through the trunk I think, to get to the nut and cut it loose. If the tap doesn't work I again have no reasonible choice but to cut access and replace the nut. Cutting access or the bolt will be my last resort. |
|

|

|
|
01-15-2013, 08:57 AM
|
#16 | |
|
Site Moderator

Join Date: Dec 2010
Drives: Stuff
Location: Florida
Posts: 10,317
Thanks: 955
Thanked 5,965 Times in 2,689 Posts
Mentioned: 262 Post(s)
Tagged: 8 Thread(s)
|
Quote:
__________________
-Dave
Track cars: 2013 Scion FRS, 1998 Acura Integra Type-R, 1993 Honda Civic Hatchback DD: 2005 Acura TSX Tow: 2022 F-450 Toys: 2001 Chevrolet Corvette Z06, 1993 Toyota MR2 Turbo, 1994 Toyota MR2 Turbo, 1991 Mitsubishi Galant VR-4 Parts: 2015 Subaru BRZ Limited, 2005 Acura TSX Projects: 2013 Subaru BRZ Limited track car build FS: 2004 GMC Sierra 2500 LT CCSB 8.1/Allison with 99k miles Last edited by Dave-ROR; 01-15-2013 at 12:49 PM. Reason: fixed some typos |
|
|
|
|
| The Following 2 Users Say Thank You to Dave-ROR For This Useful Post: | Calum (01-15-2013), FRSFirestorm (01-15-2013) |
|
01-15-2013, 12:25 PM
|
#17 | |
|
Red is Fastest
Join Date: Dec 2012
Drives: 13 FRS 6MT Firestorm
Location: Central Kentucky
Posts: 439
Thanks: 85
Thanked 242 Times in 120 Posts
Mentioned: 11 Post(s)
Tagged: 0 Thread(s)
|
Quote:
I also thought if there were enough room I could drill the nut center out large enough to pass a longer bolt through it and put a new nut on top. I'd still have to cut an access hole but much smaller. Just enough to get fingers into to hold and start the nut and possibly get a wrench on it till I get the bolt tightened. |
|
|
|
|
|
01-15-2013, 12:42 PM
|
#18 |
|
Senior Member

Join Date: Jun 2012
Drives: 85 AE86 Hatch, 92 SW20 , 13 GT86
Location: San Francisco
Posts: 317
Thanks: 149
Thanked 97 Times in 61 Posts
Mentioned: 2 Post(s)
Tagged: 0 Thread(s)
|
Ugh sorry to hear about your bad luck hope all goes well. Im istalling mine later this week glad I have access to a shop.
|
|
|
|
| The Following User Says Thank You to Touge Monster For This Useful Post: | FRSFirestorm (01-15-2013) |
|
01-15-2013, 12:48 PM
|
#19 | |
|
Site Moderator
Join Date: Dec 2010
Drives: Stuff
Location: Florida
Posts: 10,317
Thanks: 955
Thanked 5,965 Times in 2,689 Posts
Mentioned: 262 Post(s)
Tagged: 8 Thread(s)
|
Quote:
 I'd try the retap to stock size first, and failing that, go one size larger if the rest of the parts allow it, you should be able to get that to work.
__________________
-Dave
Track cars: 2013 Scion FRS, 1998 Acura Integra Type-R, 1993 Honda Civic Hatchback DD: 2005 Acura TSX Tow: 2022 F-450 Toys: 2001 Chevrolet Corvette Z06, 1993 Toyota MR2 Turbo, 1994 Toyota MR2 Turbo, 1991 Mitsubishi Galant VR-4 Parts: 2015 Subaru BRZ Limited, 2005 Acura TSX Projects: 2013 Subaru BRZ Limited track car build FS: 2004 GMC Sierra 2500 LT CCSB 8.1/Allison with 99k miles |
|
|
|
|
|
01-15-2013, 01:18 PM
|
#20 |
|
Senior Member

Join Date: Nov 2012
Drives: Whiteout FRS- autocross ready
Location: Montana
Posts: 283
Thanks: 136
Thanked 109 Times in 68 Posts
Mentioned: 0 Post(s)
Tagged: 0 Thread(s)
|
Sorry to hear that, I know the sick feeling you have. It is learn by doing, and I have done similar things myself. Just take your time now, get the right tap, a good tool store would be able to measure the threads to get the right size and thread count. Go easy with the tap and use some some oil, etc, turn the tap in slowly making sure it is aligned correctly to start, then turn in and back out often to clear the cutters. With a cross-thread it shouldn't be a real struggle to cut/clean new threads.
One thing about these projects is you will think twice in the future when the bolt sticks or doesn't thread right. Another good idea, at least for me, was to get a torque wrench, it made me realize just how hard I was turning bolts, and why I was breaking small bolts so often. Good luck. |
|
|
|
| The Following User Says Thank You to MTCRX For This Useful Post: | FRSFirestorm (01-15-2013) |
|
01-15-2013, 02:33 PM
|
#21 | |
|
Red is Fastest
Join Date: Dec 2012
Drives: 13 FRS 6MT Firestorm
Location: Central Kentucky
Posts: 439
Thanks: 85
Thanked 242 Times in 120 Posts
Mentioned: 11 Post(s)
Tagged: 0 Thread(s)
|
Quote:
Think I have 4 torque wrenchs now. One down to less than 15 in/lbs that I use to set pre-load on crush washers for pinion shafts in differential setups. I started a gym regiment a couple years ago. Maybe my strength gains have my torque calibrated arm screwed up
|
|
|
|
|
| The Following User Says Thank You to FRSFirestorm For This Useful Post: | Carsnguitars (11-12-2018) |
|
01-15-2013, 02:59 PM
|
#22 |
|
Banned
Join Date: Aug 2012
Drives: VortechSC,BorlaEL,Perrin,GCRace
Location: HighHeatHighAltitudeAZ,USA
Posts: 2,254
Thanks: 458
Thanked 669 Times in 394 Posts
Mentioned: 9 Post(s)
Tagged: 2 Thread(s)
|
dont beat yourself up
best of us do stupid shit I wouldnt suggest it if it wasnt what I'd do: 1-find a warm place to work, hard as it may be find someone pay them, see if there is a forum member to help you 2- rent a car, dont rush this or make choices based on time orbitz has cars for $25 a day 3-drop subframe, gain access, clean out threads, tap once, tap right and be done man I feel ya..pay attention to #1 and #2 more than #3 best- gem |
|
|
|
|
01-15-2013, 07:58 PM
|
#23 | |
|
That Guy
Join Date: Dec 2011
Drives: 2013 asphalt FRS MT
Location: Halifax, Nova Scotia
Posts: 4,865
Thanks: 5,058
Thanked 2,867 Times in 1,499 Posts
Mentioned: 82 Post(s)
Tagged: 1 Thread(s)
|
1 USE AN IMPACT GUN! Set it to the lowest setting and even reduce the air pressure, let it sit there hammering away, until it slowly starts turning the bolt out. You should start at a setting that's too low and slowly work it up to just turning the bolt. This will keep the bolt in the elastic range of the material instead of causing it to yield or fail. Using a breaker bar is a sure way to twist it off or break the internal nut free. I've done this more times then I can count. It works great, you just need a little patience.
2 USE A TAP! If you can get the bolt out run a tap through to clean things up and hopefully straighten out enough of the threads to get a good hold. OP seems like he's probably thought about this, but for anyone reading this please PLEASE don't follow the advice below. Impact guns aren't the enemy, not knowing how to use them is. Quote:
|
|
|
|
|
| The Following User Says Thank You to Calum For This Useful Post: | FRSFirestorm (01-16-2013) |
|
01-16-2013, 07:53 AM
|
#24 | |
|
Red is Fastest
Join Date: Dec 2012
Drives: 13 FRS 6MT Firestorm
Location: Central Kentucky
Posts: 439
Thanks: 85
Thanked 242 Times in 120 Posts
Mentioned: 11 Post(s)
Tagged: 0 Thread(s)
|
Quote:
Must admit I am skeptical about using an impact but will keep it in mind when I attempt to remove the bolt. Thanks for the input. |
|
|
|
|
|
01-16-2013, 08:01 AM
|
#25 |
|
Red is Fastest
Join Date: Dec 2012
Drives: 13 FRS 6MT Firestorm
Location: Central Kentucky
Posts: 439
Thanks: 85
Thanked 242 Times in 120 Posts
Mentioned: 11 Post(s)
Tagged: 0 Thread(s)
|
Running through the scenerios again in my mind and all the input from this thread I am going to modify the plan a bit.
Instead of starting off directly on the offending bolt I'm going to get the bushings in the front two attachments first. Do the work with wheels off the ground and leaving all the bolts loose to allow movement for alignment as advised. This will help with the attempt at tapping. If the tap is also sucessful I only want to attempt to torque the bolt one time so I want to have the other bushings in place. Torque them and never touch them again. |
|
|
|
| The Following User Says Thank You to FRSFirestorm For This Useful Post: | Calum (01-16-2013) |
|
01-18-2013, 04:26 PM
|
#26 |
|
Red is Fastest
Join Date: Dec 2012
Drives: 13 FRS 6MT Firestorm
Location: Central Kentucky
Posts: 439
Thanks: 85
Thanked 242 Times in 120 Posts
Mentioned: 11 Post(s)
Tagged: 0 Thread(s)
|
Was hoping to work on it this weekend. Bolt I ordered are on back order. Was told next week delivery.
On a side note, according to the service manual these bolts are designated as "non-reusable part" |
|
|
|
| The Following User Says Thank You to FRSFirestorm For This Useful Post: | unsurety (05-30-2014) |
|
01-19-2013, 12:54 PM
|
#27 |
|
Red is Fastest
Join Date: Dec 2012
Drives: 13 FRS 6MT Firestorm
Location: Central Kentucky
Posts: 439
Thanks: 85
Thanked 242 Times in 120 Posts
Mentioned: 11 Post(s)
Tagged: 0 Thread(s)
|
Update. Woot! not ideal but I'm back under full power.
Decided this morning, being again some good weather, to go ahead and install the front bushings. I obviously was anxious about it but must say they went in without a hitch. Thanks to some tips from this thread. I think the key was getting the rear wheels off the ground. Just some minor adjustments with the jack supporting the rear assembly and I was able to hand thread the front bolts back in. After getting the front bushings in and torquing the three sections I decided to again take a stab at getting the cross threaded bolt loose. To my surprise it started backing out fine. Being I didn't have a new bolt or tap I just decided to see if I could drive it home even though cross threaded. It took some effort and time but I managed to get it in, and tight, without any further damage. Obviously not ideal but I'm going to run it as is. I will eventually take it back out and do the tap and new bolt but it will be in fairer weather. I'm so happy! 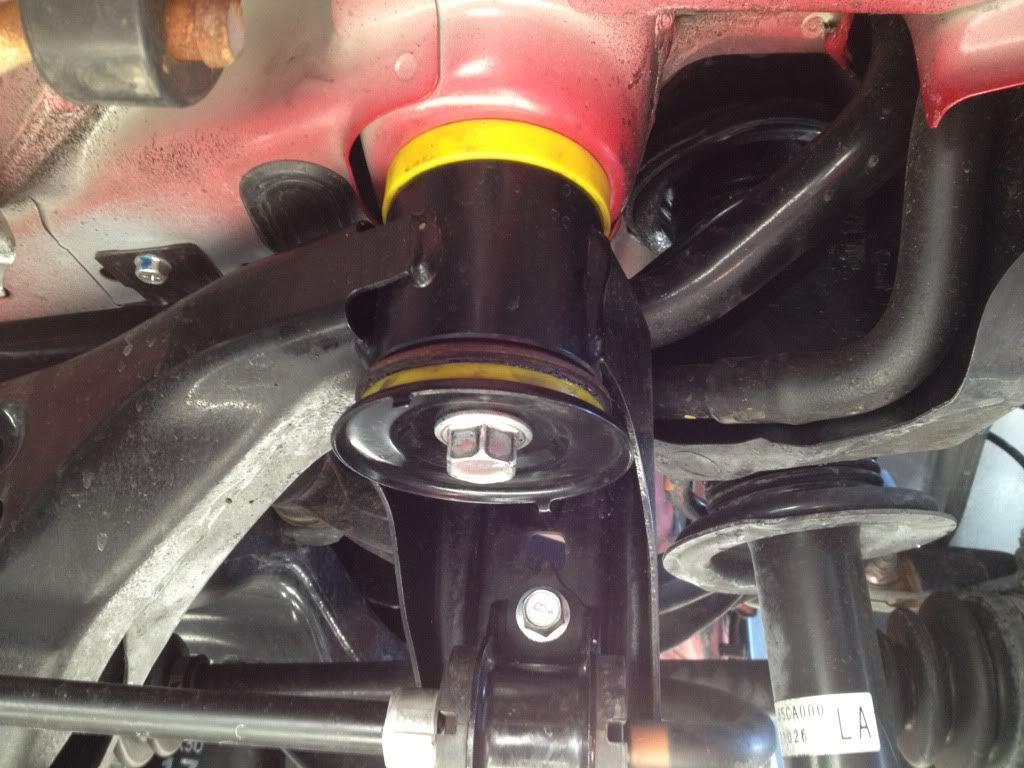 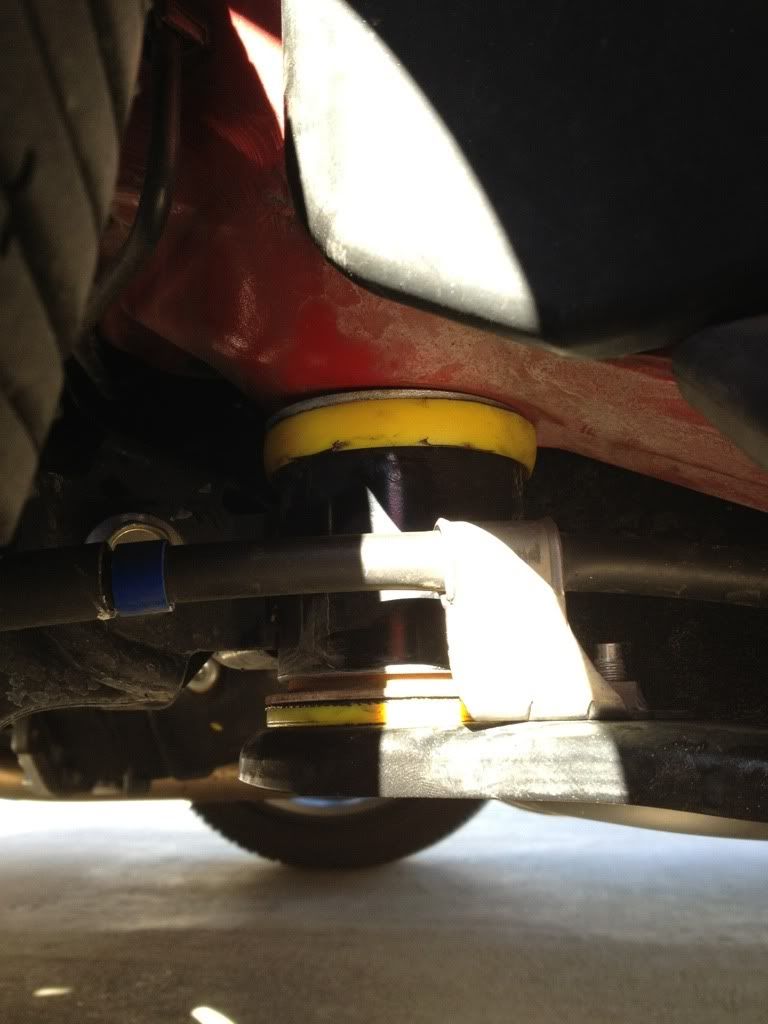
Last edited by FRSFirestorm; 01-20-2013 at 09:57 AM. |
|
|
|
|
01-19-2013, 01:28 PM
|
#28 |
|
Cones are bad

Join Date: Aug 2012
Drives: 2013 BRZ Premium
Location: Upstate NY
Posts: 244
Thanks: 616
Thanked 125 Times in 66 Posts
Mentioned: 6 Post(s)
Tagged: 0 Thread(s)
|
I almost had this problem. Mine started in a little hard, so I stopped, looked underneath and the hole wasn't lined up. So I loosened the other side and used a mallet/hammer to move the subframe back into position. I cross treaded a bolt installing the whiteline positive shift kit (and I did not force that bolt at all). I must say I'm very disapointed in certain production points of this car (very cheap). I'm glad you got things sorted out
__________________
 |
|
|
|
| The Following User Says Thank You to RazBRZ For This Useful Post: | FRSFirestorm (01-20-2013) |
|
|
|
|
|
|
|
 Similar Threads
|
||||
| Thread | Thread Starter | Forum | Replies | Last Post |
| Perrin Rear Shifter Bushing Install | F1point4 | DIY (Do-It-Yourself) Guides | 55 | 10-21-2021 02:39 PM |
| Whiteline rear subframe bushing install... | fl_speed001 | Suspension | Chassis | Brakes -- Sponsored by 949 Racing | 35 | 07-11-2020 12:29 AM |
| Perrin pulley install gone wrong | Hops Normal | Engine, Exhaust, Transmission | 79 | 01-27-2013 12:20 PM |
| Whiteline transmission bushing and Perrin shifter bushing review. | Superhatch | Suspension | Chassis | Brakes -- Sponsored by 949 Racing | 1 | 12-09-2012 08:40 PM |
| What's wrong with my HID kit? | seven | Cosmetic Modification (Interior/Exterior/Lighting) | 17 | 11-28-2012 07:36 PM |


 The Beast