


 07-10-2017, 02:42 AM
|
#43 | |
|
Senior Member

Join Date: Jul 2016
Drives: BRZ, WRX
Location: Sydney, Australia
Posts: 291
Thanks: 105
Thanked 962 Times in 233 Posts
Mentioned: 2 Post(s)
Tagged: 0 Thread(s)
|
Quote:
|
|

|

|
|
07-10-2017, 02:47 AM
|
#44 |
|
Senior Member
Join Date: Jul 2016
Drives: BRZ, WRX
Location: Sydney, Australia
Posts: 291
Thanks: 105
Thanked 962 Times in 233 Posts
Mentioned: 2 Post(s)
Tagged: 0 Thread(s)
|
I was pretty sick yesterday and should have put this job off to another day. After sleeping on it which was from 10pm to 12pm the next day I know what I did wrong and will bend up another tube when I'm feeling better.
Basically when positioning the second bends I did not center the tube in my guide and ended up doing the bends in the wrong spot. A pretty stupid mistake really. This photo is the main hoop I made yesterday, I could still use it but I know I can do much better. I want to tuck it in a lot closer to the body work in the lower part so I can minimise the amount of gussets required and keep the weight to a minimum. 
|
|
|
|
|
07-10-2017, 12:34 PM
|
#45 | |
|
sleep, drive, eat, repeat

Join Date: Mar 2012
Drives: '13 BRZ, '12 Outback
Location: Sack of Potatoes
Posts: 4,431
Thanks: 2,630
Thanked 3,796 Times in 1,981 Posts
Mentioned: 188 Post(s)
Tagged: 4 Thread(s)
|
Quote:
|
|
|
|
|
|
07-10-2017, 06:46 PM
|
#46 | |
|
Senior Member
Join Date: Jul 2016
Drives: BRZ, WRX
Location: Sydney, Australia
Posts: 291
Thanks: 105
Thanked 962 Times in 233 Posts
Mentioned: 2 Post(s)
Tagged: 0 Thread(s)
|
Quote:
[ame="https://www.youtube.com/watch?v=3n_lf2RHIPs"]TFS: Tube Bending Basics 1 - What You Need to Know - YouTube[/ame] |
|
|
|
|
| The Following 2 Users Say Thank You to DIY For This Useful Post: | BigFatFlip (07-10-2017), i8ur911 (11-25-2019) |
|
12-28-2017, 03:39 AM
|
#47 |
|
Senior Member
Join Date: Jul 2016
Drives: BRZ, WRX
Location: Sydney, Australia
Posts: 291
Thanks: 105
Thanked 962 Times in 233 Posts
Mentioned: 2 Post(s)
Tagged: 0 Thread(s)
|
I'm back!
Sorry for the lack of updates but I have not touched the car in almost 6 months. I have just started working on it again this week.
So full steam ahead whilst I'm on holidays and hopefully I will find more time to keep working on it once I'm back to work, the last half of this year has been a bit difficult with my young children. I decided to keep the first main hoop I made after thinking about it for a while, I ended up removing all the roof bracing and this allowed me to move the hoop toward the rear more and it lined up really well with the chassis rails.   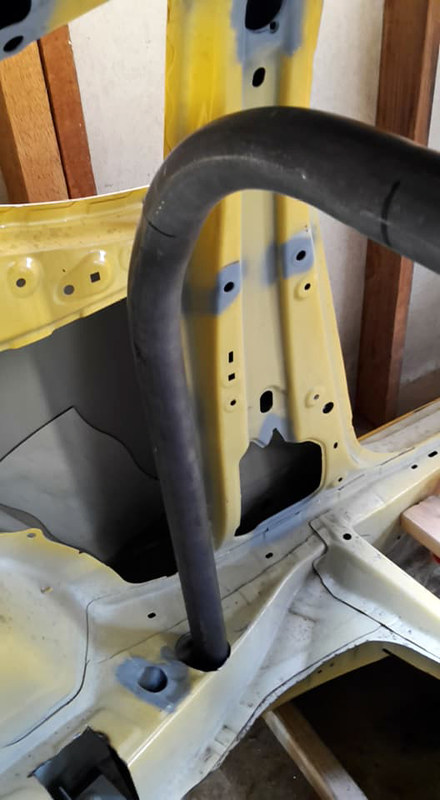 At the rear of this foot plate for the main hoop is where I am cutting the frame rails off.  I have bent up both front lateral half bars, these were a bit of a learning curve with the offset required in the top bend so the bar follows the A-pillar. I'm happy with how well they turned out.  The last job I completed up to welding stage was the front rocker boxes. These came out real nice.     I did the larger radius bend in them instead of just welding as I didn't want sharp corners near my feet.  
Last edited by DIY; 12-31-2017 at 07:07 AM. Reason: double photo and typo |
|
|
|
| The Following 3 Users Say Thank You to DIY For This Useful Post: |
|
12-30-2017, 03:22 AM
|
#48 |
|
Senior Member
Join Date: Jul 2016
Drives: BRZ, WRX
Location: Sydney, Australia
Posts: 291
Thanks: 105
Thanked 962 Times in 233 Posts
Mentioned: 2 Post(s)
Tagged: 0 Thread(s)
|
Just got back from a couple of days visiting family for Christmas, managed to get some welding done this afternoon after driving home.
I have not picked up the welder since July so it was a bit shaky at first but I got my rhythm back towards the end. Both front rocker boxes are now welded up and ready to install in the car. 
|
|
|
|
|
01-04-2018, 04:05 AM
|
#49 |
|
Senior Member
Join Date: Jul 2016
Drives: BRZ, WRX
Location: Sydney, Australia
Posts: 291
Thanks: 105
Thanked 962 Times in 233 Posts
Mentioned: 2 Post(s)
Tagged: 0 Thread(s)
|
I have been busy the past few days working on the car so here is an update.
Currently everything you see in the photos is tack welded in place, I won't do the full welds until I have all the front half of the cage done just in case I stuff something up. The front lateral bars were super difficult, well I found them very difficult anyway, there are probably some tricks to make it easier that I don't know about. They took a lot of time to get right and I had to double or triple check everything, main difficulty was due to the offset bends and the notch at the rear is on a bend which made it hard to get the right notch angle. You can see how tight I got the cage to the chassis, this also took extra time but I wanted to be able to weld the cage straight to the chassis with minimal gussets. 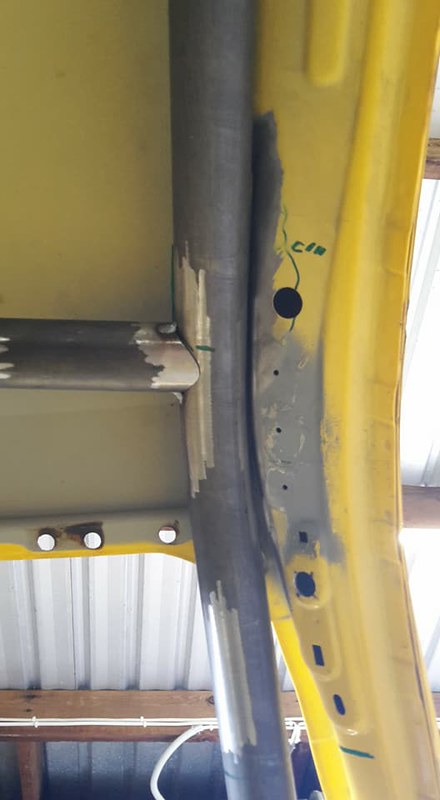  I put a 10 degree bend in the middle of the windscreen bar to tuck it up as high as possible but I also left enough space for the foam core reinforced carbon roof I intend on using.  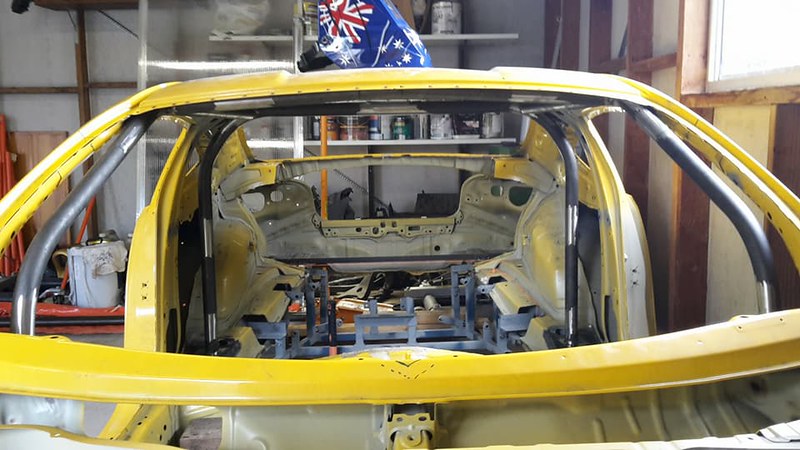  All my notches are tight fitting too, if they didn't line up perfect straight out of my hole saw style tube notcher I took the extra time to finish them by hand.  This was the tricky one on the bend of the main hoop. 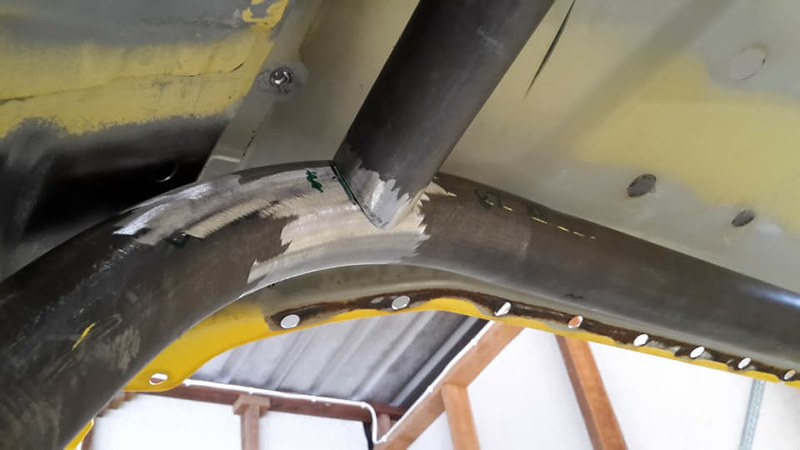 I had to cut the rear floor plates down in size a little due to the shape of the floor not being very flat. 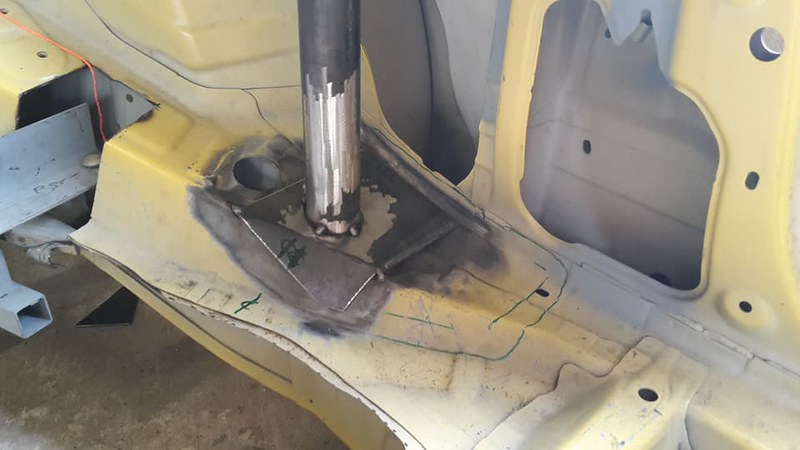 Front rocker boxes came out nice. 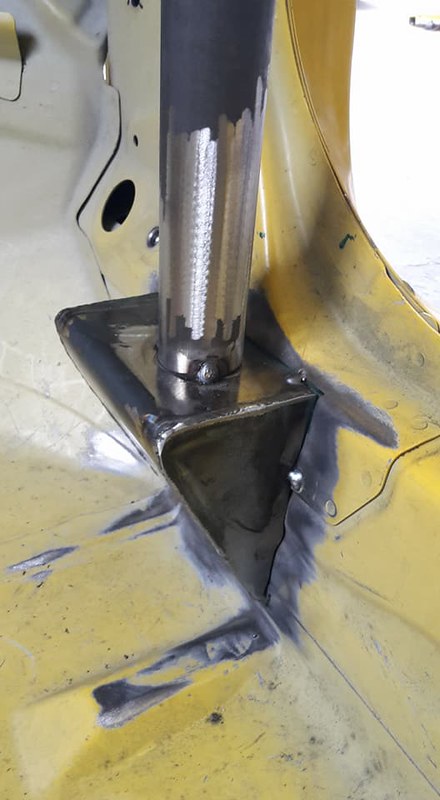 Next job will be the roof bars, door bars and dash bar. Then I can weld it as much as possible before dropping it down off the rocker boxes to weld the top. That's the plan anyway! |
|
|
|
| The Following 8 Users Say Thank You to DIY For This Useful Post: | Ash_89 (03-01-2021), BigFatFlip (01-04-2018), Code Monkey (01-04-2018), DustinS (01-04-2018), flippy (10-29-2021), JeremyR (01-04-2018), knapper (10-01-2021), Takumi788 (01-04-2018) |
|
01-04-2018, 12:39 PM
|
#50 |
|
Senior Member

Join Date: Nov 2012
Drives: 2015 BRZ Limited
Location: Bay Area, CA
Posts: 487
Thanks: 613
Thanked 269 Times in 181 Posts
Mentioned: 13 Post(s)
Tagged: 0 Thread(s)
|
Amazing progress! Keep up the great work! I really look forward to all the updates

|
|
|
|
| The Following User Says Thank You to JeremyR For This Useful Post: | DIY (01-04-2018) |
|
01-05-2018, 05:09 AM
|
#51 |
|
Senior Member
Join Date: Jul 2016
Drives: BRZ, WRX
Location: Sydney, Australia
Posts: 291
Thanks: 105
Thanked 962 Times in 233 Posts
Mentioned: 2 Post(s)
Tagged: 0 Thread(s)
|
Roof Bars
Another day working on the car, my last day of holidays actually.
The morning went well and I got the roof bars done rather fast and they came out just how I wanted them to. This is how I get my angles for the notches.  Then transfer it over to the tube notcher.  Result.  Again I went with a 10 degree bend in the roof bars to give some extra head room and also create extra strength by having the bars bent out kind of like an egg shell effect.  The afternoon did not go so smooth as I really struggled with the windscreen corner gussets. I could not get my head around how to clock the tube in the tube notcher to allow for the out of plane bars. It turned out to be the angle of the windscreen bar which was 3.5 degrees off level. Still don't have my head around it though and I did ruin one gusset trying to figure it out. So here is the finished result. 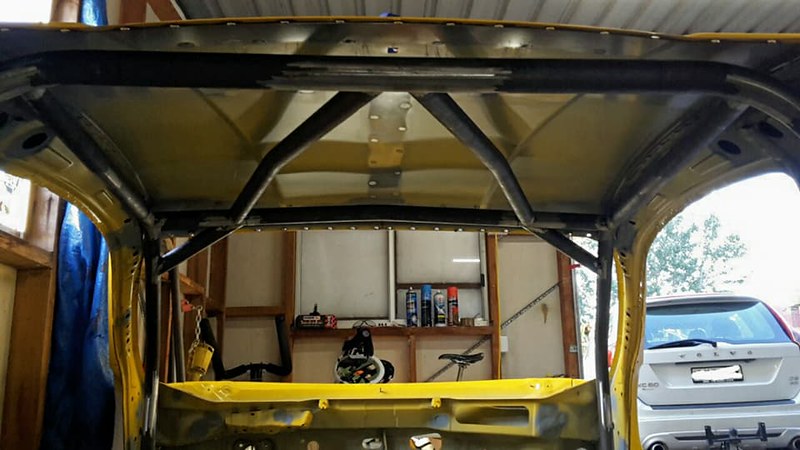 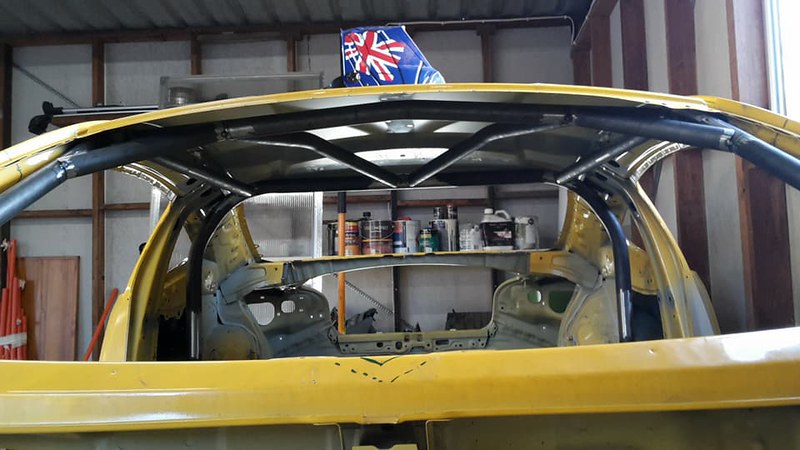 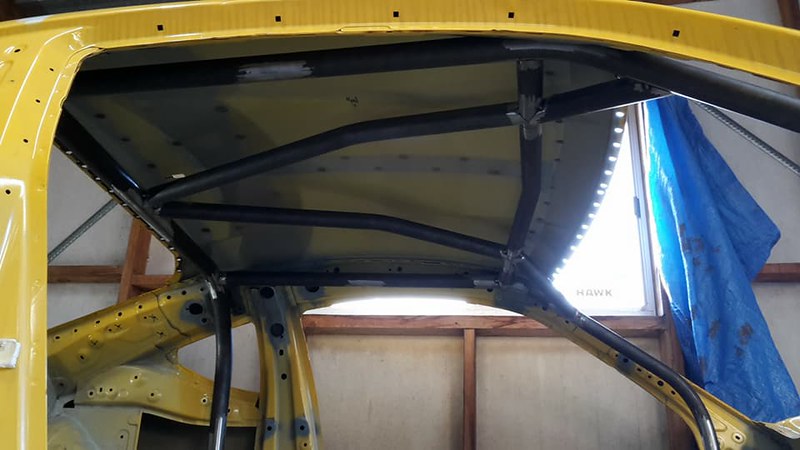 I might get a little more done on the weekend but I will be busy with the kids for at least half the time. |
|
|
|
|
01-06-2018, 09:08 PM
|
#52 |
|
Senior Member
Join Date: Jul 2016
Drives: BRZ, WRX
Location: Sydney, Australia
Posts: 291
Thanks: 105
Thanked 962 Times in 233 Posts
Mentioned: 2 Post(s)
Tagged: 0 Thread(s)
|
I had planned to work on the car today but it is way too hot here in Sydney. 42 C (108F) in the shade so there is no way I'm going to be doing any welding like I had planned.
Yesterday I did just a little bit of work playing around with the seat position which I need to get an idea of before doing the gussets at the rear of the door and the door X bars. The seat is actually the passenger seat from my WRX but I think I will just use it anyway and swap it back and forth depending on which car I'm going to be driving. Saves me the expense of buying another race seat. Just looking at my spreadsheet which I keep so I know exactly how much I have spent on this car, total spend as of today is $3134 AUD. 
|
|
|
|
| The Following User Says Thank You to DIY For This Useful Post: | Ash_89 (03-01-2021) |
|
01-13-2018, 04:50 AM
|
#53 |
|
Senior Member
Join Date: Jul 2016
Drives: BRZ, WRX
Location: Sydney, Australia
Posts: 291
Thanks: 105
Thanked 962 Times in 233 Posts
Mentioned: 2 Post(s)
Tagged: 0 Thread(s)
|
I got some work done last night and again this afternoon on the roll cage. First job was some corner gussets from above my head and back to the main hoop.
Here they are ready to be tack welded into the car.  I seem to struggle with bars like these, I found these ones even more difficult than the windscreen corner gussets. The difficulty is the notch angles and how they are orientated relative to each other as you are joining two bars not in the same plane. If you were just using the hand notching method it would much easier but I prefer the super tight fitment of my hole saw notcher as it makes the tig welding much easier and I need all the help I can get with that. This is the passenger side done.  Drivers side.  The reason I have added the bends in them is to keep them further from my head but also to allow me to upgrade my seat in the future to one of those seats with the extra wrap around head restraint. Here is another angle showing the extra clearance the bend gives.   The next job is to tig weld as much as I can then break some tack welds to drop the cage down and weld the top parts I can't reach now with the cage up hard against the roof. I decided to quickly add the dash bar this afternoon for some extra support. This was super easy and only took me about 20 minutes. Straight bar with two 90 degree notches.  and done. 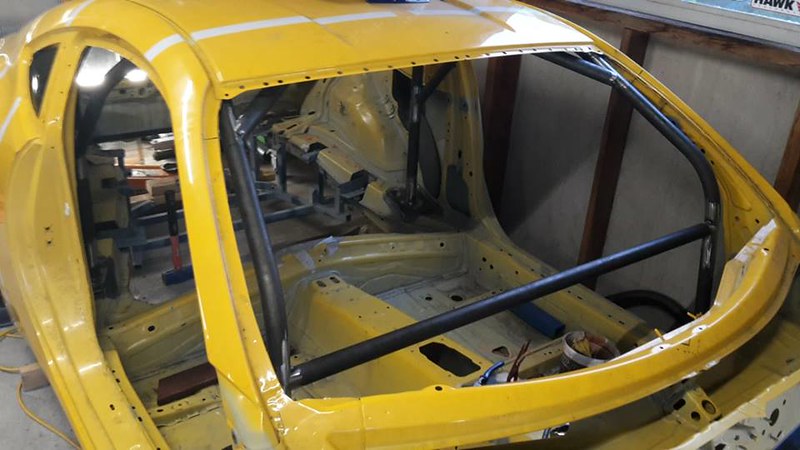
|
|
|
|
| The Following User Says Thank You to DIY For This Useful Post: | Ash_89 (03-01-2021) |
|
01-14-2018, 04:21 AM
|
#54 |
|
Senior Member
Join Date: Jul 2016
Drives: BRZ, WRX
Location: Sydney, Australia
Posts: 291
Thanks: 105
Thanked 962 Times in 233 Posts
Mentioned: 2 Post(s)
Tagged: 0 Thread(s)
|
Last update for a few weeks
Hey guys, this will be my last update for a little while as I am heading to Japan to go snowboarding again.
I was hoping to have the current bars in the cage welded and primed before I leave but I have run out of time once again. Today I started tig welding the tubes as much as possible so it would be stiff enough to drop down and weld the top. I started with a test piece on the bench just to get my rhythm back. This came out pretty good (for me) so I went and got stuck into the car. Test piece.  Once I got into the car I soon discovered that my foot pedal was useless so I had to mount the switch onto the torch.  So tig welding above your head in a small sports car really sucks! I can't say I enjoyed it at all and I only got maybe half of it done before my back ached and I left it for another day. I tried to get comfortable but it was just impossible, I even tried using clamps and lengths of timber to prop against but it didn't really help much. Anyway here are a couple of my welds inside the car. This one is mostly sideways so not too hard.  and this one was was completely above my head. 
|
|
|
|
|
02-10-2018, 11:14 PM
|
#55 |
|
Senior Member
Join Date: Jul 2016
Drives: BRZ, WRX
Location: Sydney, Australia
Posts: 291
Thanks: 105
Thanked 962 Times in 233 Posts
Mentioned: 2 Post(s)
Tagged: 0 Thread(s)
|
Back from Japan
Hey guys,
I'm back from my snowboarding trip and working on the car again. Before I left I was struggling to weld upside-down so here is my solution. One of my neighbors was throwing out some junk and on the pile I noticed some scrap steel so I grabbed it thinking I could make another work bench out of it.  I had to buy another $20 worth of steel to finish it off but I also wanted to make the legs height adjustable.  Once it was all welded together I was then able to use it inside the BRZ so I could lay flat on my back and comfortably weld the cage upside-down.  Even though it is slow to reposition each time I am steadily getting the welds done and they are coming out so much better than before. 
|
|
|
|
| The Following 2 Users Say Thank You to DIY For This Useful Post: | Ash_89 (03-01-2021), RJasonKlein (02-11-2018) |
|
02-18-2018, 04:10 AM
|
#56 |
|
Senior Member
Join Date: Jul 2016
Drives: BRZ, WRX
Location: Sydney, Australia
Posts: 291
Thanks: 105
Thanked 962 Times in 233 Posts
Mentioned: 2 Post(s)
Tagged: 0 Thread(s)
|
I did not get much time to work on the car this weekend but I did make some small progress.
To weld the top of the roll cage which is pressed up hard against the roof I need to drop the whole thing down a little. To do this I had to cut the tack welds off the front rocker boxes and floor plates at the rear. I had already pre-drilled some large holes at the rear so the cage could drop through the floor. 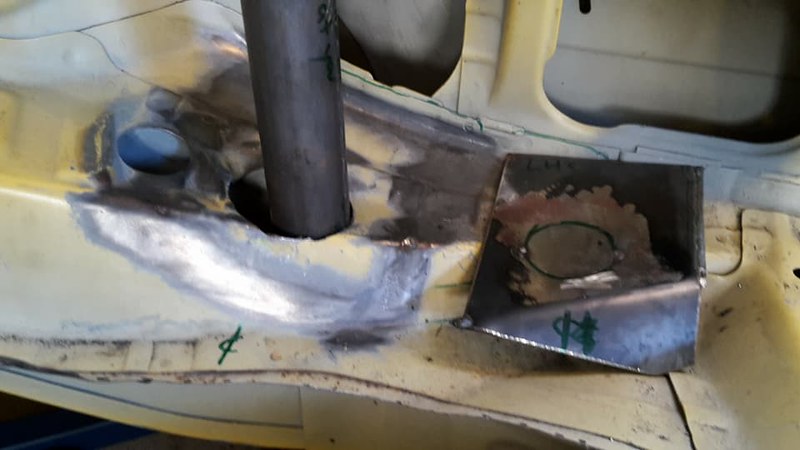 The cage has dropped down a fair bit plus I can also move it back and forth a little to help get better access to some of the welds. 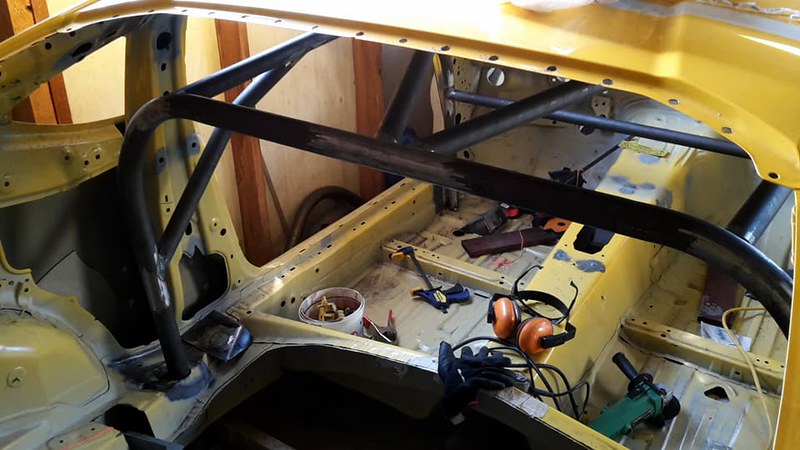 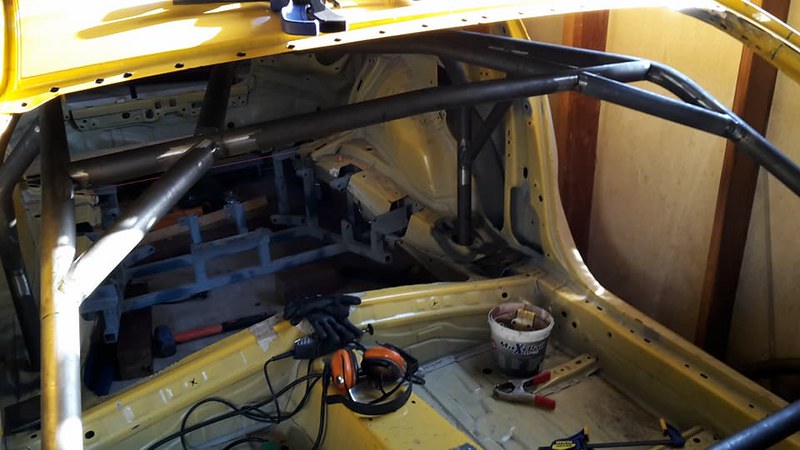 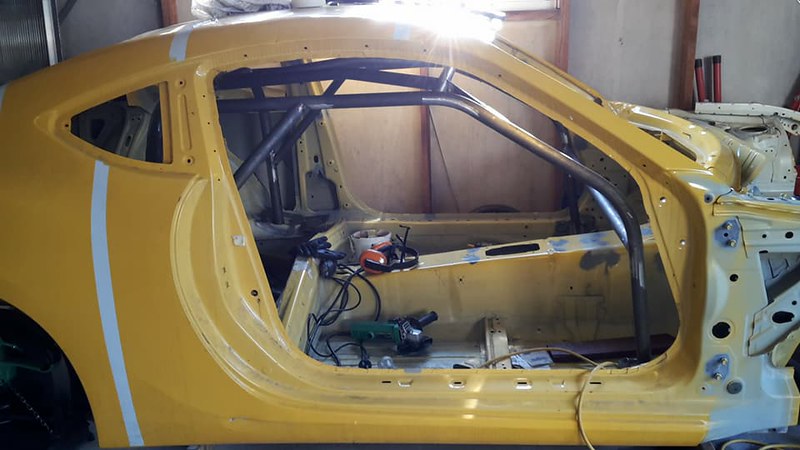 Next job is to weld the tops of all the joins then bring it back up into the proper position. After that I can completely weld the rear floor plates and front rocker boxes to the shell. |
|
|
|
| The Following 3 Users Say Thank You to DIY For This Useful Post: |
|
|
|
|
 |
|
|


