


|
||||||
| Engine, Exhaust, Transmission Discuss the FR-S | 86 | BRZ engine, exhaust and drivetrain. |
 |
|
|
Thread Tools | Search this Thread |
 10-11-2023, 09:51 PM
|
#15 | |
|
Senior Member

Join Date: Jan 2018
Drives: Crapcan
Location: Oregon
Posts: 11,167
Thanks: 18,158
Thanked 16,325 Times in 7,383 Posts
Mentioned: 107 Post(s)
Tagged: 0 Thread(s)
|
Quote:
TLDR OP find a used engine and fix the car. Will be worth far more complete then with blown engine if you decide to go a different route down the road.
__________________
"Experience is the hardest kind of teacher. It gives you the test first and the lesson afterward." -Oscar Wilde.
|
|

|

|
|
10-28-2023, 01:14 PM
|
#16 |
|
Ultra Senior Member
Join Date: Feb 2014
Drives: 2014 BRZ Premium, WRB
Location: East Coast, US
Posts: 209
Thanks: 43
Thanked 60 Times in 37 Posts
Mentioned: 6 Post(s)
Tagged: 0 Thread(s)
|
Thank you everyone for the helpful feedback. I've decided to move forward with replacing the engine and, as a matter of giving back to the community, I'll try to document what I did and post up about it as I'm able.
|
|
|
|
| The Following User Says Thank You to vfrqqq For This Useful Post: | bcj (10-28-2023) |
|
10-28-2023, 04:24 PM
|
#17 | |
|
Undisputed El Presidente

Join Date: Jun 2012
Drives: Zenki 37J ZN6
Location: Stockton, CA
Posts: 11,571
Thanks: 9,382
Thanked 9,397 Times in 5,261 Posts
Mentioned: 374 Post(s)
Tagged: 33 Thread(s)
|
Quote:
__________________
 "Just like how a strut bar somehow enables you to corner 20MPH faster around a cloverleaf on-ramp, when the reality is, you can do it already but you just don't have to balls to do it." - CSG David |
|
|
|
|
| The Following User Says Thank You to finch1750 For This Useful Post: | Opie (01-09-2024) |
|
10-28-2023, 05:34 PM
|
#18 |
|
Senior Member

Join Date: Jul 2015
Drives: Many
Location: Independence, Ore.
Posts: 704
Thanks: 227
Thanked 391 Times in 235 Posts
Mentioned: 9 Post(s)
Tagged: 2 Thread(s)
|
Last motor swap I did (which was a few years ago) took about 5 hours from driving one into the garage with rod knock to firing the new (used, ebay) motor up.
These things are stupid simple. |
|
|
|
| The Following 4 Users Say Thank You to e1_griego For This Useful Post: |
|
11-03-2023, 01:11 AM
|
#19 | |
|
Senior Member

Join Date: Sep 2015
Drives: 2013 Rally Blue BRZ
Location: OH
Posts: 123
Thanks: 15
Thanked 53 Times in 32 Posts
Mentioned: 1 Post(s)
Tagged: 2 Thread(s)
|
Quote:
I had your opinion here until a buddy pushed me to just go for it. How long did you drive it after it was blown? I shut my car down within a minute, and the heads were super clean. There aren't THAT many crevices metal bits can hide, and you really don't have to take apart as much as you think. Chances are the heads are just fine, and the new-ish subaru head gaskets Subaru uses now with multiple layers of metal mean head gasket failures aren't really a thing. The most annoying part is scraping off the RTV. The youtube content around a short block replacement has come a long way too since when I did mine ~3 years ago. You'll be freaking out about stuff because it's your first time, but you can do anything with the forum guidance/youtube. Just get a torque wrench and follow the manual. You'll probably want to buy: - full engine gasket kit. You won't need all of the gaskets in the kit. (map performance has a good priced one) - Engine timing kit, this includes chains, tensioners and guides (ebay) - crankshaft bolt (from subaru dealership) - head bolts (from subaru dealership - Right stuff grey gasket maker. Black works okay too, but it's not officially rated for "asian" vehicles. - Good time to replace the clutch and maybe flywheel, throw out bearing too. If you do this, get some grease (brake grease is fine here) - Good time to replace the spark plugs too. Then you'll need to buy/rent an engine hoist. Last edited by demasrv; 11-03-2023 at 01:26 AM. |
|
|
|
|
|
12-22-2023, 09:19 AM
|
#20 | |
|
Ultra Senior Member
Join Date: Feb 2014
Drives: 2014 BRZ Premium, WRB
Location: East Coast, US
Posts: 209
Thanks: 43
Thanked 60 Times in 37 Posts
Mentioned: 6 Post(s)
Tagged: 0 Thread(s)
|
Quote:
 At this point, the replacement motor has been installed and I'm waiting on parts for the exhaust before I can begin the process of firing up the new motor. Last edited by vfrqqq; 01-14-2024 at 08:32 AM. |
|
|
|
|
|
01-15-2024, 02:02 PM
|
#21 |
|
Ultra Senior Member
Join Date: Feb 2014
Drives: 2014 BRZ Premium, WRB
Location: East Coast, US
Posts: 209
Thanks: 43
Thanked 60 Times in 37 Posts
Mentioned: 6 Post(s)
Tagged: 0 Thread(s)
|
The engine replacement is all finish and my BRZ lives to see another day! I think I got lucky mating the engine to the transmission as it only took about 30 minutes of orienting the engine and transmission before they were fully together. I was fully expecting that part to take hours and at least a couple attempts!
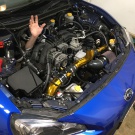
I ended up removing all the old flex fuel from the tank and fuel lines all the way--working with flex fuel is so much nicer than gasoline. I also reinstalled the OEM fuel pump and ended up cleaning all port and direct fuel injectors and replaced the fuel delivery pipes for the direct injector system. Replacing the fuel pipes seems quite wasteful and not inexpensive, but I didn't want to take any chances give the high operating pressures of the DI system and not wanting to have to pull everything apart to deal with a potential fuel leak. Perhaps I made up for it by avoiding having to drop $$$ on the specialized tools for installing new DI seals as I'd improvised my own. I ended up using various different sized washers, the perfectly sized head of a mechanical pencil that I had to modify a little, and a small plastic block left over from some Ikea furniture. Turns out a 5/16" drill bit was perfect for making a hole in the plastic block that I could just slide over the DI seal after it was installed to restore its form after being stretched out. A delicate operation to be sure, but patience and a comfortable work area proved crucial for success. I attempted to clean out as much gunk from the intake ports as I could but was only really able to work on the one side of the engine with closed intake valves. I wasn't able to fill up the other side with carburetor cleaner so I just wiped up as much as I could. I made the silly mistake of forgetting to reconnect the vacuum line for the brake booster before I'd attempted to start and idle the motor a few times for the first time after the install  . After correcting that problem, the motor has been running very smoothly and the data logs seem to reflect as much. . After correcting that problem, the motor has been running very smoothly and the data logs seem to reflect as much.All in all, given it was my first time replacing a motor and dismantling the fuel system, I figured there were easily about 25 or more opportunities for me to have substantially screwed something up that would take way more patience to troubleshoot than I was interested in, so it's quite nice that everything worked out (knocked on wood). Thanks to all for feedback, thoughts, and discussion on this. I greatly appreciate it. Last edited by vfrqqq; 01-15-2024 at 02:29 PM. Reason: added pics |
|
|
|
|
|
|
|
|
|
|
 Similar Threads
|
||||
| Thread | Thread Starter | Forum | Replies | Last Post |
| Blown 2016 FA20 swap 2017 FA20 | HRLQN | Engine Swaps | 11 | 10-15-2019 07:17 AM |
| Bad ball joint;possible to just replace balljoint or do I have to replace control arm | kev0 | Suspension | Chassis | Brakes -- Sponsored by 949 Racing | 8 | 01-03-2019 03:07 PM |
| Have to replace entire assembly to replace fuel filter? | tobkin | Mechanical Maintenance (Oil, Fluids, Break-In, Servicing) | 20 | 08-04-2017 02:26 PM |
| To replace rims or not replace? | unlimited86 | Cosmetic Maintenance (Wash, Wax, Detailing, Body Repairs) | 23 | 09-21-2015 12:12 PM |
| Replace one blown OEM tire or upgrade to Super Sport? | Yellow_Jacket | Wheels | Tires | Spacers | Hub -- Sponsored by The Tire Rack | 12 | 01-23-2013 09:33 PM |


