


 05-20-2013, 12:54 AM
|
#1 |
|
Senior Member
Join Date: May 2013
Drives: Scion FR-S Whiteout
Location: Hollywood, CA
Posts: 962
Thanks: 297
Thanked 241 Times in 137 Posts
Mentioned: 22 Post(s)
Tagged: 0 Thread(s)
|
Demon Eyes
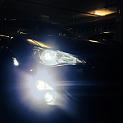
  In the pictures above, I have painted assemblies and demon eyes. Only the demon eyes are covered in this post. Also, this is also a very good time to replace the stock halogen projectors with HID ones, to achieve better light output than just replacing the bulbs with HID conversion kits. The Retrofit Source sells a kit at a good price. They also offer great warranty and exceptional customer service. Disclaimer: Not an affiliate, just a very satisfied customer. LINK TO PICTURES THREAD DIFFICULTY RATING: 7/10 WHAT YOU NEED
NOTES
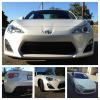
INSTRUCTIONS 1. There are already some DIYs here for removing the bumper, taking off the headlights and baking it open. Find and follow them. 2. Remove the projector from the headlight assembly and disassemble it. You'll need to paint the foreground limiter (the metal piece in between) white. Why white? Because it reflects all colors and will work the best if you want to use other LED colors. I used a flat white primer rattle can.  Projectors above are Morimoto Mini H1 from another project. Just demonstrating the effect of the white paint. 3. Mount the LED to the bottom of the lens holder. It's important to put it at the bottom with the light beam facing upwards, otherwise the red light will shine on the front bumper and the effect will not look as good. Reassemble the projector.  4. (Optional) Remove the bare CCFL tubes from the protective diffuser casing. If you opt to skip this step, the light emitted with the diffusers on will be softer. I prefer mine without. The following steps assume that you removed the diffusers. Use your nail to pry the metal clips behind the diffusers (they're soft). Pry the metal backing off. (Optional, but recommended) Do not remove the clear rubber rings around the halos. Those will be used so that the wire mounts will not show up in front of the halos when it's on. 5. Masking the halos. Cut the CCFL wires (near the clip), remove the clear plastic tube from one wire. Test fit the halos to see which part you want to mask. I mask about 1/3 of the ring, starting on one of the rubber ends. Shrink wrap method - snake a shrink wrap to the halos, use a sharp cutter to remove excess and heat with the heat gun. Vinyl wrap - cut out the shape of the mask, attach and use heat gun to wrap it around the ring and make sure there's no light bleed.    6. Using the drill or the butane torch + nail, create two holes on the circle emboss on the front of the headlight's chrome assembly for the CCFL wires to pass through. Do this first if you plan on painting the chrome!. Then create two more holes for the wire mount on the opposite side.  Note: The second pair of holes I created was designed for the thin wires to tie the halo directly, it's perpendicular to the line of the circle emboss, but I realized soon after that I can tie the rubber rings to the wires instead. You'll understand this more below. 7. Insert the cut halo wires on the top pair of holes. The way I did it, these wires will also serve as the top mount so that the halos will not fall off. If you did not took off the rubber rings from the halos, insert a short piece of mounting wire through them and then tie the mounting wire through the second pair of holes. This way, the mounting wires won't block the halo light. The rubber rings will, but they are clear. Another advantage is that the rubber rings will flex and will not put too much pressure on the ring when being mounted. If you took off the rubber rings, mount the halo with the thin wire directly. Be very careful with the tightness of the wires, the rings will break easily.  8. You're done, but make sure to test them first. Re-connect the CCFL wires to the clip end, then to the inverter. Test it and the LED with a 12v source (car battery). 9. Re-attach the different parts of the assembly together. Snake the wires to the back and use the stock rubber caps to hold them in place. 10. Bake the headlights for 5 min at 250F. Press on both halves really well, otherwise, you'll have condensation issues. I usually press on one side and attach the screws to keep it sealed tight. I also attach industrial clamps to the sides, but that's optional. WIRING For now, I have the demon eyes wired to the park lights (one click of the light knob thing in the steering wheel). With the low beams on, the red LED will not show up because the halogen bulbs are way brighter. To hook it up to the park lights, locate the wiring for the signal lights. There are three wires: black, red and green. You need to tap into the green positive to the red positives of the CCFL inverter and the LED. You can hook up their black negatives to any screws that attach to the chassis body. Another way to do this is by installing a remote control switch. A 1-channel remote will be around $12 from Amazon, while a 4-channel will run you around $30-40. Make sure to get the 12v. This way, you can turn it on/off at will, remotely. Great for car shows and for extending the life of your CCFL halos and LEDs. FAQs Is this legal in my state? Most certainly not, in CA anyway. The way I wired it up is only temporary and I am planning to install a remote switch to it in the near future. Will the LEDs burn out due to the heat of the halogen/HID bulbs? I have been running this same setup on my tC for 4 months and haven't encountered any burnt out bulbs. How did you do that paint technique? Masking tape, patience and steady hands. Will my headlights fog up or have condensation inside? Only if you didn't push the halves together well. Also, if you've baked it open three or more times, it'll be safer to apply more butyl sealant. You can buy them for $15 from TRS. You only need a thin rope on the sides, that roll will last you around 10 full headlight sealing.  Picture above shot on a fairly bright day. The red LEDs really shine up well during dim days. LINK TO PICTURES THREAD Last edited by retrosmiths; 07-31-2013 at 08:52 PM. Reason: UPDATED |

|

|
|
05-20-2013, 01:11 AM
|
#2 |
|
Senior Member

Join Date: May 2013
Drives: 13 BRZ Limited & 16 Hyperblue
Location: Bonney Lake, WA
Posts: 451
Thanks: 14
Thanked 235 Times in 126 Posts
Mentioned: 5 Post(s)
Tagged: 0 Thread(s)
|
This is awesome.
Blue LIGHTS are illegal on anything but cop cars (in WA at least), anyone know if I'd get jammed up for doing the ring blue though? I think the effect would be awesome inside the strip on a BRZ 
|
|
|
|
|
05-20-2013, 01:15 AM
|
#3 | |
|
Senior Member
Join Date: May 2013
Drives: Scion FR-S Whiteout
Location: Hollywood, CA
Posts: 962
Thanks: 297
Thanked 241 Times in 137 Posts
Mentioned: 22 Post(s)
Tagged: 0 Thread(s)
|
Quote:
So, yes, I think blue strips on the BRZ will definitely get you in trouble, even if it's just "accent" lighting. |
|
|
|
|
|
05-20-2013, 01:16 AM
|
#4 | |
|
Senior Member
Join Date: May 2013
Drives: 13 BRZ Limited & 16 Hyperblue
Location: Bonney Lake, WA
Posts: 451
Thanks: 14
Thanked 235 Times in 126 Posts
Mentioned: 5 Post(s)
Tagged: 0 Thread(s)
|
Quote:

|
|
|
|
|
|
05-20-2013, 02:58 AM
|
#5 |
|
Senior Member
Join Date: May 2013
Drives: Scion FR-S Whiteout
Location: Hollywood, CA
Posts: 962
Thanks: 297
Thanked 241 Times in 137 Posts
Mentioned: 22 Post(s)
Tagged: 0 Thread(s)
|
There's a guy here who made demon eyes using the BRZ trim as halos.
__________________
2013 Scion FR-S
|
|
|
|
|
05-20-2013, 03:50 AM
|
#6 |
|
Senior Member

Join Date: Jun 2012
Drives: 2013 Scion FR-S
Location: Santa Rosa
Posts: 549
Thanks: 474
Thanked 115 Times in 60 Posts
Mentioned: 1 Post(s)
Tagged: 1 Thread(s)
|
My friend almost got arrested for having blue halo's here in CA. The cop said he would have been charged for impersonating a police officer. just a heads up.
|
|
|
|
|
05-20-2013, 04:24 AM
|
#7 | |
|
Senior Member
Join Date: May 2013
Drives: 13 BRZ Limited & 16 Hyperblue
Location: Bonney Lake, WA
Posts: 451
Thanks: 14
Thanked 235 Times in 126 Posts
Mentioned: 5 Post(s)
Tagged: 0 Thread(s)
|
Quote:
|
|
|
|
|
|
05-20-2013, 07:47 AM
|
#8 | |
|
That Guy
Join Date: Dec 2011
Drives: 2013 asphalt FRS MT
Location: Halifax, Nova Scotia
Posts: 4,865
Thanks: 5,058
Thanked 2,867 Times in 1,499 Posts
Mentioned: 82 Post(s)
Tagged: 1 Thread(s)
|
Quote:
|
|
|
|
|
|
05-20-2013, 07:48 AM
|
#9 | |
|
That Guy
Join Date: Dec 2011
Drives: 2013 asphalt FRS MT
Location: Halifax, Nova Scotia
Posts: 4,865
Thanks: 5,058
Thanked 2,867 Times in 1,499 Posts
Mentioned: 82 Post(s)
Tagged: 1 Thread(s)
|
Quote:
|
|
|
|
|
|
05-20-2013, 08:45 AM
|
#10 |

Join Date: Sep 2012
Drives: FR-S baby!
Location: Oklahoma City
Posts: 804
Thanks: 16
Thanked 52 Times in 43 Posts
Mentioned: 9 Post(s)
Tagged: 0 Thread(s)
|
Looks nice! Great write up!
|
|
|
|
| The Following User Says Thank You to JWMotoring For This Useful Post: | retrosmiths (05-20-2013) |
|
05-20-2013, 08:45 AM
|
#11 | |
|
Join Date: Sep 2012
Drives: FR-S baby!
Location: Oklahoma City
Posts: 804
Thanks: 16
Thanked 52 Times in 43 Posts
Mentioned: 9 Post(s)
Tagged: 0 Thread(s)
|
Quote:
|
|
|
|
|
|
05-20-2013, 10:51 AM
|
#12 | |
|
Senior Member
Join Date: May 2013
Drives: Scion FR-S Whiteout
Location: Hollywood, CA
Posts: 962
Thanks: 297
Thanked 241 Times in 137 Posts
Mentioned: 22 Post(s)
Tagged: 0 Thread(s)
|
Quote:
__________________
2013 Scion FR-S
|
|
|
|
|
|
05-21-2013, 08:40 PM
|
#13 | |
|
Senior Member
Join Date: Jun 2012
Drives: 2013 Scion FR-S
Location: Santa Rosa
Posts: 549
Thanks: 474
Thanked 115 Times in 60 Posts
Mentioned: 1 Post(s)
Tagged: 1 Thread(s)
|
Quote:

|
|
|
|
|
|
05-23-2013, 05:19 PM
|
#14 |
|
Ridge Racerrrrrrrrr
Join Date: Jul 2012
Drives: 2013 Scion FR-S, 2004 Toyota Coroll
Location: Regina, Sk
Posts: 3,516
Thanks: 5,786
Thanked 1,363 Times in 954 Posts
Mentioned: 37 Post(s)
Tagged: 1 Thread(s)
|
Beautifully done!
__________________
|
|
|
|
| The Following User Says Thank You to SkAsphalt For This Useful Post: | retrosmiths (05-23-2013) |
|
|
|
|
 |
| Thread Tools | Search this Thread |
|
|
 Similar Threads
|
||||
| Thread | Thread Starter | Forum | Replies | Last Post |
| BRZ headlight upgrade, paint, demon eyes (PICTURE HEAVY) | Lee358 | Cosmetic Modification (Interior/Exterior/Lighting) | 59 | 04-18-2014 12:42 AM |
| Demon Eyes | retrosmiths | Cosmetic Modification (Interior/Exterior/Lighting) | 16 | 05-20-2013 12:55 AM |
| Will Demon Eyes affect light temperature output? (also the legality) | boredom.is.me | Cosmetic Modification (Interior/Exterior/Lighting) | 6 | 01-04-2013 05:37 PM |
| My GT86 with Carbon Demon Makeover | GT86FKINEL | FR-S & 86 Photos, Videos, Wallpapers, Gallery Forum | 4 | 10-30-2012 02:39 AM |
| Headlight lens question (demon eyes) | WolfsFang | Cosmetic Modification (Interior/Exterior/Lighting) | 19 | 09-30-2012 02:58 PM |


 Snow White


