follow ft86club on our blog, twitter or facebook.
FT86CLUB
Ft86Club
Speed By Design
Register Garage Community Calendar Today's Posts Search

Go Back   Toyota GR86, 86, FR-S and Subaru BRZ Forum & Owners Community - FT86CLUB > Technical Topics > Electronics | Audio | NAV | Infotainment

Electronics | Audio | NAV | Infotainment Anything related to in-car electronics, navigation, and infotainment.


User Tag List

Reply
 
Thread Tools Search this Thread
Old 11-11-2013, 01:11 PM   #43
mrdanyo
Senior Member
 
Join Date: Mar 2013
Drives: 2014 BRZ Limited (World Rally Blue)
Location: Markham, Ontario
Posts: 233
Thanks: 56
Thanked 72 Times in 36 Posts
Mentioned: 1 Post(s)
Tagged: 0 Thread(s)
Does anyone know what wires I need to do this on a 2014 Canadian model?

Sent from my Nexus 5 using Tapatalk
__________________
mrdanyo is offline   Reply With Quote
Old 12-10-2013, 01:17 PM   #44
davesbrz
Member
 
davesbrz's Avatar
 
Join Date: Jul 2013
Drives: '14 SWP BRZ
Location: San Jose, CA
Posts: 34
Thanks: 25
Thanked 14 Times in 10 Posts
Mentioned: 0 Post(s)
Tagged: 0 Thread(s)
Painting the backup camera

Has anyone painted the body of one of these backup cameras?
I am thinking that it wouldn't be so difficult for me to mask the camera hole and get a rough match to SWP and make this camera look less visible.
Opinions? anyone done this?
Thanks!
davesbrz is offline   Reply With Quote
Old 01-20-2014, 02:48 PM   #45
THEWAKLER
USMC
 
THEWAKLER's Avatar
 
Join Date: Aug 2013
Drives: DGM BRZ LMT
Location: NC
Posts: 106
Thanks: 12
Thanked 29 Times in 20 Posts
Mentioned: 0 Post(s)
Tagged: 0 Thread(s)
Just installed the Duo today, took about 2hrs thanks to this great guide! Only hiccup was the green grid line wire on the camera was ripped out when going through the trunk grommet, so have the 2 grids right now. Will install some new wire later this week to complete the circuit.
__________________
THEWAKLER is offline   Reply With Quote
Old 02-13-2014, 11:02 AM   #46
zinzan
Senior Member
 
zinzan's Avatar
 
Join Date: Jan 2014
Drives: Subaru BRZ 2014 Limited WRB
Location: Atlanta
Posts: 268
Thanks: 112
Thanked 109 Times in 59 Posts
Mentioned: 3 Post(s)
Tagged: 0 Thread(s)
Garage
Damn--photobucket is not showing the pictures at this time. Should have printed off the guide before I needed it.

Can they be hosted somewhere else? Or does someone else have a PDF or something of the OP's original guide?

-Z
zinzan is offline   Reply With Quote
Old 02-13-2014, 12:11 PM   #47
kludger
Senior Member
 
kludger's Avatar
 
Join Date: Oct 2012
Drives: '13 Boxter S, '13 BRZ(gone)
Location: SE PA
Posts: 235
Thanks: 309
Thanked 103 Times in 57 Posts
Mentioned: 9 Post(s)
Tagged: 0 Thread(s)
Quote:
Originally Posted by zinzan View Post
Damn--photobucket is not showing the pictures at this time. Should have printed off the guide before I needed it.

Can they be hosted somewhere else? Or does someone else have a PDF or something of the OP's original guide?

-Z
I had made a backup of this great DIY in case I lost track of it, and had uploaded the PDF of it to my Dropbox acct when someone asked earlier in the thread, you should still be able to download it here:
https://dl.dropboxusercontent.com/u/...0by%20Step.zip
kludger is offline   Reply With Quote
The Following 3 Users Say Thank You to kludger For This Useful Post:
a_dee (07-03-2015), djdnz (04-09-2014), zinzan (02-13-2014)
Old 02-13-2014, 12:11 PM   #48
FLYFISHR
Senior Member
 
FLYFISHR's Avatar
 
Join Date: Aug 2013
Drives: 2014 BR"ZED" Sport-tech DGM MT
Location: GTA CANADA
Posts: 720
Thanks: 464
Thanked 253 Times in 162 Posts
Mentioned: 7 Post(s)
Tagged: 3 Thread(s)
Quote:
Originally Posted by zinzan View Post
Damn--photobucket is not showing the pictures at this time. Should have printed off the guide before I needed it.

Can they be hosted somewhere else? Or does someone else have a PDF or something of the OP's original guide?

-Z
I hope the file is not to big but this is what I saved for my install.
__________________
Old enough to know better but young enough to do it again
FLYFISHR is offline   Reply With Quote
The Following 3 Users Say Thank You to FLYFISHR For This Useful Post:
djdnz (04-09-2014), Xx-Ness-xX (11-09-2015), zinzan (02-13-2014)
Old 02-13-2014, 02:16 PM   #49
zinzan
Senior Member
 
zinzan's Avatar
 
Join Date: Jan 2014
Drives: Subaru BRZ 2014 Limited WRB
Location: Atlanta
Posts: 268
Thanks: 112
Thanked 109 Times in 59 Posts
Mentioned: 3 Post(s)
Tagged: 0 Thread(s)
Garage
Great, thanks!
zinzan is offline   Reply With Quote
Old 02-13-2014, 05:16 PM   #50
mrdanyo
Senior Member
 
Join Date: Mar 2013
Drives: 2014 BRZ Limited (World Rally Blue)
Location: Markham, Ontario
Posts: 233
Thanks: 56
Thanked 72 Times in 36 Posts
Mentioned: 1 Post(s)
Tagged: 0 Thread(s)
Quote:
Originally Posted by FLYFISHR View Post
I hope the file is not to big but this is what I saved for my install.
LMK how your install goes! I'm curious as to whether the install is the same on CDN 2014 models. I don't know if the wires will be the same considering it's a new head unit inside (Subaru, not Pioneer). When you're done, please help us CDN brz owners out and let us know what wires are needed!
__________________
mrdanyo is offline   Reply With Quote
Old 02-13-2014, 06:49 PM   #51
JS + BRZ
Banned
 
Join Date: Dec 2013
Drives: 2010 MS3
Location: Los Angeles
Posts: 1,820
Thanks: 1,180
Thanked 1,161 Times in 597 Posts
Mentioned: 18 Post(s)
Tagged: 0 Thread(s)
Maaannnnn can someone in LA area do this for me!?
JS + BRZ is offline   Reply With Quote
Old 03-06-2014, 02:03 PM   #52
leicaboss
Coffee Snob
 
leicaboss's Avatar
 
Join Date: Dec 2013
Drives: '14 SWP BRZ Limited
Location: SF (Mission)
Posts: 992
Thanks: 536
Thanked 395 Times in 250 Posts
Mentioned: 31 Post(s)
Tagged: 0 Thread(s)
I wonder if there are any Bay Area folks willing to do this
leicaboss is offline   Reply With Quote
Old 03-12-2014, 10:26 PM   #53
BRZprime
Member
 
Join Date: Jul 2013
Drives: 2013 Subaru BRZ
Location: SoCal
Posts: 30
Thanks: 6
Thanked 2 Times in 2 Posts
Mentioned: 1 Post(s)
Tagged: 0 Thread(s)
Quote:
Originally Posted by tiny41 View Post
Rydeen Miny HD works with the SVXdc's harness also.

I didn't drill into my car. I routed the wire through the grommet used by the trunk release. Mounted the camera by the Rydeen license plate bracket.
I'm trying to do the exact same thing (no drill, rydeen miny with bracket). Do you have any pictures? Since you also have a limited, I'm wondering if the miny gets in the way of the trunk release?
BRZprime is offline   Reply With Quote
Old 03-13-2014, 11:22 PM   #54
tiny41
Member
 
Join Date: Sep 2013
Drives: Subaru BRZ Limited
Location: CA, USA
Posts: 20
Thanks: 1
Thanked 10 Times in 8 Posts
Mentioned: 0 Post(s)
Tagged: 0 Thread(s)
Unfortunately the camera does kinda get in the way but I just got used to pushing the button off the side of the camera.

I also don't have pictures cause I've never really been much of a camera person. It tends to slow down my install and distract me.

For the grommet, you will need to have a small and sharp item to cut the center of the grommet. I used a small snap-on flat head you get free from the snap-on tool-man to "cut" it.

The grommet has 2 small holes that the trunk release wire goes through it. I cut the wall between the holes to turn the 2 holes into 1 large hole to thread through the camera wires through. After threading the camera wire through, I sealed with with some silicon sealants.
tiny41 is offline   Reply With Quote
Old 03-16-2014, 03:57 PM   #55
BRZprime
Member
 
Join Date: Jul 2013
Drives: 2013 Subaru BRZ
Location: SoCal
Posts: 30
Thanks: 6
Thanked 2 Times in 2 Posts
Mentioned: 1 Post(s)
Tagged: 0 Thread(s)
Quote:
Originally Posted by tiny41 View Post
Unfortunately the camera does kinda get in the way but I just got used to pushing the button off the side of the camera.

I also don't have pictures cause I've never really been much of a camera person. It tends to slow down my install and distract me.

For the grommet, you will need to have a small and sharp item to cut the center of the grommet. I used a small snap-on flat head you get free from the snap-on tool-man to "cut" it.

The grommet has 2 small holes that the trunk release wire goes through it. I cut the wall between the holes to turn the 2 holes into 1 large hole to thread through the camera wires through. After threading the camera wire through, I sealed with with some silicon sealants.
Okay I see, seems like I'll be doing the same thing. Thanks for the help!
BRZprime is offline   Reply With Quote
Old 03-23-2014, 08:14 PM   #56
zinzan
Senior Member
 
zinzan's Avatar
 
Join Date: Jan 2014
Drives: Subaru BRZ 2014 Limited WRB
Location: Atlanta
Posts: 268
Thanks: 112
Thanked 109 Times in 59 Posts
Mentioned: 3 Post(s)
Tagged: 0 Thread(s)
Garage
BRZ Limited Backup Camera Step by Step (WARNING long post, many pictures)

Great guide. I have a couple observations/tips:

Quote:
Originally Posted by runny_yolk View Post


Pull off the head unit trim panel. If you have a plastic wire/panel tool, this might help. I was able to pull this out simply with friction from the pair of vinyl gloves that I was wearing. Do not use a metal pry tool (certainly not a screw driver) so as to not scratch the trim panel.
I do have panel tools, but can easily get this trim piece off by hand:
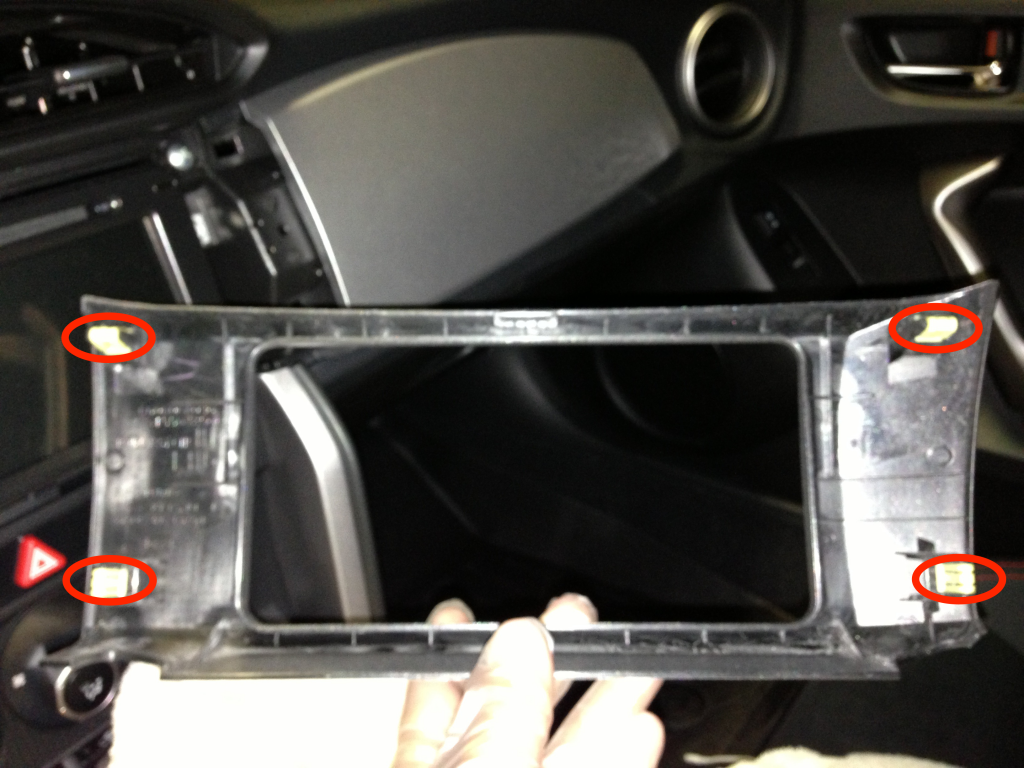
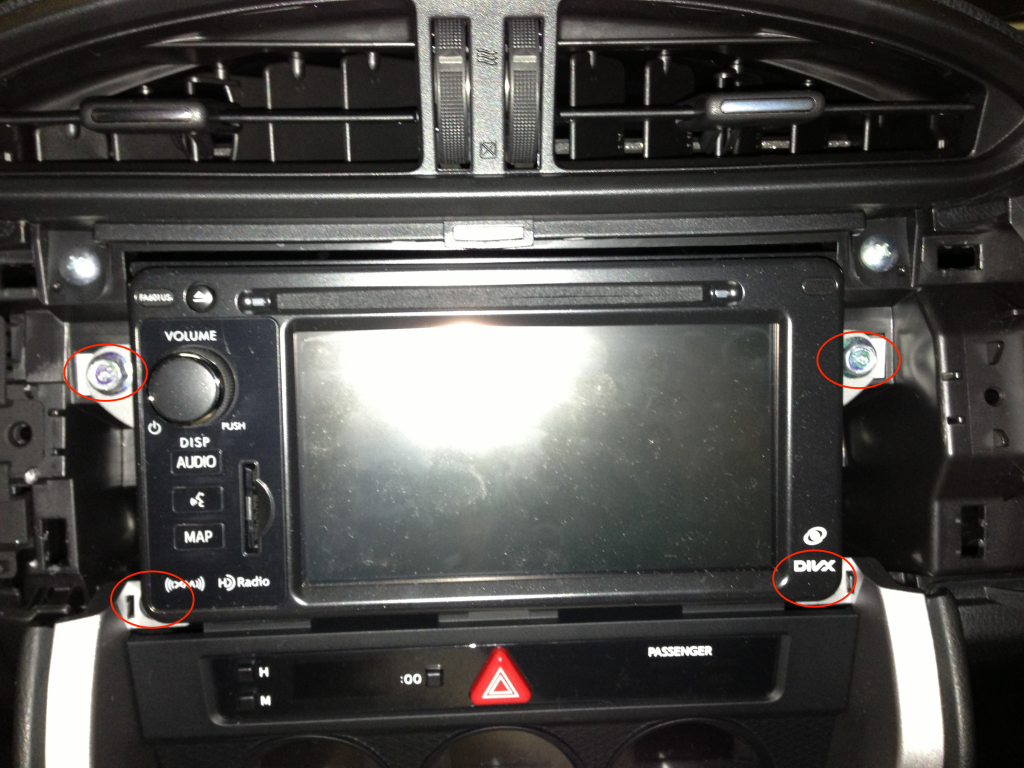
* First, I remove the panel piece above the glove compartment by just pushing up on the bottom left corner with my thumb.
* The head unit trim could then be pulled out starting at the open edge.

Quote:
Originally Posted by runny_yolk View Post

With the trim panel removed, use a deep 10mm socket to remove the four bolts holding the head unit in. Be careful not to drop any of these bolts as you will be dooooomed if you lose one (j/k, just be careful).
This isn't as scary as it may sound--the top two screws are very close at hand, so you can loosen them and finish unscrewing with your fingers. The bottom two screws are set further in, but if you did drop the screws while removing them, they won't fall very far as it's kinda "walled-off" in that area.

Quote:
Originally Posted by runny_yolk View Post
Not necessary to remove the light sockets.

Quote:
Originally Posted by runny_yolk View Post
Now drill the hole, for my camera, I needed a 1/4" drill bit.
I think a lot of people get scare of drilling into their car, but this is really easy. I'd suggest first drilling a pilot hole before graduating to the necessary hole size (5/16" for the Rydeen Duo).

Quote:
Originally Posted by runny_yolk View Post

Now, gently pull out the two ends of the rubber conduit connecting the trunk to the body of the car (one side is labelled Door and the other is labelled Body). We will now need to pass the camera wire through here. This is probably the hardest part of the whole install. To make things easier: make sure you pass the smallest part of the wire through this conduit. That may mean feeding the butt-end of the wire instead of the head end (I failed to do this and it took forever to feed the wire). I also suggest using a screw driver to feed a length of string (I used a shoestring) through. That way, you can both push on the end of the wire to feed it through the conduit AND by tying the string around your wire, pull it through the conduit as well. Either way, this took me a good 30 minutes to successfully get through.
Actually, this wasn't too hard, using the OP's earlier drinking straw trick. I hand-compressed the conduit, straightening it out at the same time, then stuck a drinking straw through. I put a narrow chopstick in the straw to give it rigidity. Then I removed the chopstick and was able to feed the camera wire through pretty easily.

Quote:
Originally Posted by runny_yolk View Post
Now it's time to start removing panels and running wire.


Start with the left-side kick-panel in the driver's side footwell. It's held on by one clip (similar to the clips holding the trunk roof liner). Loosen this clip and pull the panel out and back. It should come off.
Actually, the panel was still attached at the bottom under the door threshold trim. Remove the threshold trim first, then this panel.

Quote:
Originally Posted by runny_yolk View Post
...You don't need to remove the panel, just create enough space for you to reach through and pass the cable. If you had a wire fish tape, you might even be able to do this without move the panel/loosening clips at all. I HAD a wire fish tape, but couldn't find it.
Yeah, as someone else suggested, having a fish tape makes this job much easier. You don't have to remove the seat or rear side panel. Once you've removed the door weatherstripping (just need to partially remove it around the bottom rear corner) and folded back the side panel in the trunk, you can easily run the fish tape down the side of the amp right along the smooth metal floorboard and all the way down to the opening where the weatherstripping has been pulled to the side. So easy.

Again, thank you to the OP, and everyone else here that contributed to this thread and the others that the OP referenced!

-Z

__________________

Last edited by zinzan; 03-24-2014 at 10:00 AM.
zinzan is offline   Reply With Quote
 
Reply


Posting Rules
You may not post new threads
You may not post replies
You may not post attachments
You may not edit your posts

BB code is On
Smilies are On
[IMG] code is On
HTML code is Off

Forum Jump

Similar Threads
Thread Thread Starter Forum Replies Last Post
WRB BRZ - 2 step paint correction & Opti-Coat by Mr. Sparkle Detailing - Long Island Mr. Sparkle Cosmetic Maintenance (Wash, Wax, Detailing, Body Repairs) 4 02-10-2013 10:04 PM
step 1 :buy frs in phx, step 2: drive to pikes peak haymaker FR-S & 86 Photos, Videos, Wallpapers, Gallery Forum 15 08-21-2012 10:44 AM
[StreetFX] License Plate LED light upgrade, and DIY step by step guide (GT and GTS) WTF Australia Classifieds 0 07-11-2012 11:38 AM
[StreetFX] BRIGHT Boot/Trunk LED light upgrade & DIY step by step guide (GT and GTS) WTF Australia Classifieds 0 07-11-2012 11:27 AM


All times are GMT -4. The time now is 03:37 AM.


Powered by vBulletin® Version 3.8.11
Copyright ©2000 - 2024, vBulletin Solutions Inc.
User Alert System provided by Advanced User Tagging v3.3.0 (Lite) - vBulletin Mods & Addons Copyright © 2024 DragonByte Technologies Ltd.

Garage vBulletin Plugins by Drive Thru Online, Inc.