


|
||||||
| DIY (Do-It-Yourself) Guides For all DIYs. |
 |
|
|
Thread Tools | Search this Thread |
 07-02-2014, 11:33 PM
|
#1 |
|
Negative Mass
Join Date: May 2012
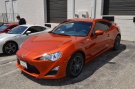
Drives: Orange Metallic AVO Turbo GT86 6MT
Location: Arlington VA
Posts: 702
Thanks: 272
Thanked 345 Times in 201 Posts
Mentioned: 56 Post(s)
Tagged: 1 Thread(s)
|
TRD JDM Louver Install (and "review")
Heya folks,
Time for another fail DIY from me. This won't be quite as bad as my previous endeavors, but I still have some useful "don't do it this way" advice as always. Skip to the review section if you just want to read that part. It's after all the pictures so it should be easy enough to find. Warning: excuse the quality of the pictures; I drink while I do things to my car. Preparation What comes in the box? Sorry I don't really have much in the way of inventory pictures; I kinda decided last second to make a DIY, as always. But here's a list of what you should find very nicely packaged in your box from TRD:
What tools do I need? Scissors, and painter's or masking tape. Seriously that's it. Everything you need comes in the box. I would also recommend a box cutter / razor blade to make your life easier, but the tip of a scissor blade worked fine for my purposes. What do I do!? Holy crap Japanese! I can't read this shit... What do I do?? Relax, my rudimentary (worse than a 4 year old's) ability to read katakana got me through this. I am armed with enough knowledge, and now experience, to tell you what the steps are so you can avoid the pitfalls I found. It's really hard to mess up this installation. I say it enough times that it's getting old but I am seriously inept at this stuff, and I still managed to do a good job IMO. There are only a few major steps to this, and lots of repetition. The basic idea is as follows:
I will go over each step in detail with pictures! Installation The templates  The templates are provided on these (irritatingly) folded pieces of paper. Desperately and futilely attempt to flatten them out, then arm yourself with scissors and/or a razor blade. Work very slowly, ESPECIALLY ON THE SIDE WITH THE SHADING, and be as accurate as possible. This is the part where you guarantee you will be positioning the louvers correctly. DO NOT BE IMPATIENT. ZEN.
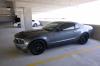
. Don't forget to cut out the center rectangles in each template. This is where the brackets will be positioned for the louvers. Prepare the window (Optional but not really) You should clean the rear windshield with some windex or your other favorite window cleaner before you even come near it with anything in this installation. After you have done this put on the industrial-strength plastic glove provided and cut open the 3M cleaning solution provided (picture below).  Clean all around the edges of the windshield (I believe the instructions specify 70 mm... because wtf). Just clean basically anywhere that you can't see through, it's okay to get this stuff on the rest of the glass... It smells like it's probably just isopropyl but whatever. Don't breathe too much of it. Position and tape the templates Time for my first mistake. There is an order to the templates along the bottom of the window. There's the really long-ish ones that go in the center-bottom. These should go on first before the bottom corners. Fold them along the line the wrong way first (see picture).  This allows you to guarantee you folded it along the line correctly. Open the trunk lid. Now position them so that the shaded regions are perfectly up against the very edge of the glass. Tape. Now fold that flap up and toward the trunk. Here's a couple pictures that I took showing how I did this out of order...   Now you can install the rest of the templates. As stated always make sure the shaded regions touch the very edge of the glass. They were intended to position the brackets relative to the edges of the glass. Here are pictures for reference of the rest of the positions. Yeah they're blurry I suck.   Okay. You're past the "hard" part. The rest of this is comically easy. Prepare, prime, and install the brackets You should already have the trunk lid open at this point. Remove the closer of the two bolts from the hinges on each side.  Now you want to prime all the areas in the middle of the brackets. Put on your trusty industrial-strength plastic glove again and cut open the 3M primer packet.  Now revel in the glory of my cameraman-ship and prime every template for the brackets. Don't worry about spreading the stuff on the paper, it won't dissolve before you finish. INHALE! This stuff smells like modelling glue. Brings back childhood memories.  Once all positions are primed get the bracket that looks like this and put it on the correct side so that it mates with the corresponding bottom-corner template and hinge bolt (reminder: you should have the bolts out by now).  Do these first for each side just to make things easy, every other bracket is the same.    Now you should have all the brackets in place. Position the Louvers Now you should position the Louvers and verify your craftsmanship.  Make sure that all the bolt holes line up decently, there is some wiggle room so you don't have to be factory perfect. The washers are rubbery and give a bit too making things even easier. If you are satisfied with your accuracy (and you damn well better be) remove the Louvers and pull off all the templates and tape. You will have to rip the two bottom corner ones as they have gotten trapped under the bracket you installed there. Don't worry, believe it or not these will never be useful again! Bolt down the Louvers Not much to say here.  That about sums it up. Do this 8 times. Just make sure the washer has flat side down, kinda obvious but whatever, that's the point of these DIY things. And finally enjoy your final product!!  Review I was very uncertain of this purchase. Actually I think I was a bit drunk when I made it. Fact remains I made the purchase, so now you all can benefit from my knowledge and experience. Visually If you're reading this then you probably already agree. This is the single most striking upgrade I have done to my car. I get comments from people who have all levels of knowledge about our car (none at all to ft86club member). Since adding my spoiler this is the single most satisfying visual upgrade, even over my JDM (well okay series 10...) headlights. Material Quality $800 in plastic you say? I say flawless fitment, extremely rugged plastic, and high quality hardware. You absolutely will not get that with a knock-off if it's ever made. By the way I doubt that will ever happen. I underestimated just how huge this product is... Ground effects are easy, this is a relatively complex piece that is extremely large. Practicality This is gonna get some snorts and scoffs, but there is an extremely legitimate reason to purchase these things. It's the summer, and it's bloody hot here in VA. These things provide complete shade during the peak sun. Combine that with my 35% tint and it stays very cool in my car. I was getting in my car to cool off at autocross, because with the windows down I was in complete shade with a breeze. Oh and to answer the question EVERYONE asks. Remove all 8 bolts and washers. Remove Louvers. Done. You can clean the windshield easily. I keep the Allen key with my wheel lock under the trunk lid. Conclusion If you have the cash and are on the fence just do yourself the favor and buy them. Don't wait for the knock-off that isn't going to come. Notice I said if you have the cash... There are many definitions of "afford" and I didn't want to have them confused. I do not recommend this mod unless it's completely expendable income. But that's a different issue and I'm not your dad! Thanks for reading. I hope it was informative and worth your time. And if you decide to get the Louvers, ENJOY! P.S. The first couple days are scary. I kept checking my blind spot and seeing them in the corner of my eye... P.P.S. By popular demand here are some interior pics: Mirror in motion (yes this was totally safe definitely no doubt)  Rear view sans louvers but post-install  Rear view with louvers  Rear mirror stationary  These pictures make it appear that the louvers are obtrusive, but trust me in motion you can see just fine. Like I said before, the biggest impact they have is on the blind-spot check. It is very startling at first to see an object on the window out of the corner of your eye.
__________________
Build thread for my Lovely Lady.
Last edited by nataku; 08-11-2020 at 01:08 PM. |

|

|
| The Following 47 Users Say Thank You to nataku For This Useful Post: | 1stGenBRZ86 (07-13-2014), Alabang 86 (12-11-2015), AtlasMick (10-14-2014), atomicalex (06-26-2018), Ben_G (07-04-2014), Busybee (06-07-2020), Chee-Hu (07-03-2014), chimmay (08-09-2014), Creole (07-04-2014), cwpbrz-ji (08-02-2016), Dadhawk (10-14-2014), DarkSunrise (07-03-2014), DoctorNick (07-04-2014), FearBoy (07-09-2014), funwheeldrive (10-02-2014), Guff (07-03-2014), hmong337 (07-03-2014), HunterGreene (12-22-2015), idreamofdrifting (10-20-2014), JonnyRocket (07-07-2014), Jyn (09-18-2017), kanundrum (07-03-2014), Karl07 (07-04-2014), kch (04-27-2015), keen as (07-09-2014), Lateral G (03-03-2015), Lorico (01-28-2016), Namuna (07-03-2014), NIN69 (07-03-2014), NWFRS (06-22-2015), Omi Ham-Sandwich (12-21-2016), pcuerpo (07-09-2014), protpibe (07-08-2014), Reign (10-17-2014), Silent_Dan (07-05-2014), slava (07-03-2014), SuperDave (09-28-2016), supragoods (11-15-2014), tbertran (07-02-2014), TRD-X (02-02-2015), trvth (06-01-2018), Tye300 (07-04-2014), van_fc3s (07-09-2014), WallsAndFoundations (07-03-2014), wtrxprs007 (07-03-2014), wulfstan (02-22-2016), xn7485 (10-06-2016) |
|
07-02-2014, 11:50 PM
|
#2 |
|
Member
Join Date: Jun 2014
Drives: 2014 FRS
Location: Rockford, IL
Posts: 18
Thanks: 0
Thanked 3 Times in 3 Posts
Mentioned: 0 Post(s)
Tagged: 0 Thread(s)
|
I kinda dig it.
More pictures from different angles?
__________________
yep
|
|
|
|
|
07-03-2014, 12:43 AM
|
#3 |
|
Member
Join Date: Aug 2013
Drives: too soon junior
Location: Edmonton
Posts: 88
Thanks: 60
Thanked 42 Times in 24 Posts
Mentioned: 1 Post(s)
Tagged: 0 Thread(s)
|
I love these and want to get them some day. Was the rear visibility affected at all?
|
|
|
|
|
07-03-2014, 12:46 AM
|
#4 |
|
Negative Mass
Join Date: May 2012
Drives: Orange Metallic AVO Turbo GT86 6MT
Location: Arlington VA
Posts: 702
Thanks: 272
Thanked 345 Times in 201 Posts
Mentioned: 56 Post(s)
Tagged: 1 Thread(s)
|
Yeah sorry I don't have more pictures guys. I'll get a lot more and post here tomorrow. The visibility is still quite good. You can definitely see them there, and it's slightly obtrusive, but not to an unsafe degree.
__________________
Build thread for my Lovely Lady.
|
|
|
|
|
07-03-2014, 01:42 AM
|
#5 |
|
Senior Member
Join Date: Sep 2012
Drives: 2003 Camry Blue | 2013 FR-S White
Location: Bay Area - South Bay
Posts: 1,144
Thanks: 804
Thanked 288 Times in 221 Posts
Mentioned: 8 Post(s)
Tagged: 0 Thread(s)
|
I have to say that this is an awesome DIY and pays SO MUCH tribute to the retro toyo cars.
As much as I love it, and I mean I REALLY love it! I cannot justify 800 on louvers.... Maybe if the price drops down on a real one, even 600 I would buy it and most likely replace my roof spoiler from beat sonic, but right now I think I cannot justify 800 for louvers. BUT i have to say, I love love love it!!! awesome that you had the pocket change to buy it, I just don't at the time. |
|
|
|
| The Following User Says Thank You to CamryDS For This Useful Post: | ramiram1984 (10-20-2014) |
|
07-03-2014, 03:42 AM
|
#6 |
|
Member
Join Date: Feb 2014
Drives: GT86
Location: Russia
Posts: 25
Thanks: 2
Thanked 5 Times in 4 Posts
Mentioned: 0 Post(s)
Tagged: 0 Thread(s)
|
Where to buy ?

|
|
|
|
|
07-03-2014, 07:49 AM
|
#7 |
|
Member

Join Date: May 2014
Drives: FR-S & MK6 Golf
Location: NEOhio
Posts: 35
Thanks: 3
Thanked 19 Times in 15 Posts
Mentioned: 0 Post(s)
Tagged: 0 Thread(s)
|
Nice DIY! The kid inside of me that grew up watching Miami Vice makes me love these.
__________________
"David Hasselhoff, disguised as his superhero alter ego, The Bay Watcher. He stuffs his fanny pack (he calls it his "utility belt") with cheeseburgers and stalks the city fighting crime (actually, he is just eating cheeseburgers)."
|
|
|
|
|
07-03-2014, 10:30 AM
|
#8 |
|
Member

Join Date: Apr 2013
Drives: frs
Location: georgia
Posts: 76
Thanks: 27
Thanked 27 Times in 21 Posts
Mentioned: 0 Post(s)
Tagged: 0 Thread(s)
|
Looks good. sorry but what does that do? Seen them before just never knew what the purpose..
|
|
|
|
|
07-03-2014, 11:28 AM
|
#10 | ||
|
Senior Member

Join Date: Jul 2013
Drives: Neptune GR86
Location: Portland
Posts: 3,862
Thanks: 1,438
Thanked 3,505 Times in 1,806 Posts
Mentioned: 60 Post(s)
Tagged: 2 Thread(s)
|
Quote:
Quote:
__________________
 |
||
|
|
|
| The Following User Says Thank You to Andrew025 For This Useful Post: | nataku (07-05-2014) |
|
07-03-2014, 11:58 AM
|
#11 |
|
Senior Member

Join Date: May 2012
Drives: BRZ
Location: Elk Grove, CA
Posts: 964
Thanks: 360
Thanked 323 Times in 221 Posts
Mentioned: 12 Post(s)
Tagged: 0 Thread(s)
|
Nice write-up. Very well done!
For those asking the purpose...the purpose is the OP likes it. Nothing more, nothing less. No need to ask silly questions. |
|
|
|
|
07-03-2014, 10:58 PM
|
#12 |
|
Senior Member

Join Date: Apr 2013
Drives: 2000 Integra LS, 2013 FRS Firestorm
Location: Bikini Bottom
Posts: 271
Thanks: 108
Thanked 74 Times in 59 Posts
Mentioned: 13 Post(s)
Tagged: 0 Thread(s)
|
very nice and thanks for the DIY.
a few questions,how long was the wait time on this and how was the packaging? secondly, being that this is new, you're probably not going to notice the changing of colors. are these prone to that ( changing of color- looking won) I would like to think TRD are made from better materials and are not prone to that but just don't have enough experience with them to really know. thanks
__________________
 "Power is nothing without Control" |
|
|
|
|
07-04-2014, 01:51 AM
|
#13 |
|
Senior Member
Join Date: Jun 2014
Drives: 2014 Satin White Pearl GTS auto
Location: Kyalami- South Africa
Posts: 301
Thanks: 11
Thanked 163 Times in 83 Posts
Mentioned: 1 Post(s)
Tagged: 0 Thread(s)
|
I really like this, but would prefer it in body colour
__________________
2002 MR2 Spyder 2zz-GE Apexi PFC PPE Race header 8500 RPM of FUN
2014 37J 86 Auto |
|
|
|
|
07-04-2014, 09:40 AM
|
#14 |
|
Senior Member
Join Date: Jun 2012
Drives: Blue BRZ
Location: Canada
Posts: 506
Thanks: 108
Thanked 127 Times in 75 Posts
Mentioned: 0 Post(s)
Tagged: 0 Thread(s)
|
I love how upfront and awesome you are about your mistakes and how you would go better about it if doing it again, but "I drink while I do things to my car" might be an issue? LOL!! =)
|
|
|
|
| The Following User Says Thank You to Ben_G For This Useful Post: | nataku (07-05-2014) |
|
|
|
|
|
|
|
 Similar Threads
|
||||
| Thread | Thread Starter | Forum | Replies | Last Post |
| Book Review - "An Astronaut's Guide to Life On Earth" by Chris Hadfield | Frost | Off-Topic Lounge [WARNING: NO POLITICS] | 33 | 09-23-2023 12:51 PM |
| Epic Chris Harris GT-86 / FR-S Review! -- "This is the car I've been waiting for" | kanundrum | Scion FR-S / Toyota 86 GT86 General Forum | 211 | 01-03-2013 04:29 PM |
| New article - JDM spec "Review From The Backseat" | sastexan | Scion FR-S / Toyota 86 GT86 General Forum | 7 | 12-04-2012 03:07 PM |
| "86" video review from South Africa | Khazandra | FR-S & 86 Photos, Videos, Wallpapers, Gallery Forum | 1 | 10-14-2012 05:07 PM |
| Subaru BRZ Prototype First Drive Review: "Off the Chart" (Motor Trend) | Hachiroku | BRZ First-Gen (2012+) -- General Topics | 67 | 11-09-2011 05:58 PM |


 Betty
Betty
