


|
||||||
| Cosmetic Modification (Interior/Exterior/Lighting) Discussions about cosmetic mods. |
 |
|
|
Thread Tools | Search this Thread |
 03-05-2014, 02:41 AM
|
#1 |
|
Member
Join Date: Apr 2013
Drives: Scion FRS
Location: New York
Posts: 35
Thanks: 13
Thanked 4 Times in 4 Posts
Mentioned: 0 Post(s)
Tagged: 0 Thread(s)
|
Painting tails red. Is it worth wet-sanding/clear coating?
Hey guys, I have vinyl overlays on my tail lights to make them red. It looks great on my whiteout frs, but they don't wrap around the entire tail light which pisses me off from certain angles. Also, they lack gloss and shine which I do not like either.
I want to paint them red with the VHT Nightshade Red. I see a lot of people here using it for this purpose. I wanted to know how essential it is to wet-sand, clear coat, polish, etc. after applying the initial layers of red paint? I have seen pictures of them without being wet sanded or polished or anything, and although they do have a matte look they are still better looking than the vinyl overlays I have. Is the wet sanding really worth it? I honestly don't want to have a job that looks half-assed, but the pics I have seen without the wetsanding/polish really do look very good. My painting skills are limited. I've painted a couple side-view mirrors and plasti-dipped my emblems and rims. All came out very nice, but I am no expert. Is the wet sanding hard or easy to mess up? Can someone link me to a good DIY for the wet sanding, clear coating, polishing, etc. part? Detailing each step and proper application and procedure, particularly for a tail-light or surface of this sort? Thanks guys! |

|

|
| The Following User Says Thank You to nodeal For This Useful Post: | Jolaessss (03-05-2014) |
|
03-05-2014, 03:15 AM
|
#2 |
|
Senior Member

Join Date: May 2013
Drives: SWP FR-S
Location: San Jose, CA
Posts: 620
Thanks: 346
Thanked 172 Times in 114 Posts
Mentioned: 24 Post(s)
Tagged: 0 Thread(s)
|
I too, want to do this but a bit on the fence
__________________
 |
|
|
|
|
03-05-2014, 05:48 AM
|
#3 |
|
Senior Member

Join Date: Jan 2013
Drives: frs
Location: garden grove
Posts: 241
Thanks: 249
Thanked 81 Times in 45 Posts
Mentioned: 7 Post(s)
Tagged: 0 Thread(s)
|
Yes. wet sanding will remove all orange peel you see on your paint surface to give it a pro look. You could skip the wet sanding but clear/polish/wax are must-to-do (especially clear coat). wet sanding also helps to remove unwanted dirt/hair that stick to the paint when you spray.
Here are how I did mine. - 3 light coats of duplicolor metalcast - 2-3 medium coats - 2-3 mid-heavy coats ( wait between coats was around 15') That was all. Wait overnight and put tails back on the car and left it there for a week to let the paint cured. - wet sading with 2500 sand paper (some people don't but I did) - looks like shit but people say clear coat will bring everything back (true) - 3-4 light coats of spray max 2k (they say this is the best clear coat for shinny) - 3-4 medium coats - 3-4 mid-heavy coats (wait was around 15' between coats) And I did put it back on my car and wait for another week (paint needs time to cure and I only can do all my car stuff once a week on my day off) - wet sand with 2500 sand paper, you can go with 1500 and follow with 2000 or start with 2000 to remove the orange peel faster and use 2500, 3000 is even better (I stopped at 2500 cause I couldn't find 3000 at autozone). - rubbing compound - polishing compound - wax I never seen a pro job but my eye can tell that my job was not bad. Don't have any thing to complaint !!! |
|
|
|
| The Following User Says Thank You to vincent201089 For This Useful Post: | wrb (03-06-2014) |
|
03-05-2014, 11:48 AM
|
#4 | |
|
Member
Join Date: Apr 2013
Drives: Scion FRS
Location: New York
Posts: 35
Thanks: 13
Thanked 4 Times in 4 Posts
Mentioned: 0 Post(s)
Tagged: 0 Thread(s)
|
Quote:
I have never wet sanded before. Stupid question, but do you wet the surface of the tail light, and then sand it down? Or do you wet the sand paper and then sand it down? Or it doesn't matter? How come you went with Duplicolor Metalcast over the VHT Nightshade? If you have pics of the finished job, I'd love to see them 
|
|
|
|
|
|
03-05-2014, 12:24 PM
|
#5 |
|
Senior Member
Join Date: Jul 2012
Drives: 2013 Asphalt FR-S Manual
Location: Whitby, ON, Canada
Posts: 6,716
Thanks: 7,875
Thanked 3,351 Times in 2,134 Posts
Mentioned: 99 Post(s)
Tagged: 1 Thread(s)
|
Wet sanding just uses water as a lubricant to give a smoother finish when sanding and keep the very fine paper from clogging.
You'll definitely want to wet sand after the colour coats (before the clear), and also wet sand and buff the clear for best results.
__________________
Light travels faster than sound, so people may appear to be bright until you hear them speak... flickr |
|
|
|
|
03-05-2014, 12:29 PM
|
#6 |
|
Senior Member
Join Date: Apr 2013
Drives: 2013 FRS- Hot Lava
Location: Michigan
Posts: 674
Thanks: 16
Thanked 162 Times in 115 Posts
Mentioned: 4 Post(s)
Tagged: 0 Thread(s)
|
Without a proper clear, expect your color to fade.
I actually liked mine best with just the red, but added the clear to protect it. Of course the clear ran, so I had to wait two weeks and then sand/buff it back. It looks nice now, but boy was it a pain. Still, I would recommend clear coating. |
|
|
|
|
03-05-2014, 01:03 PM
|
#7 |
|
TURBOLICIOUS

Join Date: Nov 2013
Drives: a machine :]
Location: DALLAS, TX
Posts: 340
Thanks: 158
Thanked 243 Times in 126 Posts
Mentioned: 15 Post(s)
Tagged: 0 Thread(s)
|
More info and pics in these threads:
http://www.ft86club.com/forums/showthread.php?t=7826 http://www.ft86club.com/forums/showthread.php?t=32259 |
|
|
|
|
03-05-2014, 01:06 PM
|
#8 |
|
Senior Member
Join Date: Jan 2013
Drives: frs
Location: garden grove
Posts: 241
Thanks: 249
Thanked 81 Times in 45 Posts
Mentioned: 7 Post(s)
Tagged: 0 Thread(s)
|
I was worry about messing everything up when I wet sand then red coat before applying the clear. However, I followed the instruction in the Diy thread and they say that we dont have to worry, clear coat will bring the shine and gloss back.
Evrything looked perfect after the clear was dry/cured but there was tons of orange peel/uneven level because of the home job. Thats why we have to wet sand to remove the orage peel to make the surface even/remove small dirt/hair sticked to the paint. After sandding everything down. I started with rubbing compound to remove big scratches and followed with polishing compound for thinner scratches. Now you will see your job looks just like it just came out from the factory. Lol and just a thin layer of wax to bring up the shine/gloss. Thats it. Good luck. |
|
|
|
|
03-05-2014, 07:15 PM
|
#9 |
|
ProCrastinationConsultant

Join Date: Sep 2013
Drives: '14 Ranger, '18 Tacoma 4Dr LB
Location: chicago-ish
Posts: 11,330
Thanks: 35,240
Thanked 13,673 Times in 6,781 Posts
Mentioned: 98 Post(s)
Tagged: 0 Thread(s)
|
__________________
"The time you enjoy wasting is not wasted time"
 |
|
|
|
|
03-05-2014, 07:21 PM
|
#10 | |
|
Howdy!

Join Date: Nov 2013
Drives: Party ST, Classic Mini
Location: WI/IL
Posts: 196
Thanks: 73
Thanked 97 Times in 52 Posts
Mentioned: 5 Post(s)
Tagged: 1 Thread(s)
|
You need 3M Hand Glaze to get the orange peel out of the clear coat.
Here's something I posted elsewhere recently: Quote:
|
|
|
|
|
| The Following User Says Thank You to fourvalleys For This Useful Post: | Jolaessss (03-05-2014) |
|
03-05-2014, 10:09 PM
|
#11 | |
|
Go Big Red!!
Join Date: Jan 2014
Drives: 2013 SSM BRZ Limited
Location: TX
Posts: 515
Thanks: 489
Thanked 196 Times in 120 Posts
Mentioned: 11 Post(s)
Tagged: 0 Thread(s)
|
Quote:
|
|
|
|
|
|
03-06-2014, 09:58 AM
|
#12 | |
|
Howdy!
Join Date: Nov 2013
Drives: Party ST, Classic Mini
Location: WI/IL
Posts: 196
Thanks: 73
Thanked 97 Times in 52 Posts
Mentioned: 5 Post(s)
Tagged: 1 Thread(s)
|
Quote:
  In this order: - Sprayed 2-3 coats of VHT (light 2000 grit wet-sand between each coat to scuff) - Sprayed 2 coats of clear (light wet-sand between coats - you may want to do more than two coats) - wet sand clearcoat once hardened - 3M hand glaze If it still isn't perfect... - went sand again if there are remaining imperfections in the clear - 3M Hand Glaze Just give the 3M a day or two to set. If you touch it an hour or two after you hand buff, it will still scratch easily and leave marks. Even a microfiber can leave marks when it's fresh. Just be patient. At least leave it overnight before installing them. |
|
|
|
|
| The Following User Says Thank You to fourvalleys For This Useful Post: | Husker BRZ (03-06-2014) |
|
03-06-2014, 10:48 AM
|
#13 | |
|
Senior Member

Join Date: Jun 2013
Drives: Ultramarine toyobaru
Location: NS Canada
Posts: 605
Thanks: 311
Thanked 576 Times in 221 Posts
Mentioned: 3 Post(s)
Tagged: 0 Thread(s)
|
Quote:
|
|
|
|
|
|
03-06-2014, 11:42 AM
|
#14 | |
|
Howdy!
Join Date: Nov 2013
Drives: Party ST, Classic Mini
Location: WI/IL
Posts: 196
Thanks: 73
Thanked 97 Times in 52 Posts
Mentioned: 5 Post(s)
Tagged: 1 Thread(s)
|
Quote:
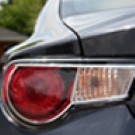
I didn't think it would darken as much as it did with a second coat. e: here are a couple other pictures. It's dark, but not super dark.  Here's how it looked (wet) after the first coat. When this coat dried it was noticeably darker.  This is what ONE coat of VHT Red looks like in direct sunlight: 
|
|
|
|
|
|
|
|
|
|
|
|
 Similar Threads
|
||||
| Thread | Thread Starter | Forum | Replies | Last Post |
| Powder coating vs painting Rims | Giccin | Other Vehicles & General Automotive Discussions | 36 | 01-28-2015 07:44 PM |
| WTT: Buddy Club Tails for Clear Toms | CreinCrein | Canada Classifieds | 25 | 10-15-2014 12:56 PM |
| *LEGIT USDM TOM'S TAILS US LEGAL! RED LENS & CLEAR LENS $450 AUTHORIZED DEALER!!!* | Vicious LED | Exterior Parts - Lighting | 121 | 04-19-2014 04:13 PM |
| Autobody Shop/Painting Near Me ? Issue with Painting Carbon Fiber Hood? | ScionFR-S | Cosmetic Modification (Interior/Exterior/Lighting) | 20 | 11-08-2013 01:51 PM |
| Wet sanding curves | qoncept | Cosmetic Modification (Interior/Exterior/Lighting) | 3 | 07-02-2013 02:50 PM |


 2013 Subaru BRZ