


|
||||||
| DIY (Do-It-Yourself) Guides For all DIYs. |
 |
|
|
Thread Tools | Search this Thread |
 03-18-2017, 08:05 PM
|
#57 |
|
Senior Member

Join Date: Dec 2015
Drives: 2015 Ultramarine FR-S AT
Location: Baton Rouge
Posts: 368
Thanks: 134
Thanked 133 Times in 78 Posts
Mentioned: 0 Post(s)
Tagged: 2 Thread(s)
|
 This little sanding stone melted through those plastic rivets in seconds and the light came out clean. Just a suggestion. 😎 Sent from my SAMSUNG-SM-G900A using Tapatalk |

|

|
|
03-21-2017, 02:07 AM
|
#58 | |
|
Senior Member
Join Date: Apr 2013
Drives: GTS 86 auto
Location: Australia
Posts: 486
Thanks: 263
Thanked 127 Times in 99 Posts
Mentioned: 3 Post(s)
Tagged: 0 Thread(s)
|
Quote:
I have cut my dash-mat too. They always shrink and holes e.g. over the vents near the doors become misaligned. Now it is easy to slide the mat back over the holes from time to time. The centre cut will gap about 30mm eventually so cover with e.g. a strip of felt about 45mm wide.
__________________
GTS86 Auto (Australia)
|
|
|
|
|
|
04-09-2018, 11:24 PM
|
#59 |
|
Junior Member
Join Date: Apr 2018
Drives: 2014 Scion FR-S
Location: Charlotte, NC
Posts: 1
Thanks: 0
Thanked 0 Times in 0 Posts
Mentioned: 0 Post(s)
Tagged: 0 Thread(s)
|
What are the chances we can get the original first post pictures re-added to this post?
|
|
|
|
|
05-01-2018, 03:33 PM
|
#60 | |
|
Junior Member

Join Date: Dec 2017
Drives: 2017 GT86 Pro
Location: UK
Posts: 4
Thanks: 0
Thanked 5 Times in 2 Posts
Mentioned: 0 Post(s)
Tagged: 0 Thread(s)
|
Quote:
https://chrome.google.com/webstore/d...alioapbifiaedg It's a godsend for viewing the many amazing DIY posts in this forum. |
|
|
|
|
| The Following 4 Users Say Thank You to 86_dave For This Useful Post: |
|
05-26-2018, 11:11 PM
|
#61 |
|
Member
Join Date: Apr 2018
Drives: 2016 Subaru BRZ Limited MT
Location: Texas
Posts: 12
Thanks: 2
Thanked 7 Times in 5 Posts
Mentioned: 0 Post(s)
Tagged: 0 Thread(s)
|
I just got this out on my 2016 BRZ. At first I thought it was superglued to the entire deck but its just a little sticky on the foam pads and around the white pop clip holders. A panel removal tool like the one the OP used really helps. I used it to push one clip out from underneath the deck. I can confirm that it is possible to remove this without removing the C-pillar panels. You just pull the entire deck towards you and up. It might make it a little easier to remove those panels first but not absolutely necessary. After pulling the deck out I see so many areas for potential rattles that I plan to fix with some felt or speaker gasket foam tape, especially where the brake light meets the glass.
|
|
|
|
|
05-27-2018, 09:58 PM
|
#62 | |
|
Senior Member
Join Date: Apr 2013
Drives: GTS 86 auto
Location: Australia
Posts: 486
Thanks: 263
Thanked 127 Times in 99 Posts
Mentioned: 3 Post(s)
Tagged: 0 Thread(s)
|
Quote:
__________________
GTS86 Auto (Australia)
|
|
|
|
|
|
09-26-2018, 03:24 PM
|
#63 |
|
Junior Member
Join Date: Dec 2017
Drives: 2013 Scion FRS
Location: 205
Posts: 1
Thanks: 0
Thanked 0 Times in 0 Posts
Mentioned: 0 Post(s)
Tagged: 0 Thread(s)
|
FRS/BRZ/86 Front Grill Mods with Raptor
Has anyone ever installed the 3 yellow bulb Raptor style lights with their FRS/BRZ/ 86 front grill? Starting to wonder if this would look cool.. I've seen a few examples with the 4Runner mods: http://kustom54lighting.com/Morimoto...ts-_p_334.html
|
|
|
|
|
08-01-2020, 09:48 PM
|
#64 |
|
Be Kind

Join Date: Apr 2020
Drives: 2020 86
Location: MD
Posts: 1,077
Thanks: 5,152
Thanked 1,254 Times in 605 Posts
Mentioned: 6 Post(s)
Tagged: 0 Thread(s)
|
Dang. A lot of this was drastically overstated here lol.
You don't need to pull all of the panels to get the trim out. It's actually the four clips in the front and if you lay down and carefully look through some of the trunk holes, you can see the white clips and where they're located on the trim. Pop the light up, pop the trim up, everything comes out super easy. The center of the plastic welds work like center punches so a half inch drill bit makes super light work of those. And then putting it back, just make sure the white clips are lined up and straight. Again, you can lay on your back and look through some of the holes to see where the clip is and guide them in that way. The way this thread was written, I thought this would be a bit of an ordeal. In and out of the car in 20 minutes including the isopropyl wipe down and drilling. 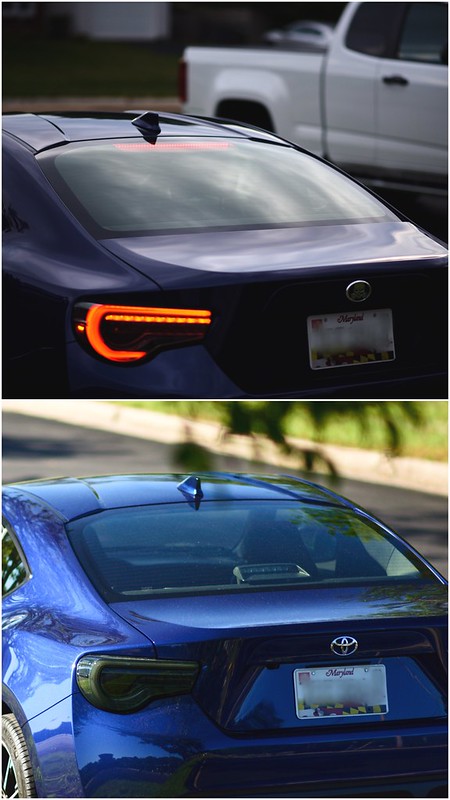
__________________
|
|
|
|
| The Following User Says Thank You to Wally86 For This Useful Post: | Spankopotomous (01-07-2021) |
|
|
|
|
|
| Thread Tools | Search this Thread |
|
|
 Similar Threads
|
||||
| Thread | Thread Starter | Forum | Replies | Last Post |
| Third brake light out? | Longhorn248 | BRZ First-Gen (2012+) -- General Topics | 21 | 11-23-2015 03:23 PM |
| How to remove third brake light (to tint back window) | 96z2 | Cosmetic Modification (Interior/Exterior/Lighting) | 10 | 06-07-2012 04:14 AM |
| The third brake light looks like a car! | Longhorn248 | BRZ First-Gen (2012+) -- General Topics | 12 | 06-06-2012 07:14 PM |
| FR-S Rear brake light... | MF_DEUCE | FR-S & 86 Photos, Videos, Wallpapers, Gallery Forum | 70 | 05-05-2011 03:53 PM |
| Secondary Rear Brake Caliper for drifting or parking brake?? (pics) | Axel | Scion FR-S / Toyota 86 GT86 General Forum | 20 | 02-25-2010 10:28 AM |


