05-31-2012, 02:12 AM
|
#1 |
|
NW Region Moderator
Join Date: Mar 2010
Drives: FR-S No More
Location: Portland OR
Posts: 5,156
Thanks: 1,134
Thanked 3,186 Times in 1,091 Posts
Mentioned: 300 Post(s)
Tagged: 4 Thread(s)
|
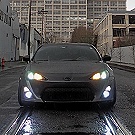
FR-S Debadging Tutorial
Easy to do, looks good.
 Before you begin, you need an FR-S with badges.  You also need: - window tinting hard squeegie - heat gun - lacquer thinner - cleaner and wax  Start by using the tint squeegie to work behind the emblem. The tool is plastic that won't scratch your clearcoat.  Once I got the Scion emblem off I realized there are holes behind it. Oops, I'll figure out a way to make this look good later.  Hit the leftover adhesive with the heat gun. Make sure you move it around so that you don't hurt your paint. You just need to get the adhesive warm.  Once the adhesive is warm you can peel it off with your fingers. There will still be a little bit of residue left.  Use lacquer thinner with a soft cloth to remove the residue without hurting your clearcoat. Don't scrub it, just get it wet and then use your finger to remove larger chunks.  Clean and wax the area. I didn't use paste wax because sometimes fresh paint needs to breathe and I'm not sure how long ago this car was painted. I'll apply real wax soon, though.  The finished product.
__________________
|

|

|
| The Following 13 Users Say Thank You to DarrenDriven For This Useful Post: | DrewIsAmus (02-01-2014), Enraged21 (04-07-2013), ESBjiujitsu (06-02-2012), Fly Guy (05-31-2012), Godzilla35 (05-31-2012), Got3n (09-27-2012), Karigan (07-26-2014), LeavingNormal (05-31-2012), M-17 (09-04-2013), r4m3n (05-31-2012), Scooby (05-31-2012), sinigang_guy (02-25-2013), sosick (03-14-2014) |
|
05-31-2012, 02:15 AM
|
#2 |
|
Addicted to cars

Join Date: May 2012
Drives: 2013 Whiteout FR-S AT
Location: Florida
Posts: 178
Thanks: 5
Thanked 83 Times in 24 Posts
Mentioned: 0 Post(s)
Tagged: 0 Thread(s)
|
Looking forward to seeing how you cover up those holes. If you come up with some way that looks clean I might do this too now that I have my FR-S badge off.
__________________
2009 370z (sold), 2011 Mustang v6 Premium (sold), 2013 FR-S [Whiteout](current)
|
|
|
|
|
05-31-2012, 02:17 AM
|
#3 |
|
NW Region Moderator
Join Date: Mar 2010
Drives: FR-S No More
Location: Portland OR
Posts: 5,156
Thanks: 1,134
Thanked 3,186 Times in 1,091 Posts
Mentioned: 300 Post(s)
Tagged: 4 Thread(s)
|
   
__________________
Last edited by DarrenDriven; 07-12-2012 at 11:27 PM. |
|
|
|
| The Following User Says Thank You to DarrenDriven For This Useful Post: | BabaYaga (09-26-2014) |
|
05-31-2012, 02:27 AM
|
#5 |
|
NW Region Moderator
Join Date: Mar 2010
Drives: FR-S No More
Location: Portland OR
Posts: 5,156
Thanks: 1,134
Thanked 3,186 Times in 1,091 Posts
Mentioned: 300 Post(s)
Tagged: 4 Thread(s)
|
Oooh, there is a DIY section? Oops, never saw it. Thanks!
__________________
|
|
|
|
|
05-31-2012, 03:16 AM
|
#6 |
|
Senior Member

Join Date: Apr 2012
Drives: Audi A5 Coupe
Location: Netherlands
Posts: 103
Thanks: 135
Thanked 29 Times in 22 Posts
Mentioned: 5 Post(s)
Tagged: 0 Thread(s)
|
Shouldn't be too hard or costly to have that little panel repainted (after filling the holes)
|
|
|
|
|
05-31-2012, 03:58 PM
|
#7 |
|
Senior Member
Join Date: May 2012
Drives: 2013 Scion FR-S Firestorm Red MT
Location: Charlotte, NC
Posts: 529
Thanks: 199
Thanked 219 Times in 103 Posts
Mentioned: 1 Post(s)
Tagged: 0 Thread(s)
|
Can't see the pictures while at work, but anyone know if the Toyota badges would completely cover/seal the alignment holes? I plan on doing this within the first month, debadging 'FR-S' and changing the front/rear Scion to the Toyota emblems instead.
Also, would the Prius badges fit on the FR-S? I like the newer-style with the blue glow in them, especially since I'm getting an Ultramarine this weekend! |
|
|
|
|
05-31-2012, 04:02 PM
|
#8 |
|
NW Region Moderator
Join Date: Mar 2010
Drives: FR-S No More
Location: Portland OR
Posts: 5,156
Thanks: 1,134
Thanked 3,186 Times in 1,091 Posts
Mentioned: 300 Post(s)
Tagged: 4 Thread(s)
|
Well, I know for sure that the JDM "T" badge from the Toyota 86 would fit perfectly. The "S" seems to be the same size as other "T" badges... so it should work. If I see a Prius today I will measure for you.
__________________
|
|
|
|
|
05-31-2012, 04:25 PM
|
#9 |
|
Re-member
Join Date: Nov 2011
Drives: Toyota camry
Location: S. Cali
Posts: 1,001
Thanks: 98
Thanked 292 Times in 152 Posts
Mentioned: 2 Post(s)
Tagged: 0 Thread(s)
|
I wonder if the lacquer thinner is too harsh for the paint. Ive used a product called goo gone (which may have lacquer thinner in it?) and had no problem with my paint for two plus years in S. CA sun. Use that heat gun carefully some heat guns will easily melt the paint completely off. Also I have used fishing wire and worked it back and forth under the emblem with good results. You can also paint the emblem with spray paint and put it back on if you want to mod your car and are annoyed with the holes.
__________________
Nothing decays like progress, and nothing preserves like neglect.
|
|
|
|
| The Following User Says Thank You to ahausheer For This Useful Post: | Synack (07-28-2012) |
|
05-31-2012, 04:46 PM
|
#10 |
|
NW Region Moderator
Join Date: Mar 2010
Drives: FR-S No More
Location: Portland OR
Posts: 5,156
Thanks: 1,134
Thanked 3,186 Times in 1,091 Posts
Mentioned: 300 Post(s)
Tagged: 4 Thread(s)
|
My buddy is a painter and he specifically instructed me to use lacquer thinner because it won't harm clearcoat. I'm no paint expert, but I used it and it didn't do any damage at all.
I did hit Goo Gone's website and it is safe for automotive paint finishes, so that seems to be another alternative to lacquer thinner. Fishing line is good, you could also use dental floss. And I agree that you should be careful with a heat gun... you can damage the clearcoat if you get it too hot. A hair dryer would also work because you just need the adhesive to be warm for it to be removed easier.
__________________
|
|
|
|
|
05-31-2012, 05:13 PM
|
#11 | |
|
That Guy
Join Date: Dec 2011
Drives: 2013 asphalt FRS MT
Location: Halifax, Nova Scotia
Posts: 4,865
Thanks: 5,058
Thanked 2,867 Times in 1,499 Posts
Mentioned: 82 Post(s)
Tagged: 1 Thread(s)
|
Quote:
|
|
|
|
|
|
05-31-2012, 06:12 PM
|
#12 |
|
Senior Member

Join Date: Mar 2011
Drives: FRS :D
Location: Vancouver BC
Posts: 2,985
Thanks: 545
Thanked 699 Times in 438 Posts
Mentioned: 18 Post(s)
Tagged: 0 Thread(s)
|
goo gone is car safe and works well getting rid of the left over sticky tape/glue as well
__________________
Out of the FRS game
|
|
|
|
|
05-31-2012, 06:15 PM
|
#13 |
|
Senior Member
Join Date: May 2011
Drives: Nissan GT-R
Location: SoCali
Posts: 436
Thanks: 425
Thanked 84 Times in 58 Posts
Mentioned: 3 Post(s)
Tagged: 1 Thread(s)
|
-Heatgun will be fine as long as you don't bake in the paint in one area for a long time, remember the paint / clearcoat is cured in heat. But, using a less harsh hairdrier and/or leaving the car in the sun will definitely help the process.
-If you're thinking about doing this... sooner the better as cars actually do get "tan" lines supposedly, although I've waited up to 1-2 years when de-badging with perfect results. -I would not use paint thinner or any harsh chemicals, especially on a brand new car. You can use Goo GONE, but PLEASE make sure you don't confuse this with GOOF off... completely different results (you won't like what happens). If you are patient and use your finger to rub off the glue / peel patiently, it's not so bad. NO DIGGING WITH NAILS. If you're impatient, than use goo gone or a citrus cleaner (better in my opinion but takes longer than goo gone). WD40 works too to help loosen the glue, but I think it makes it hard to "grip" it. -I use flat dental floss (you'll go through a few strands, because it will break) and a slow side-to-side sawing motion, with liberal heat applied. Again, sun is your friend getting the emblem off and getting the glue off... so take breaks and let it do the work for you. -don't pull or pry like Darren did (no offense) cuz that can definitely scratch / chip the clear / paint. 1) Spray down cracks / edges with a LOT of WD40 / Goo Gone / Citrus cleaner 2) let soak (in sun preferably) 3) cut pieces of floss (or fishing line if you fish for fish and have fishing line already for fish) 4) heat the emblem in circular motions (don't stay in one spot too long --- more important if you have a heatgun -- hair dryer has smaller margin of error) 5) careful, don't burn your hand off, and "saw" through the glue / double-sided tape trying to stay as close to the paint to help you get rid of residuals. Go slow to help reduce breakage of line/floss and to prevent marring. 6) CLEAN, (repeating soak / heat / wipe with microfiber), and detail / polish / wax / whatever to your heart's content. Optional, put Turbo logo to signify upgraded model that no one else has, or dares to race.... I have no idea why you did just check for holes before you did this, but I think I read somewhere the Toyota one should line up. I will wait, personally, for other cool options. I hope they make a roundel for the 86 logo like the one on the JDM steering wheel. |
|
|
|
| The Following User Says Thank You to Godzilla35 For This Useful Post: | RRnold (05-31-2012) |
|
05-31-2012, 06:21 PM
|
#14 |
|
First 86
Join Date: May 2012
Drives: 2013 Scion FR-S
Location: Lexington, KY
Posts: 303
Thanks: 14
Thanked 98 Times in 56 Posts
Mentioned: 0 Post(s)
Tagged: 0 Thread(s)
|
I've always just used 3M Adhesive Remover.
__________________
Scion First 86 in Lexington KY - Firestorm 6MT - Delivered May 17, 2012
Mods: Motegi 17x7 TrakLites, BFG Rivals, K&N 33-2300 Filter, Nameless Perf. Track Pipe, TRD springs & rear bar, Hotchkis front bar (eh), Kask trailer hitch |
|
|
|
| The Following 2 Users Say Thank You to MTeator For This Useful Post: | Godzilla35 (05-31-2012), Pekingduck (06-03-2012) |
|
|
|
|
 |
| Tags |
| teq emblem |
|
|
 Similar Threads
|
||||
| Thread | Thread Starter | Forum | Replies | Last Post |
| Debadging - How difficult will it be? | Dadhawk | Scion FR-S / Toyota 86 GT86 General Forum | 86 | 06-24-2014 10:49 PM |


 優雅
優雅