


|
||||||
| DIY (Do-It-Yourself) Guides For all DIYs. |
 |
|
|
Thread Tools | Search this Thread |
 05-12-2013, 10:55 PM
|
#1 |
|
Professional Smartass

Join Date: Jul 2012
Drives: White Out FRS
Location: Houston TX
Posts: 1,126
Thanks: 114
Thanked 610 Times in 308 Posts
Mentioned: 51 Post(s)
Tagged: 0 Thread(s)
|
DIY Backup camera for BeSpoke and 2014 Pioneer
Peek a boo!
I can confirm this works for the 2014 FRS pioneer head unit. Same exact pins, same exact connectors. 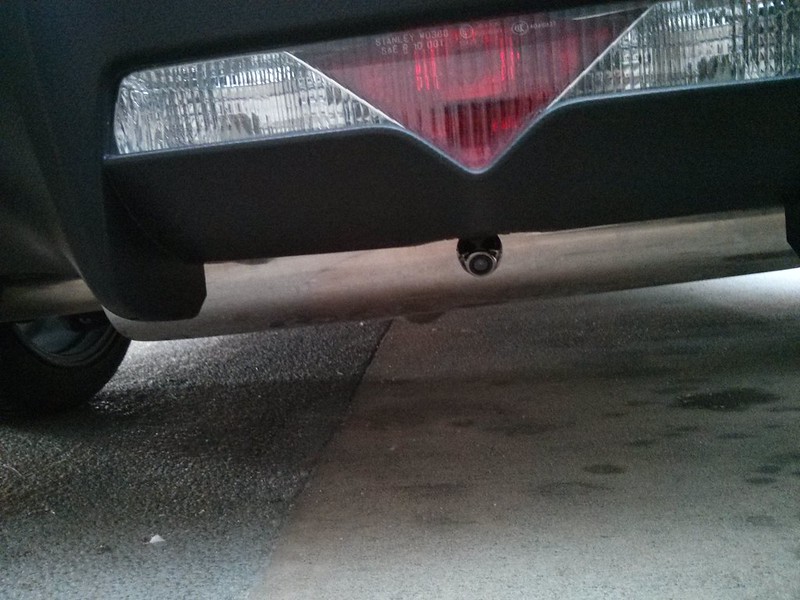 IMG_20130514_080343 by herzeleid435, on Flickr So you bought the BeSpoke upgrade for your FRS and you want a backup camera. Well guess what, you can install one for under $20 assuming you have the following things... Soldering Iron Electrical Tape 40 feet of stranded wire Tons of zip ties A weekend Things you will need to buy: This camera (or get a different one) [ame="http://www.amazon.com/Waterproof-Vehicle-Backup-High-definition-Viewing/dp/B005CTKYB4/ref=sr_1_2?ie=UTF8&qid=1368411381&sr=8-2&keywords=backup+camera"]Amazon.com: Waterproof Car Rear Vehicle Backup View Camera High-definition Cmos 170 Degree Viewing Angle E363: Electronics[/ame] What you're going to be doing is simple on paper, difficult to implement. Wire 1: The video wire has to go from the head unit, to the bumper. Wire 2: The trigger wire. This wire tells the head unit to go into reverse mode. You need to supply at least 12v, anything less and it won't work trust me. Wire 3: 12v to power the camera. This is the tricky part... So on paper you're probably thinking, I'll run the video wire to the bumper (wire 1), as well as the trigger wire (wire 2). I'll tap the reverse lights to do double work, power the camera, and trigger the head unit to go into reverse mode, no need to run wire 3. Wrong. This won't work. When the car is powering the reverse lights, along with the camera, it's under 12v and it won't trigger the headunit to go into reverse mode. I've tried everything to get this to work and it just refuses to work. Whenever I powered the camera separately it worked like a chime. So what do you need to do? Run 3 wires like I did. Maybe you can get it working with only 2 wires but after troubleshooting this for the better of an afternoon me and a friend gave up. So you're ready to get started. Pull off the dashboard trim. Start from the bottom and give it a yank. Start with the passenger side, then work the trim around the bespoke. 4 10mm screws and the BeSpoke is out of there. Disconnect all the adapters and grab the 28 pin connector on the drivers side. Top left one spot over from the end is empty. There is a red wire in spot 4. See photo below. The orange cable with the red arrow points to the trigger wire (Wire 2).  IMG_20130511_145706 copy by herzeleid435, on Flickr This wire you will run from the head unit back to the reverse light. You could also find the fuse location in the fuse box on the drivers side but I decided not to go that route. You can get by with a thicker gauge wire and simply shoving it into that slot, what I did is found the tiny little metal piece that these leads actually use and soldered it to the wire, I then opened the connector just enough to feed it through. It's not easy and don't recommend it for people who are unsure as you can open the connector too much and release all of the wires. Bad news bears. Now for the camera wires (wire 1). You will need to cut the end off the video wire included with the camera. Then solder stand offs similar to those found on motherboard connectors. I picked mine up at an electronics store. They are little black square plastic ends that the pins of the head unit insert into. Top right hand pin is video, bottom right hand pin is ground. This connection has no connector and is unused so you wont be plugging anything into it other than these 2 pins. 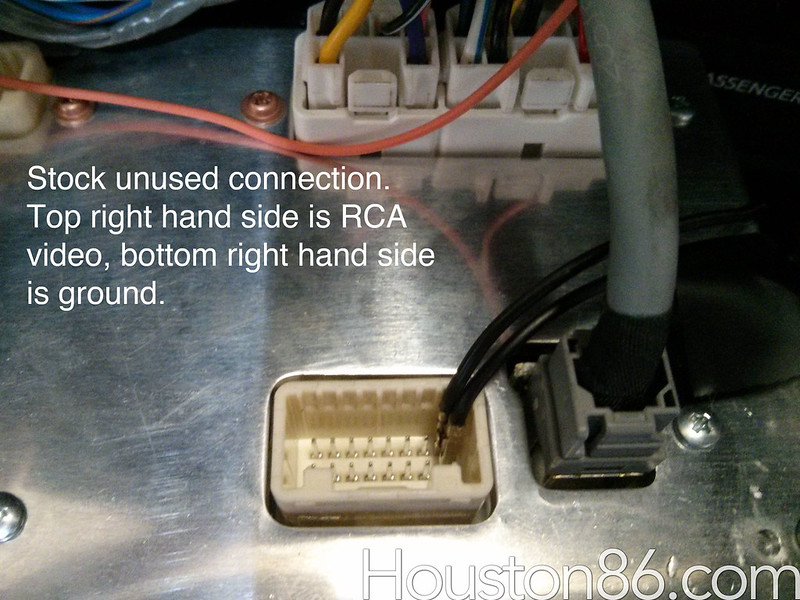 IMG_20130511_145717 copy by herzeleid435, on Flickr I sourced a 12v line from the fuse box that is only on when the car is on. I believe I used the 12v accessory power. Using an add a fuse run this wire to the head unit to join the other 2 wires going to the trunk. See I told you this wasn't going to be fun. Now for the fun part, run these three wires to the trunk. I ran mine through the glove box, down the kick panel, under the carpet, under the back seat, to the trunk. You will need to remove the weatherstripping, the rear wall panel, and the rear seat to do so. Now you need to get these wires outside. Taking everything out of the trunk I found a hole that feeds to a plug down the crash beam. See this photo for reference.  IMG_20130511_194447 copy by herzeleid435, on Flickr 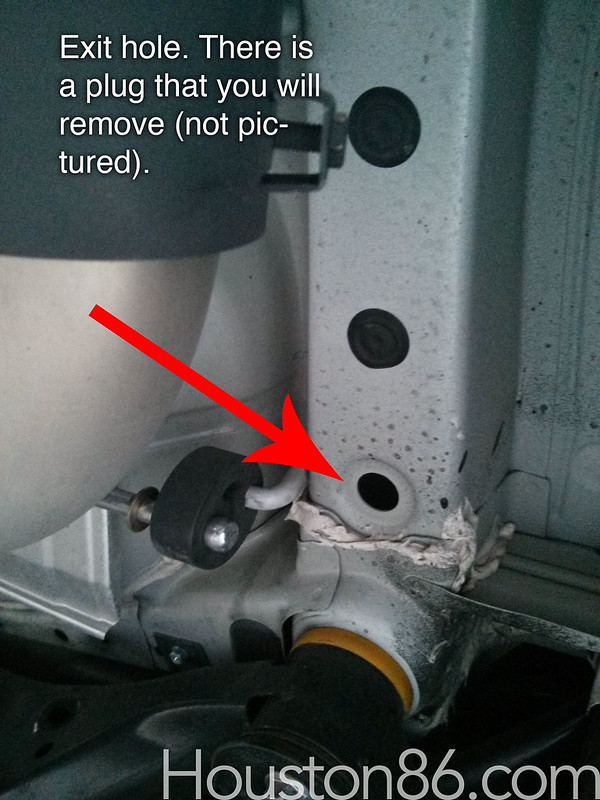 IMG_20130511_194459 copy by herzeleid435, on Flickr This is the plug, I cut a notch and fed the wires through it making it somewhat waterproof. 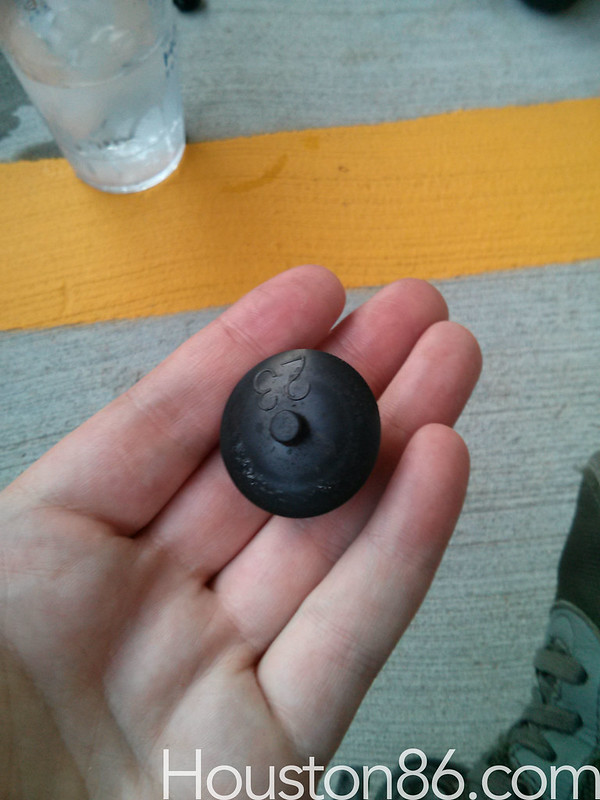 IMG_20130511_194507 copy by herzeleid435, on Flickr Now that the wires are under the car feed them behind the bumper, zip tie the crap out of them and make sure you use split loom and electrical tape. You're going to pull the passenger side bulb out of the reverse light and cut some of the black plastic shrink tube. Green wire is 12v, black is ground. Solder the trigger wire (wire 2) to green. Solder the ground from the camera power to the black wire. Solder the power wire for the camera to your 12v feed (wire 3). This will provide 12v to the camera at all times. I don't like this setup and will be adding a relay to the mix. Essentially the relay will kick on supplying that 12v fee (wire 3) to the camera the second the reverse lights kick on. This is so much more complicated that I wanted but will greatly increase the back up camera's lifetime. Now that you've got everything soldered and zip tied enjoy your stupid little backup camera. You'll be cursing yourself considering it was "only $15" for the stupid thing. 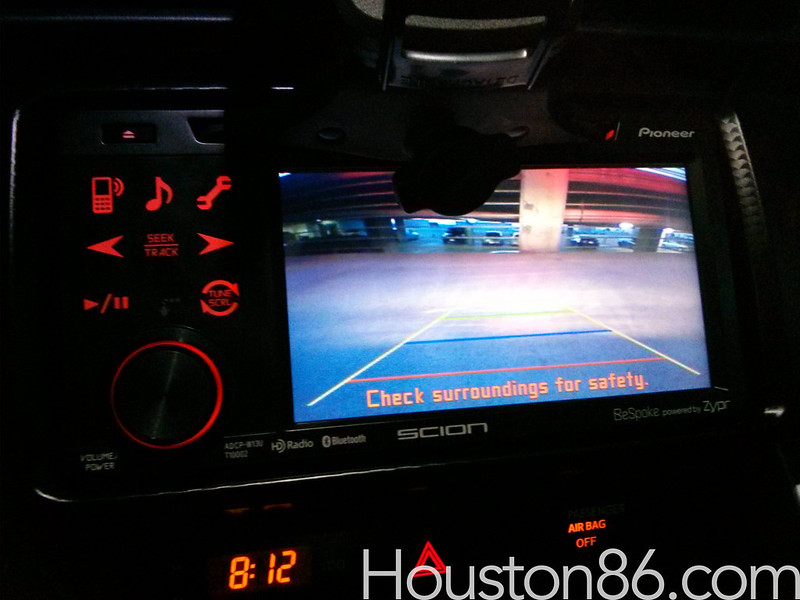 IMG_20130512_201241 copy by herzeleid435, on Flickr I mounted mine right below the lower fog light. You can mount yours wherever you like. Last edited by post_break; 12-24-2013 at 12:47 PM. |

|

|
| The Following 12 Users Say Thank You to post_break For This Useful Post: | continuecrushing (05-13-2013), draggin_az (05-12-2013), GT 86 Brah (05-12-2013), JimmyMac (05-14-2013), kthxbai (05-15-2013), Lanbaldo3 (06-09-2013), Lorico (06-22-2016), Mikem53 (06-09-2013), ML (05-14-2013), Ornelas66 (03-21-2015), Tama-Y (05-15-2013), Thesandlord (05-23-2013) |
|
05-12-2013, 10:58 PM
|
#2 |
|
u aware?

Join Date: Jan 2013
Drives: it like a turtle.
Location: New Orleans
Posts: 495
Thanks: 453
Thanked 318 Times in 160 Posts
Mentioned: 8 Post(s)
Tagged: 0 Thread(s)
|

|
|
|
|
|
05-13-2013, 01:06 PM
|
#3 |
|
Member
Join Date: Apr 2012
Drives: 2002 WRX
Location: Cincinnati, OH
Posts: 13
Thanks: 0
Thanked 6 Times in 5 Posts
Mentioned: 1 Post(s)
Tagged: 0 Thread(s)
|
That is really nice! Good job!
I wonder if how different this would be on a BRZ. |
|
|
|
|
05-13-2013, 01:45 PM
|
#4 | |
|
Senior Member

Join Date: Aug 2012
Drives: 2006 STi
Location: NYC
Posts: 589
Thanks: 495
Thanked 444 Times in 210 Posts
Mentioned: 40 Post(s)
Tagged: 0 Thread(s)
|
Quote:
__________________
|
|
|
|
|
|
05-13-2013, 02:00 PM
|
#5 |
Join Date: Mar 2013
Drives: 2013 Firestorm FRS
Location: Lake Elsinore, CA
Posts: 2,707
Thanks: 1,231
Thanked 2,144 Times in 1,003 Posts
Mentioned: 73 Post(s)
Tagged: 2 Thread(s)
|
Are you able to switch to the rear view camera while driving, or does it have to be in reverse?
Thanks for the write up, I knew there had to be a cheaper solution than buying a $70 harness adapter thing to use for this |
|
|
|
|
05-13-2013, 02:48 PM
|
#6 | |
|
Professional Smartass
Join Date: Jul 2012
Drives: White Out FRS
Location: Houston TX
Posts: 1,126
Thanks: 114
Thanked 610 Times in 308 Posts
Mentioned: 51 Post(s)
Tagged: 0 Thread(s)
|
Quote:
|
|
|
|
|
|
05-14-2013, 01:00 AM
|
#7 |
|
Senior Member

Join Date: Aug 2012
Drives: 2013 FR-S, 2016 Miata Club
Location: NC
Posts: 785
Thanks: 183
Thanked 258 Times in 171 Posts
Mentioned: 7 Post(s)
Tagged: 0 Thread(s)
|
Nice write up. I think I'm gonna install this on a switch. I'd like to put one on the front bumper too so that I don't run into any curbs while parking the car, hee hee.
|
|
|
|
|
05-14-2013, 09:14 AM
|
#8 | |
|
Professional Smartass
Join Date: Jul 2012
Drives: White Out FRS
Location: Houston TX
Posts: 1,126
Thanks: 114
Thanked 610 Times in 308 Posts
Mentioned: 51 Post(s)
Tagged: 0 Thread(s)
|
Quote:
|
|
|
|
|
|
05-14-2013, 05:10 PM
|
#9 | |
|
Senior Member
Join Date: Aug 2012
Drives: 2013 FR-S, 2016 Miata Club
Location: NC
Posts: 785
Thanks: 183
Thanked 258 Times in 171 Posts
Mentioned: 7 Post(s)
Tagged: 0 Thread(s)
|
Quote:

|
|
|
|
|
|
05-15-2013, 05:43 PM
|
#10 |
|
Addicted

Join Date: Jun 2012
Drives: 2013 Asphalt FR-S 6MT
Location: United States
Posts: 1,093
Thanks: 260
Thanked 261 Times in 175 Posts
Mentioned: 7 Post(s)
Tagged: 0 Thread(s)
|
definitely going to do this one. thanks
would it be difficult to put this on the trunk lid instead of on the bottom of the car or would wires be exposed?
__________________
Phantom Supercharger | Tsudo Cat-Back Exhaust | K&N Drop-in Filter | Winjet Headlights | Opti-coated | 35/20 Tint | Radar/Dashcam Hardwired | OFT tuned | OEM Audio+ Reference 400CF | Uber Sound Deadened | LED DRL strips | JPM Coachworks Kneepads
|
|
|
|
|
05-15-2013, 06:14 PM
|
#11 |
|
Senior Member
Join Date: Jun 2012
Drives: 2013 SWP BRZ Limited
Location: Long Island, NY
Posts: 204
Thanks: 64
Thanked 33 Times in 31 Posts
Mentioned: 1 Post(s)
Tagged: 0 Thread(s)
|
Someone do this for the BRZ!
|
|
|
|
|
05-15-2013, 08:46 PM
|
#12 | |
|
Member

Join Date: Dec 2012
Drives: SWP BRZ
Location: San Francisco/Santa Barbara
Posts: 54
Thanks: 14
Thanked 35 Times in 15 Posts
Mentioned: 0 Post(s)
Tagged: 0 Thread(s)
|
Quote:
|
|
|
|
|
| The Following User Says Thank You to Tony Mac For This Useful Post: | jmelgar23 (05-16-2013) |
|
05-16-2013, 10:22 AM
|
#13 | |
|
Senior Member
Join Date: Jun 2012
Drives: 2013 SWP BRZ Limited
Location: Long Island, NY
Posts: 204
Thanks: 64
Thanked 33 Times in 31 Posts
Mentioned: 1 Post(s)
Tagged: 0 Thread(s)
|
Quote:
 What part of NY you in? Maybe you can help out if I mess it up lol |
|
|
|
|
|
05-22-2013, 10:25 AM
|
#14 |
|
JDM Vaping Stance Nation

Join Date: May 2013
Drives: 2013 White
Location: FL
Posts: 710
Thanks: 647
Thanked 345 Times in 218 Posts
Mentioned: 14 Post(s)
Tagged: 2 Thread(s)
|
Do you have a picture of the 12v fuse line? The only wire I'm doubting myself on.
|
|
|
|
|
|
|
|
|
| Thread Tools | Search this Thread |
|
|
 Similar Threads
|
||||
| Thread | Thread Starter | Forum | Replies | Last Post |
| Scion FRS Bespoke Backup Camera, What do I need? | post_break | Electronics | Audio | NAV | Infotainment | 8 | 07-02-2016 09:55 PM |
| Kenwood CMOS-210 Backup Camera Install | TSY | Electronics | Audio | NAV | Infotainment | 34 | 12-10-2014 01:18 PM |
| Running Backup Camera Wire | Tony Mac | Electronics | Audio | NAV | Infotainment | 9 | 12-04-2013 11:28 PM |
| Beat-Sonic Backup Camera & Adapter for FR-S (Bespoke) & BRZ Special Price | Beat-Sonic | Audio/Visual, Electronics, Infotainment, NAV | 60 | 07-15-2013 03:58 PM |
| Backup Camera Help | husker741 | Electronics | Audio | NAV | Infotainment | 2 | 02-13-2013 01:04 AM |


 Betty
Betty


