


 06-02-2014, 11:50 PM
|
#575 | |
|
Member
Join Date: May 2014
Drives: 2010 MX-5
Location: SoCal
Posts: 93
Thanks: 24
Thanked 13 Times in 11 Posts
Mentioned: 10 Post(s)
Tagged: 0 Thread(s)
|
Quote:
Anyhow, at roughly $400 for the alternate solution (5.5kw motor and seadoo compressor) its hard to convince myself to start saving up. Best I could do is to design the rest of the system to support up-to 7kW and upgrade later (if needed). Also , I presume the 7~9psi figure for the eCycle is at the low end. As the engine starts breathing more towards the upper rpms , the boost will drop. |
|

|

|
|
06-03-2014, 12:09 AM
|
#576 | |
|
Senior Member

Join Date: Jan 2012
Drives: '13 GBS Subaru BRZ
Location: Minneapolis, MN
Posts: 2,030
Thanks: 680
Thanked 664 Times in 382 Posts
Mentioned: 26 Post(s)
Tagged: 1 Thread(s)
|
Quote:
__________________
-Fortes fortuna adiuvat (Fortune favors the bold)
|
|
|
|
|
|
06-03-2014, 12:45 PM
|
#577 | |
|
Member
Join Date: May 2014
Drives: 2010 MX-5
Location: SoCal
Posts: 93
Thanks: 24
Thanked 13 Times in 11 Posts
Mentioned: 10 Post(s)
Tagged: 0 Thread(s)
|
Quote:
1. Does it pause charging or disconnect the parallel connection once the series connection is activated / trolling motor started ? In originally intended funtionality, the trolling motor is only started once the outboard motor/alternator is turned off and the ignition/purple wire de-energizes. I guess my question is, can we continue to draw the current from battery back in series WHILE the batteries are being charged ? Also, in another similar product, I saw that there was a limit to how much max current can be drawn by the trolling motor in series .. It was something like 85AMPS. Will the MinnKota mind a huge current draw in our situation ? |
|
|
|
|
|
06-03-2014, 03:53 PM
|
#578 | |
|
Senior Member
Join Date: Jan 2012
Drives: '13 GBS Subaru BRZ
Location: Minneapolis, MN
Posts: 2,030
Thanks: 680
Thanked 664 Times in 382 Posts
Mentioned: 26 Post(s)
Tagged: 1 Thread(s)
|
Quote:
__________________
-Fortes fortuna adiuvat (Fortune favors the bold)
|
|
|
|
|
|
06-04-2014, 01:46 AM
|
#579 |
|
Member
Join Date: May 2014
Drives: 2010 MX-5
Location: SoCal
Posts: 93
Thanks: 24
Thanked 13 Times in 11 Posts
Mentioned: 10 Post(s)
Tagged: 0 Thread(s)
|
|
|
|
|
|
06-04-2014, 03:23 AM
|
#580 |
|
Member
Join Date: May 2014
Drives: 2010 MX-5
Location: SoCal
Posts: 93
Thanks: 24
Thanked 13 Times in 11 Posts
Mentioned: 10 Post(s)
Tagged: 0 Thread(s)
|
came across this ESC which has built in data logging of current, voltage, temperature, RPMs, power and throttle input. Sounds like a pretty good thing to have while setting up a new ESC system. Has a lot of programmable features like low V cut off, High temp cutoff, softstart etc. but I guess these are rather common.
http://www.offshoreelectrics.com/pro...d=hef-HBF1300L I wanted to log voltages of each battery in the bank to see how it drops and charges in various phases of the eSC operation. Some options are available but kind of Pricey. |
|
|
|
|
06-04-2014, 09:06 AM
|
#581 | ||
|
Senior Member
Join Date: Jan 2012
Drives: '13 GBS Subaru BRZ
Location: Minneapolis, MN
Posts: 2,030
Thanks: 680
Thanked 664 Times in 382 Posts
Mentioned: 26 Post(s)
Tagged: 1 Thread(s)
|
Quote:
Quote:
Edit: this is a marine version but I think the only difference is water cooling.
__________________
-Fortes fortuna adiuvat (Fortune favors the bold)
|
||
|
|
|
|
06-04-2014, 09:14 AM
|
#582 |
|
Senior Member
Join Date: Jan 2012
Drives: '13 GBS Subaru BRZ
Location: Minneapolis, MN
Posts: 2,030
Thanks: 680
Thanked 664 Times in 382 Posts
Mentioned: 26 Post(s)
Tagged: 1 Thread(s)
|
I finished machining the SeaDoo compressor yesterday. I'm very happy with the results the motor mount is very clean, and I will be able to test a variety of motors. Currently I should be able to fit any motor with a M4 x 30mm bolt pattern and 6mm or 8mm shafts.
I'll post pics later today.
__________________
-Fortes fortuna adiuvat (Fortune favors the bold)
|
|
|
|
|
06-04-2014, 12:29 PM
|
#583 |
|
Senior Member
Join Date: Jan 2012
Drives: '13 GBS Subaru BRZ
Location: Minneapolis, MN
Posts: 2,030
Thanks: 680
Thanked 664 Times in 382 Posts
Mentioned: 26 Post(s)
Tagged: 1 Thread(s)
|
Seadoo/Rotax Compressor Build
Here is the step by step build process for my modified Seadoo/Rotax Compressor. Please keep in mind this is a prototype I'm building for testing, and will probably change some as I find issues.
Step 1: Removing the bearing shaft. We did this with a bandsaw and then finished with a hacksaw because of the odd angle needed. 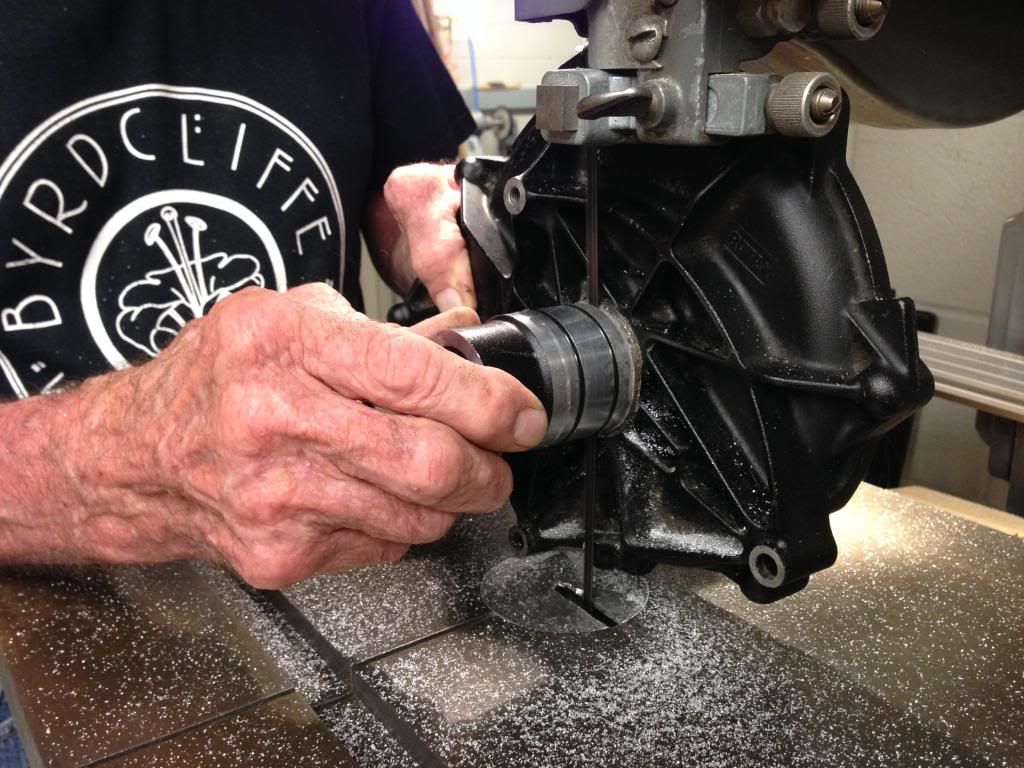 step 2: Milling the back flat. Clamping this in the mill is a little tricky because although the center surface is flat here are a couple of locating pins, and an exit section that protrude. I did this manually in the Mill so I don't have exact dimensions, but I would guess I took the back down by about 5mm. 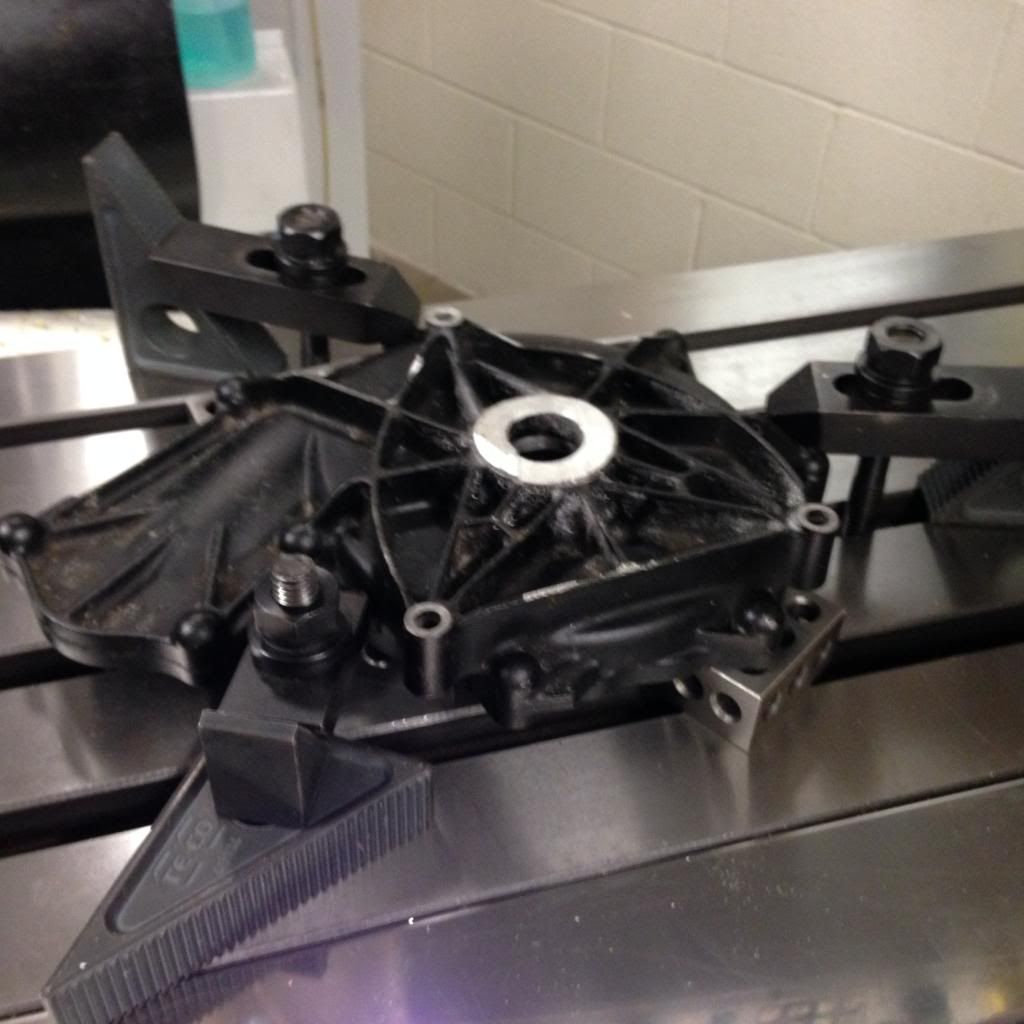 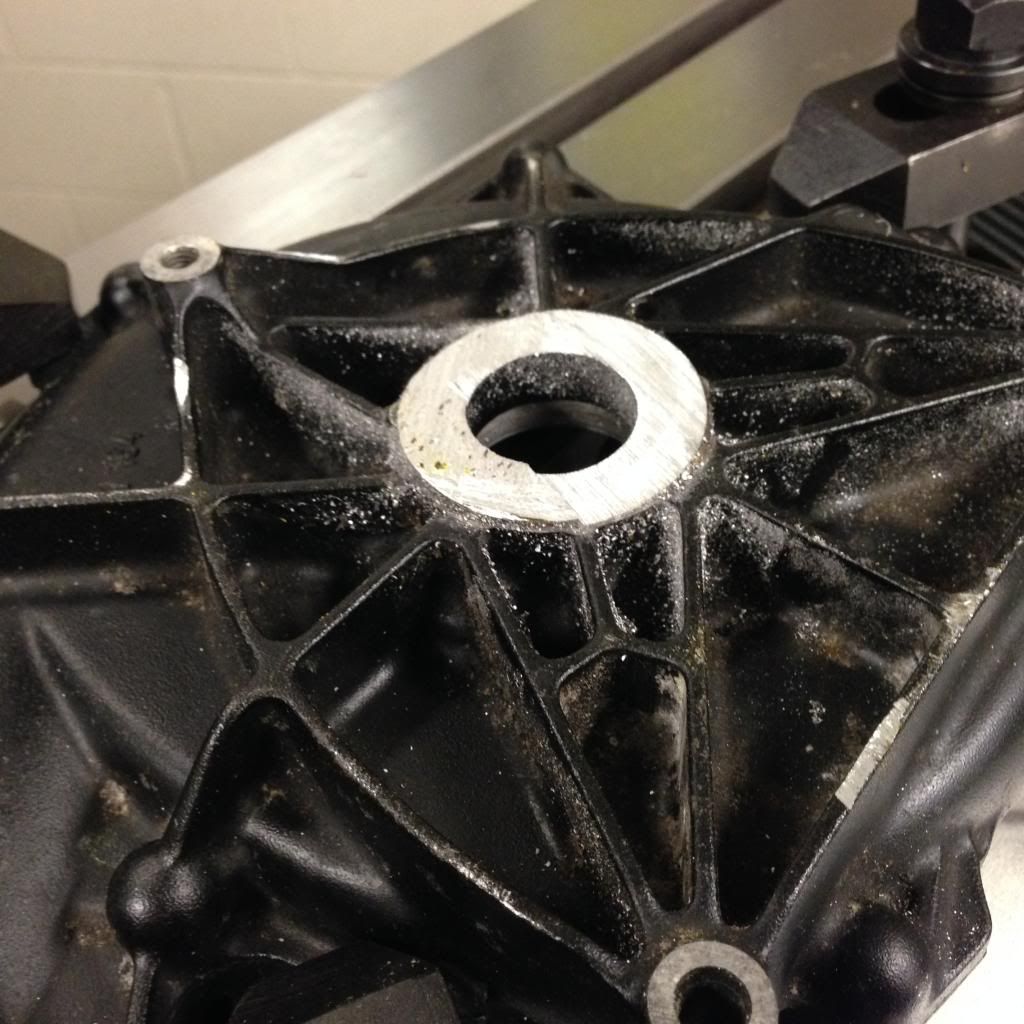 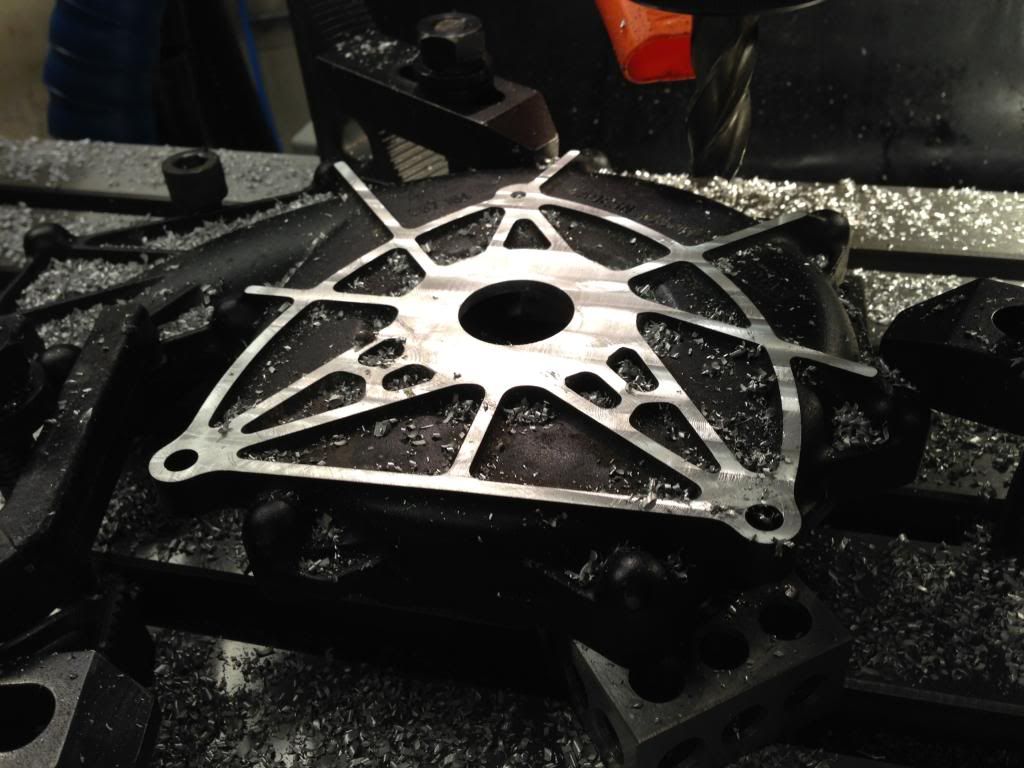 Step 3: Notching for the motor Mounting bolts. I'm setting this up for motors that use a 4mm x 4 in a 30mm bolt circle. The hole itself is 30mm so we ended up just putting 4mm notches in it. It's very important to have this centered so take your time. A good machinist with have the right tools for this and it should be pretty simple. 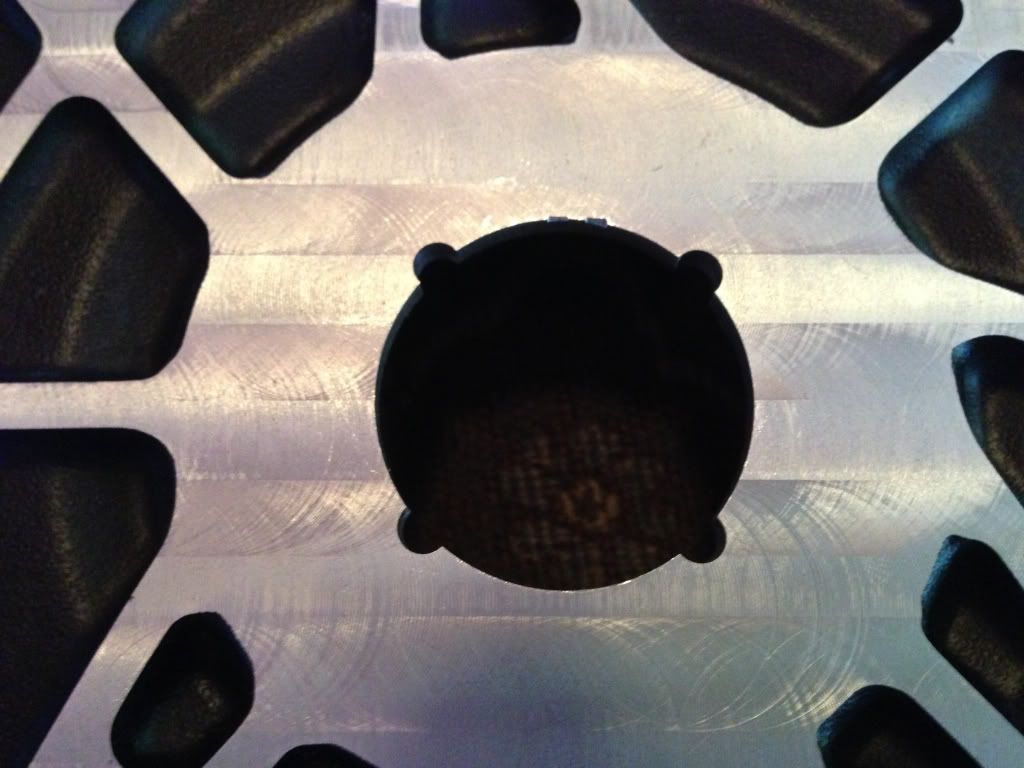  Step 4: (optional) Motor spacer. With some motors there may not be a flat mounting face or it may have addition mounting holes. We want to seal the compressor so I had to make a spacer for this purpose. It's 1/8" thick 1.5" diameter. and the center hole is 5/8". We did the basic shape in the lathe, and then the bolt circle on the mill. It's the same 30mm bolt circle as in the compressor housing. In this case we drilled #20 clearance holes. Ignore the 5 hole. This was an error on my part in not adding a tool offset on the mill. I just filled it with JB Weld rather then remaking the whole part. 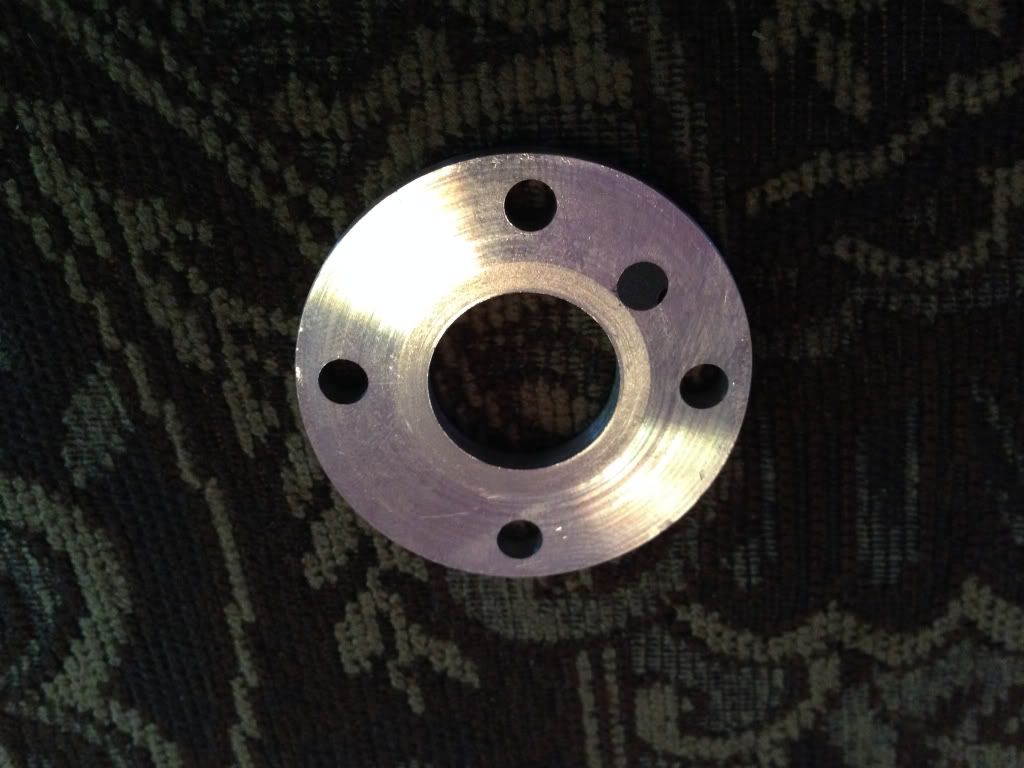 Next post assembly...
__________________
-Fortes fortuna adiuvat (Fortune favors the bold)
Last edited by neutron256; 06-04-2014 at 01:05 PM. |
|
|
|
|
06-04-2014, 12:54 PM
|
#584 |
|
Senior Member
Join Date: Jan 2012
Drives: '13 GBS Subaru BRZ
Location: Minneapolis, MN
Posts: 2,030
Thanks: 680
Thanked 664 Times in 382 Posts
Mentioned: 26 Post(s)
Tagged: 1 Thread(s)
|
Seadoo/Rotax Compressor Build (Assembly)
Assembling the Sedoo Compressor:
Step 1: Attaching the motor. This is pretty simple just four bolts, washers, and the spacer (if used) 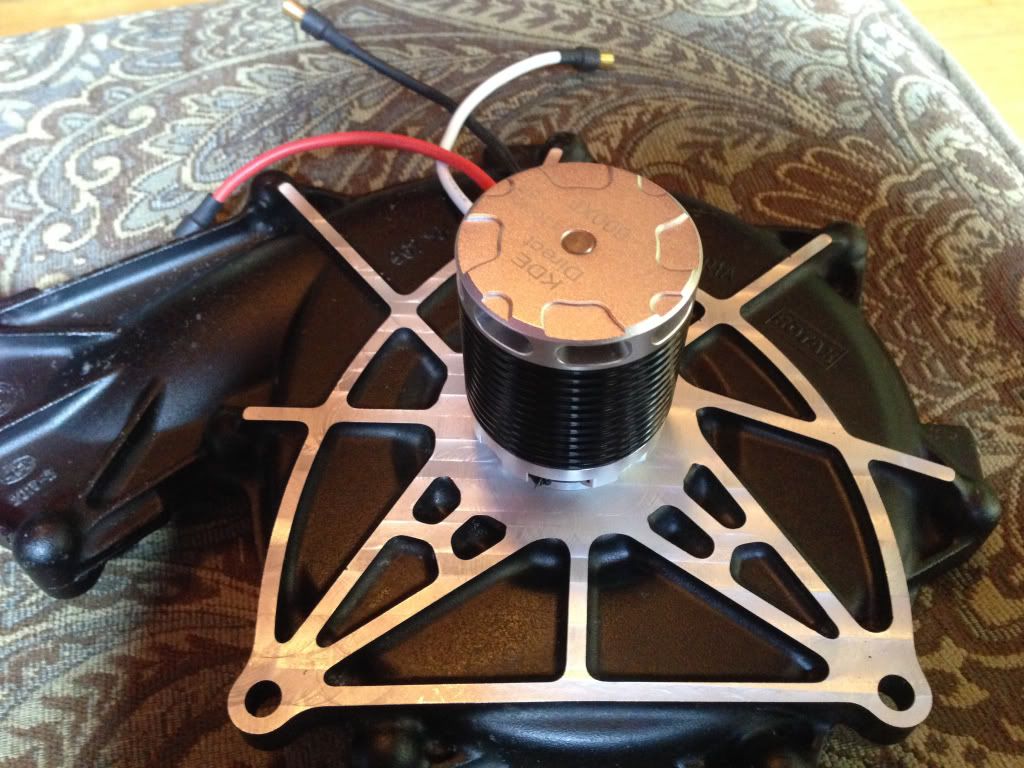   Step 2: Trimming the shaft. The shaft my be too long for the impeller wheel to sit at the correct height in the housing. I just did this by hand with a dremel cutoff wheel. I did this carefully in several steps. I actually went a tiny bit too far so I used a 5mm washer inside the collet to act as a shim. The height could also be adjusted by changing the thickness of the motor spacer. Step 3: Attaching the impeller. 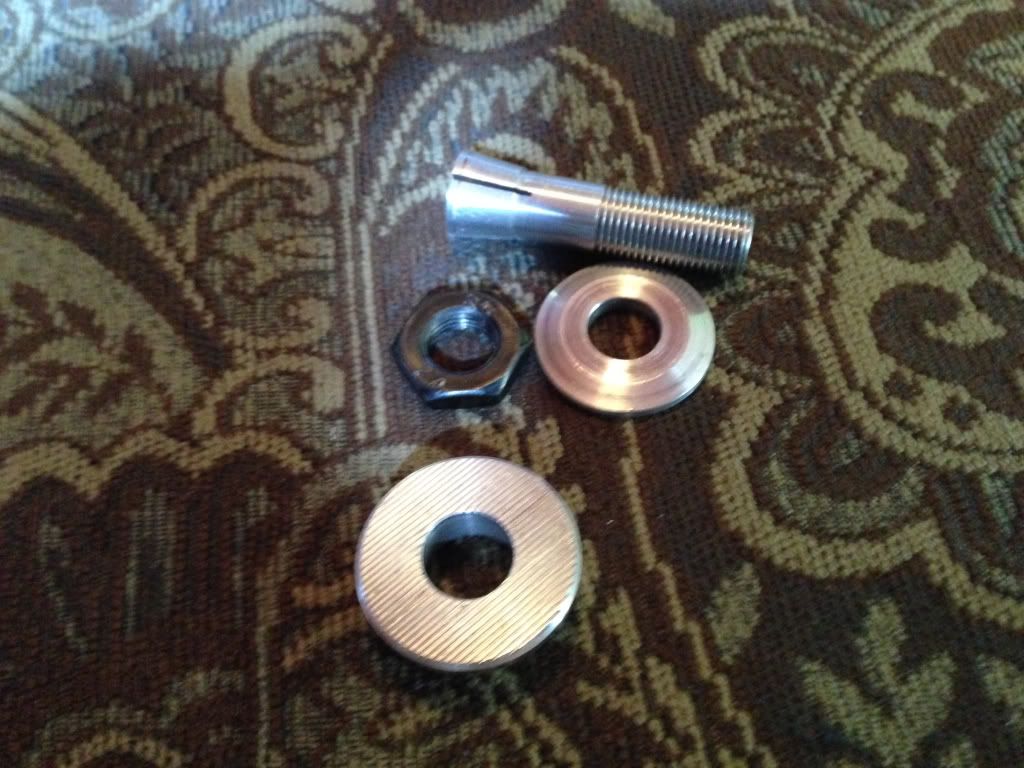 First the collet shank attaches to the motor shaft. 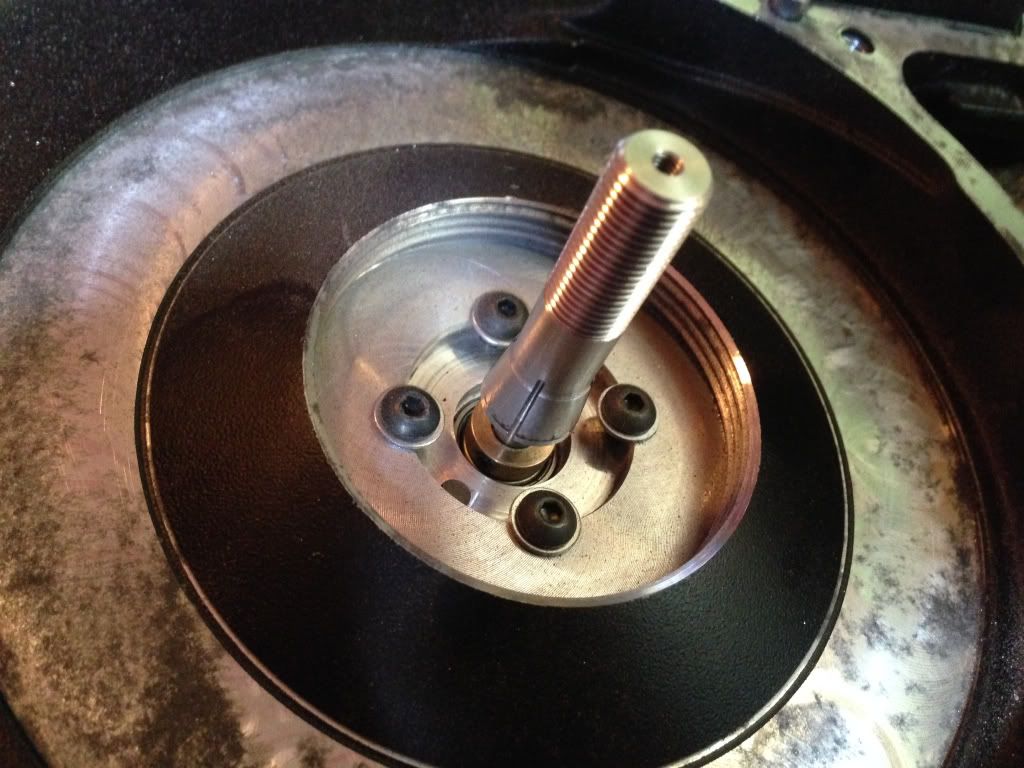 Then comes the compression ring 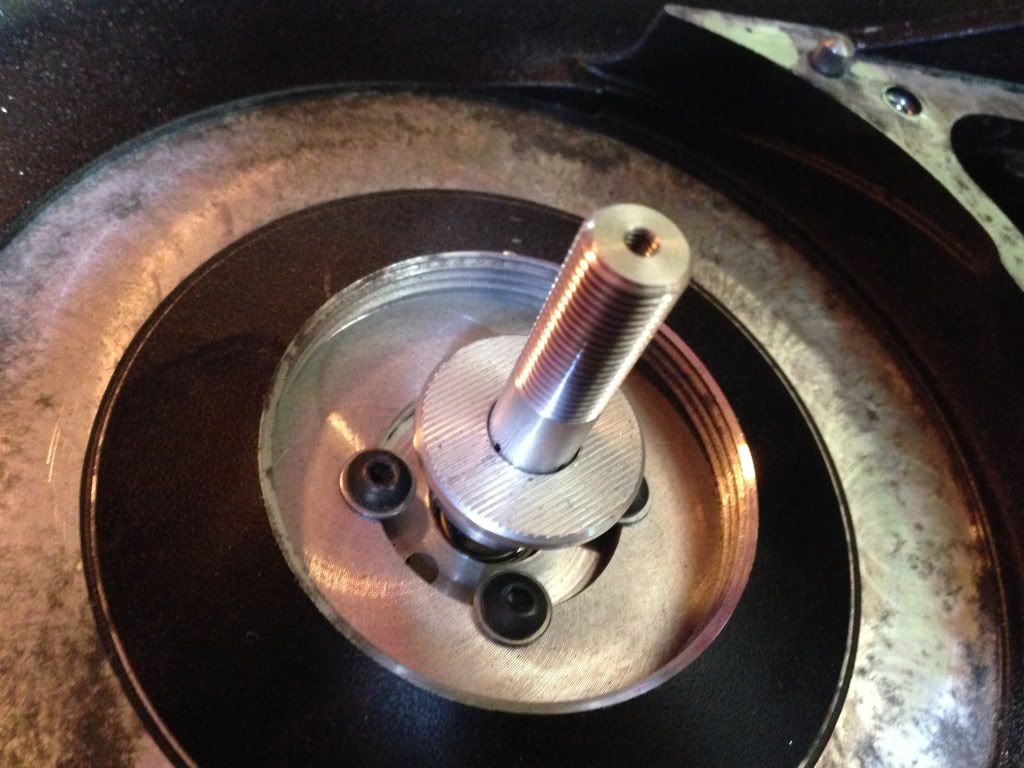 Next the impeller wheel. 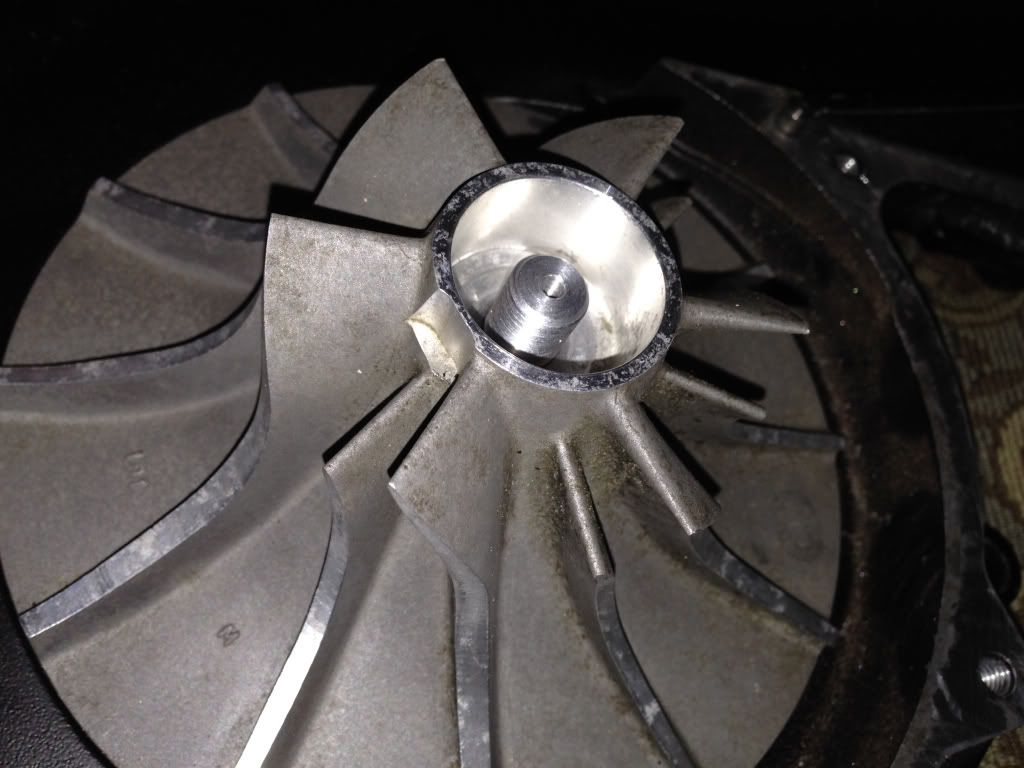 Then the washer. The washer provided with the adapter may or may not fit inside the end of the impeller wheel. I got lucky and this one did. Any good thick M10 washer should be fine. 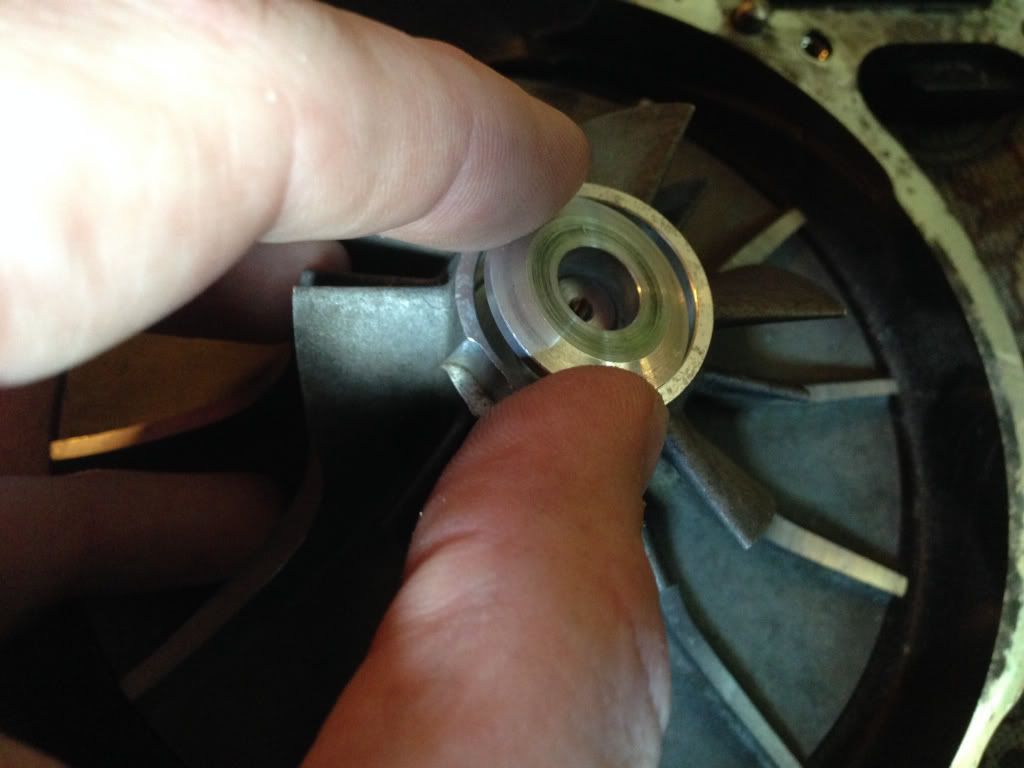 And lastly the nut. This is a right hand thread so it needs to be locked in place somehow or it will be loosened by the torque of the motor over time. I'll be using Loctite Red for this. 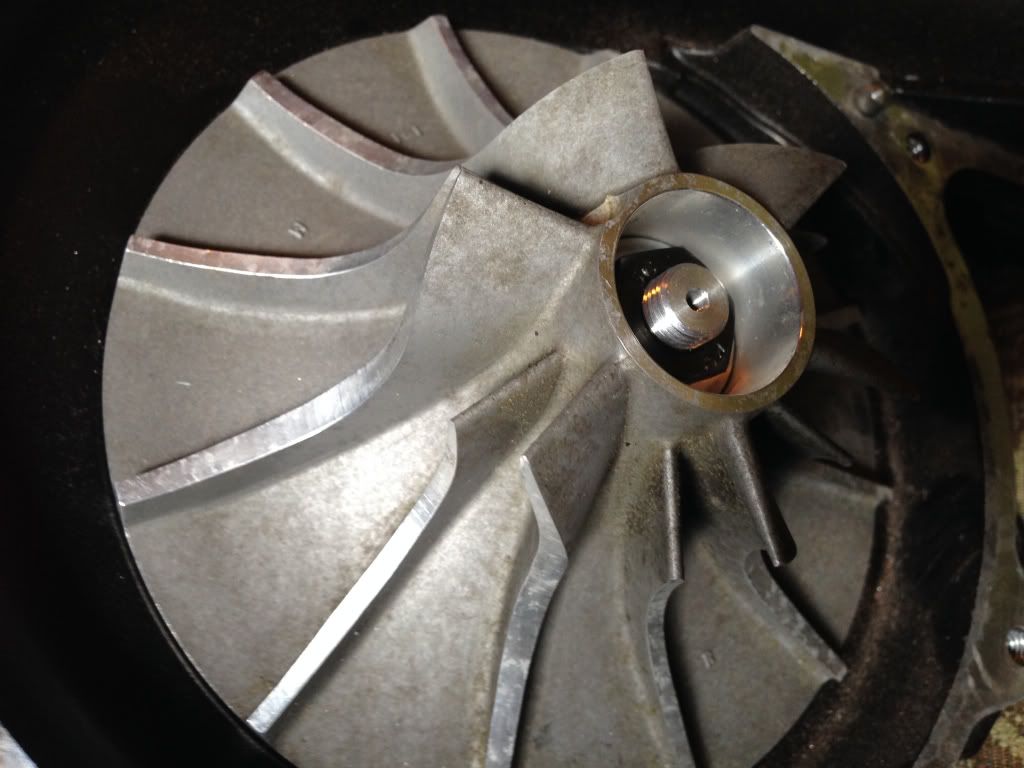 And there is the finished compressor I'll be doing some testing on this before I put the two housing pieces back together. When resealing the housing use a very thin bead of silicone gasket between the two halves.  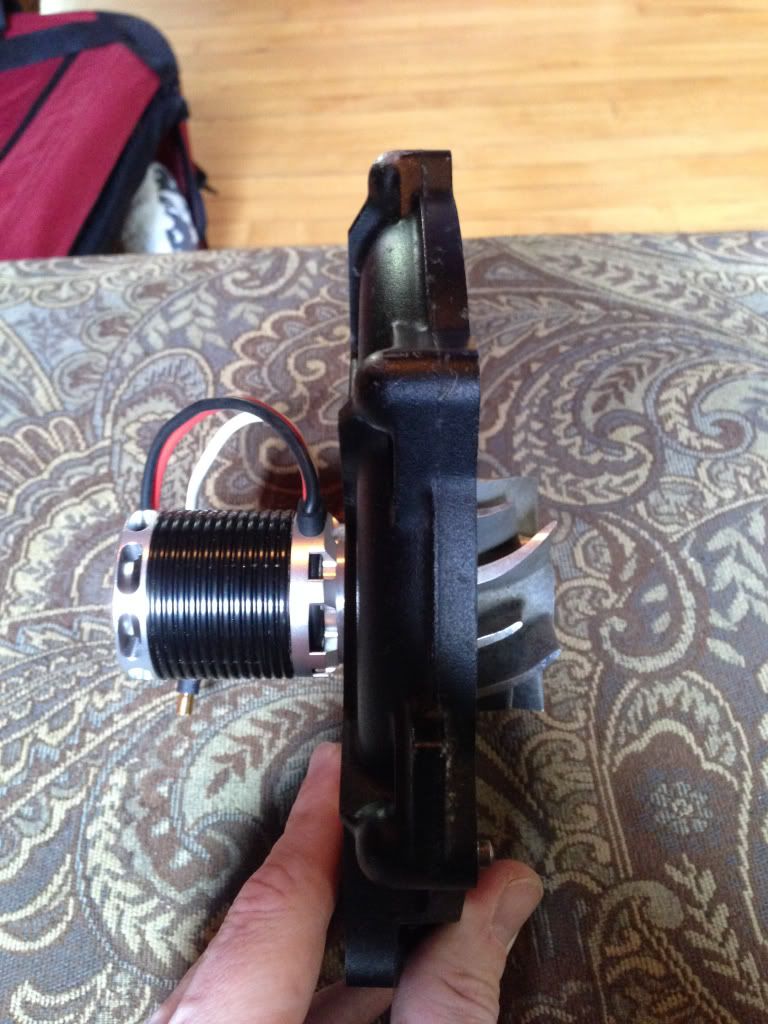
__________________
-Fortes fortuna adiuvat (Fortune favors the bold)
|
|
|
|
|
06-04-2014, 01:16 PM
|
#585 |
|
Member
Join Date: May 2014
Drives: 2010 MX-5
Location: SoCal
Posts: 93
Thanks: 24
Thanked 13 Times in 11 Posts
Mentioned: 10 Post(s)
Tagged: 0 Thread(s)
|
Nice work @neutron256. To me, with no experience with machining / machine shops, looks like a lot of work. Specially if you want to make sure everything is centered and just wont explode out of balance at 40k rpm.
On thing I noticed was that the holes in through which the motor is secured to the housind are more notches due to the larger opening in the housing (due to bearings I guess). Dont you think it will be better if you move the spacer that you made to the inside of the housing vs outside , like you have in the pictures. Or you might even make 2 spacers so that you can torque the motor to the housing a little higher. I will try to draw up something to make it clearer as to what I am suggesting. Last edited by AN; 06-04-2014 at 01:34 PM. |
|
|
|
| The Following User Says Thank You to AN For This Useful Post: | neutron256 (06-04-2014) |
|
06-04-2014, 01:24 PM
|
#586 | |
|
Senior Member
Join Date: Jan 2012
Drives: '13 GBS Subaru BRZ
Location: Minneapolis, MN
Posts: 2,030
Thanks: 680
Thanked 664 Times in 382 Posts
Mentioned: 26 Post(s)
Tagged: 1 Thread(s)
|
Quote:
I'm honestly not concerned, it's mounted very solid even with just having the notches. The opening in the compressor is 30mm and so is the bolt circle so since it's on an arc slightly more then 50% of the washer is in contact with the compressor housing. Edit: If you were hiring someone to do this from scratch, yes it would be a fair amount of work and I have no idea what they would charge. In reality though with these instructions at a well equipped shop with a good machinist it shouldn't take more then a few hours. Just knowing sizes and what tooling to use in advance saves a ton of time.
__________________
-Fortes fortuna adiuvat (Fortune favors the bold)
|
|
|
|
|
|
06-04-2014, 01:48 PM
|
#587 |
|
Member
Join Date: May 2014
Drives: 2010 MX-5
Location: SoCal
Posts: 93
Thanks: 24
Thanked 13 Times in 11 Posts
Mentioned: 10 Post(s)
Tagged: 0 Thread(s)
|
Also, is that KDE an out-runner motor ?
|
|
|
|
|
06-04-2014, 01:57 PM
|
#588 | |
|
Senior Member
Join Date: Jan 2012
Drives: '13 GBS Subaru BRZ
Location: Minneapolis, MN
Posts: 2,030
Thanks: 680
Thanked 664 Times in 382 Posts
Mentioned: 26 Post(s)
Tagged: 1 Thread(s)
|
Quote:
I'm also planning on testing my Aqustar T20 inrunner with this and see which performs better.
__________________
-Fortes fortuna adiuvat (Fortune favors the bold)
|
|
|
|
|
|
|
|
|
 |
| Tags |
| hairdyerperformance, only pulls hard one gear |
|
|
 Similar Threads
|
||||
| Thread | Thread Starter | Forum | Replies | Last Post |
| Full throttle Electric Supercharger Build Thread | fenton | Forced Induction | 11295 | 02-19-2024 03:42 PM |
| DUP THREAD MODZ PLZ DELETE KTHX | SloS14 | Forced Induction | 0 | 07-09-2013 05:41 PM |
| Electric Turbocharger | Shankenstein | Forced Induction | 91 | 06-24-2013 02:47 PM |
| Electric 86 | frosty86 | Scion FR-S / Toyota 86 GT86 General Forum | 8 | 11-10-2012 02:16 PM |
| WRX Electric turbo | Neilus | Engine, Exhaust, Transmission | 42 | 05-03-2012 09:20 PM |


