


 03-30-2013, 04:06 AM
|
#1 |
Join Date: Mar 2013
Drives: 2013 Firestorm FRS
Location: Lake Elsinore, CA
Posts: 2,707
Thanks: 1,231
Thanked 2,144 Times in 1,003 Posts
Mentioned: 73 Post(s)
Tagged: 2 Thread(s)
|
DIY: Wrapping Sun Visors
Hey guys and gals,
Follow along to see how you can wrap your sun visors in a fabric/material of your choice. My main reason for doing this was to remove the airbag sticker. I was able to successfully remove the sticker from my drivers side visor, but I tore the passenger side visor a little bit in the process of sticker removal, so I decided to just wrap the visors in new material. Also, removing the airbag sticker still left a rectangle of where it had originally been, so this was better for me in the long run. *UPDATE*-This is a step by step for the FRS, the BRZ has lights in the mirror, so at this time I do not know how the lights/wiring is affected by this, or what extra precaustions you would need to take because of this. When I can get my hands on BRZ visors, I will be sure to include those steps/tips. As always, proceed at your own risk, as I am not responsible for damages/injury's/etc. Proceed at your own risk! Materials needed: Screwdriver (Phillips and Flathead) Scissors Box cutter/utility knife/xacto knife/something sharp Adhesive Spray Hot Glue Gun Material for wrap -Should be fairly flexible -Should be thin, as thicker material will be more difficult to form/mold to visor as well as make it more difficult to put pieces back together. -I used faux micro suede from Joann's. It was $12.99 for 1 yard, which provides enough material to do probably 4 full visors(at least) so don't freak if you mess up. -They have HUNDREDS of different materials/colors/fabrics/etc, so if you wanna be a little different and throw some wild colors/patterns in there go for it. -To keep costs low, avoid bringing your wife/gf to Joann's. My $25 dollar trip went from, well $25, to like $75, because my wife found some other things there we "needed". Don't say I didn't warn you. -Also, if you are thinking about throwing red stitching into your ebrake boot, pick up that thread now while you're at the store. First, this is what you start with(well, mine is missing the airbag sticker-Note that you can still see where it was!) 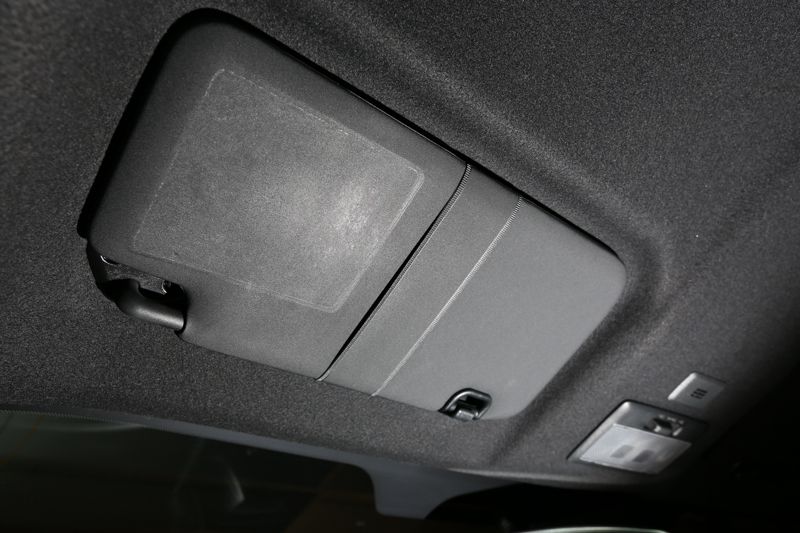 This is what you want/end result: 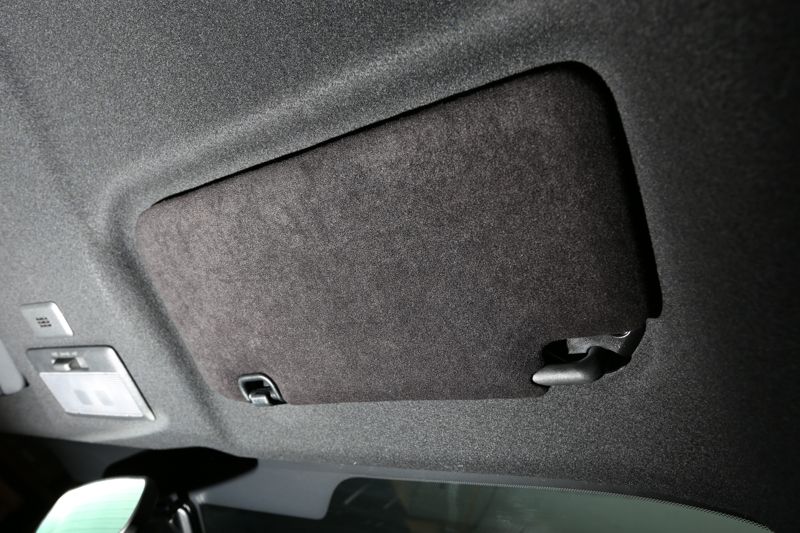 Start by using Phillips screwdriver to remove two screws 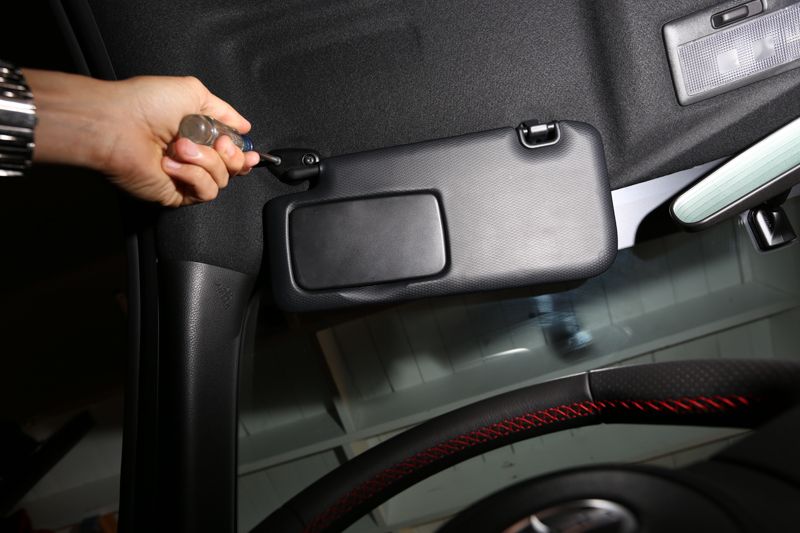 Pull on Bracket, with a pull/twist motion. This is hard to remove, but if you pull and twist, you will find a spot where it starts to pull out. 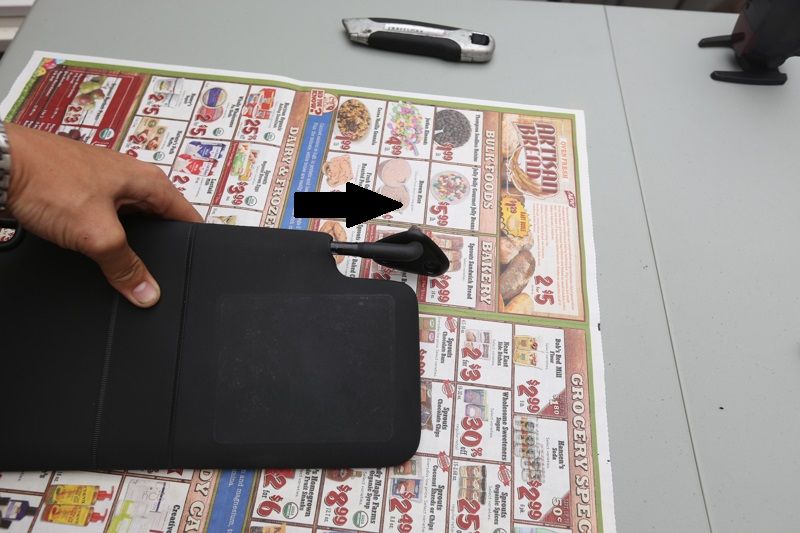 Next, use Flathead to "pop" the plastic clip off. Start where the photo shows, and it should come apart. 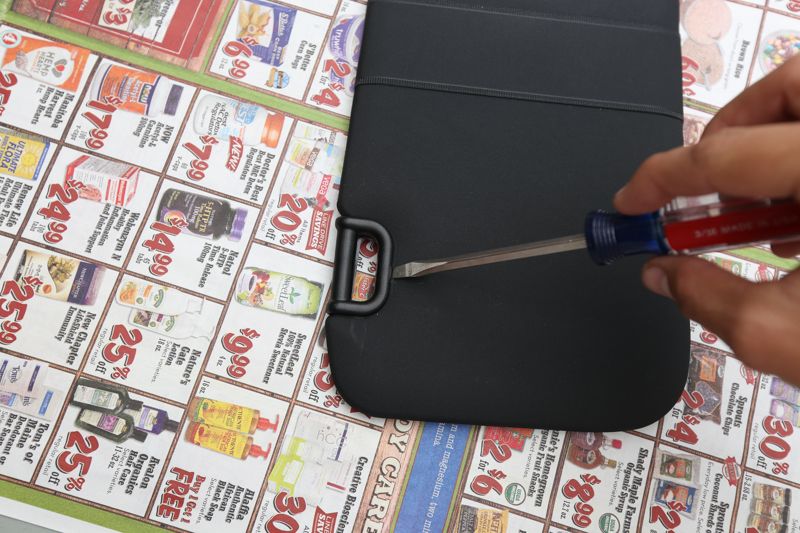 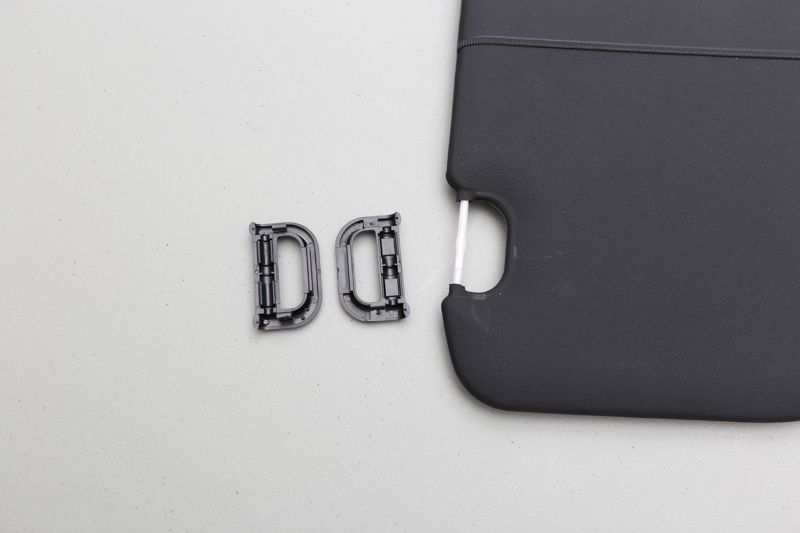 Next is the vanity mirror. It is held in by two clips(2) on the top half, that will separate when pulled enough. The clips are attached to the mirror, on the edge closest to the hinge. Flex the visor until you can get a finger in to start pulling. The parts circled in red are where the clips are. Do not pull from the bottom part, as there are plastic tabs you could break. 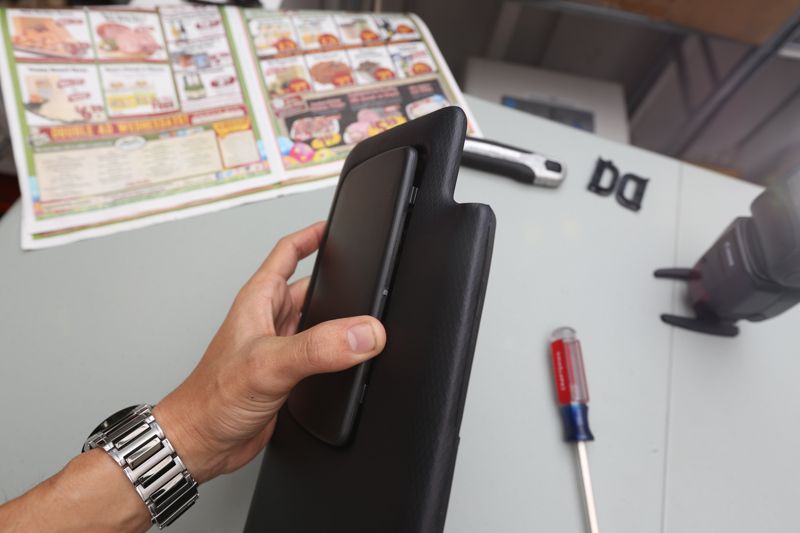 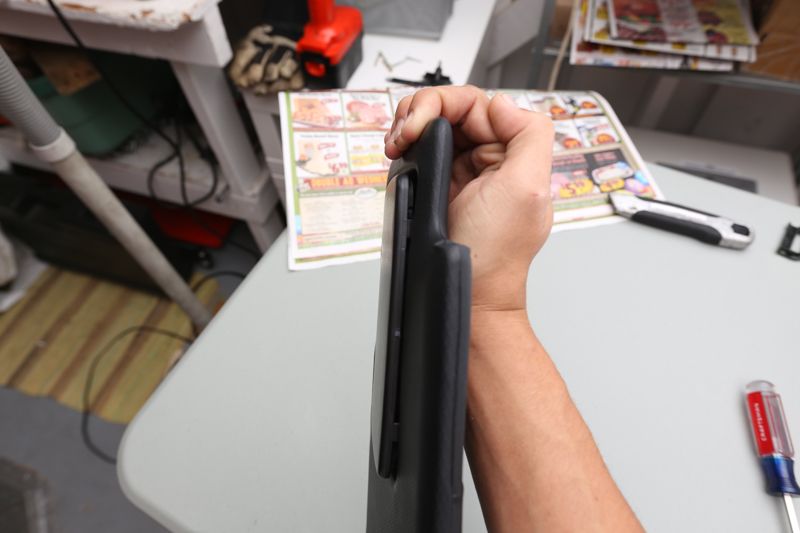 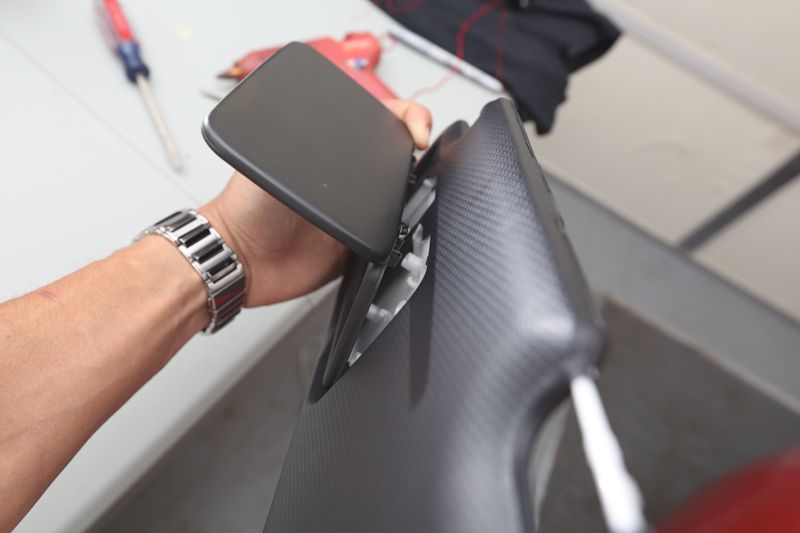 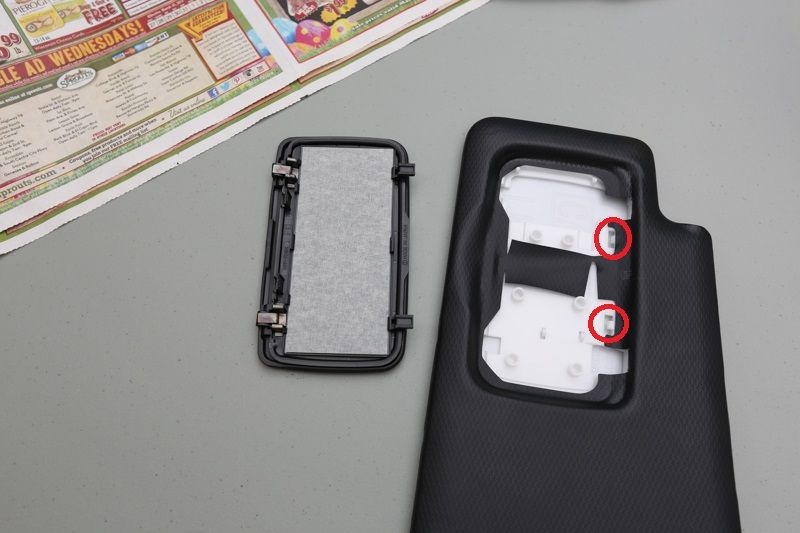 Now, use a box cutter/knife to cut along the edge in red. Pull plastic visor out. Stop here if you're looking for the ultimate 4 gram weight reduction jkjk. 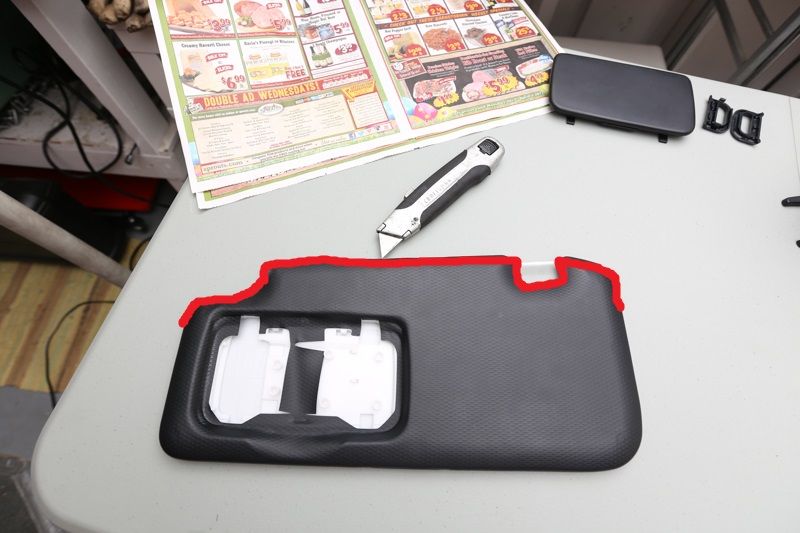 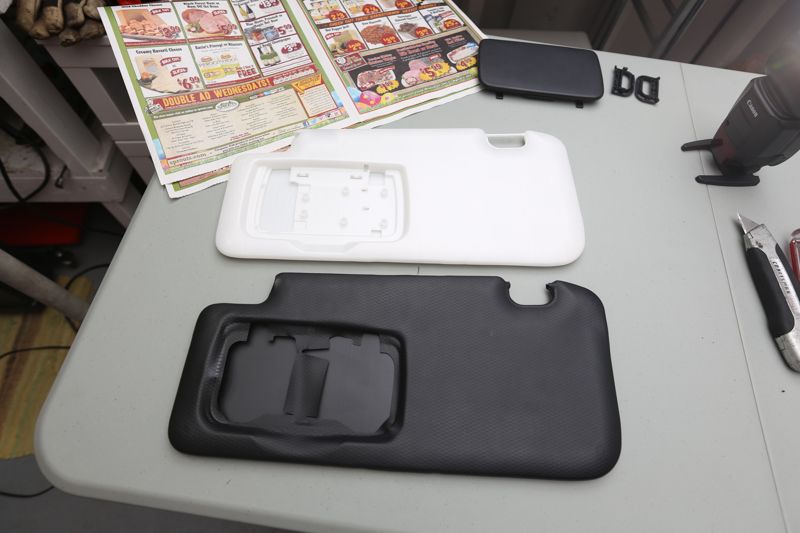 Start to pop the visor apart/separate the two halves 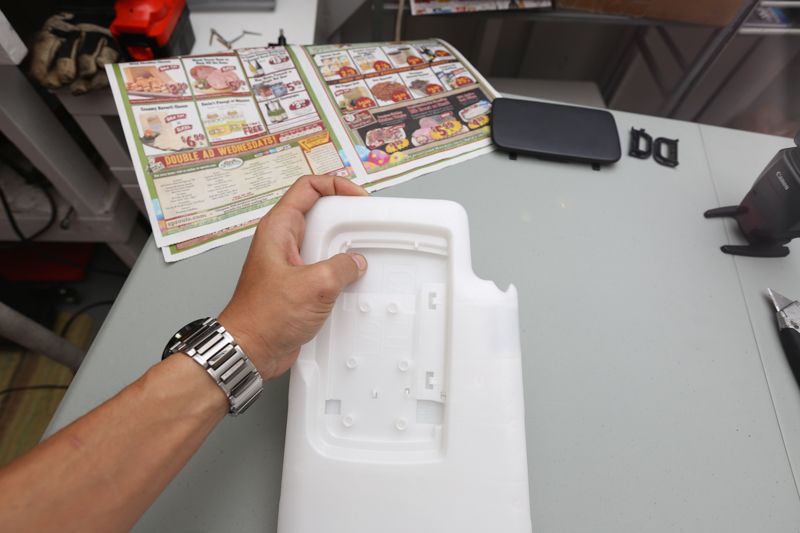 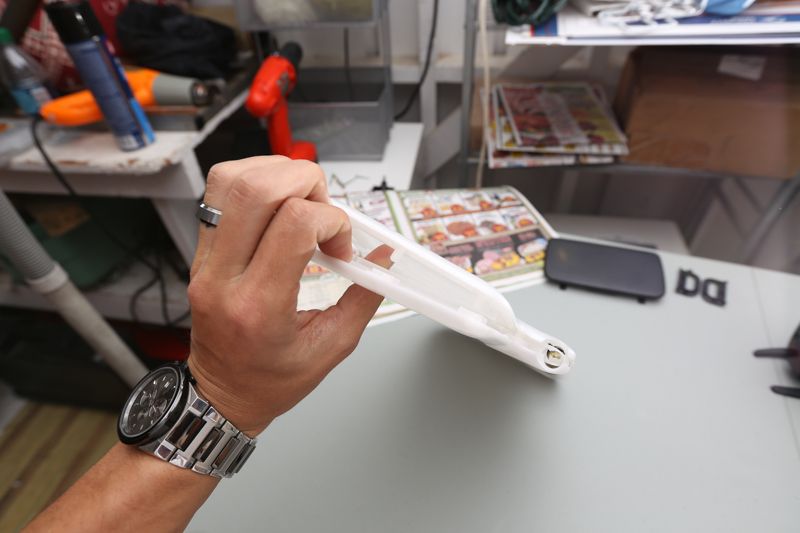 Remove metal tab 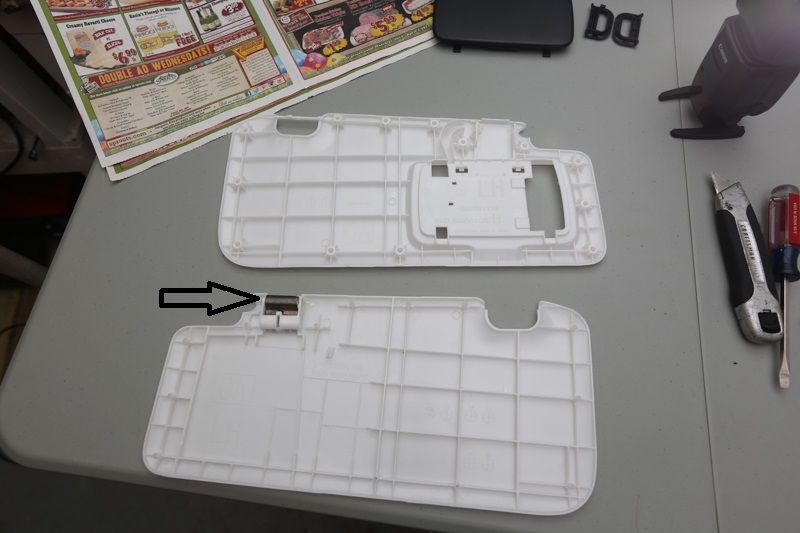 Next, lay plain(side without vanity mirror cutout) on your choice material, and trace a line with a pen(I used silver sharpie). Give yourself about 1-1.5" around EVERY edge. 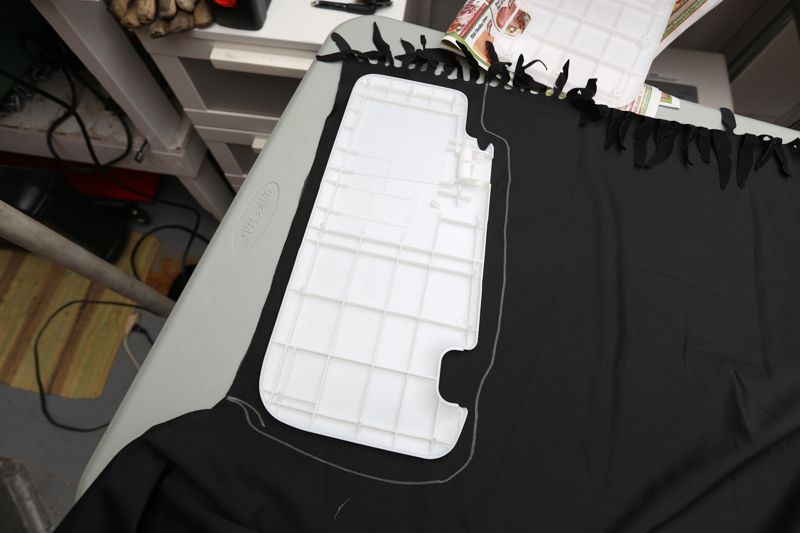 Spray 1-3 coats of spray adhesive. Be sure to cover car/exposed things near by to prevent getting adhesive on anything else. Follow directions on spray can, mine instructed to allow 1 min or so for the glue to become tacky. 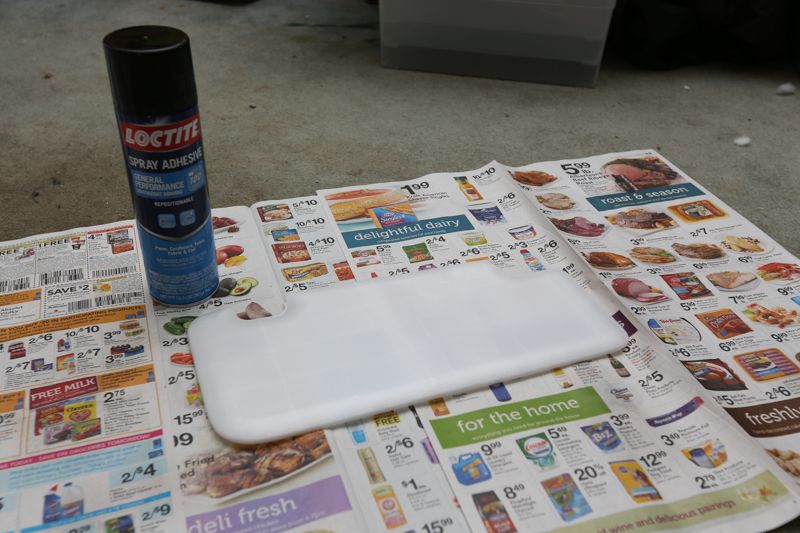 Place visor on material. Make sure you dont have the material backward! IE. The microsuede I was using had a "front" side/side with the microsuede.  Flip over, and make sure to get rid of any wrinkles. The glue does not set immediately, but its best to not re-position the material a bunch of times. 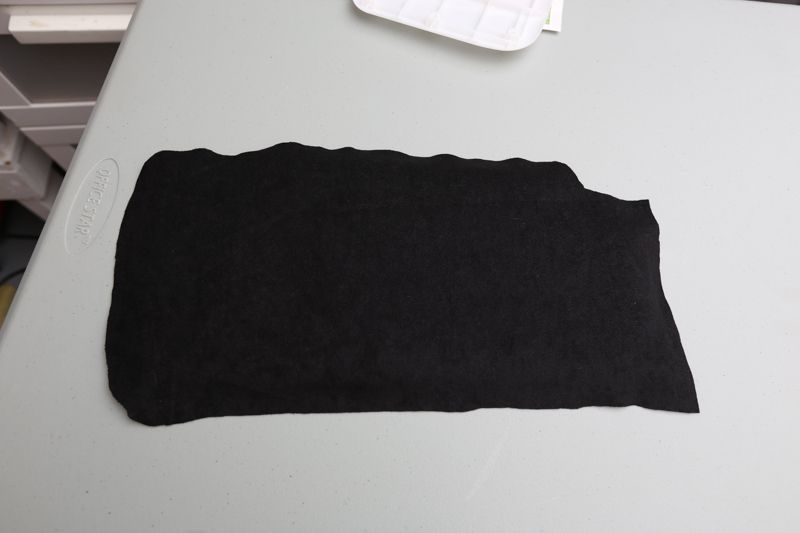 Pick up the visor, and smooth the edges out as well. Make sure to pay attention to where the hinge/attachment goes and the clip. It doesnt need to stay perfectly, but it needs to be semi-attached/formed to the edge. 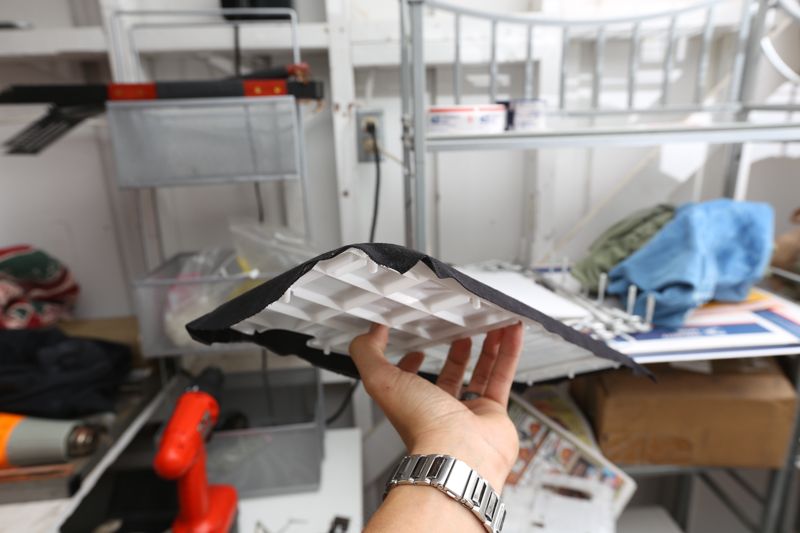  Trim the edges of your material, so you are left with about a 1/4" overlap when folded over. You dont need to trim all edges at once, you can do small area's at a time if you are more comfortable. 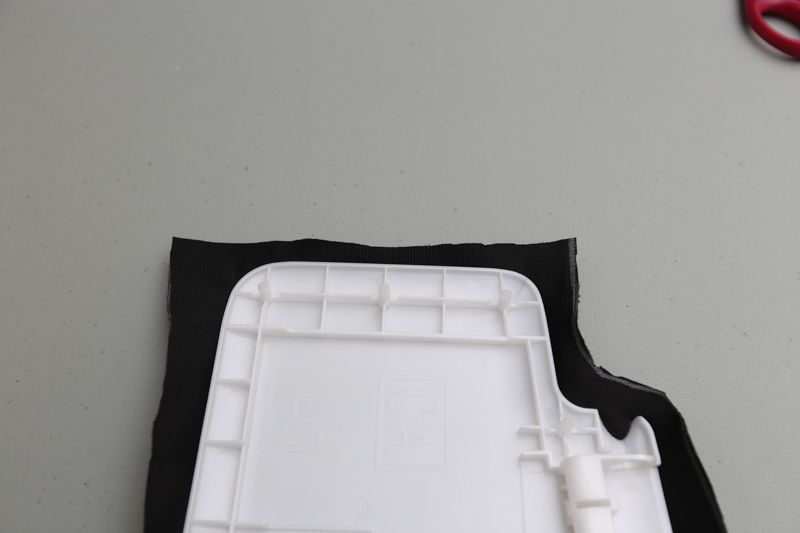 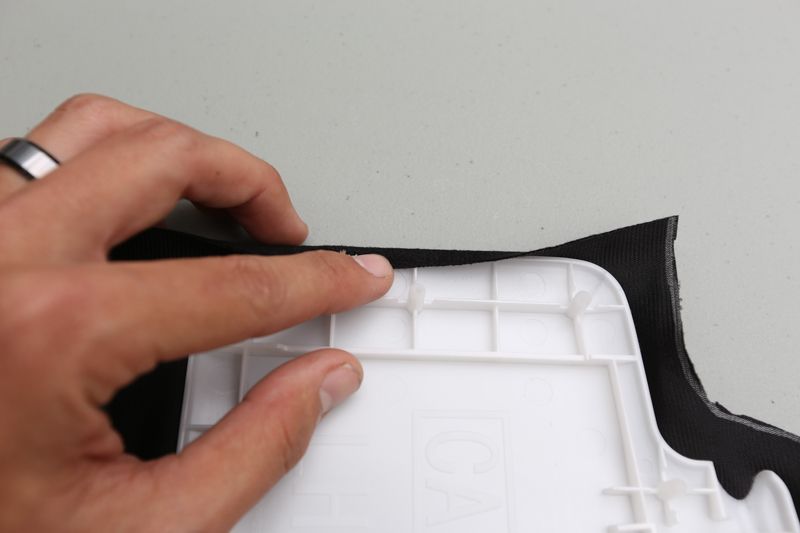 Apply hot glue to small edge pieces at a time, and press material into glue. Take your time, and ensure the glued edge looks good and has no wrinkles. 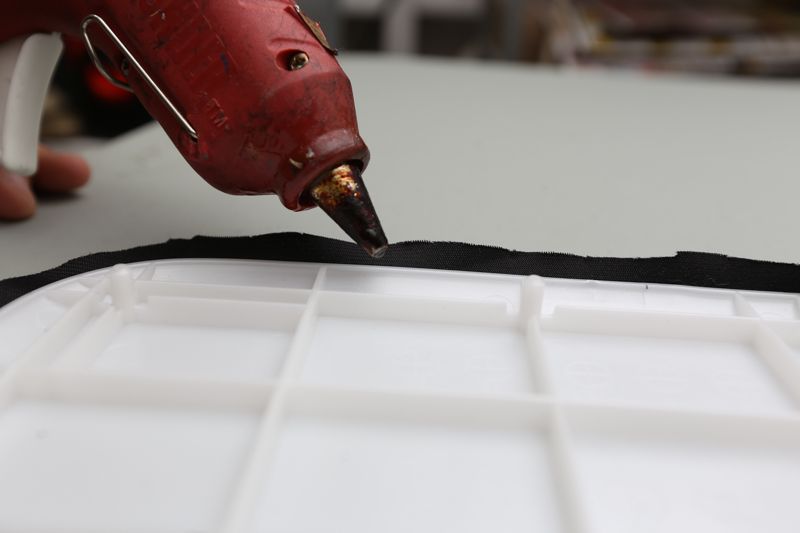 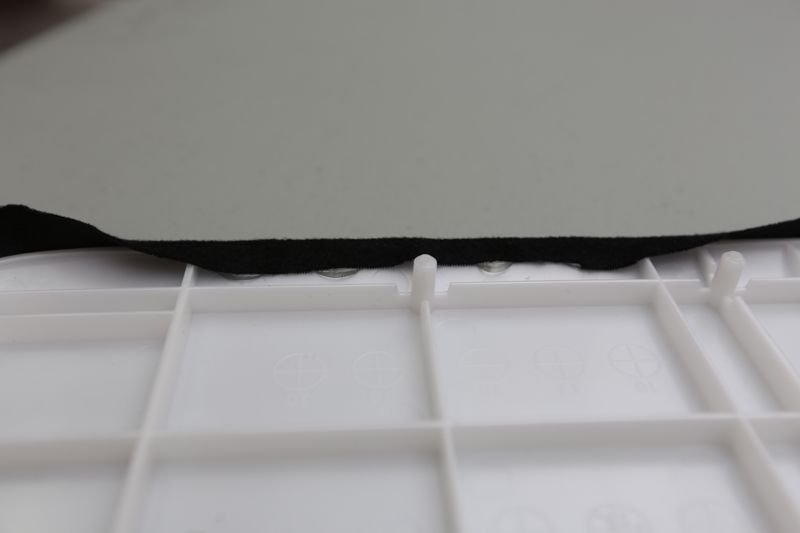 Corners are more difficult, but with patience, can be smoothed out. 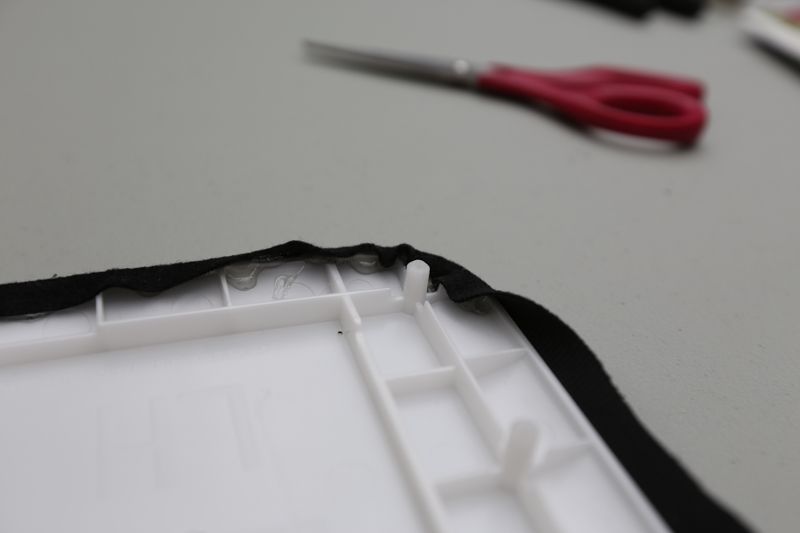  The Hinge area is the hardest part to glue/keep smooth. Work/glue small areas at a time, and try to avoid having too much extra material folded over and glued. 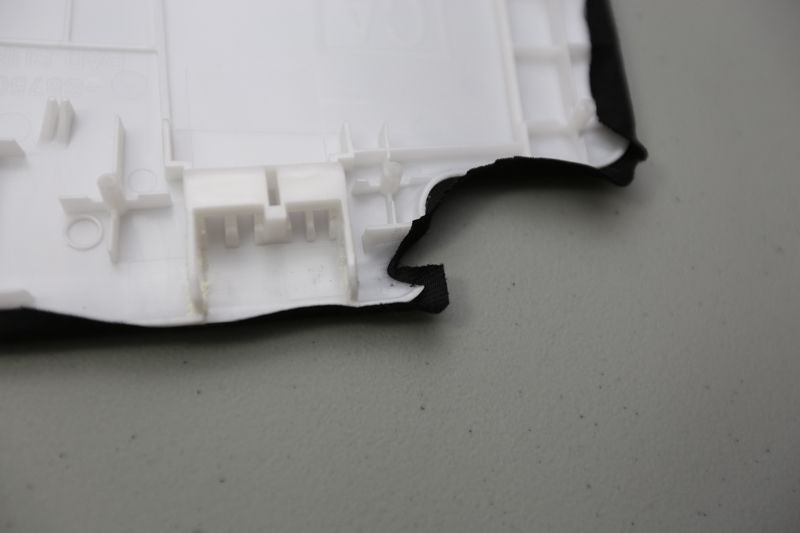 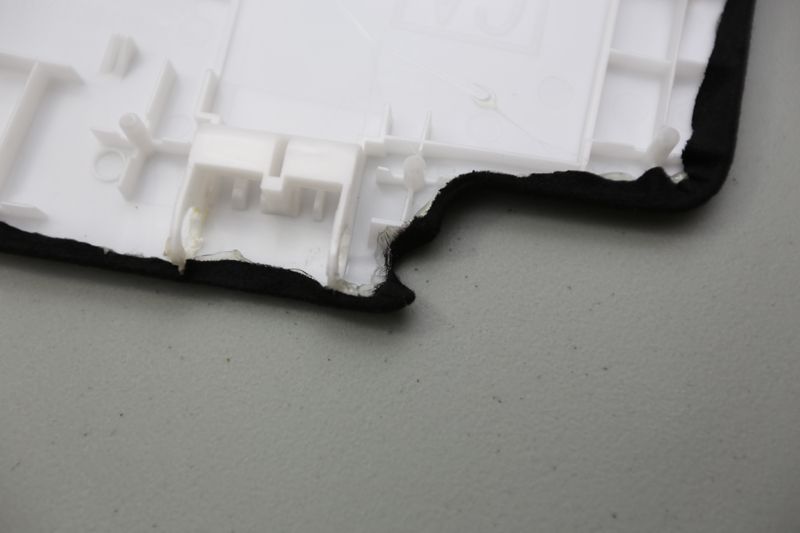 The clip part of the visor does not need to be perfect. The area's circled in red need to be glued well, but the rest(in blue/purple) is covered by the plastic clips, and just needs to be trimmed close to the visor plastic. 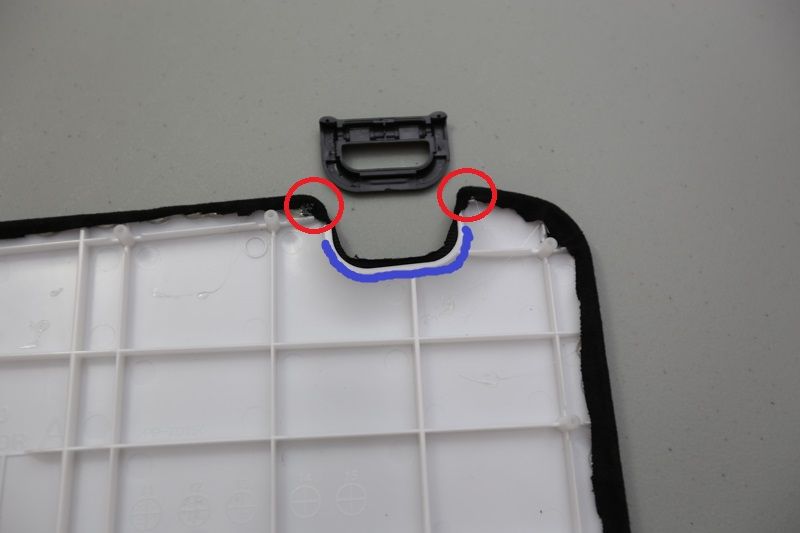 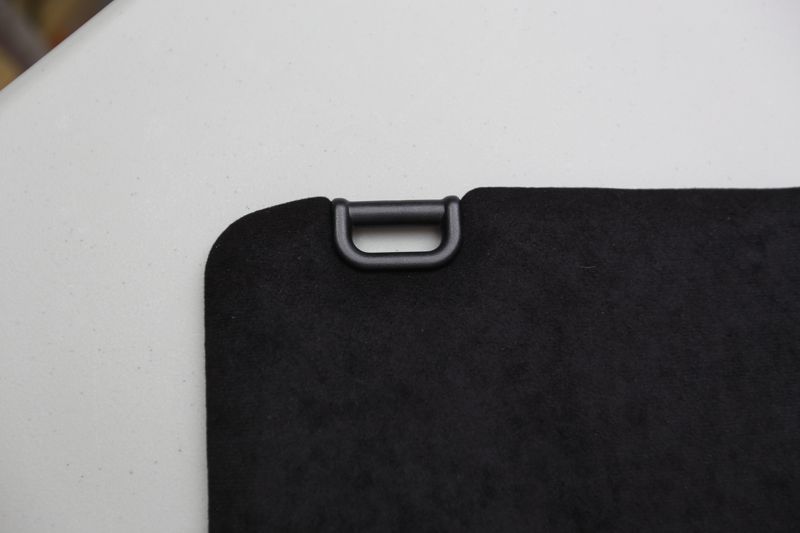 Be sure material is not too close to the little feet/plastic tabs. If material/glue is here, the pieces wont fit together properly. 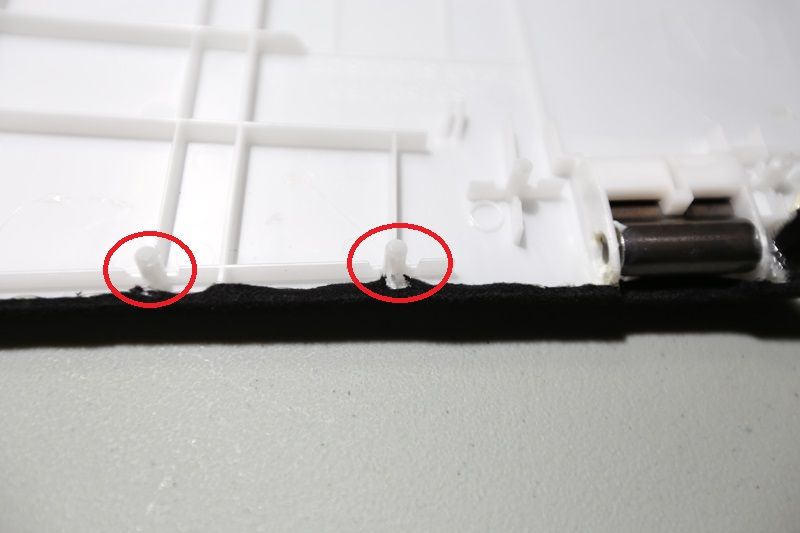 Side 1 should be complete, and look like: 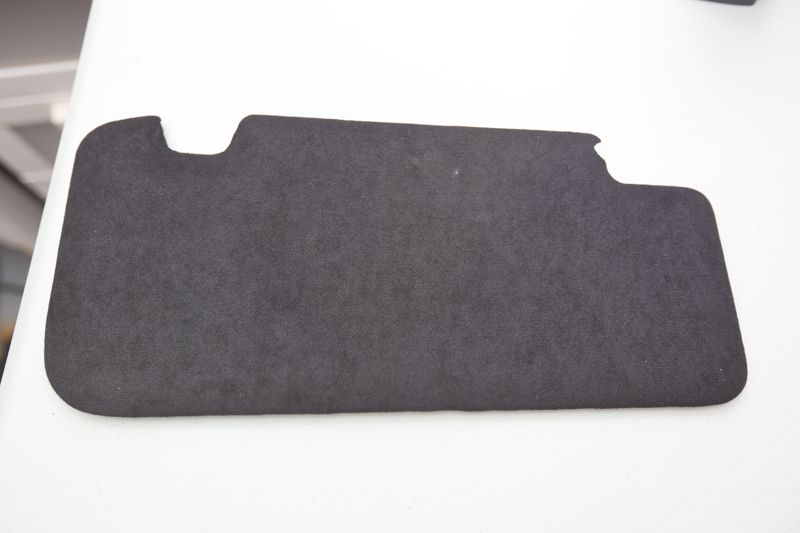  Now, onto the (slightly) harder visor piece. Once again, trace a line around the visor, leaving at least 1-1.5" inches for movement/re positioning because of vanity mirror). 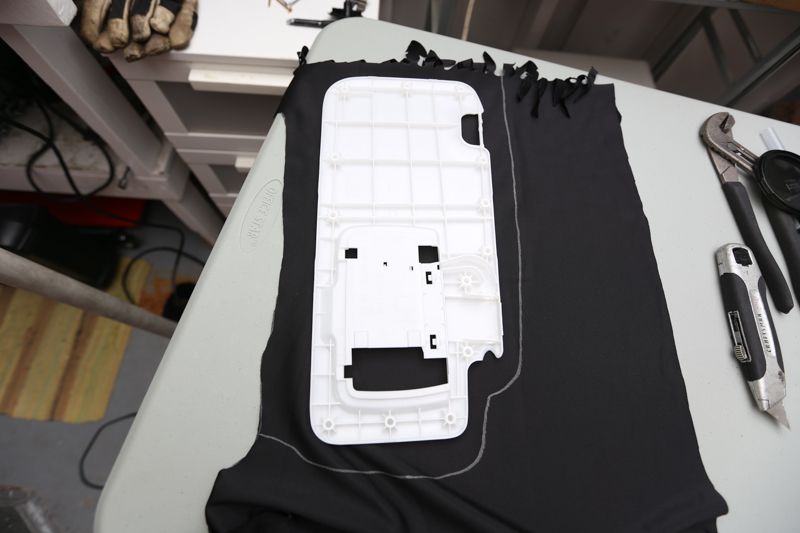 Spray with glue/adhesive 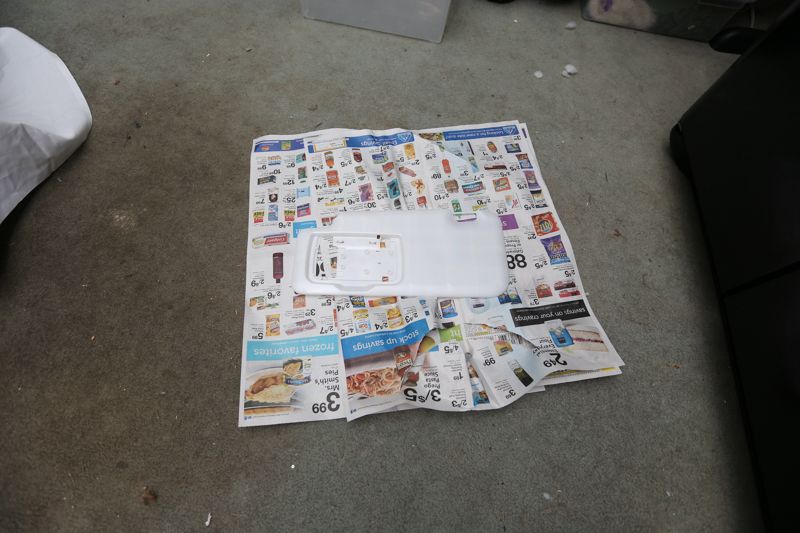 Place visor piece on material, but do not push down hard. You will need to position the material under the mirror before the rest of the visor. Firmly press the material to conform with the visor/mirror slot, then work on smoothing out the rest of the visor. 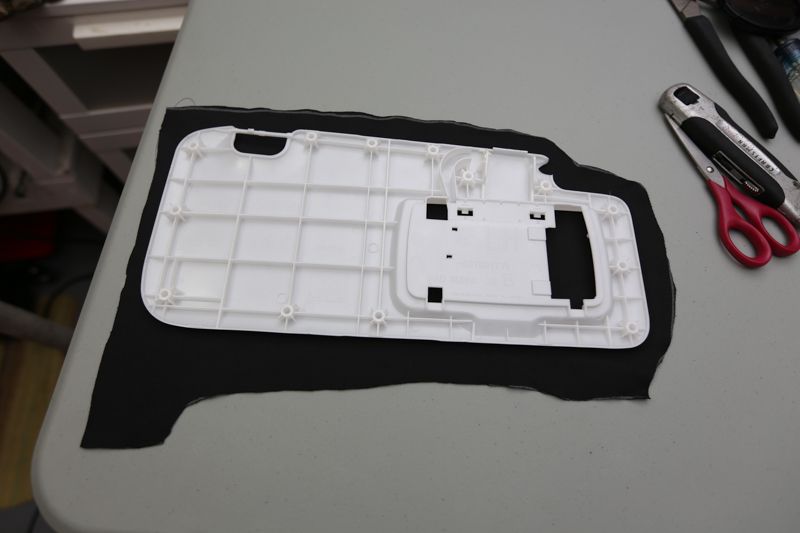 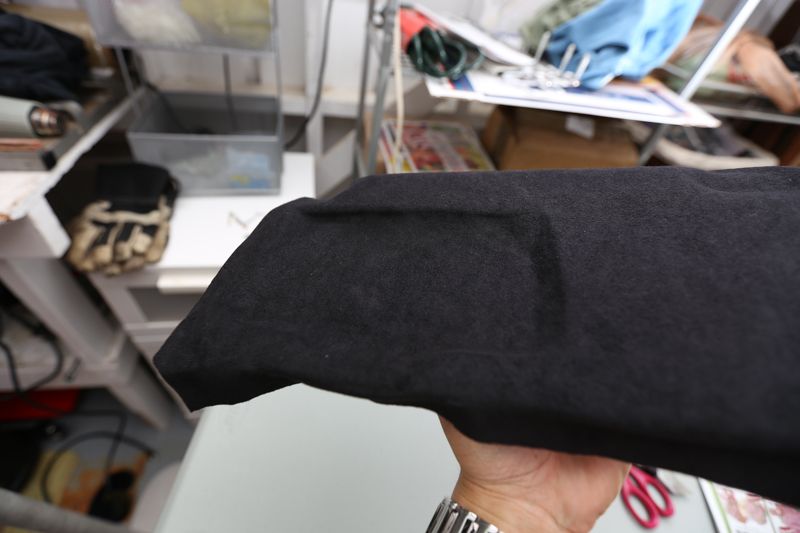 Cutout/slice/make a hole where the red circles are located. You can cut out more material from this area if you want since it is covered by the mirror, but I choose to only make incisions in the areas needed. If you are using thicker material, you may need to remove more from this spot to allow the mirror to properly lock in. 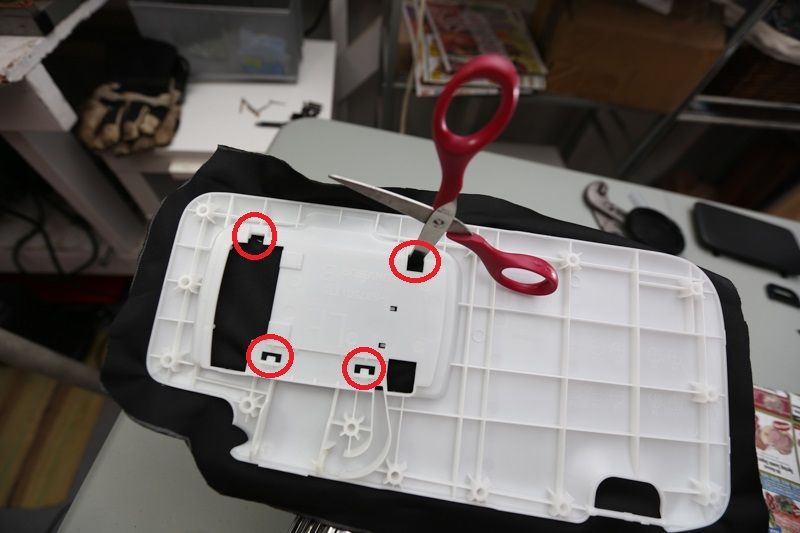 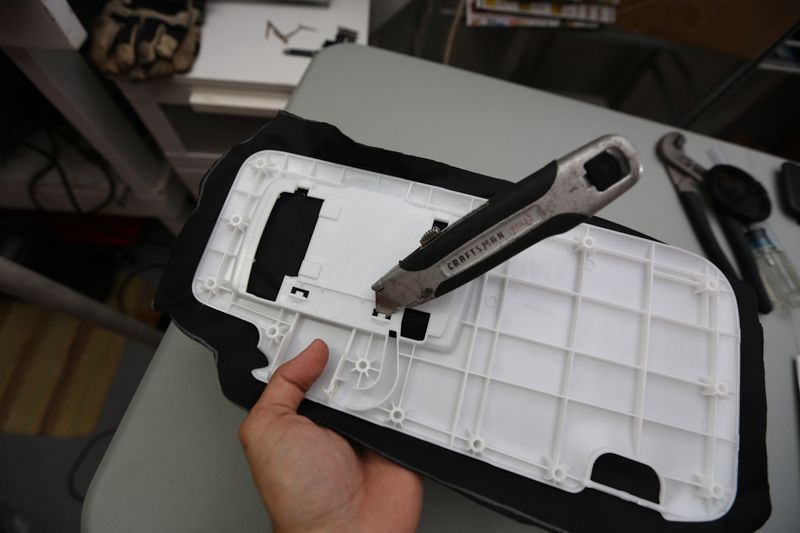 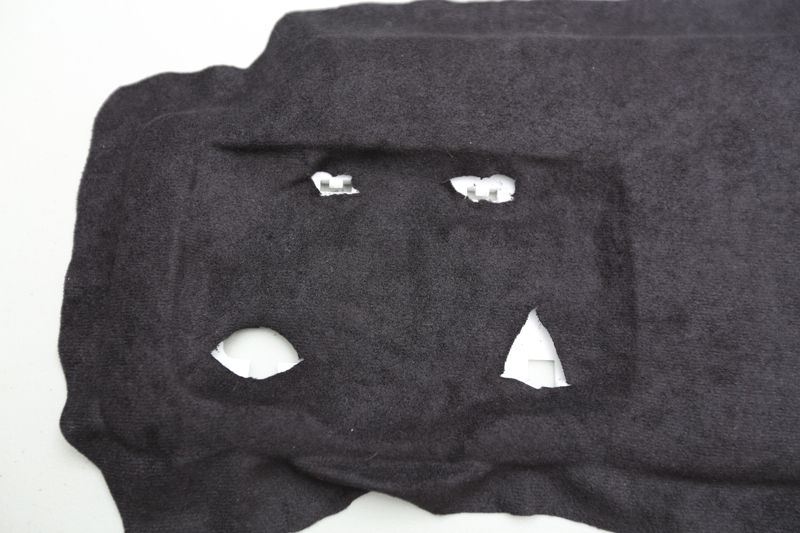 Place vanity mirror back into visor. The two bottom plastic tabs slide into a slot, and the top clips "clip" into place when pressed in. Press the mirror in, and double check for smoothness of material. 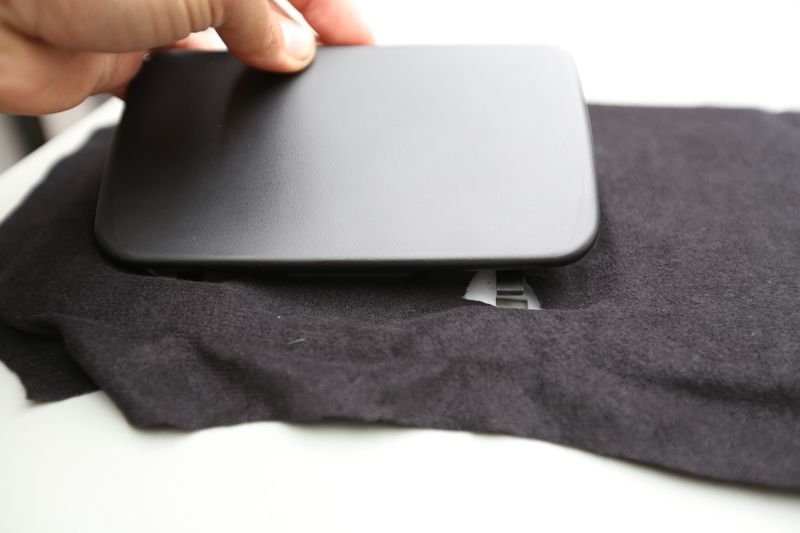 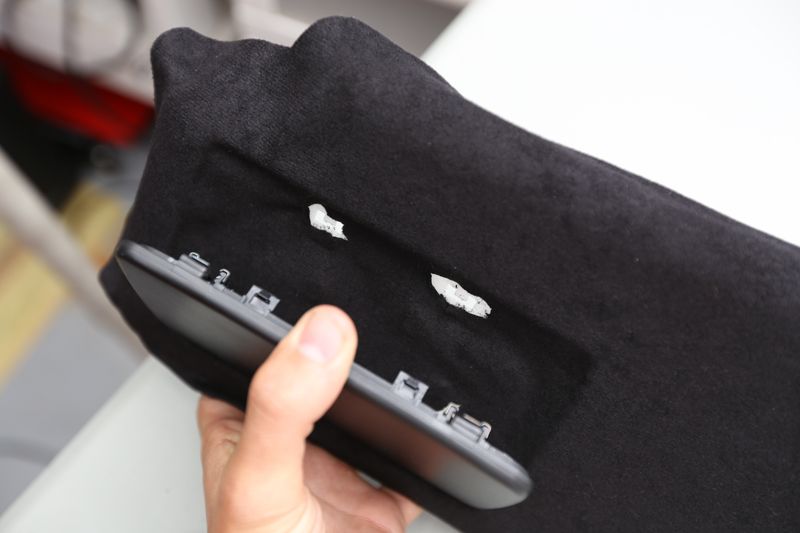 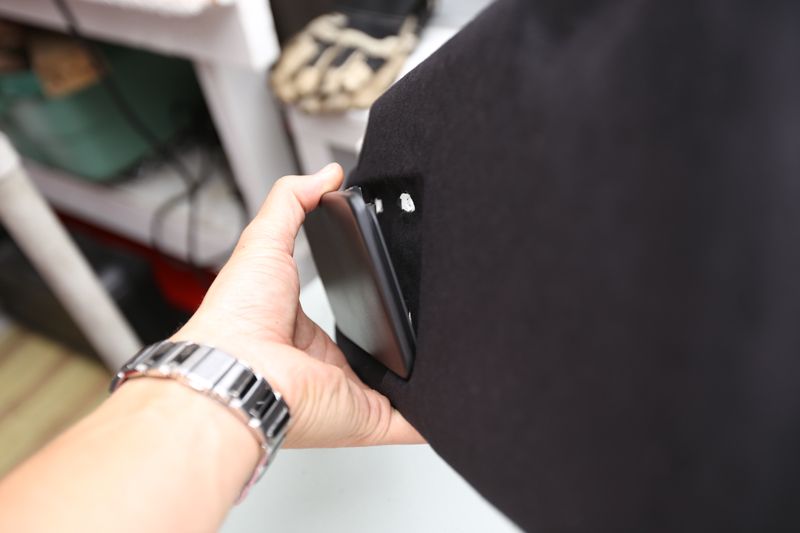 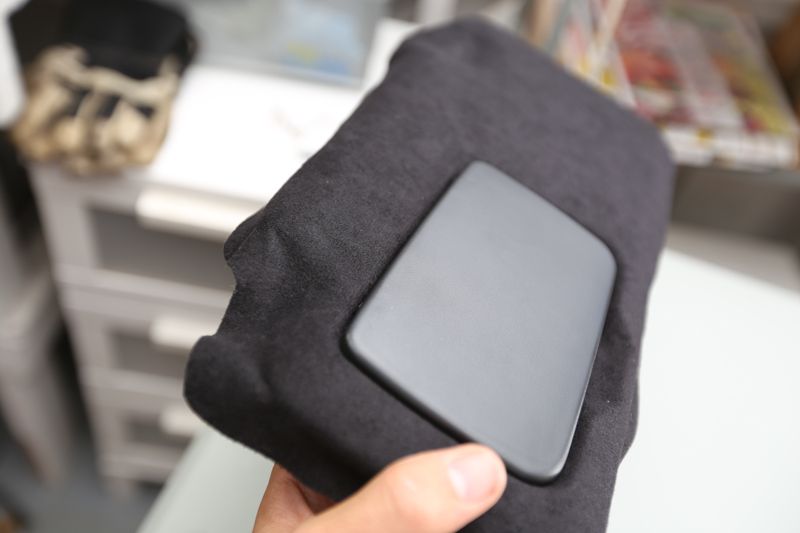 If you mess up, use a screwdriver to "undo" the clips. 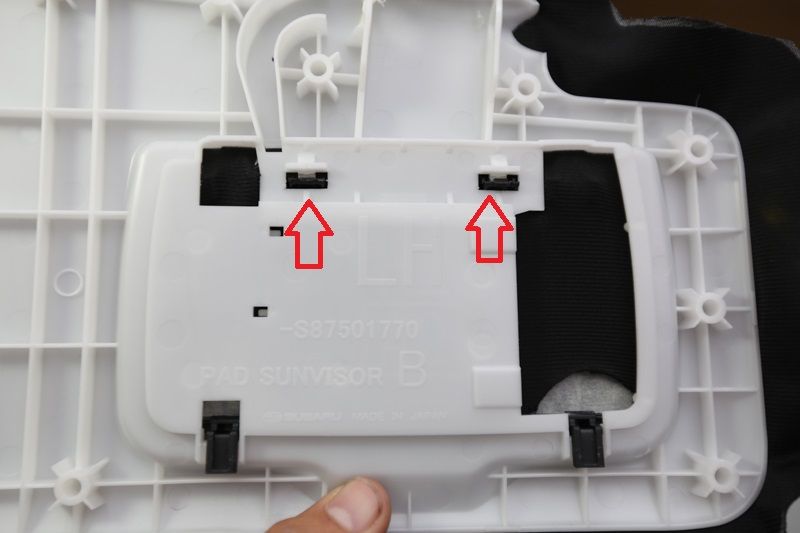 Hopefully where you are at: 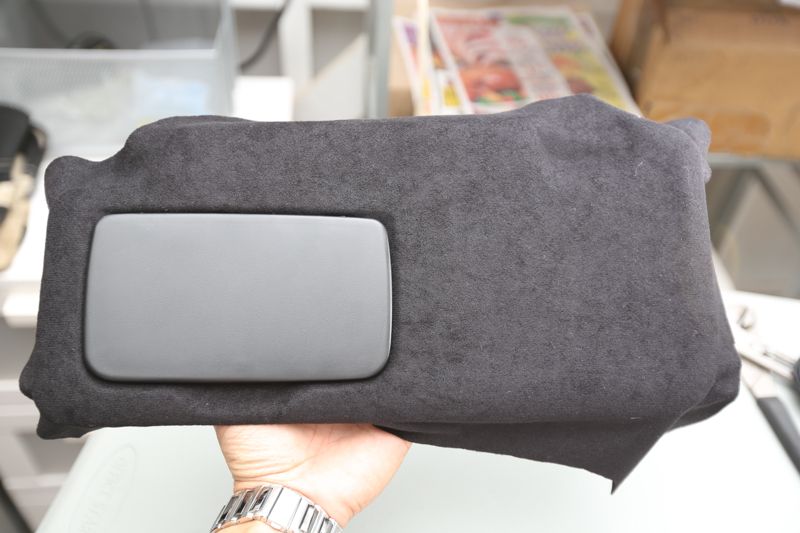 Proceed with triming/glueing material as you did with the reverse side 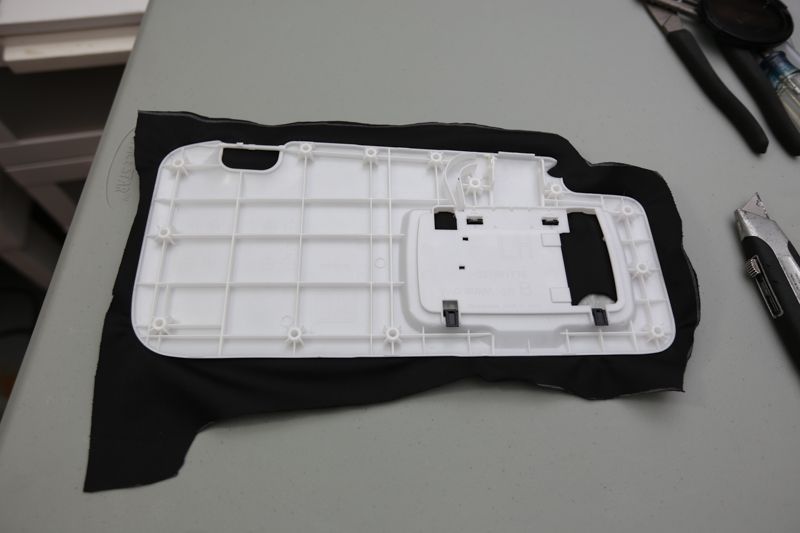 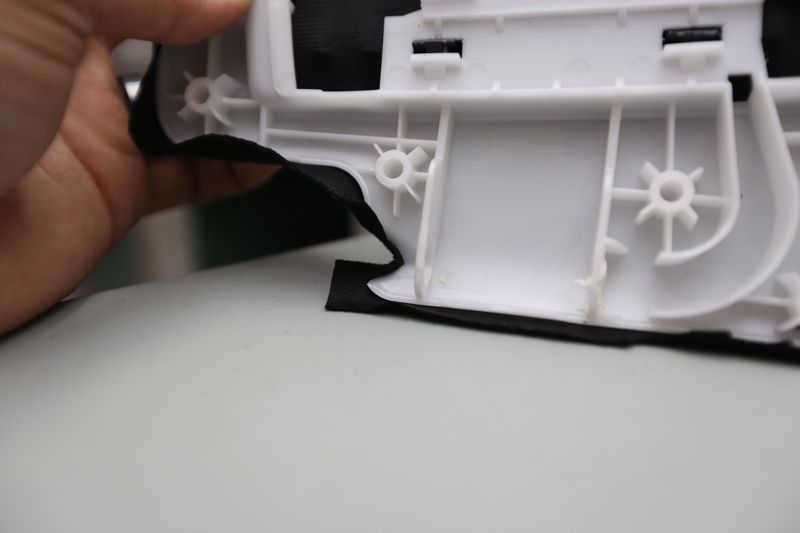 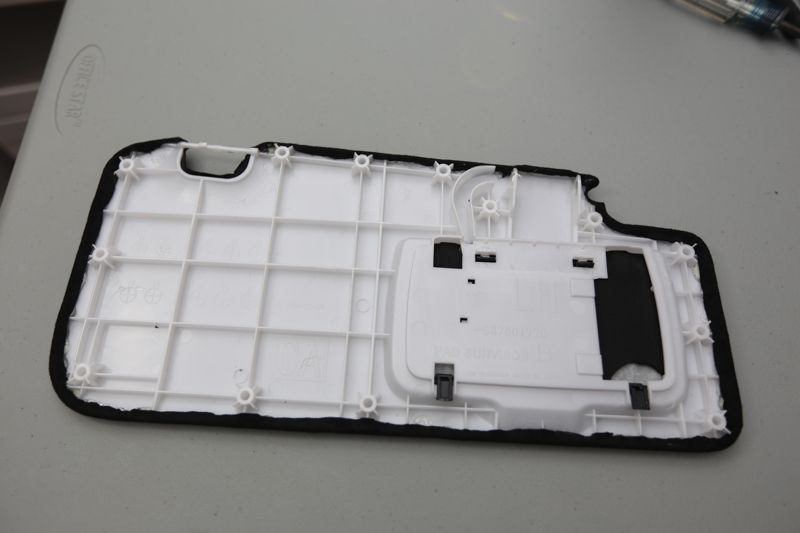 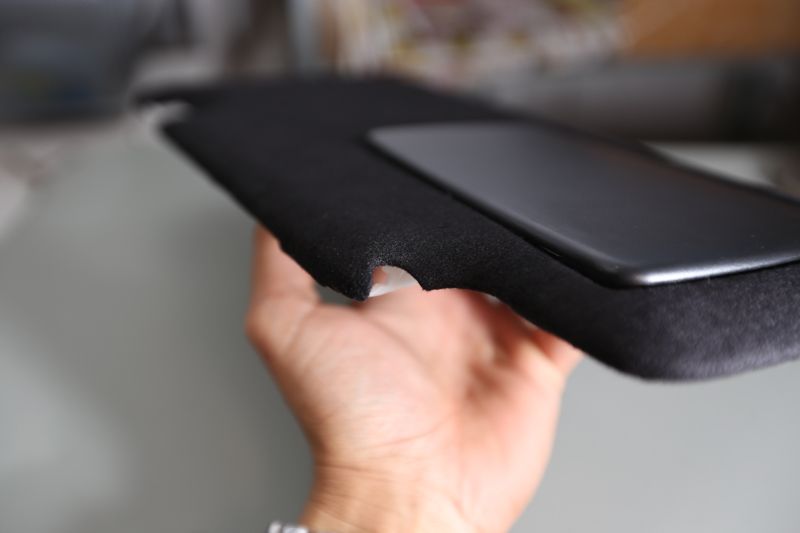 Almost done 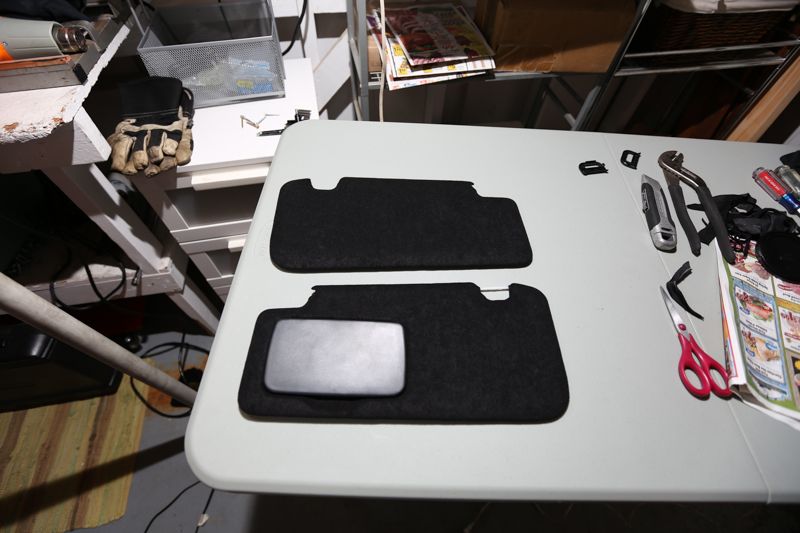 Insert Metal tab/clip. It only goes in one way. 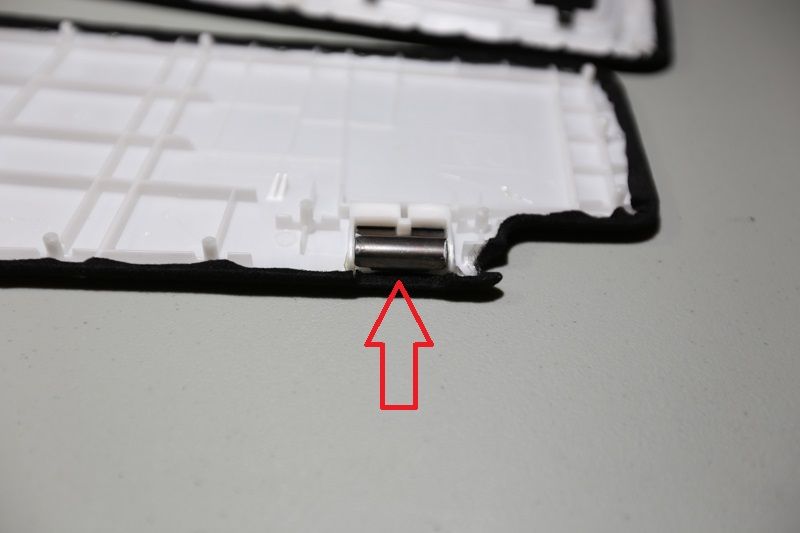 Start to sandwich the pieces together 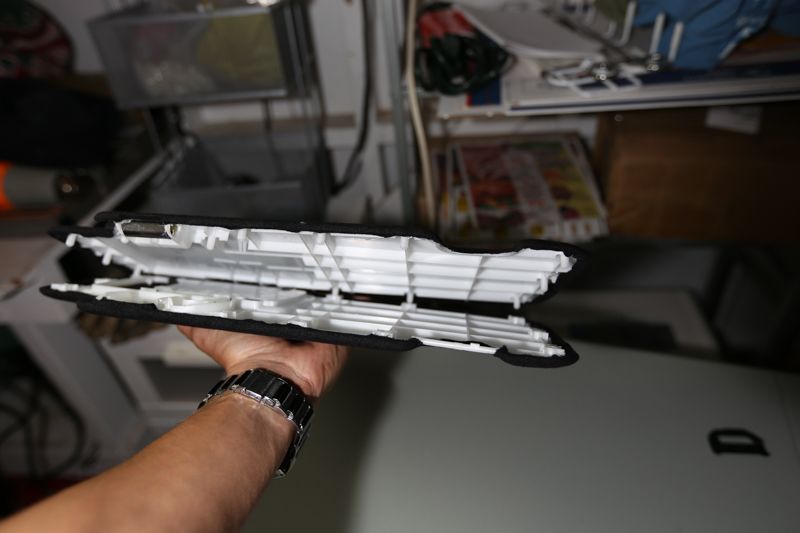 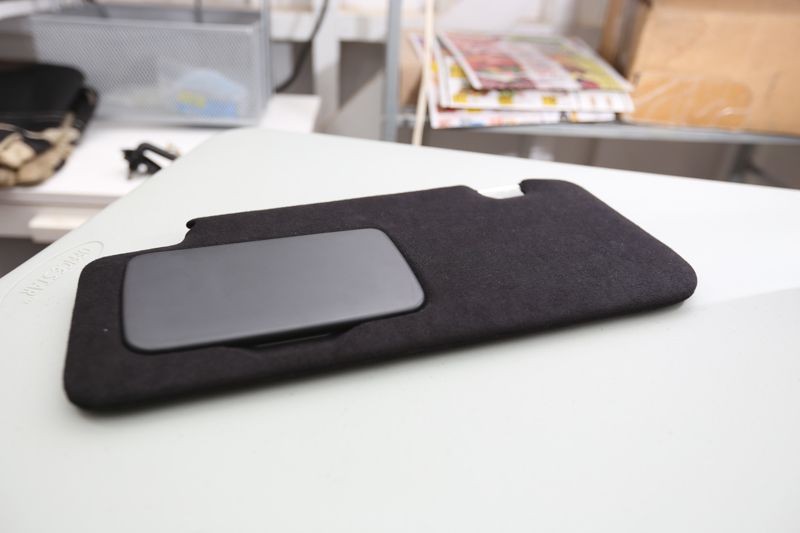 Snap plastic clips into place. 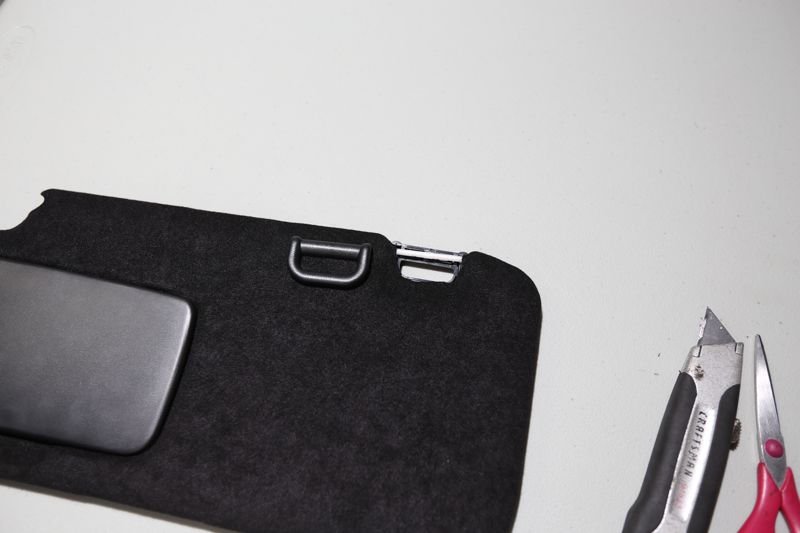 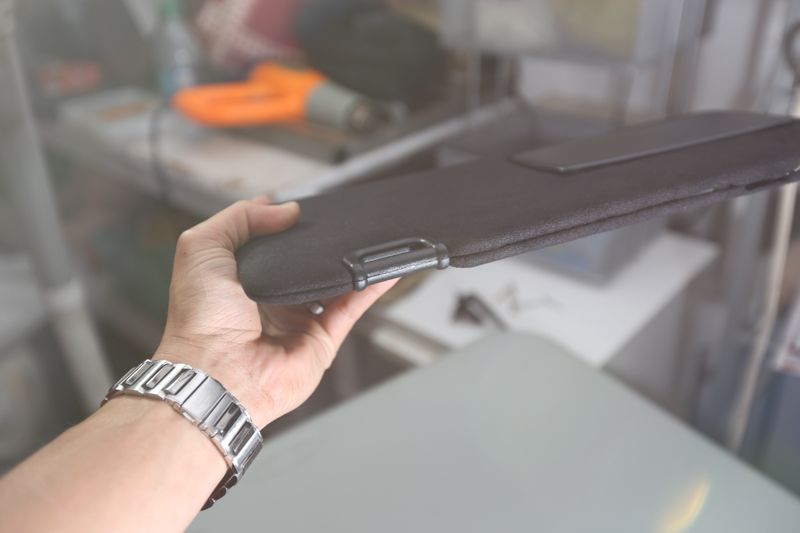 Insert metal hinge. Same as removing it, pushing it in will be difficult. Make sure to rotate it, as there is a certain orientation that it needs to be installed. I did not find it necessary to glue the two halves together, as mine stayed together quite well, and the large metal hinge helps hold the two pieces together. YMMV, but if you dont glue it, you can always re-wrap the visors more easily if something happens down the road. 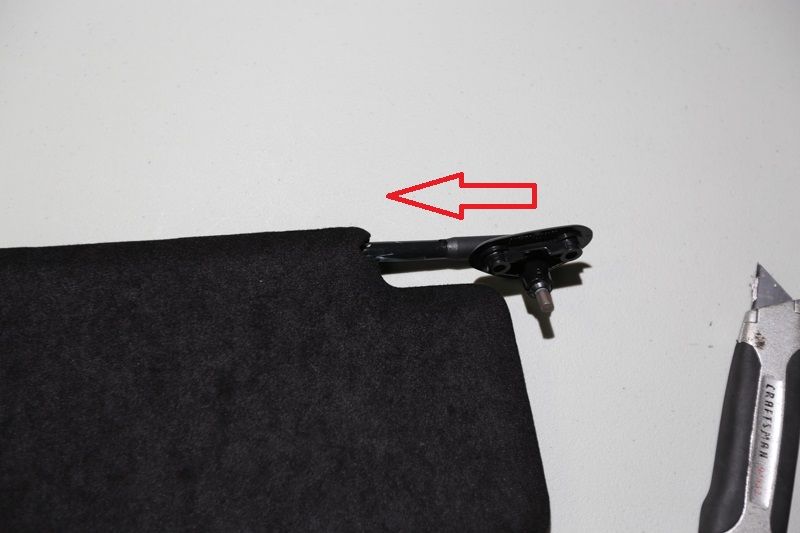 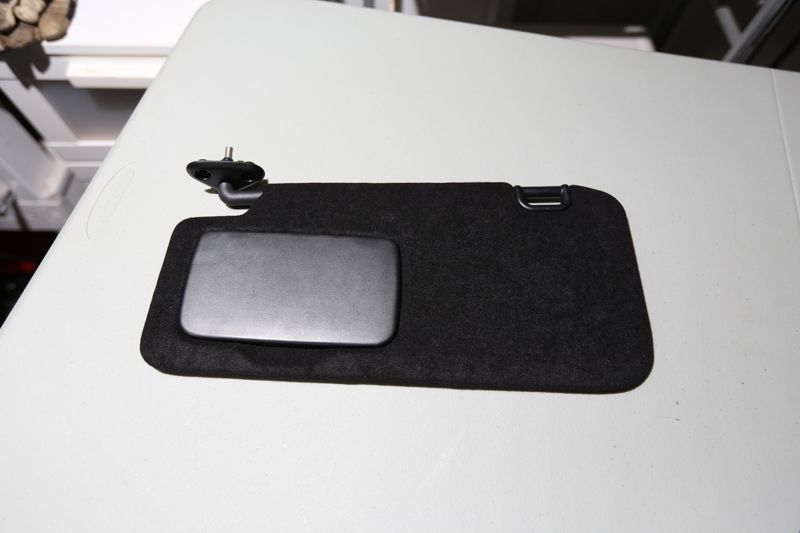 Done! Now start the other visor... 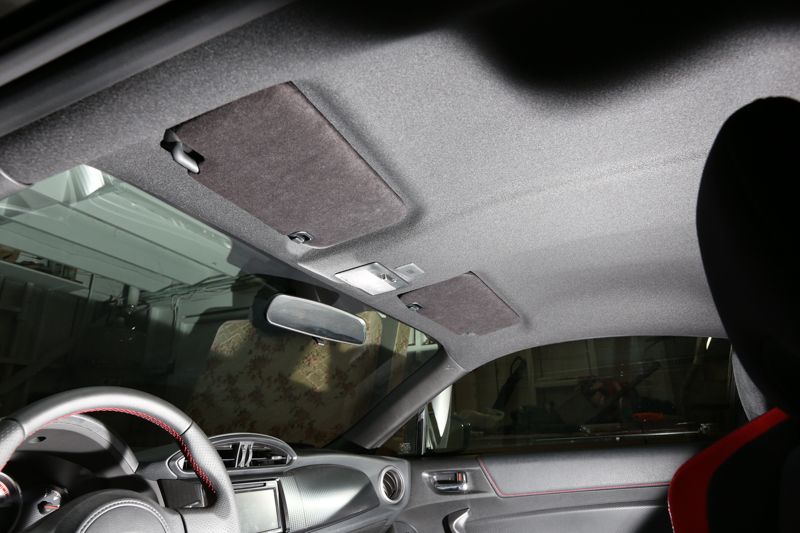 Please let me know if there's anything I forgot, and lets see some photos of finished(or work in progress) re-wrapped visors! Last edited by continuecrushing; 11-24-2017 at 06:30 PM. |

|

|
| The Following 29 Users Say Thank You to continuecrushing For This Useful Post: | Alabang 86 (04-29-2013), Anthonytpt (04-09-2013), aqua8701 (05-30-2013), B L U E S L A T E (03-30-2013), bcj (03-30-2013), BlUURZ (01-18-2015), Burrcold (03-30-2013), Calin (04-02-2013), cdo221 (03-30-2013), cywinr (09-26-2014), ducks (10-30-2013), emutcfut (04-05-2013), ftc~brz (04-04-2013), GaN-MaN (11-12-2013), Guff (02-21-2014), Hawk77FT (10-26-2018), LivingLegend (03-30-2013), marcoaferrer (07-22-2014), MaXimus (03-16-2016), mrlewistan (06-21-2013), Pandanoid (10-14-2014), Pointmutation (03-29-2016), post_break (04-04-2013), QuikSilveRX-8 (04-02-2013), Shagaliscious (11-10-2013), Shipwreck (09-05-2013), SWPinATL (07-22-2014), Timmy_Jones (04-05-2013), W2 (03-30-2013) |
|
03-30-2013, 04:16 AM
|
#2 |
|
Join Date: Mar 2013
Drives: 2013 Firestorm FRS
Location: Lake Elsinore, CA
Posts: 2,707
Thanks: 1,231
Thanked 2,144 Times in 1,003 Posts
Mentioned: 73 Post(s)
Tagged: 2 Thread(s)
|
additional notes:
The black color blends very well IMO under normal lighting conditions, and the difference is only shown here so much because of the flash. Otherwise the color/texture is similar to the seats. |
|
|
|
|
03-30-2013, 04:34 AM
|
#3 |
|
Senior Member
Join Date: Dec 2012
Drives: BMW E84
Location: SoCal
Posts: 706
Thanks: 635
Thanked 388 Times in 219 Posts
Mentioned: 9 Post(s)
Tagged: 0 Thread(s)
|
That looks great! Thank for sharing the DIY.
|
|
|
|
|
03-30-2013, 07:06 AM
|
#4 |
|
'Senior' Junior Member

Join Date: Mar 2013
Drives: 13 FR-S,08 Mustang Bullitt,06 MX-5
Location: Southeastern CT
Posts: 388
Thanks: 117
Thanked 211 Times in 121 Posts
Mentioned: 15 Post(s)
Tagged: 0 Thread(s)
|
Nice job - most would just replace the factory visors after something like that. Glad to see you didn't give up!
 Can't tell you how many Mustang friends have replaced one after trying to remove the stickers - it's like they're welded right to the fabric.
__________________
"You'll never know if you don't try" - Shinroko Momose |
|
|
|
|
03-30-2013, 07:15 AM
|
#5 |
|
Banned
Join Date: Oct 2012
Drives: Whiteout frs
Location: PR
Posts: 188
Thanks: 214
Thanked 86 Times in 52 Posts
Mentioned: 2 Post(s)
Tagged: 1 Thread(s)
|
Thanx Shutter! Great DIY!! missing fold mirrors, but i magine its the same process when piece is out during DIY, carefull with the glue people! I've had very bad experiences with glue...not cool!
Thanks again. |
|
|
|
|
03-30-2013, 08:27 AM
|
#6 |
|
Gundam Meister

Join Date: Oct 2011
Drives: A Gundam
Location: Westchester County, NY
Posts: 2,685
Thanks: 320
Thanked 1,010 Times in 510 Posts
Mentioned: 9 Post(s)
Tagged: 0 Thread(s)
|
Results are very very clean.
|
|
|
|
|
03-30-2013, 11:02 AM
|
#7 |
|
Senior Member

Join Date: Dec 2012
Drives: 2013 SWP BRZ Limited
Location: Jersey Shore
Posts: 596
Thanks: 0
Thanked 144 Times in 120 Posts
Mentioned: 5 Post(s)
Tagged: 2 Thread(s)
|
Wow I really like that. Thanks
|
|
|
|
|
03-30-2013, 11:08 AM
|
#8 |
|
Senior Member
Join Date: Jul 2010
Drives: Subaru BRZ Limited
Location: Toronto, Canada
Posts: 2,624
Thanks: 763
Thanked 1,586 Times in 776 Posts
Mentioned: 10 Post(s)
Tagged: 0 Thread(s)
|
Great job! I would definitely not have the attention span to be able to do this.
__________________
 |
|
|
|
| The Following User Says Thank You to Burrcold For This Useful Post: | BlueDubbinTDI (11-10-2013) |
|
03-30-2013, 12:30 PM
|
#9 | |
|
Join Date: Mar 2013
Drives: 2013 Firestorm FRS
Location: Lake Elsinore, CA
Posts: 2,707
Thanks: 1,231
Thanked 2,144 Times in 1,003 Posts
Mentioned: 73 Post(s)
Tagged: 2 Thread(s)
|
Quote:
It took me probably 3 hours just to get the driver side(first photo) to look like how it did. And you could still see where the sticker was. |
|
|
|
|
|
04-02-2013, 12:27 AM
|
#10 |
|
Senior Member
Join Date: Nov 2012
Drives: 2013 BRZ Limited 6MT GBS
Location: Walnut Creek - Bay Area
Posts: 426
Thanks: 83
Thanked 112 Times in 64 Posts
Mentioned: 4 Post(s)
Tagged: 0 Thread(s)
|
this is awesome I need to do this when I get time lol
__________________
2014 infiniti Q50 Daily 1996 Mazda Miata Racecar
 SOLD -> Galaxy Blue Silica Subaru BRZ Limited 6MT SOLD -> 2003.5 Infiniti G35 Sedan Emerald Mist |
|
|
|
|
04-04-2013, 01:18 PM
|
#11 |
|
Member
Join Date: Oct 2012
Drives: 2013 Raven Scion FR-S 6MT
Location: Missouri City, TX
Posts: 30
Thanks: 1
Thanked 8 Times in 4 Posts
Mentioned: 0 Post(s)
Tagged: 0 Thread(s)
|
i work at a pharmacy and there's a product out there called unisolve...probably the best adhesive remover ever
__________________
|
|
|
|
|
04-04-2013, 01:49 PM
|
#12 |
|
Senior Member

Join Date: Dec 2009
Drives: '13 FR-S firestorm, 6 mt - '11 CR-V
Location: Tucson
Posts: 2,133
Thanks: 243
Thanked 1,387 Times in 657 Posts
Mentioned: 36 Post(s)
Tagged: 0 Thread(s)
|
Just another option: On my last car ('02 Miata) I took the visors off and hit the decals with acetone. It took a lot of applications and elbow grease. During the removal process the vinyl took on a distorted look because of stretching. I let them dry and they came out perfect. They shrunk back to their original size and there was absolutely no evidence a decal had been there.
If you're thinking of covering your visors you might try this first. It would be worth the effort. If it worked (I haven't tried it on my FR-S) you would have got by with a lot less work. If it didn't work you could still go with your plans to recover them. |
|
|
|
|
04-04-2013, 02:13 PM
|
#13 |
|
Senior Member
Join Date: Sep 2012
Drives: '13 BRZ Ltd WRB
Location: Vista, CA
Posts: 1,351
Thanks: 508
Thanked 570 Times in 412 Posts
Mentioned: 15 Post(s)
Tagged: 0 Thread(s)
|
That looks great, I found a new project for myself!
Did you leave the mirror flap uncovered simply due to clearances?
__________________
|
|
|
|
|
04-04-2013, 03:35 PM
|
#14 |
|
Senior Member
Join Date: Jul 2012
Drives: 2013 SWP BRZ
Location: New York
Posts: 2,240
Thanks: 458
Thanked 878 Times in 556 Posts
Mentioned: 34 Post(s)
Tagged: 0 Thread(s)
|
Just a note, the BRZ has lights inside the mirrors. In case any BRZ owner is looking to do this, it will end up being a bit different.
I'm debating whether or not I will tackle this. I've done plenty of doorcard reupholstering so this should be cake, and I do have some perforated black alcantara left over.. |
|
|
|
| The Following User Says Thank You to xxscaxx For This Useful Post: | continuecrushing (04-05-2013) |
|
|
|
|
 |
|
|
 Similar Threads
|
||||
| Thread | Thread Starter | Forum | Replies | Last Post |
| Installing JDM Window Visors | Calidrifter | DIY (Do-It-Yourself) Guides | 65 | 07-01-2019 12:25 AM |
| Zeta Performance - JDM Window Visors | ZetaPerformance | Cosmetic Modification (Interior/Exterior/Lighting) | 11 | 05-16-2014 01:03 AM |
| Custom 86 sun visors? | enjoi23 | Cosmetic Modification (Interior/Exterior/Lighting) | 1 | 04-29-2013 08:32 PM |
| Window visors | Kai Uhl | Cosmetic Modification (Interior/Exterior/Lighting) | 4 | 03-03-2013 09:35 AM |
| FS: FRS (oem) Sun Visors | NRG x FRS | Interior Parts (Incl. Lighting) | 3 | 01-09-2013 08:41 PM |


 BRZ
BRZ Morgan